
How to Use Adobe Connect: A Step-by-Step Guide
- Thomas Conner
- Last Modified: March 8, 2024

Adobe Connect has become an integral tool for hosting and attending virtual meetings, webinars, and training sessions. As a cloud-based platform, it offers a suite of powerful features for users to collaborate and share content, regardless of their physical location. My experience with Adobe Connect has shown that its flexibility in creating a dynamic virtual environment is particularly beneficial for interactive eLearning experiences. Whether it’s a business meeting, an online classroom, or a multi-day conference, this platform is designed to deliver a convenient and effective way for users to connect and engage with each other.v
Managing an Adobe Connect session involves a few critical steps that ensure its effectiveness. From my perspective, careful planning is essential to facilitate a seamless experience for participants. This includes setting up the meeting room, customizing its layout to suit the event, and preparing multimedia content in advance. During the session, being adept at using Adobe Connect’s array of tools can significantly enhance interactions. As the host, you can move between different stages of content, use polls and Q&A features to engage your audience, and even break out into smaller groups for discussions. Paying attention to these details helps in optimizing the learning and collaboration outcomes of the session.
Key Takeaways
- Adobe Connect facilitates seamless collaboration and content sharing for a diverse range of virtual events.
- Effective planning and management of the platform’s tools enhance the quality of interactions within sessions.
- Utilizing Adobe Connect’s features supports immersive eLearning experiences and aids in tracking participant engagement.
🚨 Full Adobe Connect review here .
How to Use Adobe Connect – Quick Guide
Before starting an Adobe Connect meeting, ensure you have the necessary software installed. I recommend downloading the Adobe Connect application for desktop for a seamless experience. To install, follow these steps:
- Visit Adobe Connect’s download page.
- Click Download Adobe Connect .
- Follow the on-screen instructions to install.
Creating a Meeting Room:
- Visit the Adobe Connect central interface.
- Choose Meetings , and select Create New Meeting .
- Fill in the meeting details and adjust the settings to your preference.
- Once created, I can manage the room’s layouts and content before participants join.
Joining a Meeting:
- If I’m a host or participant, an email invitation should be in my inbox.
- Click on the provided meeting link.
- Adobe Connect may prompt me to open the meeting in the browser or desktop application.
- Log in with the credentials if required.
During a Meeting:
- Use the Share Pod to share my screen, documents, or whiteboard.
- The Camera and Voice Pod allows me to enable my webcam and microphone.
- For engaging participants, I use the Chat , Q&A , and Poll features.
Quick Troubleshooting:
- If a meeting doesn’t open in my browser, ensure the Enhanced Audio/Video Experience is enabled.
- Use the Help resources in Adobe Connect or join the Adobe Connect User Community for additional support.
Remember, Adobe Connect also offers mobile support, making it easy to join meetings on the go.
Setting Up and Managing Meetings
When using Adobe Connect, I find that managing the various aspects of a meeting, from setting up the virtual room to controlling the settings and tools during the event, is straightforward once you understand the process.
How to Make a Class in Adobe Connect
To create a class in Adobe Connect, I navigate to the Training section where I can click on New Course or New Curriculum . I ensure the proper options are selected and the right content is uploaded, such as presentations or quizzes for the participants. This process allows me to manage compliance needs and track participant progress.
How to Make a Room in Adobe Connect
For hosting a meeting, I start by setting up a room. On the Home page, I click Create , and select Meeting , or navigate to a specific folder in the Meetings library with manage permissions. Here, I can define the room’s layout, including custom pods for specific functionality, ensuring a tailored governance structure.
How to Set Up Adobe Connect Meeting
Setting up a meeting involves deciding the event’s architecture. I select Meeting Information , add the meeting name , summary , and specify the date and time . I then manage the audio and video settings and invite participants. Before inviting, I assign roles, deciding who will be hosts or presenters to maintain control of the session.
How to Test Adobe Connect
Before the meeting, I test Adobe Connect to ensure audio and video quality, and functionality of custom pods. To do this, I visit the Adobe Connect Diagnostic Test page and run the test, which checks my system’s capability to join a meeting. This helps prevent technical issues during the session.
How to Update Adobe Connect
To update Adobe Connect, I make sure to check for any available updates in the system’s Administration area. Updates might include new features for better control settings, enhanced integration options, or improvements in tracking and reporting functions. It is important to have the latest version for security compliance and to keep the system running smoothly.
Enhancing Interactions with Media and Tools

In Adobe Connect, I find that using various media and tools can significantly enhance the participant’s engagement. Here’s how to leverage some of the platform’s capabilities for interactive sessions.
How to Make a Poll on Adobe Connect
To create a poll in Adobe Connect, I use the Poll pod . First, I click on Pods at the top menu, select Poll , and then Add New Poll . I can enter my question and choose the poll type — multiple choice or multiple answers. Once the poll is ready, I click Open to share it with the participants and then Close when it’s time to end polling.
How to Make a Presentation on Adobe Connect
For presentations in Adobe Connect, I rely on the Share pod . I upload content to the Content Library by clicking Share , then Share My Screen/Document , and Browse My Computer . Supported formats include PPT , PPTX , PDF , JPEG , and SWF files. Once the file is uploaded, it becomes available in the library for me to share with attendees during the session.
How to Use Videos in Adobe Connect
When I need to share a video, I use the Video pod . From the pod, I click the menu icon , then Select Video File , and browse my files to upload content such as MP4 or FLV . I ensure the video enhances the session’s content without overpowering the message I am trying to convey.
How to Use Emoji on Adobe Connect
Emojis can be used in the Chat pod to create a more engaging atmosphere. I simply select an emoji from the available list in the chat interface. This is an excellent way for me to express reactions or foster a friendly environment during a session.
How to Make Adobe Connect Recording Public
To make a recording public, I go to the Recordings tab of my Adobe Connect account, find the specific recording, and click on it. In the recording’s information page, I choose Make Public , which allows anyone with the link to view the recording. This works for various formats like MP4 and FLV files, and I use it to offer downloadable content post-meeting conveniently in the Downloads option.
Improving User Experience
To enhance the experience of using Adobe Connect, I focus on both accessibility features such as closed captioning and technical ways to run meetings without legacy plugins like Flash Player.
Does Adobe Connect Have Closed Captioning
Yes, Adobe Connect supports closed captioning which is crucial for accessibility. The platform allows for Automated Closed Captions in multiple languages, which helps ensure that all participants, regardless of hearing ability, can follow the content of the meetings. To enable this:
- Navigate to the ‘Audio’ menu in the meeting room.
- Select ‘Enable Closed Captioning’ .
Participants can then view the captions in a dedicated pod, and meeting hosts can control the size and background color to improve readability. Customization options like these contribute significantly to a personalized and inclusive user experience.
How to Use Adobe Connect Without Flash Player
Abandoning Flash Player has become necessary due to security and compatibility issues. Thankfully, Adobe Connect operates smoothly without it, thanks to the HTML5 client. Here’s what I do to ensure full functionality:
- I ensure my browser is updated, as Adobe Connect’s HTML5 version is optimized for modern browsers.
- I avoid using outdated links that might default to Flash and instead join sessions directly from the Adobe Connect Central home page, which is HTML5-based.
This enables a secure and flexible environment where users can access the full suite of Adobe Connect’s offerings such as multi-user video conferencing, interactive multimedia, and customizable virtual backgrounds, without the need for Flash Player.
Effective Communication and Collaboration

In my experience with Adobe Connect, I’ve found that it excels in facilitating communication and collaboration during online meetings. Mastery of its features ensures that the meeting runs smoothly and all participants can engage effectively.
How to Make Someone a Presenter in Adobe Connect
To designate a participant as a presenter, I click on their name in the Participants panel. Then, I choose the Make Presenter option from the menu that appears. This enables them to share content and manage parts of the meeting.
How to Mute Yourself on Adobe Connect
To mute myself during an Adobe Connect meeting, I look for the microphone icon, often at the top of the meeting interface. A quick click on this icon toggles my audio on and off, signified by a strike-through when muted.
How to Open Adobe Connect in Browser
I can join an Adobe Connect session directly in my browser without needing additional software. I simply enter the meeting URL into my web browser’s address bar and often have the option to choose between launching the application or joining via the browser.
How to See Participants in Adobe Connect
To see who is participating in an Adobe Connect meeting, I use the Participants panel. This panel lists the names of all attendees and indicates their status—whether they have presenter rights, are speaking, or are muted, for example.
Where Are Adobe Connect Recordings Stored
After recording an Adobe Connect session, I find that the recording is stored on the Adobe Connect server. To access it, I navigate to the Content tab of the relevant Adobe Connect account where my recordings are listed and can be downloaded or shared.
Technical and Mobile Usage

In this section, I cover the essential steps for using Adobe Connect on various devices and operating systems. I’ll guide you through starting meetings, utilizing tools, and managing audio settings with ease.
How to Use Adobe Connect on iPhone
To use Adobe Connect on my iPhone, I start by downloading the latest version of Adobe Connect Mobile app from the App Store. Compatibility with iOS is excellent, especially with the app designed for a rich mobile meeting experience. After installation, I open the app and log in with my credentials to join meetings.
How to Use Adobe Connect on Linux
As a Linux user, I access Adobe Connect meetings via a browser since there’s no native application. I ensure that Flash is up-to-date or use the browser’s built-in functionality. The design and tools are accessible through my browser, ensuring full participation in meetings without the need for a dedicated app.
How to Use Adobe Connect on Windows
To get started on Windows, I download the Adobe Connect application or use a compatible web browser. The functionality of Adobe Connect 12 operates smoothly on Windows, allowing me to use arrows and other annotation tools for presentations. I log in to my account and join or host a meeting with a simple interface.
How to Record on Adobe Connect
Recording a session on Adobe Connect is straightforward. I start the meeting as a host, then click on the ‘Record Meeting’ button. I can later find and manage recordings in the ‘Meeting Information’ page under ‘My Recorded Meetings’. This allows me to save content for participants who could not attend live sessions.
How to Use Microphone in Adobe Connect
To use my microphone in Adobe Connect, I ensure it’s connected and working before the session. Once in the meeting, I click on the ‘Meeting’ tab, and select ‘Audio Setup Wizard’ to test and configure my microphone settings. During the meeting, I can easily mute and unmute my microphone with the on-screen controls.
Learning and Development
In my role as a teacher or trainer, I find that Adobe Connect provides a comprehensive suite of tools designed for effective learning and development. Here are the specifics on how to leverage Adobe Connect for education purposes.
How to Use Adobe Connect as a Teacher
When I prepare to use Adobe Connect, my primary focus is on creating engaging eLearning environments. One of the first things I do is utilize Adobe Connect’s various content types within its library, such as PPT , PPTX , and MP4 , among others, to present information in a dynamic way. For interactive tutorials and courses, Adobe Captivate and Adobe Presenter are invaluable tools that I integrate within Adobe Connect sessions. They allow for the creation of SCORM-compliant materials which I can track progress on and ensure that my students are meeting their learning objectives.
Moreover, I manage and deliver my courses through what Adobe Connect refers to as virtual classrooms. These environments are equipped with features like live chat, polls, and quizzes, facilitating real-time interaction and assessment.
When designing a curriculum, I follow these steps to maintain structure and clarity:
- Organize courses : Group presentations and courses logically to support a learning path.
- Set prerequisites : Define necessary prior knowledge before starting a specific course.
- Evaluate through tests : Implement tests that students must pass to move forward in the curriculum or to test out of certain sections.
My curriculums often culminate in actionable training that blends theory with practice, ensuring that students can apply what they’ve learned directly to real-world scenarios. I consistently update courses to maintain relevancy and engagement, a practice made seamless through Adobe Connect’s management tools.
In sum, these strategies enhance the delivery of my educational content, paving the way for a more impactful learning experience for my students.
Frequently Asked Questions

In this section, I’ll cover some of the most common queries regarding Adobe Connect to help you navigate and use the platform more effectively.
What are the steps to start a meeting in Adobe Connect?
To start a meeting in Adobe Connect, I ensure that my account is set up and I have host or presenter permissions. I then log in to Adobe Connect, create a new meeting or access a scheduled one, and start the session. I can invite participants by sharing the meeting URL or through the Adobe Connect interface.
How can you create breakout rooms in Adobe Connect for smaller group discussions?
In Adobe Connect, I create breakout rooms during a live session using the Breakout Room option in the meeting’s toolbar. I allocate participants to different rooms manually or let Adobe Connect distribute them randomly. I can start and manage these rooms to facilitate smaller group discussions.
What troubleshooting steps can be taken if there are issues with Adobe Connect?
If I encounter issues with Adobe Connect, I first check my internet connection and browser compatibility. If problems persist, I can try clearing my browser cache or ensuring that the Adobe Connect add-in is properly installed. If necessary, I contact Adobe Connect support or consult the detailed troubleshooting guides available.
How do you register and manage participants for an Adobe Connect meeting?
I manage participant registration for an Adobe Connect meeting by setting up a registration form in advance and then monitoring sign-ups through the Adobe Connect central interface. During the meeting, I can control access, assign different roles to attendees, and manage participant permissions.
What types of training resources are available for new users of Adobe Connect?
New users of Adobe Connect have access to a variety of training resources, including user guides, tutorial videos, and community forums. I can also sign up for live webinars or access on-demand training sessions to learn about the platform’s features and best practices.
Can you explain the features of Adobe Connect video conferencing?
Adobe Connect’s video conferencing features include high-quality video, screen sharing, custom layouts, interactive whiteboards, and integrated chat. For engagement, I can use polls, Q&A sessions, and emojis. The platform also supports recording of sessions for later review and sharing.

© 2024. All rights reserved. TargetingMantra.com
Adobe Connect Support Blog
Publishing powerpoint presentations in connect meetings.
There are different techniques that a Connect content author or Connect Meeting Host may employ to publish PowerPoint content in Adobe Connect Meetings. This article discusses them and how they differ and how to choose the correct option and avoid common pitfalls. The four basic techniques are:
- Direct upload or drag and drop into a Connect Share Pod
- Upload to the Connect Content Library and then link to the Meeting Share Pod
- Publish to the Connect Content Library using Adobe Presenter and then link to the Meeting Share Pod
- Publish locally using Presenter to a zip package and upload to Connect
I will summarize each of these and then compare them and offer some tips to help make sure that the published converted SWF closely matches the original PPTX.
Note: There are significant improvements in PowerPoint conversion in Connect with version 10.1. The possible conversion deltas between the original PPTX and the SWF are reduced with 10.1 and later versions of Connect.
The first and perhaps most commonly used option by Meeting Hosts is to upload a PPTX directly to a Meeting room Share Pod. The ease and simplicity of this approach certainly accounts for its popularity: You can simply drag and drop a PPTX presentation into the Share Pod or navigate to the source PPTX and upload it.
Drag and drop is pictured above. As the PPTX is dropped into the Share Pod from the local client, the boarder around the Share Pod will appear with a yellow highlight.
File conversion begins as soon as you drop the file into the Share Pod.
The PPTX is converted and ready for viewing as shown above.
You may also browse to the PPTX file locally from the Share Pod menu drop-down: As a Connect Meeting Host or Presenter, click the down arrow in a Connect Meeting Share Pod and choose “Share Document” as shown above.
Choose “Browse My Computer” (We will discuss content in the shared library anon).
Browse to the PPTX locally and select it.
The size of the file and bandwidth available will determine the amount of time it takes to upload.
Likewise with conversion.
The PPTX is converted and ready for viewing.
Uploading to the Content library is also a common method of Publishing a PowerPoint to Connect. This technique provides a URL for on-demand playback of a the PPTX as well as a single source for use in multiple Connect Meeting rooms. Multiple Connect Meeting rooms may share a presentation from the same source in the Content Library thereby simplifying editing and version control.
Browse to the Content Library in Connect Central and choose “New Content” as shown above. Note that a Meeting Host will have access to “My Connect” by default but will need to request access to “Shared Content” and the “User Content” folders of others depending on prior account-wide administrative permissions set. the Authors Group can be used to allow access to Shared Content.
Browse to the desired PPTX on your client or share.
Select the desired PPTX upload.
Name the Presentation in Connect Central, create a custom URL and summarize the content for administrative reference if desired.
There will be a delay while the content is processed; see the spinning wheel in the upper left.
Once completed, the active URL and summary will be displayed.
To use the Presentation uploaded to the Content Library in a Connect Meeting, simply point the share pod to the Content Library and link it to the meeting.
It will appear instantaneously in the Connect Meeting as it is already uploaded to the Connect server.
The third means of uploading a presentation to Connect employs Adobe Presenter. This is the richest and most accurate PowerPoint conversion option. Presenter integrates with Connect, in fact, Connect had its start as Presenter: Presidia and Breeze 3.0 were originally based on PowerPoint on-demand content publishing to SWF. The integration of Flash Communication Server in Breeze 3.0.8 led eventually to the current Adobe Media Server and the Tomcat Application server platform along with such feature rich integration as Adobe Media Gateway for telephony and Adobe Experience Manager for Events management. Presenter has a long history and it is a very rich on-demand learning tool: http://www.adobe.com/products/presenter.html
Once installed, Presenter appears as a menu option in PowerPoint and you can drive publishing to Connect in a number of ways.
Out of necessity, here I will be intentionally terse and ignore a plethora of Presenter features and focus only on using Presenter to publish PowerPoint content for use in a Connect Meeting. The dialog above is under Adobe Presenter>Presentation menu items in PowerPoint with Adobe Presenter installed.
The dialog above shows Presenter publishing options, among them is Adobe Connect which pushes the published Presentation to the Adobe Connect Content Library. Presenter is able to publish to any Connect server to which the author has access and permissions by its domain name.
Presenter launches a browser to log into the Connect Central Content Library.
By default Presenter will log into the Connect Central “My Content” folder belonging to the Presenter Author.
Fill in the customer URL option if desired and the summary fields.
Publishing may take a few minutes depending on the size of the PPTX file.
Once complete the active URL is available along with the summary.
It is now available as on-demand content and can be used from the Content Library in a Connect Meeting.
From the Connect Meeting room, choose the Share Pod drop down option and browse to the Content Library. Here I am using the “My Content” folder as the repository.
The published presentation is available in the Connect Meeting Share Pod.
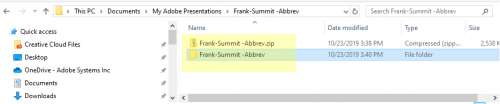
The fourth method of publishing a PPTX to Connect is to first publish locally as a zip package using Presenter and then upload it to Connect.
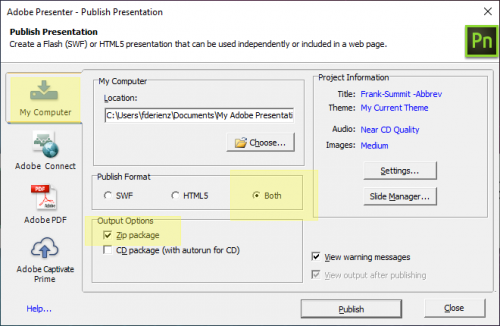
Within PowerPoint under Adobe Presenter >Presentation, choose “Publish” and set the publishing options to “My Computer” and the Output options to “Zip package”. Click “Publish”.
The conversion process may take a few minutes.
By default it will publish the zip package to: \Documents\My Adobe Presentations\
In the Connect Central Content Library, choose New Content.
See that among the supported upload file types, a zip package is listed.
Browse to the locally published zip package; in this case it is: \Documents\My Adobe Presentations\Large\Large.zip
Add the details in the Connect Central Content Library and click Save to begin the upload.
The published active URL allows access to the on-demand Presentation.
In the Meeting Share Pod the Presentation is accessible from the Content Library.
You may also directly upload the Presenter published zip package from the author’s client to the Connect Meeting Share Pod and ignore the Content Library as shown below:
The presentation is available for use in the Connect Meeting Share Pod.
Note: PPTX is referred to here rather than PPT. In some cases each will give different results when converted via Presenter. If the end result is not what is expected with a PPT, then try saving it as a PPTX prior to publishing and visa-versa. In some cases, copying the slides to a new project will also help resolve publishing issues.
Choosing the best presentation publishing option:
Once the PowerPoint presentation is selected, converted, and uploaded by whichever means, it is prudent to review it to check for any delta between the uploaded content and the original PPTX. Deltas are usually in one of two forms:
- Select fonts do not match
- Tables or bullet formatting does not line up as expected
With reference to custom fonts such as certain esoteric mathematical symbols, this article may help: Tips on Mitigating Connect Server-side PowerPoint Publishing Deltas
Using Adobe Presenter to publish, effectively eliminates any font discrepancies as all publishing is done on the author’s client where presumably all fonts are installed and are available to facilitate accurate conversion.
When uploading a PPTX to the Connect Central Content Library without Presenter, a Connect server-side version of Presenter, called Producer, facilitates the conversion process invoking the fonts available server side. If a font is used in the PPTX that is not available on the server, Producer will choose the closest font available on the Connect server to the original font.
Note: Adobe Connect hosted and ACMS customers who wish to have proprietary fonts installed on their Connect accounts should contact the Connect Support Team to discuss the process.
When uploading a PPTX directly to a Connect Meeting room Share Pod, server-side Producer is not invoked. The client-side is leveraged and Microsoft Office should be installed on the client as PowerPoint client-side helps facilitate the conversion.
This warning message may appear when uploading a PPTX to Connect:
This warning is most common when Mac users who do not have Microsoft Office installed on their clients, attempt to upload a PPTX directly to an Adobe Connect Meeting room. There are not any client-side assets to facilitate conversion.
This tech-note is relevant: Best Practices for Sharing PPTX Files on Adobe Connect
With specific reference to portions of tables missing from graphs, often this can be mitigated by saving a PPTX as PPT and re-uploading it to Connect.
A PPTX may also be locked down and further editing prohibited. This will affect conversion of the PPTX because conversion to SWF in Connect is a form of editing.
PowerPoint menu options to Protect the Presentation prior to uploading may cause a delta in the converted uploaded Presentation.
Conclusion:
The surest way to have the richest and most accurate PPTX to SWF conversion is by using Adobe Presenter on the author’s client. The next most accurate is to upload to the Connect Content library and invoke server-side Producer for conversion. The quickest way is to simply upload directly to the Meeting Share pod but be sure to have Microsoft Office installed on the client to help mitigate any delta. Be sure to upload and test well in advance of the Adobe Connect Meeting.
Frank DeRienzo, MBA
PRINCIPAL TECHNICAL ACCOUNT MANAGER
Join the discussion
Adobe Connect
Getting started.
Create Meetings | Setup Users and Groups | Publish Presentations | Learn More | Downloads
- Install Adobe Connect Add-in for Windows or Macintosh Operating Systems. The Adobe Connect Add-in allows you to share your screen and upload files to meetings.
- Test your computer to make sure that you are set up with all of the tools you will need to participate in the meeting.
- Login to Adobe Connect Central and click on the New Meeting link on the home page.
- Complete the Meeting Creation wizard and enter the meeting room by clicking the Enter Meeting Room button.
- To invite other participants from the meeting room, select Invite Participants from the Meeting menu.
- Find out more via (a) help at Adobe Connect Meeting Help , (b) video tutorials at Learn Adobe Connect web page, (c) more tutorials and best practices at Adobe Connect Users Community site. Note: You must be a member of the Meeting Administrators, Seminar Administrators, or Event Managers group to host meetings. Contact your Adobe Connect administrator if you are unable to host meetings.
- Login to Adobe Connect Central .
- Select the Administration tab and then the Users and Groups tab.
- You can add users manually, import them using a Comma Separated Values (CSV) file, or import them from a directory service such as LDAP or Active Directory.
- Assign users and groups to the built-in groups to allow users to publish presentations, and create meetings, events, courses, or curriculums.
- Find out more via (a) help at Administering Adobe Connect , (b) video tutorials at Learn Adobe Connect web page, (c) more tutorials and best practices at Adobe Connect Users Community site. Note: You must be a member of the Administrators group to create users and groups.
- Install Adobe Presenter for Windows. Adobe Presenter is installed as a menu in Microsoft PowerPoint. It lets you create self-running rich media presentations and e-learning courses.
- Follow the instructions in the Getting Started presentation that is installed with the product. It provides step-by-step instructions on how to create and publish your first Adobe Presenter Presentation.
- Login to Adobe Connect Central to manage content, including setting permissions or using presentations in courses and curriculums.
- Find out more via (a) help at Using Adobe Presenter and (b) tutorials and best practices for Presenter at Adobe Connect Users Community site. Note: This installation provides a 30 day trial of Adobe Presenter. To convert the trial into a full license, a Presenter serial number is required. Contact your account administrator to obtain a serial number for your copy of Presenter. Adobe Presenter is only available for Windows.
Adobe Connect Basics View quick and basic video tutorials.
Adobe Connect User Community Visit ConnectUsers.com for a wealth of documentation and user community information.
Tutorials Visit ConnectUsers.com for product tutorials for the various user roles.
Documentation Read product documentation to learn how to perform intermediate and advanced functions of Adobe Connect.
Learn and Support Read tech notes, search through the Adobe Connect Knowledge Base, or peruse our support forums to troubleshoot issues. Developer Center Extend and integrate your existing Adobe Connect implementation by learning about our extensive APIs and SDKs.
- Account Login
- Adobe Connect Basics
- Connect User Community
- Help and Support
- Developer Center
- About Adobe Connect

- Unit 1. About this book
- Using Adobe Connect as a virtual classroom
- Four Reasons Not to Require Students to be on Webcam All the Time
- Quick Resources About Pedagogy and Technology that May be Helpful to Share
Acknowledgements
- Unit 2. Examples of Whole-class Activities
- Creating a Mindful Learning Environment using Adobe Connect
- Creating Community Agreements Collaboratively with Online Students: Reasons, Anti-Racist Considerations, and Logistics in Adobe Connect
- The Use of a Large Chat Pod to Encourage Chat Participation About Particular Questions
- Using Large Slides and a Smaller Chat Pod to Focus Attention on Mini-Lecture Content
- Creating Opportunities for Student Voice in Online Classes by Using Polls for Feedback
- Using Polls to Guide Class Check-in Time
- Using a Poll and a Second Chat Pod to Wrap Up the Class Session
- Adobe Connect Status Icons: A Useful Feature to Increase Engagement
- Bringing All Students onto Webcam Together for Special Circumstances: Using a Large Video Pod
- Using PowerPoint Portrait-Oriented Slides to Maximize Content Sharing
Group Presentations in Adobe Connect: Using an Extra Wide Video Pod and Dedicated Second Chat Pod for Q&A
- Live Drawing Using a Second Webcam
- Using a Large Webcam Pod and Large Chat in a Panel View Layout: How to Create a Custom Virtual Stage for Successful Guest Speaker Presentations
- Dedicated Chat Pods for Simulated Client Role Play Video Exercise in an Online Skills-Based Lab
- “Good Point. I Agree.”: Challenging Students to Create “Thoughtful Contributions” in Class
- A Moment of Action: Opening an Inclusive, Engaged, and Trauma-Informed Classroom
- In-Class Breaks: The Importance of Taking a Break During Online Classes and Considerations for Break Activities
- Community-building in Adobe Connect: Using Layouts and Different Pods to Facilitate Games and Icebreaker Activities
- Building Online Class Community Through Photos and Storytelling
- “Student Spotlight” Activity: Cultivating an Empathetic Online Community
- Using Emojis in Adobe Connect to Encourage Student Engagement
- AHA Moments: Connecting Online Course Content to Field Education
- Using Layouts to Facilitate Guided Mindfulness, Meditation, and Yoga in Adobe Connect Classrooms
- Mindfulness and the Engaged Online Classroom
- Chair Yoga in the Online Classroom
- Using PhotoVoice as a Teaching Tool in the Adobe Connect Classroom
- Using a Creative Award Presentation to Review Semester Content and Leave a Lasting Impact
- Creating a Virtual Quilt: A Final Class Activity/Tool
- Unit 3. Examples of Small-Group Breakout Activities and Debriefs
- Enriching Classroom Discussions with Breakout Rooms
- Enhancing Student Engagement in the 10-Minute Breakout Activity: Pre-assigning Groups and Roles
- Showing Note Pods from Breakout Groups in one Layout to Debrief or Monitor Progress of a Breakout Conversation: Using a Birds Eye View Setup
- KWL Charts: How to Implement this Teaching Technique in the Adobe Connect Online Classroom
- Breakout Exercise for Collective Syllabus Annotation in Adobe Connect
- Concept Mapping: Bringing Universal Design for Learning to the Adobe Connect Classroom
- An Example of Using the Whiteboard for Small Breakout Groups in Adobe Connect: “Draw Poverty”
- Scripted Role Play in Adobe Connect: Practicing Clinical Skills in an Online Classroom
- Dimensions of Self Care: Exploring Clinical Issues for Social Workers in an Online Classroom
- The Use of Polls to Facilitate Post-Role Play Exercise Debriefing Discussions in an Online Skills Lab
- Ending a Course with Gratitude: A Unique and Memorable Activity Acknowledging Student Contributions to the Class Community
- Author bios
- Additional Resources About Online Education from our Authors
- Translations
Choose a Sign-in Option
Tools and Settings
Questions and Tasks
Citation and Embed Code

Teaching and Learning Goal
In this case example, I focused on building group presentation skills which are a useful tool for preparing students for group work and group presentations in their professional careers. Additionally, by using a flipped classroom I was able to center the students as the expert, an alternative to top-down instructor-led lecture.
- I wanted to facilitate focused attention on the students' presentation and ensure that questions could be answered quickly and easily.
- I also wanted to give students time prior to class to rehearse their presentation and become familiar with the Adobe Connect view in the Presenter Role.
Activity and Results
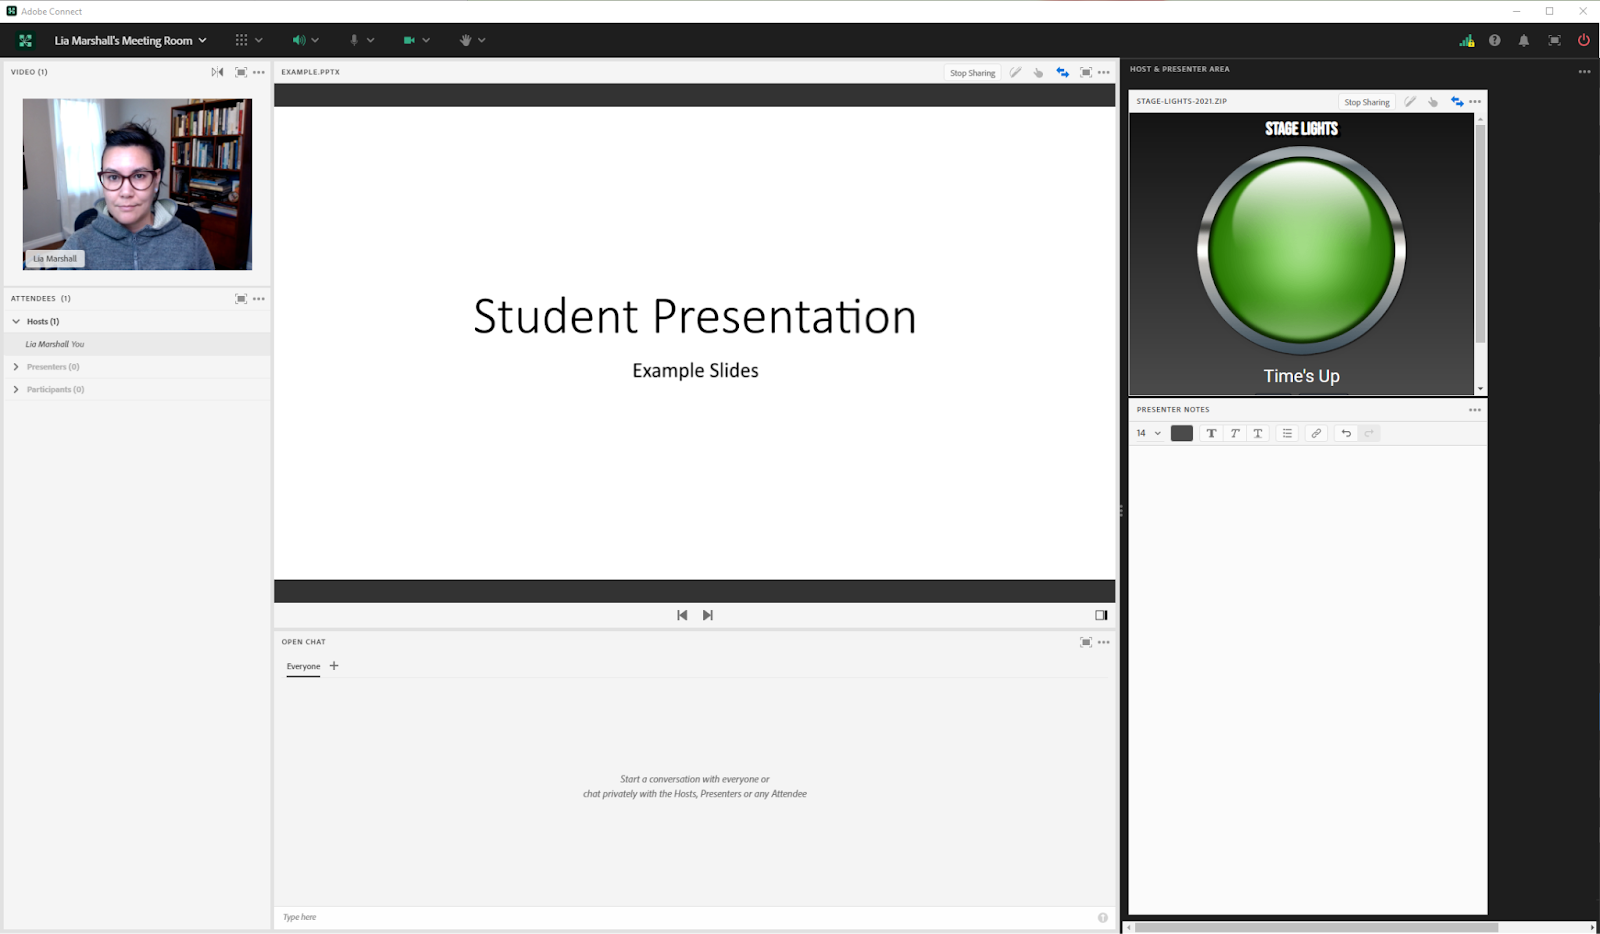
How it started: When I first started using Adobe Connect I was intimidated to use pods in ways I had not seen before. I continued using the familiar lay-outs until I used a group assignment which meant I would have more people on-camera than I was used to. At first I set up the Adobe Connect room as I had traditionally used it (Image 1), with the Video Pod in the top center; however, after all 5 participants had come on camera their images became quite small. Further, I had trouble digging through chat trying to identify specific questions for the presenters while also paying attention to the presentation I was grading live.
Issues: Some students use laptops with smaller screens, so it was possible that students could not properly see the presenter speaking when using smaller pods. Additionally, using one Chat Pod may become challenging when digging through the chat for specific questions for presenters during the proceeding Q&A.
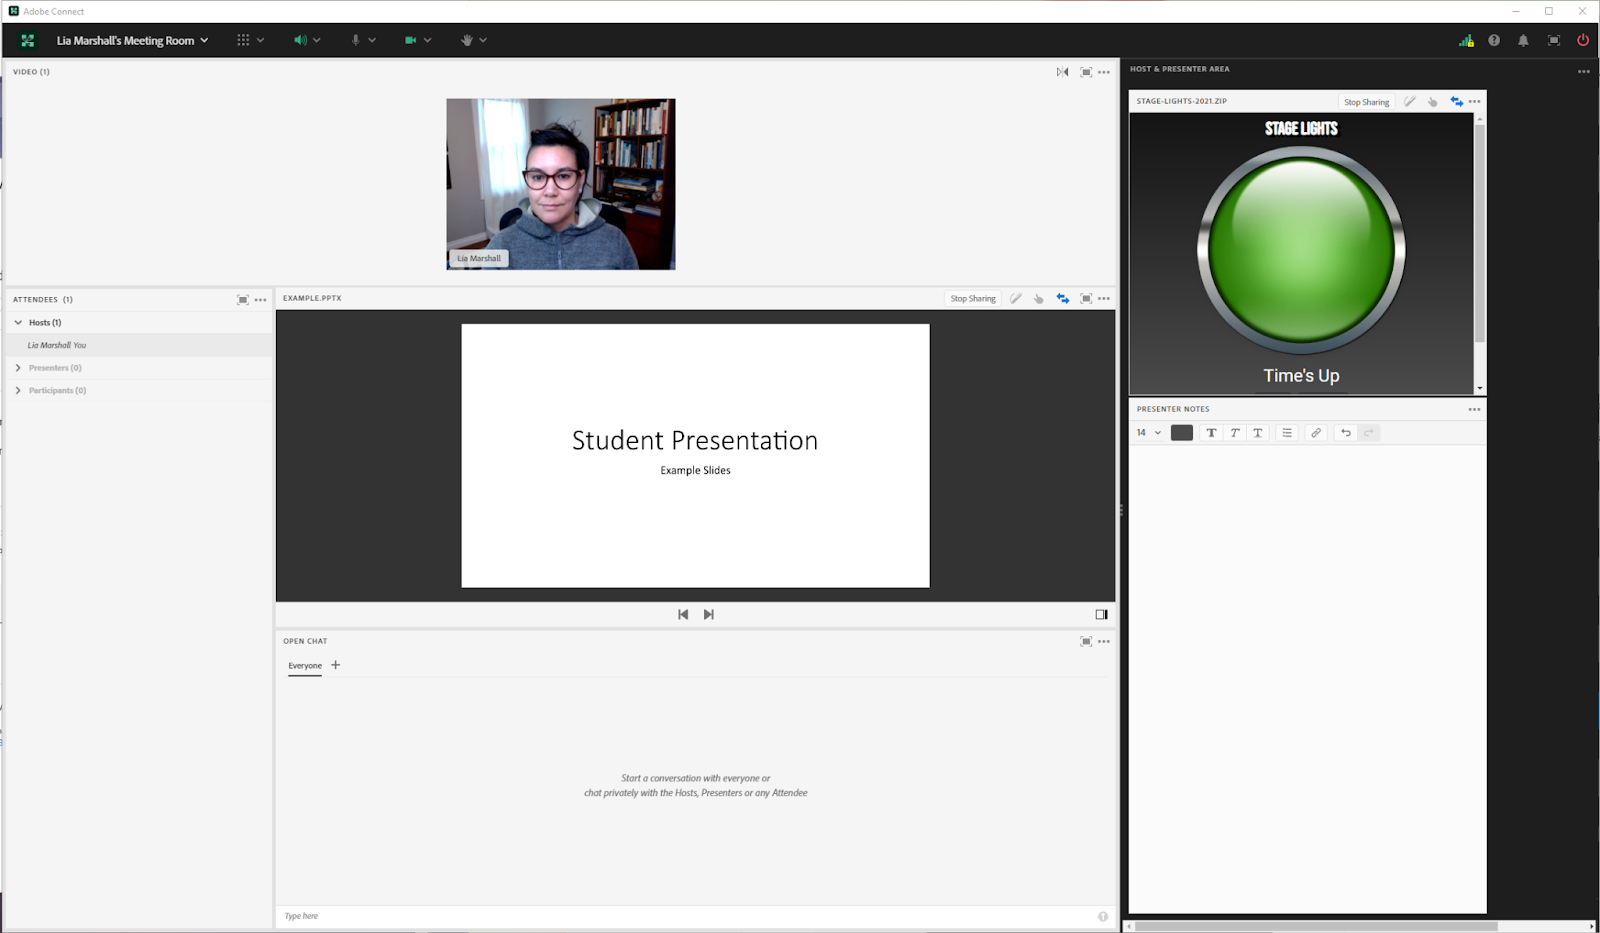
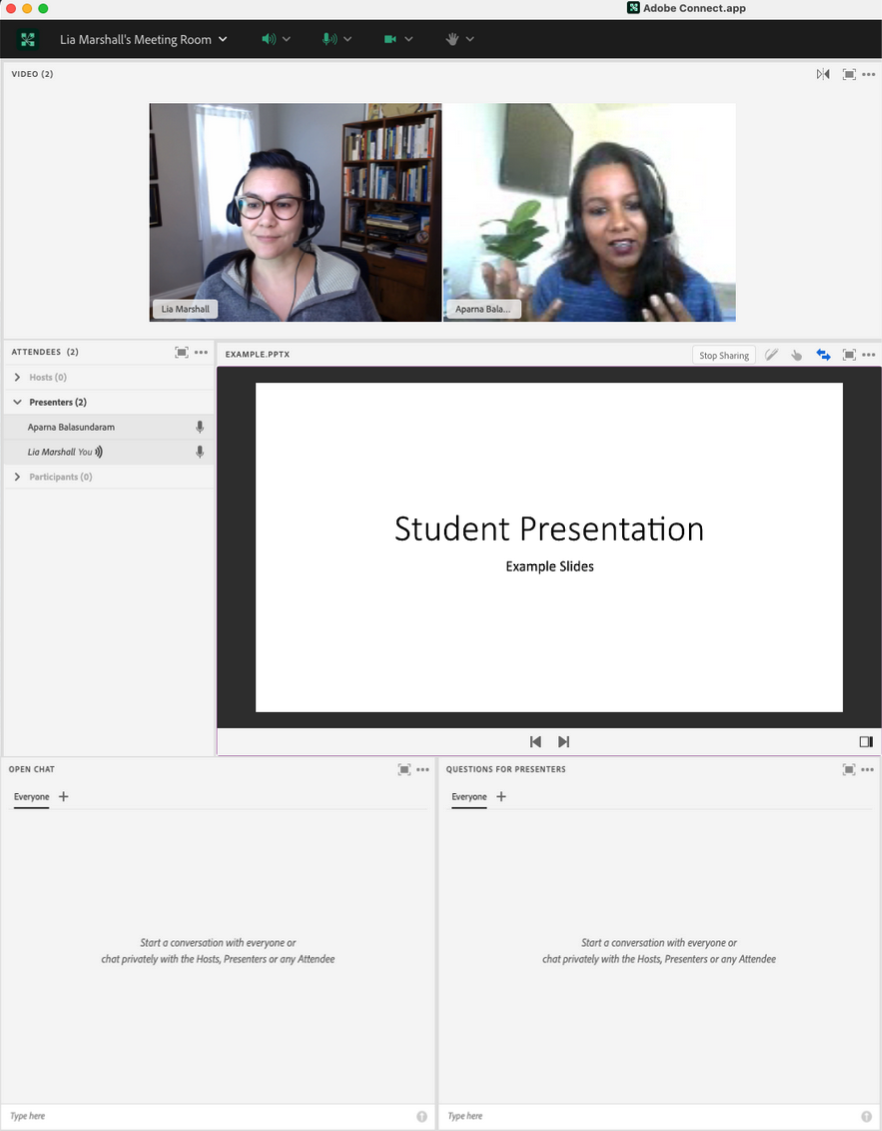
How it’s going: Because I allowed students to rehearse prior to their presentation students were quick to come on camera and audio without issues, and they were not overwhelmed by the unfamiliar layout visible when I moved them to the Presenter Role. Next, by enlarging the size of the Video Pod I was better able to ensure visibility of all group presentation members for students. By minimizing the Attendee Pod and thus allowing a bigger area at the bottom, I was able to fit two Chat Pods: one for support and kudos to the presenters and one dedicated to Q&A. This enabled a quick transition to Q&A, and allowed me to focus my attention on grading. Further, it had the added benefit of giving presenters a view of the questions as they came in, which may facilitate their preparation of responses and support those who find it helpful to see the questions in writing.
Technical Details and Steps
Step 1: Students submit group presentation prior to class
- Early receipt of the presentation allows the instructor the ability to make adjustments to the format of the presentation ahead of class to ensure useability
Step 2: Prepare Adobe Connect room for a group presentation
- Upload the student group presentation slides into a Share Pod
- Minimize the size of the Attendee Pod
- Enlarge the size of the Video Pod across the length of the top
- Create two separate Chat Pods, one for general conversation and a second specifically for students to ask the presenters questions about the content of their presentation. These two pods take up the bottom half of the screen, further minimizing the Attendee Pod
- Name the two Chat Pods clearly for student usability
Step 3: Have students enter Adobe Connect prior to class to rehearse and adjust layout if needed
- Having students enter the room prior to the regularly scheduled class time serves as a time to rehearse giving students the opportunity to make any needed adjustments and facilitates comfort in viewing and using Adobe Connect in the Presenter role.
- The rehearsal time also allows for adjustments to the Adobe Connect layout as needed
What this looked like in Adobe Connect
Image 1 : A smaller video pod would not allow a large enough space for more than 4+ on-camera presenters. Adobe product screenshot(s) reprinted with permission from Adobe.
Image 1 Alt-Text : This image includes a video pod with an image of the presenter in the top corner. The image is of a woman wearing glasses with dark hair. The attendee pod is below it, an example of a student presentation slide as a large share pod is centered and a smaller chat pod below it. In the host & presenter areas is a pod for presenters and hosts as well as a timer or "stage lights".
Columbia University School of Social Work
Dr. Marshall is currently the Manager of Course Development and Lecturer at Columbia University’s School of Social Work (CSSW) and co-facilitator of CSSW’s Institute on Pedagogy and Technology for Online Courses. She has 10 years of public health and medical research administration experience in immunology, oncology and chronic disease prevention and management where she developed an expertise in managing NIH grants, in clinical trial administration, and health policy. Her research interests include older adult well-being, and aging-well-in-place by investigating the interconnections between social isolation, mobility, and the built environment. Her academic interests are in distance learning in higher education and Social Work education as a whole.
Dr Marshall received a PhD in Social Welfare from the University of California, Los Angeles (UCLA), a Masters of Social Work from California State University, Los Angeles (CSULA) and a Bachelors of Arts in Psychology from the University of California at Santa Cruz (UCSC). She is passionate about social justice and health equity.
This content is provided to you freely by EdTech Books.
Access it online or download it at https://edtechbooks.org/designing_engaging_interactive_synchronous_online_classes/group_presentations_layout .
- Record and play back Adobe Connect meetings
- Adobe Connect User Guide
- What's New in Adobe Connect
- Adobe Connect meeting room basics
- Adobe Connect Capabilities in HTML Client
- Adobe Connect application for desktop
- Adobe Connect technical specifications and system requirements
- Keyboard shortcuts in Adobe Connect
- Start, attend, and manage Adobe Connect meetings and sessions
- Host and Presenter Area in Adobe Connect
- Adobe Connect pre-meeting diagnostic test
- Adobe Connect Central home page
- Share content during an Adobe Connect meeting
- Update and manage Adobe Connect meetings
- View meeting reports and analytics data
- Notes, chat, Q&A, polls, and quiz in Adobe Connect meeting
- Accessibility features in Adobe Connect
- Create virtual meeting rooms and arrange layouts
- Breakout rooms in Adobe Connect meetings
- Manage meeting attendees in Adobe Connect
- Enabling Adobe Connect HTML client
- Enabling single sign-on in Adobe Connect
- Change the timeout period
- Configure audio providers for Universal Voice
- Create and import users and groups in Adobe Connect
- Enhance Adobe Connect account security
- Generate usage reports in Adobe Connect Central
- Administer and manage Adobe Connect accounts
- Manage users and groups
- Set permissions for library files and folders
- Back up user data, database, and settings of Adobe Connect server
- Build custom reports from Adobe Connect database
- Maintain disk space and clean cache on an Adobe Connect server
- Manage and monitor Adobe Connect server logs
- Start and stop Adobe Connect services
- About Adobe Connect Events
- Manage Adobe Connect Events
- Attend Adobe Connect Events
- Create and edit Adobe Connect Events
- About Adobe Connect courses and curriculum for training
- Conduct trainings with Adobe Connect
- Create and manage seminars
- Create training courses in Adobe Connect
- Create and manage training curriculum in Adobe Connect
- About Virtual Classrooms in Adobe Connect
- Adobe Connect reports to monitor training features
- Participate in Adobe Connect training sessions and meetings
- Closed captioning in Adobe Connect
- Audio in Adobe Connect meetings
- Video in Adobe Connect meetings
- View reports and usage information about uploaded content
- Work with content in the Content library
- Work with Adobe Connect library files and folders
Adobe Connect is about to get faster, smarter, and younger with the upcoming Adobe Connect 12 upgrade, scheduled for Spring, 2022.
With this new upgrade, Adobe Connect’s legacy, the Flash-based Classic View will reach its end-of-life. Customers will no longer be able to host or join Adobe Connect sessions using the Classic View.
If you haven’t transitioned your Flash-based content and rooms to the HTML-based Standard View, then now would be the right time , ahead of Adobe Connect 12 release.
For more information, see Adobe Connect Classic View End of Life (EOL) .
Get all information about Adobe Connect meeting recordings. Learn how to make the recordings and transcript offline, edit, manage recording and transcript files, and access the HTML player for them.
A host can record a meeting or training session. When played back, the recording shows exactly what the attendees saw and heard. All pods and interactions in a meeting room are recorded, except for the Presenter Only area and breakout rooms. You can start and stop recording at any time, to control what content gets recorded. A host can create a reference archive of meetings and make the recordings available to attendees.
- Tips to record a meeting
Record a meeting
Stop recording.
- Edit meeting recording
- Edit recording transcript
Offline recordings in Standard view
- Closed captions
Restart recording
- Convert and download recordings
- Playback recorded meeting
HTML viewer for recordings
Navigate to specific events in recordings, managing recorded meetings, tips for recording meetings.
When recording a meeting, consider the following:
- If you use VoIP and the Video Pod to broadcast audio to meeting attendees, all audio is recorded automatically.
- If you use the Universal Voice solution, you record the audio with the meeting. All telephone-based audio is recorded, and can be played back with the audio conference. The audio heard through computer speakers during an Adobe Connect session is played back. If the audio broadcasting was stopped during the session, users on a telephone can continue to talk and listen to each other, but they are not heard through computer speakers.
- If you do not use Universal Voice, you can use your speakerphone and your computer microphone as recording devices. All audio input to your computer is captured and recorded but is not broadcast to participants. (Because audio is not directly integrated with the meeting in this case, the quality can be lower than using a direct method.)
- If you use an integrated telephony adaptor, begin your recording from within Adobe Connect, not from a telephone key command.
- The meeting recording is assigned a URL and added to the Recordings page associated with the meeting room in Adobe Connect Central. To play a recording, you need an Internet connection, the recording URL, and permission to view it.
- Adobe Connect administrators can change recording settings to adhere to standards for governance. These settings affect how meetings and training sessions are recorded and what is recorded. For more information, see Working with compliance and control settings .
Start recording a meeting
If you have associated a universal voice audio profile with the meeting, choose Audio > Join Audio Conference.
Choose Meeting > Record Session .
In the Record Session dialog box, enter a Recording name and summary for the meeting recording.
While recording a meeting, if your audio is disabled, enable it by selecting the Turn On Audio Conference option. Or, continue without audio by clicking the Record Without Audio button.

You can pause an ongoing recording. Anything you do in the live meeting during the time you pause the recording is not recorded.
If a problem occurs during the recording, an error message appears in the upper-right corner of the window. You can try to reconnect to the conference audio, record the meeting without audio, or stop recording the meeting.
STOP RECORDING A MEETING
From the Meeting menu, click Stop Recording .
The meeting recording is saved and is available for playback at any time.
Add a reminder to record the session
You can use this feature to initiate a reminder to hosts to record a session.
Choose Meeting > Preferences > General .
Select the checkbox to " Remind me to start recording the session."
Click Done .
This feature is enabled only when force recording is turned off.
About editing meeting recordings
After recording a meeting or training session, you can use the built-in editor to remove sections of the recording. The editor is useful if the recording contains periods of silence or unnecessary information. Following are some tips for editing recordings:
To edit a meeting or virtual classroom recording in the Content library, you must have Manage or higher permissions for the recording. If you created the meeting or virtual classroom, you have these rights by default.
To edit a recording under Meeting > Recordings or Training > Recordings, you must have Host permissions. You can create an index using time tags to enable participants to easily view and navigate through the recording. You can also edit/delete the existing auto-generated time tags.
In addition, you can also create sections within a recording using chapter markers. You can hide the names of participants interacting over chat and retain the content of these interactions.
The link to your recording does not change after editing. Users given the link and rights to access the recording see the most recent version saved, including any edits that were made.
Multiple users can open a recording in edit mode at the same time. However, after one user saves their changes, others editing at the same time receive an error when they try to save their changes.
In addition, you can also hide Chat Pod, Attendee Pod, or Q&A Pod, or a combination of these pods. To protect the privacy of individuals, you can also hide the names of the attendees in standard view meeting rooms.

Adobe Connect administrators can change recording settings to adhere to standards for governance. These settings affect how meetings and training sessions are recorded and what is recorded. For more information, see Working with compliance and control settings .
Edit a recorded meeting
Editing a recording is useful if the recording contains sections of silence or unnecessary information that you want to remove before making the recording available.
For Standard view meeting rooms
From the Adobe Connect Central home page, click Meetings or Training , and then click the meeting or classroom that includes the recording.
Click Recordings .
Click Edit Recording in the Actions pop-up menu, next to the recording that you want to edit.
HTML enables editing the recording in browser as well as in application mode.
Simply click the Play button to search for places that require editing or drag the progress marker to a specific location.

A. Event Index Show/Hide B. Rewind 15 seconds C. Pause D. Forward 15 seconds E. Selection markers F. Cut G. Undo cut H. Volume control
Use Tab key to navigate through all the buttons in the recording editor.
Use the selection markers to specify the areas of the recording you want to remove, and click Cut .
(Optional) At the left of the meeting window, click A to show the Events Index pane, where you can Navigate to specific events in recordings .
(Optional) To remove changes, click Undo to remove individual edits made you last saved to restore the recording to its original state.
Remove any additional sections. When you have finished, click Save .
Add bookmarks to the recording
Bookmarks can be added to the recordings to call attention to a certain point for future viewers to identify places that they can easily return to.
Click on the Add Bookmark from the options on the far left hand side.

Select the Add Bookmark icon from this menu. Once you click the bookmark icon, you are prompted to set a timestamp and name of your bookmark. You can also add some notes, if required.

Click Done . The bookmark now appears in the recording at the specified timestamp.
View, Edit or Delete recordings
In addition to viewing, editing or deleting the bookmarks, you can also add chapters in the recordings. Chapters can be added at any point along the recording timeline bar for the existing bookmarks. Chapters allow you to highlight changes at places within the recording that can be referred for discussions.
In the panel at the left corner, the bookmarks for all recordings are seen with timestamps. Click a bookmark to open a recording right to bookmarked time.

A. Add Chapter B. Edit recording C. Delete recording
To add a chapter name, click on Add Chapter . The chapter is added above the selected bookmark.
The CEF based application has only the option of persistent index pane in the recording playback in the edit recoding mode. Overlay index pane is not available for CEF-based application unlike Flash-based applications.
For WebRTC meeting rooms
Click Edit Recording in the Actions drop-down menu.
(Optional) To go back to original state, click on Revert to original icon on top.
Remove any additional sections. When you have finished, click Save edits .
Edit a recording transcript
Editing a recording's transcript aids in improving accuracy, rectifying mistakes, and enhancing readability of transcripts. Transcripts are generated by Automatic speech recognition (ASR), which can have errors due to background noise, accents, and technical limitations. The transcript editor in the recording editor will help in rectifying these errors.
- Transcript Editor is still in the Beta version of Adobe Connect 12.6 version.
- A transcript should be available with the recording. Currently, recordings will also be transcribed if ASR is enabled from preferences when the recording starts.
- For 12.6, we need to ensure that the checkbox "Show transcript viewer (Beta)" is checked from the edit recording information page for each recording to access the transcript editor in the recording editor.
Select Transcript, which is present at the lower right of the screen. It opens the transcript of the recording.

Double-click on the text you want to edit. It opens in a text editor. Make the required changes.
Click on resizer to resize the text.

Click on to save the changes in text editor.

(Optional) To revert any modifications, select Undo to eliminate specific edits made during your last save and return the transcript to its initial state.
Click Save edits .
Adobe Systems Inc.
In Adobe Connect Classic View, you could convert and download an Adobe Connect session recording offline, in MP4 or FLV format. The conversion happens using the Adobe Connect application for desktop.
From Connect 11.3, you can convert a meeting into MP4, and download recordings in the Standard view.
Start recording
To download an Adobe Connect meeting for offline viewing, follow the steps below:
Log in to Adobe Connect Central and locate the recording that you want to convert to MP4 format.
In the Actions drop-down list, click Make Offline > Standard view .

- In the recording viewer window, click the gear icon in the lower-right corner to access the settings panel ,
- Attendee Names: By choosing this option names will appear anonymous, so instead of real names, they will be replaced by ‘User1’, ‘User2’, etc. in all the pods where names appear (Video, Chat, Q&A, Attendee, and Share.
- Chat Pod: Display or hide the Chat pod in the recording.
- Attendee pod: Display or hide the Attendee pod in the recording.
- Q&A pod: Display or hide the Q&A pod in the recording.
- Video Quality: These presets are provided to allow you to easily select combinations of resolution and frame rates for different target outcomes. However, each parameter can be adjusted individually to create a custom profile.
- Resolution: Choose the resolution (720p, 1080p, etc.) for the resulting recording.
- Bandwidth: Choose the recording bandwidth from the drop-down list. The recording will dynamically adjust the video parameters, such as video compression, to attempt to stay below this value.
- Quality: This value affects the compression of the video frames, sometimes making the video slightly smaller or larger.
- Profile: These provide different levels of video compression. Baseline is the lowest compression but the best playback compatibility.
- Frames per sec: Frames Per Second (FPS) is a measure of the number of video frames that are displayed per second.
- On Windows only you can enable the option Record silently, if you want the recording to continue in the muted mode. The result will contain the audio, but the audio will be stripped of during creation of the mp4 file. Enable the option Set as default , if you want to keep these settings for the next time you make a recording offline.
Once you’ve made the changes, click Start Recording . In the dialog that follows, name the recording (MP4), and choose the location for saving the file.

Adobe Connect Recording Offline Utility
Adobe Connect provides a utility program to convert a single or multiple recordings into mp4. The conversion is done in a batch.
Note: Ensure that the Adobe Connect application must be installed.
This is a Windows-only utility.
To run the utility, perform the steps below:
Download the utility from the site and unzip the contents.
Double-click the utility, Offliner.exe .

In the Enter Recording URL field, enter the meeting URL, and click Add . In the Adobe Connect log in screen, enter the user name and password.
After signing in, you can see the meeting is queued and is ready for conversion.
If you want to add another meeting URL and click Add . Now, both the meetings are queued, and ready for conversion.

To convert the meetings into mp4 videos, click Start .
To trim the length of the recording, click Stop .
Closed Captions
If your meeting included closed captioning during the live meeting, then those captions will, by default, be included or ‘burned-in’ to the resulting video file. You can adjust the text size, colors, and placement of the captions once you start the recording, or you can turn off the captions to prevent them from showing in the video file.
A dialog box pops up when the conversion has finished and provides the details of the actual recording. The actual quality and resolution of the generated MP4 file depends on your system resources and may be equal to or lower than the chosen settings.
When you stop recording midway, the MP4 that is saved contains the recording up to the point when it was stopped. This is useful when you want only a portion of the meeting to be recorded.
In the Restart recording dialog, you can either save the current recording or discard it, and then restart the recording.
Known issues/limitations
- On macOS, when recording, we recommend that users do not switch between applications.
- On macOS, you cannot record a meeting on muted mode.
Convert and download recordings in MP4 or FLV format
You can convert and download an Adobe Connect session recording offline, in MP4 or FLV format. This conversion happens on your local system using the Adobe Connect application for desktop .
- Recordings converted to mp4 will be created in Classic view (not the Standard view ).
- The offline recording does not contain audio, if any, from the shared HTML content. HTML5 content created using Adobe Captivate 9 and Adobe Presenter 11 is supported in Virtual Classrooms and its recordings.
Against the recording, click Actions to open the pop-up menu and click Make Offline . The recording is opened in the Adobe Connect application along with a pop-up dialog.
In the Offline Recording dialog, select MP4 or FLV as an output option. Also, select the quality using either the slider or by customizing the settings of the output by selecting Advanced Options.

Optionally, to save the Advanced Options as the default, click the check box Set as default.
The set as default option is client-specific that means on a specific machine a user can continue to use set defaults. On a different machine, the system default (HD quality) remains.
Click Proceed with Offline Recording. Browse and save the file in a local folder. The recording will play in the Adobe Connect application and get converted to MP4 or FLV file. A dialog box pops up when the conversion has finished and provides the details of the actual recording. The actual quality and resolution of the generated MP4 file depends on your system resources and may be equal to or lower than the chosen settings. Check the pop-up dialog box at the end for the Resolution and the FPS achieved.

Play back a recorded meeting
A host or presenter makes the recording URL available so attendees can play the recording. Every recording is automatically assigned a unique URL and is stored on the Recordings tab for the meeting room in Adobe Connect Central.
When you play a recording, a recording navigation bar appears in a space below the meeting room. For optimal performance, a high-speed Internet connection is recommended for recording playback.

A. Pause/Play toggle button B. Progress marker C. Elapsed/total time
You control who has access to the recording:
Any user invited to the meeting using the invitees or enrollee tabs in Adobe Connect Central can view the recording if given the recording URL.
Hosts can view information, such as permissions, if they have rights to browse to the Adobe Connect Central folder where the recording is stored.
Anyone with Internet access can view the recording if you make it public. Alternatively, you can move the recording to the Content library and set specific user permissions (moving the recording to the Content library is irreversible.)
Adobe Connect administrators can change pod, sharing, and other settings to adhere to standards for governance. These settings affect the layout of meeting rooms and what you can do in meeting rooms. For more information, see Working with compliance and control settings .
Play a recording from Adobe Connect Central (hosts and presenters)
- Click the Recordings option.
- Click the name of the recording.
To view the last edited version of the recording, click the URL For Viewing.
To view the full, original, unedited version of the recording, click View Original.
You either view the original version of the recording or the latest edited version; multiple edited versions of the recording are not saved. (If the recording was never edited, the URL For Viewing is the same as View Original.)
Play a recording from a URL (for attendees)
Hosts and Presenters typically share a recording with the attendees by sending an email containing the URL of the recording.
The recording opens in your browser and is ready for playback. If you are unable to open the recording, check if you have the permission to access the recording.
- Audio with Opus codec will not play back in the classic view. You cannot create an MP4 for Opus codec-enabled meeting.
- When creating offline recordings, the recordings will be in the classic view, not the standard view.
With Adobe Connect 10.6, users can now watch HTML versions of Adobe Connect recordings in a web browser on most platforms without the need to use a Flash player or other plug-ins and try a new 'beta' HTML viewer for mobile browsers. Existing recordings created with Adobe Connect 9 or higher shall also be available through the HTML viewer. Apart from the HTML viewer, users can also choose to watch the recordings in a classic view through the Adobe Connect desktop application.
The new HTML viewer for recordings is only available if the HTML client has been enabled for the meeting room where the recording took place, or if the recording has been moved to the content library.
Any non-hybrid custom pods or non-hybrid content (i.e. SWF, FLV, Presenter, Captivate, etc...) present in the recordings will not be visible in the HTML viewer. To view this content, users should switch to the classic view.
For each meeting recording, a new indexed event is created for every chat message, layout change, slide change, and camera start or stop. Each event is listed in an Events Index, along with a timestamp. You can filter and browse the index to quickly navigate to specific events.

Click the Filter pop-up menu to select specific events to view. You can show all events, a single event, event types, or any combination of events that can be indexed. Events that can be filtered include layout changes, chat messages, slide changes, and users joining or leaving the Attendees or Video pod.
Search for specific events: type keywords into the search box and click Find. All events that contain a match appear highlighted. You can look for names of meeting participants, text in all Notes pods, text in all Chat pods, and text on meeting slides.
You can view all recordings made for a particular meeting, change permissions, rename, or move a recording, or view a content report for a recording. Also, a recorded meeting can be used as content for another meeting. (If a recording has been edited, edits are preserved if the recording is moved to the Content library.)
View a list of recorded meetings
You can access all the recordings owned by you, directly in Home > My Recordings tab. You can sort the list of recordings, search for recordings, or launch a recording. Use a minimum of three characters in the search field to search through the recording names. For more information, see Adobe Connect Central home page .
If you are an administrator or have Manage permissions for a meeting folder, you can view the recordings that have been created from a meeting room.
- Click the Meetings tab at the top of the Adobe Connect Central home page.
- If there is more than one meeting folder, navigate to the folder that contains the meeting.
- Click the meeting name in the list.

Depending on your license and your permissions, all the tabs displayed in the top row in Adobe Connect Central may not be visible.
Move recordings to the Content library
An administrator or a user with permissions to manage a specific Meetings library folder can move meeting recordings from the folder to the Content library.
Moving a meeting recording to the Content library is useful if you want to give access to people other than the original invitees.
To make a recording available to anyone in the world that is given the recording URL, see Play back a recorded meeting .
- Navigate to the meeting that has recordings you want to move.
- In the Meeting Information page, click the Recordings link on the navigation bar.
- Select the check box to the left of any recording that you want to move.
- Click Move To Folder on the navigation bar.
- Navigate to the folder in the Content library where you want to move the recording. (As you navigate, the new destination appears in the upper right of the Adobe Connect Central window.)
- Click Move.
Recordings when moved to content library can be tracked under the Reports for Number of Views and detailed Time In and Time Out of registered users.
Edit recording information
- From the Adobe Connect Central home page, click Meetings or Training. Then click the meeting or classroom that includes the recording.
- In the Recording Information bar, click Edit.
- Revise the title, summary, and language as desired.
- To update any items linked to the recording with the revised information, select Update Information For Any Items Linked To This Item.
Delete a meeting recording
Only an administrator or a user with permissions to manage that specific Meetings library folder can delete a meeting recording.
If you delete a meeting room, you can retain the associated meeting recordings. You are prompted to move all the recordings to your My Content section. You can choose to not move the recordings and delete them along with the meeting room.

- Navigate to the meeting that has recordings you want to delete.
- On the Recordings page, select the check box to the left of any recording you want to delete.
- Click Delete above the list.
- Click Delete on the confirmation page.
More like this
- Customize compliance and control settings
Get help faster and easier
Quick links
Legal Notices | Online Privacy Policy
Share this page
Language Navigation
- Virtual Reality
- Video-Based Learning
- Screen Capture
- Interactive eLearning
- eLearning Resources
- Events and Announcements
- Adobe Learning Manager
- Adobe Connect
- Recent Blogs
- VR projects
- From your computer
- Personalize background
- Edit video demo
- Interactive videos
- Software simulation
- Device demo
- System audio / narration
- High DPI / Retina capture
- Responsive simulation
- Full motion recording
- Advanced actions
- Conditional actions
- Standard actions
- Execute Javascript
- Shared actions
- Learning interactions
- Drag and Drop interactions
- eLearning Community
- Tutorials/Training
- Deprecated features
- Support questions
- New version
- Reviews/Testimonials
- Sample projects
- Adobe eLearning Conference
- Adobe Learning Summit
- Customer meetings
- Announcements
- Adobe Captivate Specialist Roadshows
- Account settings
- Active fields
- Activity modules
- Adobe Captivate Prime
- Auto enrollment using learning plans
- Automating user import
- LMS Branding
- Certifications
- Classroom trainings
- Content curation
- Content storage
- Course level reports
- Create custom user groups
- Customize email templates
- Default fields
- eLearning ROI
- Employee as learners
- Extended eLearning
- External learners
- Fluidic player
- Gamification and badges
- getAbstract
- Harvard ManageMentor
- Integration with Adobe Connect and other video conferencing tools
- Integration with Salesforce and Workday
- Integration with third-party content
- Integrations
- Internal and external users
- Internal server
- Learner dashboard
- Learner transcripts
- Learning objects
- Learning plan
- Learning programs
- Learning styles
- LinkedIn Learning
- LMS implementation
- Managing user groups
- Multi tenancy
- Multi-scorm-packager
- Overview of auto-generated user groups
- Prime integration
- Self-Paced trainings
- Set up announcements
- Set up external users
- Set up gamification
- Set up internal users
- Single sign-on
- Social learning
- Tincan/xAPI
- Types of course modules
- Virtual classroom trainings
- Accessibility
- Adobe Connect Mobile
- Breakout Rooms
- Case Studies
- Collaboration
- Connectusers.com
- Customer Stories
- Product updates
- Social Learning
- Virtual Classrooms
- Virtual Conferences
- Virtual Meetings
- Unified Communications
- Free Projects
- Learning Hub
- Discussions
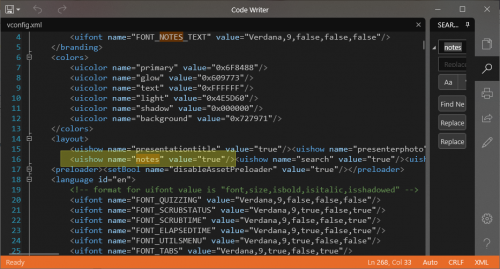
When uploading a PowerPoint with speaker notes to an Adobe Connect Virtual Classroom (VC), you may notice the lack of a Notes Tab in the PPTX in the VC Share Pod – even if you had rich notes in the PowerPoint file, they may not appear.
There is an easy workaround in Adobe Presenter to make sure that your speaker notes always appear in the Notes Tab in the Share Pod in the uploaded PPTX. This feature is driven in xml and can easily be edited.
The first step is to publish the PPTX with Adobe Presenter to a zip format locally:

Choose the local ‘My Computer’ publish option along with ‘Both’ formats as swf and HTML are both needed for this application even if only HTML5 is finally rendered in the Adobe Connect classroom (discussed further anon).
Unzip the output file and find the vconfig.xml file in the data directory:
Look for the tag named “notes” and edit it from “false” to “true” being careful not to damage the xml data with an unfriendly editor:
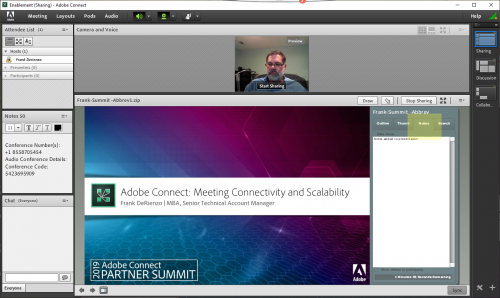
Re-zip the edited project and upload it to the Adobe Connect Content Library or directly to the VC Share Pod as appropriate. Now you will see the Notes Tab in the PPTX in the VC Share Pod:
I mentioned earlier that the appropriate publish option in Adobe Presenter (and this applies to Adobe Captivate as well) to choose is both html5 and swf output for this exercise. The reason for this is that in an Adobe Connect VC Share Pod, content published in a zip as HTML5 only will not be recognized as a supported zip for upload (not all zip files are up-loadable to Adobe Connect). And the swf only publish output option, while recognized and up-loadable, will not properly covert for rendering in the HTML client and warnings in Adobe Connect about this abound:
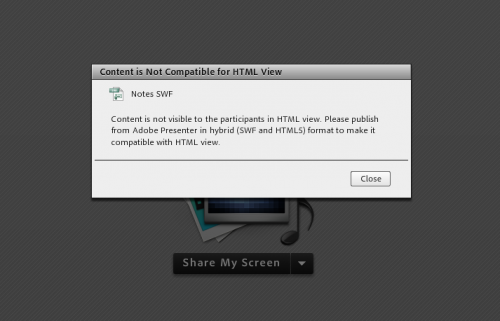
Choose ‘Both’ to enable all upload and conversion capabilities even if the final output to clients will be strictly HTML:

Although I never use PPT (but Captivate) when presenting in Connect, this is certainly a great article for other users!
You must be logged in to post a comment.

Limitless extensibility
Simple integrations that extend functionality, apps & integrations.

Adobe Connect offers an open architecture along with a thriving ecosystem of industry partners to help extend its core capabilities. These solution extensions include Custom Pods, Learning Management System integration, Advanced Authentication, Login Functionality, and much more.
Custom Pods
Extend your Adobe Connect room's functionality with Custom Meeting Pods. Just upload the ZIP file into an empty Share Pod.

Countdown Timer
Let meeting participants know exactly how much time remains before your session will begin or resume.

Adobe Connect Clock
An analog clock for your Adobe Connect room. Never have a meeting run late again.

Rock Paper Scissors
Settle all of your in-meeting disputes with this game of Rock, Paper, Scissors (a.k.a. Roshambo).

Increase interaction and fun in every meeting with the tool guaranteed to get users participating.

Custom Survey and Polling Pod
Easily deploy multiple survey/poll questions loaded from a template and switch back and forth between sections containing unique questions.

YouTube Player
Play YouTube videos and access playlists in your Adobe Connect meetings.

Use this extension to randomly select an Adobe Connect meeting participant for a prize or other special distinctions.

Vantage Point
Manage Adobe Connect in ways you never dreamed possible. See 100+ participants on a second monitor.

Closed Captioning
Display real-time captioning from professional captioning services.

Digital Timer
This timer counts up and tracks the length of your meeting, war room or virtual classroom, even over multiple sessions.

Stage Lights
Use this timer during your meetings to help keep presenters from running over their allotted time.

Doorbell Connect
Enable meeting participants to ring a bell when they need a service, or when they have entered a meeting room.

Extend Adobe Connect with one-rate, toll-free audio conferencing.

Quiz Connect
Quiz Connect is a quiz game for Adobe Connect. Players compete for high scores by answering questions as quickly and accurately as possible.

Rank It is an ideation pod for Adobe Connect which includes both ‘ ordered list’ and ‘ 100 point distribution’ styles of ranking.

YouTube Connect
Add YouTube videos to your Adobe Connect room and play them synchronously.

Soundboard Connect
Add sound effects such as applause and laughter to your Adobe Connect room.

Agree to Disagree
Make it easier to engage with the Agree to Disagree pod, which brings the Agree and Disagree status buttons to the stage along with sliders for providing feedback to the hosts.

Serpent Connect
Add some fun to your Adobe Connect lobby layouts with Serpent Connect - a Snake-style arcade classic. Use your keyboard arrows to control your serpent and eat the red apple. Your serpent grows with each bite making it harder to control.

An arcade game - navigate the Adobe Connect logo through a cave, careful not to touch any of the walls.

Desmos Connect
Desmos Connect is a real-time interactive version of Desmos made for Adobe Connect.

Interprefy Simultaneous Interpreting
Extend your Adobe Connect room’s functionality with the Interprefy Custom Meeting Pod to add real-time interpreting to your meetings.

Quickly and easily add titles and subtitles with custom backgrounds to your virtual rooms.

Garner engagement and measure effectiveness with a visual representation of words.

InFrame Connect
Quickly and easily embed surveys, polls, quizzes and other external content in an iFrame

A more colorful chat pod with up-votes and anonymous chat

Marquee Connect
An simple pod that lets you have a marquee or horizontally scrolling text to notify your users of any current event.

WordSearch Pod
Have your participants find and mark the words in the puzzle box.

Connectordle
A guessing game for participants to determine a word set by hosts with limited attempts.

Image Carousel Pod
Loops through a series of your images on a timed-basis.

Full Pod Image
Display images at 100% height and width to fill the custom pod.

iFrame Pod by Envolvemedia
Display external websites or content, such as SCORM-based content in an iFrame in a meeting

App Kit designed by webqem
Elevate your virtual experiences and apply your branding. Apps include: Event Countdown Timer, Activity Timer, Audio Player, Random Picker, and Sponsor Board.

Calendar Connect
Add a shared calendar to your Adobe Connect rooms.

House Keeper
Show customized housekeeping details to your participants.

Jigsaw Puzzle Pod
Use the Jigsaw Puzzle Pod by Envolvemedia to break any image into pieces for participants to solve.

Save Our Sheep Pod
Add a challenge to your Adobe Connect Meetings with Save Our Sheep Pod. Create a bridge for the sheep to safely cross

Include critical thinking to your meetings, in a fun/interactive way using the Sudoku Pod.

QR Code Pod
Quickly add a QR Code to your meetings or events using the QR Code Pod by Envolvemedia.
LMS Integrations

Adobe Learning Manager
Configure Adobe Learning Manager to work with Adobe Connect out of the box.

Blackboard LMS Integration by CoSo Cloud
Seamless round-trip LTI integration between Adobe Connect and Blackboard LMS

Blackboard Integration by MeetingOne
MeetingOne now offers Adobe Connect integration for Blackboard Learn 9.1.

Brightspace LMS Integration
Brightspace's online teaching and learning platform now integrates Adobe Connect.

Canvas LMS Integration
Educators have the ability to use Canvas seamlessly with Adobe Connect through LTI integration.

Connect-2-Moodle
Enter Adobe Connect meetings, launch Adobe Presenter and Adobe Captivate presentations, and watch event recordings with a single click from inside Moodle.

Moodle LMS Integration
Built for learning, Moodle's personalized learning platform now unites with Adobe Connect through LTI integration.

Sakai LMS Integration
Further expand educational experiences with integration between Sakai Open Source LMS software and Adobe Connect.

SAP Enterprise Learning Integration
Conduct virtual learning events with integration between Adobe Connect and the SAP Enterprise Learning (EL) platform.

SumTotal Integration
Create Adobe Connect meetings, plus enjoy simple scheduling, registration and entry from the SumTotal learning platform.
Event Integrations

Eloqua MeetingSync
Sync your Adobe Connect attendance data into Eloqua.
Language Navigation
Select your location / language
Toll Free: 1-888-523-9194
Toll: 1-303-623-2530 (option 3)
CHAT PLACEHOLDER
Toll Free: 1-888-523-8445
Toll: 1-303-623-2530 (option 2)
SERVICE COMMERCIAL
+33 (0)4 48 20 31 68
+33 (0)4 48 20 31 67
4 Tips to Optimize Adobe Connect for Better Experiences
March 19th, 2019 MeetingOne Contributor Posted In: MeetingOne Blog , Support Blog , Web Conferencing
Adobe Connect has long been one of the best platforms for creating meaningful experiences. Companies around the world choose Adobe Connect for online meetings, virtual training, and webinars because it delivers experiences for their audiences that are more engaging than other platforms.
With a platform that provides the most robust functionality on the market, it also means there are certain things a user can set up as best practice to achieve a great user experience. Simply consider your content and room – a few small tweaks can optimize Adobe Connect for the best experience possible.
In this blog, we’re going to look at 4 areas where prepping your content and room correctly will optimize Adobe Connect and ensure a better user experience:
- Screen Sharing
4 Quick Tips to Optimize Adobe Connect
These tips were developed by MeetingOne’s Technical Adobe Connect expert, Matt Drew .
Be sure to always use these recommended tips to fully optimize your Adobe Connect account. The outcome will be a greater experience for your audiences and other users.
Optimize Video Content
When optimizing video for Adobe Connect, it is important to understand that Connect will deliver (or attempt to deliver) exactly how the video is set up to stream. If you load a video that is too large or settings are for Blu-ray or Broadcast (which is the default for most video output and export settings), users will have a hard time streaming that video.
To best optimize a video, you need to approach it from the mindset that the video needs to be set up to play on the most common of connections on the internet.
Make sure to set your videos playback settings using these specs:
- Frame Size: 800px Width max
- Bit Rate: 500kbps to 1mbps; 800kbps is a good medium to start with.
- Audio-bit Rate: No more than 41kbps. Humans cannot notice a difference in audio with any setting over this.
Taking these steps will optimize Adobe Connect for a better video enjoyment experience.
Optimize Content Font
Being web based, Adobe Connect follows the standard rules of browsers. All browsers recognize a preset list of fonts. These are called “Universal Fonts.” Some browsers also support other fonts that others do not. These are called “Browser Specific Fonts.”
If you load a PowerPoint into Connect that uses a font not supported by the browser the viewer is in, the browser in use will change the font within their Connect view. This can cause issues to size, alignment, or cause text to go missing.
Of course, it would be terrible to displace text. The audience may miss out on valuable content.

To avoid these kind of changes to your presentation, stick to the most common Universal Fonts. Please note that the fonts listed are specific and not all variants of these fonts are supported universally.
Universal Fonts fonts will give you the best results are:
- Arial Black
- Times New Roman
- Courier New
PowerPoints are critical for online presentations. And if your slides are going bonkers, it’s going to affect the experience in a significant way. So use this helpful tip to make sure your fonts can be seen!
Optimize for Screen Sharing
As noted earlier, Adobe Connect is used for online events of all kinds . Online meetings and training. Webinars. Virtual panels and interviews. Often, the occasion arises where screen sharing becomes a must.
Adobe Connect allows you three options:
- Uploading files to the Share Pod.
- Screen sharing files from a desktop.
- Upload files to the Connect content Library.
In first two instances, you need to be aware of how large the file is you intend to share. Screen sharing from a desktop can become a large bandwidth suck. The more bandwidth required, the likelihood for latency increases. To understand file sizes better, check out the reference chart on GreenNet’s blog .
Uploading a file into your Adobe Connect virtual room is limited to ~100 Mb, based on Matt’s experience. Files any larger will not be uploaded successfully.

When possible, it is always better to upload content intended to be shared before the session. Unlike many platforms on the market, Adobe Connect offers a content library for certain use cases. The space offered is large enough to manage documents of any size – and it has unlimited storage to help store all the assets and documents you’ll ever need!
Once in the content library, the files can be pulled into your Adobe Connect room at any time. Taking this approach allows you to avoid the problem altogether. It’s a simple and efficient way to optimize Adobe Connect!
Optimize Adobe Connect Bandwidth
Bandwidth always comes into play during online events of any kind. Being aware of the bandwidth demands you are putting on audiences will affect the final product.
Everything in a virtual room consumes bandwidth. Webcam feeds. Screen sharing. Chats. File downloading and uploading. While most won’t overburden people’s connection capacity, it’s still wise to know some tricks for reducing bandwidth demands in Adobe Connect.
Adjustments to Reduce Bandwidth demand in Adobe Connect:
- Pause your webcam, use it intermittently, or use a picture instead.
- Reduce web cam and screen share quality in Adobe Connect Central or in room Preferences. Don’t drop the quality down too much, though.
- Integrate your room with telephony so users can simply call in by phone instead of using VoIP. (Learn more about integrating telephony here !)

Continue Striving for a Better Experience
The goal when you optimize Adobe Connect should be to improve the outcome of your online events. Making smart choices about video, fonts, file sizes, and bandwidth are critical steps for achieving a better outcome.
Tips provided by Matt Drew, MeetingOne Technical Account Manager.
Technical Account Manager
Matt comes from a long background of working with Learning Management Systems, specifically Adobe Captivate Prime. He has been involved in projects including the creation of content for eLearning and managing and facilitating virtual learning programs. Today, Matt provides technical assistance as a Technical Account Manager in Connect, Presenter, and Captivate authoring tools.
If you would like more tips for preparing Adobe Connect Events, we created digital takeaways that give you all the pointers you could want. We cover banner sizes, formatting considerations, and much more. You have three options to pick from:
Great tips for preparing your Events

Tips for branding your Adobe Connect Account

Strategies for creating powerful Adobe Connect Layouts

Keep learning! Visit the eBook Library
- Join Our Team
- Schedule a Demo

450 rue Baden Powell 34000 Montpellier France Tél: +33 (0) 1 84 88 01 67
United States
One Cherry Center 501 S. Cherry St., Suite 215 Denver, CO 80246 USA Toll Free: 1-866-523-1137 Local: (303) 623-2530 Fax: (303) 623-1294
- Privacy Policies
- Terms of Use
- Cookies Settings
- Privacy Overview
- Strictly Necessary Cookies
This website uses cookies so that we can provide you with the best user experience possible. Cookie information is stored in your browser and performs functions such as recognising you when you return to our website and helping our team to understand which sections of the website you find most interesting and useful.
Strictly Necessary Cookie should be enabled at all times so that we can save your preferences for cookie settings.
If you disable this cookie, we will not be able to save your preferences. This means that every time you visit this website you will need to enable or disable cookies again.
Adobe Community
- Global community
- 日本語コミュニティ Dedicated community for Japanese speakers
- 한국 커뮤니티 Dedicated community for Korean speakers
- Adobe Acrobat Sign
- Discussions
- Power Automate Adobe Acrobat Sign Connection Stopp...
Power Automate Adobe Acrobat Sign Connection Stopped Working

Copy link to clipboard

never-displayed
Adobe Express and ChatGPT team up to bring conversation to content creation

With the explosion of visual communication and storytelling, marketers, creators, and businesses of all sizes must create content that helps them stand out in a crowded landscape. However, many lack the time, resources, and experience with creative tools to bring their ideas to life through differentiated content.
Adobe Express was built to address those needs. An easy-to-use, all-in-one AI content creation app, Adobe Express is revolutionizing the way everyone creates standout content. And today, we’re excited to bring even more creative possibilities to millions of users through our new Adobe Express GPT for ChatGPT, as part of the growing collection of custom GPTs available to ChatGPT Plus subscribers, Team and Enterprise.
From chat to standout content in minutes
Generative AI is ushering in new opportunities for creative expression and bringing creativity and productivity together in ways that are more interconnected and complementary than ever before. And with the new Adobe Express GPT for ChatGPT, all you need to get started is an idea and your own words.
From within the Adobe Express GPT, enter a prompt about what you want to create — perhaps a flyer or Instagram post — the subject matter — like an advertisement or invitation — and other pertinent details — like specific colors, preferred imagery, and anything else in your imagination. The Express GPT then searches through a collection of more than 200,000 professionally designed templates from Adobe’s top artists and responds with a collection that matches your request. With a single click on one of those templates, you can take your selected design into Adobe Express for design, editing, exporting, or publishing.
Within Adobe Express, you can “talk to” Adobe Firefly generative AI-powered features like Text to Image to create new images and Generative Fill, which makes it simple to remove or replace objects with a few words. You can also access a massive library of beautifully designed assets, including stunning video and multipage templates, more than 28,000 Adobe Fonts , and hundreds of thousands of Adobe Stock videos, music tracks, images, and more.

How the Adobe Express GPT works
Select the Adobe Express GPT: To get started, just click on this link to access the Adobe Express GPT. You can also access by clicking on “Explore GPTs” and searching for Adobe Express in Open AI’s GPT store.

Start with a creative prompt: For both individual creators and brands looking to level up digitally, the Adobe Express GPT can help narrow down the best creative templates based on what you’re looking for. For instance, ask the GPT for help with designing a digital ad or Instagram Reel for an online sale. In the image below, the result shown is in response to the prompt, "Create a colorful, fun and vibrant flyer for my coffee shop."

Select the best template for your design: Once you click on the template that best fits your design needs, the template will open directly inside the Adobe Express app on your desktop browser with the pre-loaded template. You can start to edit the design or choose to go back to Express GPT and select another template before clicking over to Adobe Express to design, edit and even publish your content to popular social channels.

Firefly generative AI — designed to be safe for commercial use
Adobe is committed to developing our AI technologies responsibly. Our AI models and features are designed in alignment with our AI ethics principles of accountability, responsibility, and transparency .
Our Firefly generative AI models were trained on licensed content, like Adobe Stock, and public domain content where copyright has expired. Firefly models are designed to be safe for commercial use.
Check out Adobe Express
If you’re not a ChatGPT premium user, you can access Adobe Express directly on desktop and in the all-new mobile app in beta. Click here to get started .
https://blog.adobe.com/en/publish/2024/03/26/whats-new-at-adobe-summit-2024
https://blog.adobe.com/en/publish/2024/03/26/reimagining-customer-experience-age-ai
https://blog.adobe.com/en/publish/2024/03/26/firefly-one-enhancing-experimentation-ideation-exploration-creators-all-levels
Adobe and Microsoft partner to bring new generative AI capabilities to marketers as they work in Microsoft 365 applications

These new integrated capabilities will connect Adobe Experience Cloud applications and Microsoft Dynamics 365 natively within productivity and collaboration tools such as Outlook, Teams, and Word while using Copilot for Microsoft 365 to accomplish a range of marketing activities such as developing creative briefs, creating content, managing approvals and more.
Marketers need next-generation AI
The marketing discipline is fractured, specialized, and siloed with many different marketing tools, and many marketers, especially in the enterprise, don’t use specialized tools at all. As a result, teams often don’t succeed.
Connecting Adobe Experience Cloud workflows and insights with Microsoft 365 Copilot to deliver generative AI-powered capabilities enables modern marketers to:
- Boost marketing efficiency with easy access to insightful data. AI creates marketing briefs, content, and internal reporting all based on insights from your marketing and planning meetings.
- Save hours spent toggling between multiple tools. Enhance effectiveness across marketing activities with quick Q&A. AI answers top-of-mind marketing questions ranging from project status to campaign effectiveness within minutes to democratize knowledge across teams.
- Empower marketing teams to always stay current, right in the flow of work. AI summarizes notifications and tasks across the marketing lifecycle and surfaces them in the Microsoft 365 tools marketers frequently use, enabling them to stay on top of any updates and assignments.
Create and access data-driven campaign briefs in Microsoft 365 apps

Powered by Adobe Workfront, Adobe Analytics, Adobe Experience Platform and Microsoft Dynamics 365
Marketers want to craft data-driven briefs that specify attainable outcomes, target audiences, marketing mix, messaging, imagery, and style with confidence that the campaign will move the business forward.
Often, the data needed to find insights and build data-driven campaign briefs is hard for those writing the briefs to retrieve or explore to get insights.
Marketers will be able to:
Create data-driven briefs and sub-briefs in Word, PowerPoint, and Excel. With access to marketing data, Copilot can generate the insights marketers need to achieve the ideal objective or goal, the key target audiences, the best tactics to reach them, and the ideal tone and voice. From a high-level brief, Copilot can jump-start the creation of all the sub-briefs.
Campaign brief Q&A chat in Copilot in Microsoft 365 apps. Campaign context is readily available to marketers in their Microsoft 365 applications. Chat with Copilot about what campaigns are live or being developed to gain access to the campaign briefs. Ask about the KPIs, audiences, and messages for a brief and receive a summarized response.
Provide, manage, and respond to feedback and approvals on marketing artifacts in Outlook and Teams

Feedback and approvals often delay go-lives or updates as they can get lost in email, create confusion across different versions of a marketing artifact, and require going to tools that are disconnected from the artifact itself. It is often difficult to find the artifacts to approve, and challenging to determine their approval status and what is required to finalize the approvals.
Use Copilot to summarize stakeholder feedback and automatically create action items across multiple sources including meeting transcriptions, emails, and document comments, and reconcile them with centralized approval systems. For documents (Word, Excel, PowerPoint), Copilot provides feedback summaries and action items right within the document itself.
Get approval, Q&A, and notifications in Copilot for Microsoft 365. Understand status, outstanding items, documents or artifacts that require review or approval, and receive proactive notifications of actions and deadlines right from within Microsoft 365.
Connect a brief with feedback and approval tools right from Word, PowerPoint, and Excel. Reconcile, access, and trigger feedback and approvals in work management systems right from within the briefs in Microsoft 365.
Track, manage, and report on work progress in Microsoft 365 apps

Powered by Adobe Workfront, Adobe Experience Platform, Microsoft Dynamics 365
Marketing teams need to track and report on the progress of campaigns and their components. This is required across roles, including marketing ops, content marketers, creatives, agencies, analysts, project managers, and owners of channel and journeys. Being able to track all marketing projects, their goals, and team member capacity and output can be difficult, impeding proper prioritization, and making it hard to estimate when a project will be completed.
Access work management Q&A and chat-based work item updates via Copilot in Microsoft 365 apps. Get quick answers to project progress and completion dates, dependencies, and more. Managers or execs looking to understand the state of the project, or individuals wanting information from their work items, all can use Copilot in Microsoft 365 apps to seamlessly access and update work items in Teams or right where they are working in Word, Excel, or PowerPoint.
Report on project work progress in Outlook, Teams, or PowerPoint. When sending a status report, creating an exec presentation, or sending a quick summary in Teams, these capabilities generate what is required across progress, time spent, completion, capacity, and key dependencies right in the apps marketers are using.
Receive work item notifications. Proactive notifications right in Teams provide a summary of resources that may be sitting idle, summary of changes in a work item, and changes that affect other teams with dependencies including completion or event dates.
Turn a brief into a project plan. Automatically generate plans, work tracking, and meeting cadences in a work management system and Outlook. Create work items based on feedback, track work completion, and notify the team of changes along the way.
Understand and communicate campaign effectiveness in Excel, Outlook, Teams, and PowerPoint

Powered by Adobe Analytics, Adobe Experience Platform, Microsoft Dynamics 365
Marketing departments are always looking to deliver efficient programs and campaigns that have high ROI. Yet, getting answers about the results and KPIs of a campaign, and insights into what is driving those results, can be difficult and require multiple tools and people to answer, consuming both time and resources.
Access marketing analytics Q&A chat via Copilot in Microsoft 365 apps. Enable marketers and business leaders to get direct answers to their questions in everyday words, in the Microsoft 365 flow of work. This includes descriptive (“Show me currently live campaigns,” “How much revenue has this campaign generated,” or “How much have we spent?”), diagnostic (“Why is journey X underperforming?”) and predictive (“Will this campaign hit its goal by next week?”). For business leaders, instead of trying to “find that link,” they can simply ask Copilot questions they have about campaign or business KPIs and get answers right in Teams, with links to the full dashboards and last reviews.
Report on campaign effectiveness in Outlook, Teams, Excel, or PowerPoint. When sending a status report, creating an exec presentation, or sending a quick summary in Teams, this solution will generate what’s needed across key outcomes and key metrics (such as spend, sends, open rates, impressions, leads, and revenue) right in the apps marketers are using.
Use a research canvas to discover insights into effectiveness. Use a generative AI-first research canvas within Microsoft 365 to write an email, prepare a presentation, or create a brief in Word or Excel to discover insights about effectiveness to share with the team or to inform future campaigns.
Author marketing content in Word and PowerPoint

Powered by Adobe Experience Manager Sites, Adobe Firefly
Marketers often ideate on experiences within Microsfot 365 applications because those are the tools they use every day. Generating content can be time consuming, and it can be difficult to find inspiration that aligns to campaign objectives. Additionally, marketers often aren’t able translate their ideas directly into customer-facing experiences. Their contributions are typically mediated by technical team members who create final content and activate it in the delivery tools. This mediation can lead to lengthy communication cycles and slow time to market.
Generate marketing content and update websites with relevant context. With Adobe Experience Manager Sites capabilities integrated into Copilot for Microsoft 365, marketers can create imagery with Adobe Firefly generative AI, generate copy for marketing experiences directly in Word, and then publish to channels such as web and mobile.
For more details about the Adobe and Microsoft partnership click here .
As Senior Director of Experience Cloud Product Management, Daniel Sheinberg drives cross-product initiatives, including content supply chain, as well as the unification of the user experience across Experience Cloud. He and his team also lead customer feedback programs, user guidance, and product measurement across Adobe’s Digital Experience portfolio. Earlier in his Adobe career, Daniel led product management for Adobe Target where he was responsible for the product strategy and roadmap for Adobe’s experimentation and personalization engine. Daniel joined Adobe in 2013 from Microsoft, where he led yield management and the advertising exchange for Microsoft’s display advertising business.
COMMENTS
If you share an application, in the upper-right corner of the application window, click the arrow next to the Stop Sharing button. Then select Pause and Annotate. If you are sharing your entire desktop, click the Adobe Connect icon in the system tray (Windows) or icon bar (Macintosh) and select Pause and Annotate.
Adobe Connect has a backstage area that's only visible to Hosts and Presenters in the room. Learn how it works to help enable private chat, hidden notes, and...
Visit Adobe Connect's download page. Click Download Adobe Connect. Follow the on-screen instructions to install. Creating a Meeting Room: Visit the Adobe Connect central interface. Choose Meetings, and select Create New Meeting. Fill in the meeting details and adjust the settings to your preference.
Within PowerPoint under Adobe Presenter >Presentation, choose "Publish" and set the publishing options to "My Computer" and the Output options to "Zip package". Click "Publish". The conversion process may take a few minutes. By default it will publish the zip package to: \Documents\My Adobe Presentations\.
1 Prepare your presentation and environment. Before you start your Adobe Connect session, you need to make sure that your presentation and environment are ready. First, upload your presentation ...
The Adobe Connect Add-in allows you to share your screen and upload files to meetings. Test your computer to make sure that you are set up with all of the tools you will need to participate in the meeting. Login to Adobe Connect Central and click on the New Meeting link on the home page. Complete the Meeting Creation wizard and enter the ...
Enter the meeting room, and select drop-down for room options. Select Preferences, and choose Broadcast control from left panel. Toggle ON Enable broadcast control. Select Sync session recording with broadcasting to record the session and sync it with the broadcast. Select Done.
In Filmstrip mode, to set a video as the main video, hover pointer over the video and click Set as Main Video. You can maximize the Video pod within the meeting room. Click the icon , and click Maximize. You can select a particular webcam to use in your meetings from the Video pod.
This step by step video shows how you can add a presenter to Adobe Connect.
If this is the folder you want to use, go to step 5. Navigate to and select a template folder, such as the Shared Template folder. Click Move at the bottom of the column. Your meeting room now resides in the template folder that you selected. The template is added to the list in the appropriate folder.
Share a presentation View or change an attendee's role Taking notes in a meeting Chat in meetings Place a meeting on hold or end a meeting ... Home / Using Adobe Connect 8 / Adobe Connect Meeting / Adobe Connect How To topics // Ethnio survey code removed ...
* Using a flipped classroom model, I was able to prepare students for group work and oral presentations in their future careers. * I wanted to ensure focus and visibility of all student presenters.* I wanted to make sure all groups had enough time to present which meant presenters needed to be prepared, rehearsed, and familiar with Adobe Connect in the Presenter Role. * There was a Q& ...
From the Adobe Connect Central home page, click Meetings or Training, and then click the meeting or classroom that includes the recording. Click the Recordings option. Click the name of the recording. Do one of the following: To view the last edited version of the recording, click the URL For Viewing.
Welcome to the real virtual. Adobe Connect gives you complete control over your virtual sessions, with the ability to create stunning, custom experiences. Adobe Connect helps deliver engaging training and learning sessions, highly customized, branded, and engagement-led webinars, as well as reliable, personalized, high-quality meetings.
Unzip the output file and find the vconfig.xml file in the data directory: Look for the tag named "notes" and edit it from "false" to "true" being careful not to damage the xml data with an unfriendly editor: Re-zip the edited project and upload it to the Adobe Connect Content Library or directly to the VC Share Pod as appropriate ...
Only Adobe Connect gives you complete control over your virtual sessions with the ability to create Custom Experiences. Adobe Connect helps deliver engaging Training and Learning sessions, highly-customized, branded & engagement-led Webinars, and reliable, personalized high-quality Meetings. Government agencies use Adobe Connect as persistent virtual environments for Emergency Preparedness and ...
Add some fun to your Adobe Connect lobby layouts with Serpent Connect - a Snake-style arcade classic. Use your keyboard arrows to control your serpent and eat the red apple. ... Enter Adobe Connect meetings, launch Adobe Presenter and Adobe Captivate presentations, and watch event recordings with a single click from inside Moodle.
Polls are a great way to provide interaction and capture feedback in your Adobe Connect sessions. This video covers the different poll types you can use in y...
Hi Adobe Community, I'm taking a virtual course and they use Adobe Connect for our virtual classroom. After the class, the Adobe Connect presentation is saved on the course website.
Simply consider your content and room - a few small tweaks can optimize Adobe Connect for the best experience possible. In this blog, we're going to look at 4 areas where prepping your content and room correctly will optimize Adobe Connect and ensure a better user experience: Video. Font Size. Screen Sharing.
In this video, you'll explore how to create engaging classroom presentations with Adobe Spark Page, Adobe InDesign and Adobe Acrobat DC.This video is part of...
Hi I've been working on making presentation panels in Adobe Illustrator, but the last time I was working on it, I accidentally reset my computer before or while saving. Since then, I can't open it again. I get two errors: 1) Illustrator could partially read the file. We recovered as much as possible, etc. 2) Acrobat PDF File Format is having ...
Power Automate Adobe Acrobat Sign Connection Stopped Working. 32962074qng7. New Here , Mar 28, 2024. Since yesterday (3/27/2024), I have not been able to create any new adobe sign connector. When I click create connection, and then Connect as Acrobat Sign User, usually it takes me to a page where I can enter my credentials, but now it just ...
From within the Adobe Express GPT, enter a prompt about what you want to create — perhaps a flyer or Instagram post — the subject matter — like an advertisement or invitation — and other pertinent details — like specific colors, preferred imagery, and anything else in your imagination.
Adobe and Microsoft partner to connect Adobe Experience Cloud workflows and insights with Microsoft Copilot to deliver generative-AI powered capabilities that enable marketers to increase collaboration, efficiency and creativity. ... prepare a presentation, or create a brief in Word/Excel to discover insights about effectiveness to share with ...