

How to Make a PowerPoint into a Video in Under 5 Minutes
- how to make a powerpoint into a video

PowerPoint is, by far, the most popular tool people use to make presentations , whether for school projects or work-related activities, such as staff training or pitching a product idea to investors.
PowerPoint is genuinely a great tool. It’s simple and easy to use, offers hundreds of themes, and if you spend a bit of time playing around with all the different options inside the program, you can make professional presentations that will captivate your audience.
The only issue regarding PowerPoint—more specifically, presentations in general—is the limited usability of PPT files. You can’t upload a presentation on YouTube , for example. You could technically share it on your website or on social media, but a presentation without a presenter is just a random compilation of images.
Unless the person who created the presentation takes the time to weave the story, explain all the concepts, and expand on the bullet points the audience sees on the slides, the presentation won’t have the desired impact.
Does that mean that presentations are only viable in a face-to-face setting? Not exactly. There are a number of different ways to utilize presentations, but they all involve converting the PPT file into a video .
Now, the question begs itself— how do you make a video out of a presentation?
Turn PPTs into engaging videos
With InVideo’s online editor

Creating a Video from PowerPoint
The first thing that will go through most people’s minds is a webinar. When you stop to think about it, a webinar is nothing more than a glorified presentation. Someone takes the time to record themselves as they’re going through all the different slides and explaining everything in detail.
A webinar is a rather specific form of content, and it takes a lot of time and effort to put one together and to get enough people to watch it to make it worthwhile. Unless you’re an experienced salesperson who is adamant about selling a product and firmly believes that the best way to do so is to blabber about it for two hours, you’re probably looking for a faster, less painstaking way to turn a PowerPoint into a video.
Thankfully, there are a number of different ways to do so. In fact, PowerPoint itself gives you the option to convert the presentation into a video. In this article, we’ll walk you through the entire process step by step and show you how to make a video PPT using all the different versions of the program.
How to make a video from PowerPoint?(Office 365, PowerPoint 2019, PowerPoint 2016)
Although the option is there, keep in mind that it’s not as simple as clicking a Convert to video button. You do need to record narration and laser point gestures (mouse movement on-screen) beforehand.
The reason for that is simple and technical in nature—unless you record narration and timings beforehand, PowerPoint will default to five seconds per slide when creating a video.
You can change this by clicking the upward arrow next to the Timing under the Create a Video option, but keep in mind that you’ll be adjusting the time for all slides simultaneously. There is no option to adjust how long each individual slide will appear on the screen.
If you want to use different timings per slide, as well as record narration, select the Recording option inside PowerPoint and create a video.
Here’s how you’ll enable recording inside Office 365 PowerPoint, as well as PowerPoint 2019 and 2016:
1. Click on File and select Options on the left-hand side of the screen 2. Choose Customize Ribbon (A) from the drop-down menu 3. Check Recording (B) in the pop-up window and hit OK (C)

Image source: Microsoft
You’ll see a new option appear on your screen under the Recording tab, titled Record Slide Show. Clicking on the downward pointing arrow will allow you to choose whether you want to start recording the slideshow from the start or from the slide you’re currently on.
You can also choose to record the narration as audio or video, and you will be able to leverage a variety of different tools, such as pens and markers, to highlight certain elements on your slides.
As you’re recording, the red circle next to the Record Slide Show button will be blinking, indicating that the audio and/or video is being captured. Once you go through all the slides, you can either:
- Click on the square Stop button - Press S on your keyboard.
Exporting your video
The easiest way to export the video you just recorded is to navigate to the Recording tab and select Export to Video . This will open up a new menu, and PowerPoint will prompt you to choose the video quality.
One thing to keep in mind is that the Ultra HD option is available only on Windows 10 .
Next up, you’ll need to either set the timings for the slides or select the Use Recorded Timings and Narration option.
Then, click on Create a Video , name your file, and choose where you want to save it.
Finally, select the Save as Type option and choose between two available formats:
- MPEG-4 Video - Windows Media Video
PowerPoint will start converting the slideshow into a video automatically. Depending on the video quality and length, this process might take a while, so we suggest timing it so that you don’t have to use the computer during that time. For larger, Full HD or Ultra HD videos, it’s best to keep the program running overnight.
PowerPoint 2013
One notable difference with the 2013 version of PowerPoint is that the video quality options are slightly different. Ultra HD (4K) was just entering the scene, and not a lot of people owned devices that supported the 3840 × 2160 video resolution, so it’s no surprise that the option doesn’t exist in this version.
The interface didn’t change much over the years, so if you happen to be running PowerPoint 2013, you’ll go through the exact same process as with the newer versions of the program:
1. Navigate to File , click Export , and choose to Create a Video 2. Select the resolution 3. Set timing parameters or use recorded timings and narration 4. Click on Create Video 5. Choose Save as Type and select between MPEG-4 or Windows Media Video
PowerPoint 2010
If you are still using the 10-year-old version of PowerPoint, the options for creating a video out of your slideshow will be a bit different.
The first thing to keep in mind is that PowerPoint 2010 only supports .mp4 files and that the maximum resolution for the videos is 1290 x 720, which isn’t exactly ideal. If you want to create a professional-looking video from your PowerPoint presentation to share with business partners or your audience, you might want to consider a less restrictive alternative.
Here’s how you would turn your slideshow into a video in this outdated version of the program:
1. Select Save & Send under File 2. Choose the option Create a Video at the very bottom of the right-hand side of the screen 3. Find the Create a Video tab if you want to see the available video quality options 4. Click on the downward-pointing arrow next to the Computer & HD Displays option and choose from the three available options 5. Choose between Use and Don’t Use Recorded Timings and Narration depending on whether you want to use recorded timings and narration 6. Click on Create a Video , name it, choose the destination folder, and hit Save
PowerPoint Video Drawbacks
It’s always great when you can use the same tool for various different tasks. In the case of PowerPoint, you can both create the presentation within the program and convert it into a video on the spot.
That said, PowerPoint isn’t a video editing tool . What we mean by this is that you are severely limited in terms of what you can do with the video you create from your PPT. There are no transitions, you can’t leverage fade-ins and fade-outs, and there is no music, among other things.
No matter how you look at it, the videos created through PowerPoint will be bland. PowerPoint’s PPT to video conversion might get the job done if your only goal is to share a presentation internally with your team. Even then, it only makes sense in a remote work environment, where you can’t physically hold the presentation to your coworkers.
If you’re planning on using the presentation as a core part of your marketing strategy , then the video quality—and we don’t mean the resolution here—you’ll get from PowerPoint won’t suffice. No matter how professional you sound during the narration, the videos created through PowerPoint will still give off the impression that you didn’t try all that hard.
When you see the production value of the videos that businesses share on their websites, YouTube channels , and social media, it’s painfully obvious that PowerPoint videos can’t compete. This doesn’t mean you have to spend months learning video editing or spend a small fortune hiring a professional videographer to make and edit the videos for you.
With InVideo, a powerful yet easy-to-use online video editor , you can create stunning videos from your presentations in minutes! We’ll walk you through the whole process to show you how easy it is to create breathtaking videos from presentations with InVideo .
How to make a video from a PowerPoint Presentation using InVideo?
Videos are quickly becoming an integral part of every business’s marketing strategy. Whether you’re a startup, an enterprise, a medium-size business, or a solo entrepreneur, you will need to use videos if you want to attract as much traffic to your website as possible. The same goes for influencers and bloggers—videos beat any other type of content when it comes to user engagement.
InVideo makes video editing quick, easy, and fun. Thanks to our intuitive, drag-and-drop video editor , professionally designed video templates , and an extensive library of photos and audio tracks, you can create killer videos in no time, even if you have absolutely no video editing experience.
Our platform is cloud-based, meaning you can access it from any browser on your computer and laptop. This also means that your video editing capabilities won’t depend on how powerful your machine is, meaning you can create HD and Ultra HD videos even with a low-end PC or laptop.
The best part about InVideo is the fact that you can export up to 60 videos per month for free! With our free plan , you’ll have access to all of InVideo’s features so that you can play around with all the different options and learn video editing at your own pace. We also have dozens of video editing tutorials for different use-cases, so you can get started right away.
Creating videos from photos and PowerPoint presentations is one of many things you can do with InVideo.
Here’s are the simple steps you can follow to create a stunning video from your presentation with InVideo:
Step 1: Create an account
To get started, you’ll need to create an account.
Navigate to our website and click Sign Up in the top right corner. Input your email, set up your password, and you’re good to go. We’ll never ask you for your credit card information or phone number. We won’t bombard you with emails either—we hate spam as much as you do.
Step 2: Select a Template or start from scratch
Once you log in, you’ll see several different options on the homepage:

The Pre-made Templates option will be selected by default. While there are over 5000 stunning video templates in our library, we strongly suggest that you go with the Blank Template option for this purpose.
You will be starting from scratch, but it’s not as scary as it might sound. The blank template is the most convenient option since you’ll be treating each slide as a separate scene and editing them individually. Here’s how to do it:
- Choose how long each slide appears on the screen - Add the appropriate narration - Throw in effects , filters, transitions , etc.
Step 3: Upload your media
Assuming you are the one who created the presentation, you should have all the necessary media on your device—photos, slides, and the script . To add it to the video, you’ll first need to upload it through our video editor .
From the menu on the left, select the Uploads option and click on the Upload button at the bottom of the screen.

You can upload files up to 800MB at a time. If you have all the photos neatly sorted into a folder, you can upload the entire folder in one go. All the media you upload will be available immediately to the left of your video—for this and all future projects—and you can drag and drop images to the center of the screen to add them to the timeline.
Step 4: Add the photos
Let’s start with a single scene—the intro of your presentation. Drag and drop the desired image from the Uploads library onto the screen to add it to the scene.

The video editor will show you what the image will look like in the video. When you drop the photo, you’ll need to select one of the two options:
- Replace - Add as a layer

If the slide consists of a single image, choose Replace. Since we’re not using a pre-made template here, the image you chose will replace the black background.
If you would like to add additional images on top of it—such as graphs, screenshots, product photos, or lifestyle images—drag and drop them to the center of the screen once again, but this time select the Add as a Layer option. This will put the new image on top (in front) of the background one, making the first one act as a backdrop.
Step 5: Edit the Scenes and add text
By default, scenes will be about five to six seconds long, which probably isn’t sufficient for the narration. You can edit how long each slide—referred to as a scene in the video editor—will be on the screen for on the timeline.

The image above shows the basic timeline, which is great for having an overview of all your scenes. To edit a specific scene, click on it on the timeline and select the Advanced Timeline option in the top right corner.

On the left side, you’ll see all the different elements that make up the scene. Select each one you’d like to edit, whether it’s a logo, the text, or the image itself.
The middle of the timeline is reserved for the length of the scene. To adjust how long this scene will be in the video, move the sliders left or right. The duration of the scene will always be displayed in the center.
On the right side, you’ll be able to zoom in and out, so you can edit the timeline more easily.
As far as text editing is concerned, you can do so either from the timeline or by selecting the text box on the screen. You’ll be able to drag and drop the text box to adjust the positioning, rotate the text, change the colors and font, and more. To add multiple text boxes, select the Text option from the left-hand menu and drag and drop the new box onto the screen.

Step 6: Add narration
All that’s left to do is add narration. If you’ve recorded the audio already, you can add it through Uploads , the same way you did with photos. If not, you can add a voice-over to each individual scene. Select the Add VO option and import an existing voice-over or choose to record it on the spot.

Step 7: Export the Video
After you record or upload the VO, add the photos, and edit the length of each scene, you’re good to go. You can play around with filters, effects, and transitions if you’d like, but the base video is complete and ready to be shared with the world!
All that’s left to do is to click on Export in the top right corner and wait for the video to render. After a few minutes, depending on the video’s length, you’ll be able to download it, post it on YouTube and social media, or copy the shareable link and use the video in your marketing campaigns.
Turn your PPTs into epic videos
Without spending hours on editing

That’s how easy it is to create stunning videos with InVideo. Click here to get started today for free and turn your PowerPoint presentations into breathtaking videos in no time!
Let’s create superb videos
How to Turn a Presentation into a Video in Powerpoint 2010
You may find that you need to turn a Powerpoint presentation into a video if you are going to be giving that presentation somewhere and won’t have access to Powerpoint, or if you need to display the presentation in a spot where a slideshow would be impractical.
Your first thought might be that you need separate software to convert your slideshow to a video, but you can actually do everything you need to directly from Powerpoint 2010.
Powerpoint slideshows are a great way to convey information to an audience. You can show text and images on each slide, allowing you to convey your ideas in a visually appealing way.
But another great medium for visually showing your information to an audience in a video which can, in many cases, be easier to show to people than a slideshow. But if you do not have a lot of experience making videos, then the process can be a little intimidating.
Fortunately, Powerpoint 2010 has a tool within the program that will allow you to easily convert your slideshow to a video file.
How to Convert a Powerpoint Slideshow to a Video
If you are looking to put information on the Internet for an audience, then one of the best ways is to turn your content into a lot of different types of files. Two types of files that you can easily share across the Internet are Powerpoint slideshows, at sites like Slideshare.net , and video files, at places like Youtube.com . By using the video creation utility within Powerpoint 2010 you can really simplify this process by creating a video file from your existing Powerpoint slideshow.
Step 1: Double-click your Powerpoint 2010 slideshow to open it.
Step 2: Click the File tab at the top-left corner of the window.
Step 3: Click Save & Send in the column at the left side of the window.

Step 4: Click the Create a Video button under File Types at the center of the window.

Step 5: Click the Computer & HD Displays drop-down menu at the right side of the window to choose a resolution for your video, then choose whether to use timings and narrations.
Step 6: Click the arrows to the right of Seconds to spend on each slide and select a duration option, then click the Create Video button.

Step 7: Type a name for the video into the File name field, then click the Save button at the bottom of the window.
Now that you know how to turn a presentation into a video in Powerpoint 2010, you can make it a little easier to generate multiple types of media from a single file.
Summary – How to make a Powerpoint into a video
- Open Powerpoint 2010, then click the File tab.
- Click the Save & Send button in the left column.
- Click the Create a Video button.
- Select your video resolution, as well as Timing and Narrations settings.
- Choose the number of seconds to spend on each slide.
- Click the Create Video button.
If you are going to be sharing this video file with others, it may be too large to send through email. A good way to share large videos is to either upload them to YouTube , or to upload them to an online cloud storage service like Dropbox and share the link to the file from there.

Matthew Burleigh has been writing tech tutorials since 2008. His writing has appeared on dozens of different websites and been read over 50 million times.
After receiving his Bachelor’s and Master’s degrees in Computer Science he spent several years working in IT management for small businesses. However, he now works full time writing content online and creating websites.
His main writing topics include iPhones, Microsoft Office, Google Apps, Android, and Photoshop, but he has also written about many other tech topics as well.
Read his full bio here.
Share this:
Featured guides and deals
You may opt out at any time. Read our Privacy Policy
Related posts:
- How to Save Powerpoint as PDF with Notes
- How to Loop a Slideshow on Powerpoint 2013
- Can You Save a Powerpoint as a Video in Powerpoint 2013?
- Can I Convert My Powerpoint to Google Slides?
- How to Put Embedded Youtube Video in Powerpoint 2010
- How to Change Hyperlink Color in Powerpoint 2010 (An Easy 5 Step Guide)
- How to Set Time for Slides in Powerpoint
- How to Make a Powerpoint Into a Video
- How to Make a Powerpoint Slide Vertical in Powerpoint 2013
- How to Insert Slides from Another Presentation in Powerpoint 2010
- How to Compress Audio and Video in Powerpoint 2010
- How to Print an Outline of the Presentation in Powerpoint
- How to Add Page Numbers in Powerpoint 2010
- How to Check Word Count on Powerpoint 2010
- How to End Powerpoint on Last Slide in Powerpoint 2010
- How to Convert Powerpoint to MP4 in Powerpoint 2013
- How to Hide a Slide in Powerpoint 2010
- How to Turn a Powerpoint Slideshow Into a PDF
- Can I Create a Timeline in Powerpoint?
- How to Change Line Spacing in Powerpoint for Every Slide at Once
Leave a Comment Cancel reply
You must be logged in to post a comment.
How To Convert A PowerPoint 2010 Presentation Into A Video With One Click
Converting a PowerPoint slide to a video has lots of uses. It can be used to send a cluster of pictures to someone who does not have PowerPoint or a PowerPoint viewer installed. Microsoft Office 2010 has come in with a slew of user-friendly new features. One of the new features in PowerPoint 2010 helps you create a video with just a click.
Converting a PowerPoint slide to a video has lots of uses. It can be used to send a cluster of pictures to someone who does not have PowerPoint or a PowerPoint viewer installed. Videos are in fact, quite an easy way to send someone a PowerPoint presentation. In any case, a video ‘show’ sounds more interesting than a PowerPoint slideshow; you can convert one and watch it on a TV. Another use I can think of straightaway is to create a novel ‘visual resume’ to stand out from the crowd. Pretty much like the one demonstrated in the said link.
Creating a video from a slideshow isn’t something new. It has been a pretty common activity thanks to the clutch of PPT to video converters . But thanks to the latest edition of Microsoft Office, you can do away with third party tools…at least for a basic video conversion job.
Microsoft Office 2010 has come in with a slew of user-friendly new features . One of the new features in PowerPoint 2010 helps you convert Powerpoint presentations to video with just a click.
Here are the steps that start with a normal presentation file.
- You can also add the recorded timings and narration to the video. You can also specify the time that will determine the transition from one slide to the next.
As the conversion to .wmv format begins there will be a progress bar displayed in the lower right corner of PowerPoint that indicates the pace. The time taken for the conversion will of course depend on the size of the PowerPoint file. My 15-slide sample presentation took about eight minutes to turn into a movie.
The inbuilt PowerPoint video conversion is a handy aid to have. There are some limitations of course:
PowerPoint 2010 supports only one video format. A few more choices like MP4, FLV etc would have been real handy. For that, you still have to depend on third-party conversion tools. Also, the highest resolution that’s on offer is 960x720. Higher resolutions (and commonly available) like 1,280x720, 1,920x1,080, or 1,920x1,080 are not available.
The limitations notwithstanding, the Create Video feature is a great tool to have. It saves us the bother of looking for a conversion tool and allows us to quickly upload and share videos of any presentations. If you are a PowerPoint super-user, would you agree that Microsoft has plugged a gap.

- Get started with computers
- Learn Microsoft Office
- Apply for a job
- Improve my work skills
- Design nice-looking docs
- Getting Started
- Smartphones & Tablets
- Typing Tutorial
- Online Learning
- Basic Internet Skills
- Online Safety
- Social Media
- Zoom Basics
- Google Docs
- Google Sheets
- Career Planning
- Resume Writing
- Cover Letters
- Job Search and Networking
- Business Communication
- Entrepreneurship 101
- Careers without College
- Job Hunt for Today
- 3D Printing
- Freelancing 101
- Personal Finance
- Sharing Economy
- Decision-Making
- Graphic Design
- Photography
- Image Editing
- Learning WordPress
- Language Learning
- Critical Thinking
- For Educators
- Translations
- Staff Picks
- English expand_more expand_less
PowerPoint 2010 - Getting Started with PowerPoint
Powerpoint 2010 -, getting started with powerpoint, powerpoint 2010 getting started with powerpoint.

PowerPoint 2010: Getting Started with PowerPoint
Lesson 1: getting started with powerpoint, introduction.

PowerPoint 2010 is a presentation software that allows you to create dynamic slide presentations that can include animation, narration, images, and videos. In this lesson, you will learn your way around the PowerPoint 2010 environment , including getting to know the new Backstage view .
We will also show you how to use and modify the Ribbon and the Quick Access toolbar , in addition to learning how to create new presentations and open existing files .
Getting to know PowerPoint 2010
If you are familiar with PowerPoint 2007, you'll notice that there aren't too many changes to the 2010 interface other than Backstage view , which we'll cover later in this lesson.
However, if you are new to PowerPoint, you will first need to take some time to learn about slides and how to navigate PowerPoint .
Navigating PowerPoint to create a slide presentation
PowerPoint uses slides to build a presentation . To create an engaging presentation, PowerPoint allows you to add text, bulleted lists, images, charts, and video to your slides. You can add as many slides as you want to a presentation, and at any time you can view or play back your presentation by selecting one of the slide show play options.
Click the buttons in the interactive below to learn how to navigate and interact with slides in the PowerPoint window.

Quick Access Toolbar
The Quick Access toolbar lets you access common commands no matter which tab you are on in the Ribbon. By default, it shows the Save , Undo , and Repeat commands. You can add other commands to make it more convenient.

Zoom Control
Click and drag the slider to use the Zoom control. The number to the left of the slider bar reflects the zoom percentage.
You can also choose the Fit slide to current window button.

Slide Views
Adjust your slide view by choosing one of the following:
• Normal view is selected by default and shows the Slide and Outline tabs, along with displaying the current slide.
• Slide Sorter view displays smaller versions of all of the slides in the presentation.
• Reading view displays only the slides with buttons at the bottom of the screen for navigation.
• Slide Show will play your slides as an actual presentation.

You can also navigate your slide show by clicking and dragging the scroll bar or by selecting the Previous Slide and Next Slide arrows.

Outline Tab
The Outline tab conveniently displays the text content of each slide. You can edit your text directly from the outline view.

The Slides tab allows you to view and work with the slides in your presentation. You can add , delete , duplicate , and rearrange slides in the Slides tab. You can also add sections to the Slides tab to organize and divide your slides.

The Ribbon contains all of the commands you will need in order to perform common tasks. It has multiple tabs, each with several groups of commands, and you can add your own tabs to customize your favorites.
In addition, special tools tabs will appear when you're formatting certain items, like images and tables.

Working with your PowerPoint environment
The Ribbon and Quick Access toolbar are where you will find the commands you need to perform common tasks in PowerPoint. If you are familiar with PowerPoint 2007, you will find that the main difference in the PowerPoint 2010 Ribbon is that commands such as Open and Print are now housed in Backstage view .
The Ribbon contains multiple tabs , each with several groups of commands. Some tabs, like Drawing Tools or Table Tools , may appear only when you are working with certain items like images or tables. In addition, you can add your own customized tabs that contain your favorite commands.

Certain programs, such as Adobe Acrobat Reader , may install additional tabs to the Ribbon. These tabs are called add-ins .
To customize the Ribbon:
You can customize the Ribbon by creating your own tabs that house your desired commands. Commands are always housed within a group , and you can create as many groups as you need to keep your tabs organized. You can even add commands to any of the default tabs, as long as you create a custom group within the tab.

- Click New Tab . A new tab will be created with a new group inside it.
- Make sure the new group is selected.
- Select a command from the list on the left, then click Add . You can also drag commands directly into a group.

If you do not see the command you want, click on the Choose commands drop-down box and select All Commands .

To minimize and maximize the Ribbon:
The Ribbon is designed to be easy to use and responsive to your current task; however, if you find it is taking up too much of your screen space, you can minimize it.

- To maximize the Ribbon, click the arrow again.
When the Ribbon is minimized, you can make it reappear by clicking a tab. However, the Ribbon will disappear again when you are not using it.
The Quick Access toolbar
The Quick Access toolbar , located above the Ribbon, lets you access common commands no matter which tab you are on. By default, it shows the Save , Undo , and Repeat commands. You can add other commands to make it more convenient.
To add commands to the Quick Access toolbar:
- Click the drop-down arrow to the right of the Quick Access toolbar .

Backstage view
Backstage view gives you various options for saving, opening, printing, and sharing your presentation. It is similar to the Microsoft Office button menu from PowerPoint 2007 and the File Menu from earlier versions of PowerPoint. However, instead of just a menu it's a full-page view, which makes it easier to work with.
To get to Backstage view:

- You can choose an option on the left side of the page.
- To get back to your document, click any tab on the Ribbon.
Click the buttons in the interactive below to learn about the different things you can do in Backstage view.

Save, Save As, Open, and Close
Familiar tasks such as Save , Save As , Open , and Close are now found in Backstage view.
Info contains information on the current presentation. You can also inspect your presentation and edit its permissions from this pane.

The Recent pane allows you to conveniently access recent presentations and file folders .

From here, you can create a new blank presentation , or you can choose from a large selection of templates .

From the Print pane, you can change the print settings and print your presentation. You can also see a preview of how your presentation will look on the page.

Save & Send
Save & Send provides options for you to share your presentation and change its file formats . In addition, you can create a video , CD , or handouts of your presentation from here.

From the Help pane, you can access Microsoft Office Help or check for updates for your software.

Here, you can change various PowerPoint options . For example, you can adjust the spelling and grammar check settings, AutoRecover settings, and Language preferences.

Creating and opening presentations
PowerPoint files are called presentations . When you start a new project in PowerPoint, you'll need to create a new presentation . You'll also need to know how to open an existing presentation .
To create a new blank presentation:
- Click the File tab. This takes you to Backstage view .
- Select New .
- Select Blank presentation under Available Templates and Themes . It will be highlighted by default.

To save time, you can create your presentation from an Office.com template , which you can also select under Available Templates and Themes .
To open an existing presentation:

- Select your desired presentation, then click Open .
If you have opened the existing presentation recently, it may be easier to choose Recent from the File tab instead of Open to search for your presentation.

Compatibility mode
Sometimes you may need to work with presentations that were created in earlier versions of PowerPoint, such as PowerPoint 2003 or PowerPoint 2000. When you open these types of presentations, they will appear in Compatibility mode .
Compatibility mode disables certain features, so you'll only be able to access commands found in the program that was used to create the presentation. For example, if you open a presentation created in PowerPoint 2003, you can only use tabs and commands found in PowerPoint 2003.
In the image below, the workbook has opened in Compatibility mode. Many of the newer slide transitions have been disabled, and only the 2003 transitions are available.

To exit Compatibility mode, you'll need to convert the presentation to the current version type. However, if you're collaborating with others who only have access to an earlier version of PowerPoint, it's best to leave the presentation in Compatibility mode so the format will not change.
To convert a presentation:
If you want access to all PowerPoint 2010 features, you can convert the presentation to the 2010 file format.
Note that converting a file may cause some changes to the original layout of the presentation.
- Click the File tab to access Backstage view.

- The presentation will be converted to the newest file type.
- Open PowerPoint 2010 on your computer. A new blank presentation will appear on the screen.
- Try minimizing and maximizing the Ribbon.
- Click through all of the tabs , and notice how the Ribbon options change.
- Try switching page views .
- Add any commands you want to the Quick Access toolbar .
- Close PowerPoint without saving the presentation.
/en/powerpoint2010/slide-basics/content/
How-To Geek
How to add a video to a microsoft powerpoint presentation.
If a picture speaks a thousand words, a video speaks a million words!
Quick Links
Embedding videos versus linking to videos, supported video formats in powerpoint, how to insert a video into a powerpoint presentation, manage an embedded video's playback in powerpoint.
Videos can make presentations even more interesting or exciting. If you're looking to add a video to your Microsoft PowerPoint presentation, it's easy to do so. We'll show you how.
In PowerPoint, you can either embed a video or link to a video from your presentation. If you embed a video, your video becomes part of the presentation, which increases the overall size of the presentation file.
Related: How to Send PowerPoint Presentations With an Embedded Video
If you link to a video, PowerPoint only adds a reference to that video in your presentation. The downside of this method is that you need to send the video file separately if you share your presentation with someone. We have written a guide on how to send PowerPoint presentations with videos , so check that out.
In this guide, we'll focus on embedding a video in your presentation so you don't have to worry about sending separate files. And, if you're looking to add a YouTube video to your presentation , there's a way to do that, too.
Related: How to Embed a YouTube Video in PowerPoint
PowerPoint supports multiple video formats, including ASF, AVI, MP4, M4V, MOV, MPG, MPEG, and WMV. If your video is already in one of these formats, you can quickly add that to your presentation.
If your video is in another format, you can convert it to a supported format and then add it to your presentation.
Related: How to Use Handbrake to Convert Any Video File to Any Format
First, make sure the video you want to add to your presentation is saved on your Windows or Mac computer. Then, open your presentation with PowerPoint on your computer.
On the PowerPoint window, in the left sidebar, click the slide in which you want to add a video.
At the top of the PowerPoint window, click the "Insert" tab.
In the "Insert" tab, under the "Media" section (which is to the extreme right side of the interface), click "Video."
You'll now see an "Insert Video From" menu. Here, select "This Device."
Your computer's standard "open" window will open. In this window, access the folder that has your video file. Then double-click your video file to add it to your presentation.
You'll see your selected video in your presentation. To resize this video, click it and use the handles around the video to change its size. Then drag the video to place it at its desired location in your slide.
If you'd like to test the video, at the bottom-left corner of the video, click the play icon.
And you're all set.
Now that you have added a video to your presentation, you might want to change how it plays in your slides. In PowerPoint, you have multiple ways to change your video's playback.
To access these playback options, first, click your video in your presentation. Then, at the top of the PowerPoint window, click "Playback."
In the "Playback" tab, under the "Video Options" section, you will find various options to manage your video's playback.
For example, to change how your video starts to play in your presentation, click the "Start" drop-down menu and select one of these options:
- In Click Sequence : This plays your video in the click sequence. This means if you press the button for the next slide, your video will play.
- Automatically : This option automatically plays your video when the slide with your video opens.
- When Clicked On : Select this option to play your video only when you click it.
The other options are "Play Full Screen," which opens your video in full screen, and "Loop Until Stopped" that plays your video over and over again until you manually stop it.
Before you close PowerPoint, make sure you save your presentation so that your embedded video is saved with it. Do this by clicking File > Save in PowerPoint's menu bar.
And that's how you make your PowerPoint presentations even more engaging by including videos in them. Exciting!
If you don't want to add a video but you do want audio, you can add music to your presentations . This also helps enhance your presentation quality.
Related: How to Add Music to Your PowerPoint Presentation
- PRO Courses Guides New Tech Help Pro Expert Videos About wikiHow Pro Upgrade Sign In
- EDIT Edit this Article
- EXPLORE Tech Help Pro About Us Random Article Quizzes Request a New Article Community Dashboard This Or That Game Popular Categories Arts and Entertainment Artwork Books Movies Computers and Electronics Computers Phone Skills Technology Hacks Health Men's Health Mental Health Women's Health Relationships Dating Love Relationship Issues Hobbies and Crafts Crafts Drawing Games Education & Communication Communication Skills Personal Development Studying Personal Care and Style Fashion Hair Care Personal Hygiene Youth Personal Care School Stuff Dating All Categories Arts and Entertainment Finance and Business Home and Garden Relationship Quizzes Cars & Other Vehicles Food and Entertaining Personal Care and Style Sports and Fitness Computers and Electronics Health Pets and Animals Travel Education & Communication Hobbies and Crafts Philosophy and Religion Work World Family Life Holidays and Traditions Relationships Youth
- Browse Articles
- Learn Something New
- Quizzes Hot
- This Or That Game
- Train Your Brain
- Explore More
- Support wikiHow
- About wikiHow
- Log in / Sign up
- Computers and Electronics
- Presentation Software
- PowerPoint Insertions
5 Ways to Embed a Video File in Microsoft PowerPoint
Last Updated: March 27, 2024 Fact Checked
Embedding a Web Video
Embedding a video file, embedding a stock video, using android, linking movie files (powerpoint 2007).
This article was co-authored by Mitch Harris and by wikiHow staff writer, Rain Kengly . Mitch Harris is a Consumer Technology Expert based in the San Francisco Bay Area. Mitch runs his own IT Consulting company called Mitch the Geek, helping individuals and businesses with home office technology, data security, remote support, and cybersecurity compliance. Mitch earned a BS in Psychology, English, and Physics and graduated Cum Laude from Northern Arizona University. This article has been fact-checked, ensuring the accuracy of any cited facts and confirming the authority of its sources. This article has been viewed 1,130,304 times.
If you want to spruce up your PowerPoint presentations, you can add a video to your slides. If you have a video file on your computer, you can easily embed it into your presentation. You can also embed YouTube videos, use looping stock videos, or, on older versions of PowerPoint, link to the videos. This wikiHow will show you how to add a video to Microsoft PowerPoint using your Windows, Mac, or Android device.
Things You Should Know
- Copy a YouTube URL. In PowerPoint, click "Insert' → "Video" → "Online Videos/Movie". Paste the URL and click "Insert".
- To embed a video file, click "Insert" → "Video" → "This Device" → select a file → "Insert".
- To use a stock video, click "Insert" → "Video" → "Stock Videos" → select a video → "Insert".

- You must have a subscription to use Office 365 . [1] X Trustworthy Source Microsoft Support Technical support and product information from Microsoft. Go to source
- Adding a video to your PowerPoint can help you make a great presentation .

- You can insert a video from supported websites such as: YouTube, SlideShare, Vimeo, Microsoft Stream, and Flip.

- On Mac, this will look like Online Movie .

- You'll see a preview of the video.

- To adjust when the video plays, click the drop-down menu next to Start: . Select In Click Sequence , Automatically , or When Clicked On .
- Check the boxes to apply any of the following: Play Full Screen , Hide While Not Playing , Loop until Stopped , and/or Rewind after Playing .
- Click Volume to adjust the video's volume. Select Low , Medium , High , or Mute .

- Select the web video and click the Video Format tab.
- Click Poster Frame on the left of the toolbar.
- Click Image from File… .
- Select From a File , Stock Images , Online Pictures , or From Icons .
- Select the image source from the chosen method, and then click Insert .

- Stock videos work best as a background graphic to your PowerPoint text, since these videos loop seamlessly

- The stock video will be added to your slide. By default, it will cover the entire slide.

- PowerPoint is available for Android in the Google Play Store .

- The menu will open.

- If you want to take a video using your camera, tap Open Camera instead.
- The video file will be added to your PowerPoint.

- Videos can only be "embedded" (included in the presentation file itself) in PowerPoint 2010 or newer.

- Click the Office button and select "Publish."
- Select "Package for CD" and then select your presentation.
- Ensure that "Linked files" is selected in the "Options" menu.
Community Q&A
You Might Also Like

- ↑ https://support.microsoft.com/en-us/office/insert-a-video-from-youtube-or-another-site-8340ec69-4cee-4fe1-ab96-4849154bc6db#OfficeVersion=Windows
- ↑ https://support.microsoft.com/en-us/office/insert-audio-or-video-in-powerpoint-for-android-95e0a2af-35fb-405a-8536-cdcd934f659a
- ↑ https://support.office.com/en-us/article/My-movie-doesn-t-play-190cf574-183d-4b7f-b627-3783a14b7b07?ui=en-US&rs=en-US&ad=US
- ↑ https://support.office.com/en-us/article/Add-and-play-a-movie-in-a-presentation-f3fcbd3e-5f86-4320-8aea-31bff480ed02
About This Article

1. Open the slide. 2. Click Insert . 3. Click Movie . 4. Click Movie from File or Video on my PC . 5. Select the video and click OK . 6. Click Playback . 7. Choose how to play the video. 8. Save your presentation. Did this summary help you? Yes No
- Send fan mail to authors
Reader Success Stories
Rjan Berglund
May 26, 2017
Is this article up to date?
Jun 20, 2017
Nov 7, 2016
Jul 27, 2016

Featured Articles

Trending Articles

Watch Articles

- Terms of Use
- Privacy Policy
- Do Not Sell or Share My Info
- Not Selling Info
Keep up with tech in just 5 minutes a week!
Search for: Search Button
- PowerPoint video audio compression tricks and traps
PowerPoint offers compression embedded video and audio files, reducing the overall file size. But these options aren’t where you might expect to find them, aren’t selective and need to be used with care.
Three media size compress options explained
Beware compression, all video/audio or nothing, how much space is used.
There is compression option for media files (video or audio) to a suitable quality level and make it compact. This feature will not only help you in improving the video/audio playback performance but will also save disk space.
You’d expect compress options to appear on the special ribbon tabs like Video Format or Playback or audio tools, but they’re not. Instead go to File | Info | Media Size and Performance.
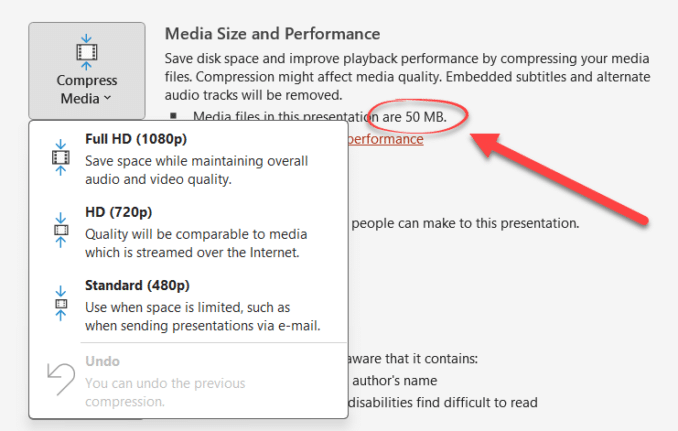
This is a PowerPoint feature that hasn’t changed in many years. Here’s the same options in PowerPoint 2010 where the only change is the labels on the three choices were less specific.
Here you have three options to compress the media file:
- Full HD (1080p) / Presentation Quality – This helps in saving space while at the same time maintaining the overall audio and video quality. Use this for big screen presentations that you want to appear at their best. Keep in mind that higher quality video needs a more powerful computer to playback smoothly and well.
- HD (720p) / Internet Quality – Here the quality of the video after compression will be comparable to the video which is mostly streamed over the internet. It’s enough for most situations including online events.
- Standard (480p) / Low Quality – This option as the name suggests produces video of low quality hence can be used when file size is more important than video quality. Since Internet connections and online storage are so much better these days, it’s not as commonly used as it once was.
The compression options will not only reduce the quality of video it will also remove any cropped/edited parts of the video.
It will also remove subtitles linked to a video and also alternate audio tracks on a video file (e.g multiple languages).
ONLY compress media in a presentation if you have an original video/audio saved separately, either in another version of the presentation or as separate media files. I always keep original / best resolution videos safely separate from anything in a PPTX file — just in case.
These compression options apply to all the media in a presentation. There’s no option to compress some files (e.g. higher quality video or audio) leaving other media unchanged.
To selectively compress media files you have to edit them separately then import into PowerPoint in the smaller form.
A PowerPoint presentation file (PPTX etc) can get much bigger when audio and especially video is added. You can see how much extra space is used from File | Info | Media Size and Performance and look for the little bullet-point item.

In this case, a single video has expanded a presentation file from a mere 5MB to 55MB! Not a lot by modern standards but still a big increase.
Choosing HD (720p) shrunk that video down by more than 40MB

PowerPoint shows the new size (50MB down to 8.8MB) and has the option to Undo the change.

Undo compression
You also have the option to revert back to the original file after compressing it. For this click on “Undo” option. While Undo is handy, we suggest you keep the original full resolution video/presentation and compress a copy.
When you choose any one of the above mentioned compression options, “Compress Media” window pops open which will show the status of the compression in progress.
- PowerPoint Photo Album
- Record Narration and Timings to PowerPoint
- Making PowerPoint files smaller
About this author

Office-Watch.com
Office 2021 - all you need to know . Facts & prices for the new Microsoft Office. Do you need it? Office LTSC is the enterprise licence version of Office 2021.
Office 2024 what's known so far plus educated guesses. Microsoft Office upcoming support end date checklist.
Latest from Office Watch
- Paste Text Only gets a Word shortcut and confusion
- Try a faster Microsoft 365 secure login
- Use free Copilot to summarize Word documents
- Ear 👂 symbol in Word, Excel, PowerPoint and Outlook
- Great image Resize options now in Windows
- Making pictures smaller - some more options.
- Use the Force with your PowerPoint & online backgrounds
- Star Wars look in Word and PowerPoint
- Happy Star Wars Day - with Microsoft Office
- How to save an Outlook attachment without knowing it
- Two ways to pay for Copilot with Microsoft Office
- PowerPoint trim video reaches the web
- What is ‘grounding’ in Copilot?
- Import EML MSG and OFT files with Outlook (new)
- The Outlook setting everyone should check
- Microsoft Teams is changing its name to … Teams
- In person vs virtual event option in Outlook
- Tag your In-person events in Outlook
- Generative ‘Smart’ Erase returns to Designer
- Add, change, or remove transitions between slides Article
- Animate text or objects Article
- Use the Morph transition in PowerPoint Article
- Insert a video from YouTube or another site Article
- Add or delete audio in your PowerPoint presentation Article
- Record your screen in PowerPoint Article

Record your screen in PowerPoint
You can record your computer screen and related audio, and then embed it in your PowerPoint slide—or you can save it as a separate file.

Open the slide that you want to put the screen recording on.
On the Insert tab of the ribbon, select Screen Recording .

Tip: PowerPoint automatically records the audio and the mouse pointer, so by default those options are selected on the control dock. To turn them off, deselect Audio and Record Pointer.
Select Record . Use Pause as needed and Stop when you're done.
Note: Unless you pin the Control Dock to the screen, it will slide up into the margin while you record. To make the unpinned Control Dock reappear, point the mouse cursor at the top of the screen.
Your video is added to the slide. Right-click the video frame, select the Start icon and pick how you want your video to start: In Click Sequence , Automatically , or When Clicked On .
You can change the look of the video by right-clicking the video frame, select the Style icon, and pick another shape.
Save your screen recording as a separate file
Right-click the video frame and select Save Media as .
In the Save Media as box, choose a folder, and in the File name box, type a name.
Select Save.
Trim your video
Right-click the video frame and select Trim .
To determine where you want to trim your video footage, in the Trim Video box, select Play .
When you reach the point where you want to make the cut, select Pause . Use the Next Frame and Previous Frame buttons to specify precise timing.
Do one or more of the following:
To trim the beginning of the clip, select the start point (shown in the image below as a green marker). When you see the two-headed arrow, drag the arrow to the desired starting position for the video.

To trim the end of the clip, click the end point (shown in the image above as a red marker). When you see the two-headed arrow, drag the arrow to the desired ending position for the video.
Select OK .

Need more help?
Want more options.
Explore subscription benefits, browse training courses, learn how to secure your device, and more.

Microsoft 365 subscription benefits

Microsoft 365 training

Microsoft security

Accessibility center
Communities help you ask and answer questions, give feedback, and hear from experts with rich knowledge.

Ask the Microsoft Community

Microsoft Tech Community

Windows Insiders
Microsoft 365 Insiders
Was this information helpful?
Thank you for your feedback.
Purdue Online Writing Lab Purdue OWL® College of Liberal Arts
Welcome to the Purdue Online Writing Lab

Welcome to the Purdue OWL
This page is brought to you by the OWL at Purdue University. When printing this page, you must include the entire legal notice.
Copyright ©1995-2018 by The Writing Lab & The OWL at Purdue and Purdue University. All rights reserved. This material may not be published, reproduced, broadcast, rewritten, or redistributed without permission. Use of this site constitutes acceptance of our terms and conditions of fair use.
The Online Writing Lab at Purdue University houses writing resources and instructional material, and we provide these as a free service of the Writing Lab at Purdue. Students, members of the community, and users worldwide will find information to assist with many writing projects. Teachers and trainers may use this material for in-class and out-of-class instruction.
The Purdue On-Campus Writing Lab and Purdue Online Writing Lab assist clients in their development as writers—no matter what their skill level—with on-campus consultations, online participation, and community engagement. The Purdue Writing Lab serves the Purdue, West Lafayette, campus and coordinates with local literacy initiatives. The Purdue OWL offers global support through online reference materials and services.
A Message From the Assistant Director of Content Development
The Purdue OWL® is committed to supporting students, instructors, and writers by offering a wide range of resources that are developed and revised with them in mind. To do this, the OWL team is always exploring possibilties for a better design, allowing accessibility and user experience to guide our process. As the OWL undergoes some changes, we welcome your feedback and suggestions by email at any time.
Please don't hesitate to contact us via our contact page if you have any questions or comments.
All the best,
Social Media
Facebook twitter.
IMAGES
VIDEO
COMMENTS
On the File menu, select Save to ensure all your recent work has been saved in PowerPoint presentation format (.pptx). Select File > Export > Create a Video. (Or, on the Recording tab of the ribbon, select Export to Video .) In the first drop-down box under the Create a Video heading, select the video quality you want, which pertains to the ...
To turn a PowerPoint presentation into a video, first, open your presentation with the PowerPoint app on your Windows or Mac computer. In the top-left corner of PowerPoint, click the "File" option. From the sidebar that opens after clicking the "File" option, select "Export." In the "Export" menu, click "Create a Video."
Learn how to publish your own video using Microsoft PowerPoint with narration, annotations, animations, and timings. As full disclosure, I work at Microsoft ...
Choose the option Create a Video at the very bottom of the right-hand side of the screen. 3. Find the Create a Video tab if you want to see the available video quality options. 4. Click on the downward-pointing arrow next to the Computer & HD Displays option and choose from the three available options.
After you've created your Presentation click on File to access Backstage view. Then click on Save & Send. Now under the File Types section select Create a Video. Now choose the size of the video, whether to use recorded narrations for the presentation, seconds to spend on each slide, the click Create Video. Select a location to save the video.
Step 1: Double-click your Powerpoint 2010 slideshow to open it. Step 2: Click the File tab at the top-left corner of the window. Step 3: Click Save & Send in the column at the left side of the window. Step 4: Click the Create a Video button under File Types at the center of the window. Step 5: Click the Computer & HD Displays drop-down menu at ...
Under the Save & Send menu, find and click on Create a Video. Click on the Computer & HD Displays option to customise the video size and quality (small, medium and large size & quality). Click the Don't Use Recorded Timings and Narrations to select if you're using timings and narrations. Click Create Video and another dialogue box opens.
Want all of our free Powerpoint videos? Download our free iPad app at http://itunes.apple.com/us/app/video-training-courses-from/id418130423?mt=8http://www.i...
One of the new features in PowerPoint 2010 helps you convert Powerpoint presentations to video with just a click. Here are the steps that start with a normal presentation file. After creating a presentation, select the File tab from the ribbon. Click on Save and Send - Create a Video under File Types. A few optional settings help to further ...
Click the Create Video command. The Save As dialog box will appear. Select the location where you want to save the presentation, then enter a name for the presentation. Saving the video. Click Save. A status bar will appear in the bottom-right corner of the PowerPoint window as PowerPoint creates your video.
To create a new blank presentation: Click the File tab. This takes you to Backstage view. Select New. Select Blank presentation under Available Templates and Themes. It will be highlighted by default. Click Create. A new blank presentation appears in the PowerPoint window. Creating a new presentation.
On the PowerPoint window, in the left sidebar, click the slide in which you want to add a video. At the top of the PowerPoint window, click the "Insert" tab. In the "Insert" tab, under the "Media" section (which is to the extreme right side of the interface), click "Video." You'll now see an "Insert Video From" menu.
Adjust the playback settings. Select the video and click the Playback tab. You'll be able to edit how your video plays on the slide. To adjust when the video plays, click the drop-down menu next to Start:.Select In Click Sequence, Automatically, or When Clicked On.; Check the boxes to apply any of the following: Play Full Screen, Hide While Not Playing, Loop until Stopped, and/or Rewind after ...
This is part 12 of the series of tutorials on PowerPoint 2016. In this video we will learn how to create a video from a PowerPoint presentation. For more in...
Three media size compress options explained. Here you have three options to compress the media file: Full HD (1080p) / Presentation Quality - This helps in saving space while at the same time maintaining the overall audio and video quality. Use this for big screen presentations that you want to appear at their best.
In this video, you'll learn more about creating presentations in PowerPoint 2010. Visit https://www.gcflearnfree.org/powerpoint2010/getting-started-with-powe...
Open the slide that you want to put the screen recording on. On the Insert tab of the ribbon, select Screen Recording. On the Control Dock, choose Select Area (or if you want to select the entire screen for recording, press Windows logo key+Shift+F). You'll see the cross-haired cursor . Select and drag to select the area of the screen you want ...
Teachers and trainers may use this material for in-class and out-of-class instruction. Mission The Purdue On-Campus Writing Lab and Purdue Online Writing Lab assist clients in their development as writers—no matter what their skill level—with on-campus consultations, online participation, and community engagement.
This tutorial will show you how to create a basic presentation with slide transitions and animations then save it as a PowerPoint show.
Part 1. How to Put Video Behind Text in PowerPoint. Enhancing your presentations with integrated video and text can significantly elevate their impact. PowerPoint simplifies this process with its Merge Shapes feature, which allows you to seamlessly incorporate video behind your text within slides. Follow these steps to achieve this effect ...
Best practices for creating PowerPoint presentations have changed dramatically over the past two versions. From themes and customizable layouts in Office 200...