

Set the 'play' options for a video in your presentation
You can use the playback options in PowerPoint to control how and when a video appears in your presentation. You can play a video in full screen mode or resize it to dimensions that you specify. You can also control the volume, play the video repeatedly (in a loop), and show the media controls.
These Play options aren't available for online videos, such as YouTube videos. They are only available for videos inserted from your computer, network, or OneDrive.
To control how your video plays, use options on the Playback tab of the PowerPoint ribbon. This tab appears on the ribbon when a video is selected on a slide.

(These options for a video are available after you embed or link to a video file from your computer .)
Play a video in the click sequence, automatically, or when clicked
Important: Set this option before adding any animations or triggers to your video. By changing this option, you will remove any animations that are associated with your video.
In Normal view, click the video frame on the slide.
On the Playback tab, in the Video Options group, from the Start list, select an option:

Tip: While a video is playing, you can pause it by clicking it. To resume playing the video, click it again.
Play a video full screen
You can play a video so that it fills the entire slide (screen) when you deliver your presentation. Depending on the resolution of your original video file, it might appear distorted when you enlarge it. Always preview your video before you include it in your presentation so that if the video appears distorted or blurry, you can undo the full screen option.
If you set the video to be displayed full screen and it is also set to start automatically, you can drag the video frame off the slide into the gray area so that it will not be visible on the slide or flash briefly before the video goes to full screen.
In Normal view, click the video frame on the slide that you want to play full screen.
Under Video Tools , on the Playback tab, in the Video Options group, select the Play Full Screen check box.
Resize a video
If you don't want to play a movie full screen, you can resize it to the dimensions that you want.
In Normal view, select the video that you want to resize.
Do one of the following:
To adjust the formatting:
Click a corner sizing handle until you see a two-headed arrow, and then drag to size the frame.

To keep the center of the video in the same place, hold down Ctrl while dragging. By default, this maintains the proportions (locks the aspect ratio) of the video as you drag.
Typically, most videos with a 640 x 480 resolution have a 4:3 aspect ratio, which is also the default aspect ratio for PowerPoint 2010 presentations. The default aspect ratio for presentations in PowerPoint 2013 and newer versions is 16:9. If the aspect ratios of the presentation and the video differ, your video will look distorted when it plays.
To specify precise height-to-width proportions of a video:
Click Size , and then under Scale , select the Lock aspect ratio check box.
Under Size and rotate , enter sizes in the Height and Width boxes, or under Scale , in the Scale Height and Scale Width boxes, enter the percentage of size that you want, relative to the video's original size.
Tip: To prevent videos from skipping when they are played, under Scale , select the Best scale for slide show check box.
Preview a video
In Normal view, click the video frame.
Click Play .
There is also a Play option in the Preview group, on both the Format and Playback tabs, under Video Tools .
Set the volume of a video
Under Video Tools , on the Playback tab, in the Video Options group, click Volume , and then choose one of the following:
Tip: You can also set the volume by using the volume slider on the play control bar.
Hide a video when not playing
While delivering your presentation, you can hide your video until you are ready to play it. However, you should create an automatic or triggered animation to initiate playback or you will never see the video play during the slideshow. For more information about creating an automatic or triggered animation, see Animate text or objects .
Under Video Tools , on the Playback tab, in the Video Options group, select the Hide While Not Playing check box.
Loop a video
To play your video repeatedly and continuously during your presentation, you can use the loop feature.
Under Video Tools , on the Playback tab, in the Video Options group, select the Loop until Stopped check box.
Rewind a video after playing
To rewind your video after playing during your presentation, do the following:
Under Video Tools , on the Playback tab, in the Video Options group, select the Rewind after Playing check box.
Show the media controls
To show the media controls during your presentation, do the following:
On the Slide Show tab, in the Set up group, select the Show Media Controls check box.

Play a video automatically or when clicked
Tip: Set this option before adding any animations or triggers to your video. Changing this option removes any animations that are associated with your video.

Figure: Specify how you want your video to start during your presentation
Under Video Tools , on the Playback tab, in the Video Options group, in the Start list, do one of the following:
To play your video when the slide containing the video appears in Slide Show view, select Automatically .
To control when you want to start the video by clicking the mouse, select On Click . (Then, when you're presenting in Slide Show view, you'll simply click the video frame when you're ready to play the video.)
Create a self-running presentation
Turn your presentation into a video
Add and play sounds in a presentation
Set the timing and speed of a transition

Need more help?
Want more options.
Explore subscription benefits, browse training courses, learn how to secure your device, and more.

Microsoft 365 subscription benefits

Microsoft 365 training

Microsoft security

Accessibility center
Communities help you ask and answer questions, give feedback, and hear from experts with rich knowledge.

Ask the Microsoft Community

Microsoft Tech Community

Windows Insiders
Microsoft 365 Insiders
Was this information helpful?
Thank you for your feedback.

PowerPoint Keyboard Shortcuts to Play and Control Video During a Slide Show

Use These PowerPoint Keyboard Shortcuts to Play, Pause and Control Videos During a Presentation
by Avantix Learning Team | Updated September 14, 2023
Applies to: Microsoft ® PowerPoint ® 2013, 2016, 2019, 2021 and 365 (Windows)
You can use these useful PowerPoint keyboard shortcuts when you are running a slide show to play, pause, restart and control videos during a slide show.
Recommended article: 50 PowerPoint Slide Show Shortcuts
Do you want to learn more about PowerPoint? Check out our virtual classroom or live classroom PowerPoint courses >
Run a slide show
In Normal View or Slide Sorter View, to start a slide show from the beginning, press F5. To start a slide show from the current slide, press Shift + F5.
Play a video during a slide show
To start a video (assuming it is not set to start automatically), press Alt + P or Ctrl + spacebar.
Pause or stop a video during a slide show
To stop video playback, press Alt + Q.
To toggle between play and pause, press Alt + P.
Jump to a bookmark in a video during a slide show
To go to the next bookmark in a video, press Alt + End.
To go to the previous bookmark in a video, press Alt + Home.
Seek forward or backward
To seek forward 3 seconds, press Alt + Shift + Page down.
To seek backward 3 seconds, press Alt + Shift + Page up.
To seek forward 0.25 seconds, then pause, press Alt + Shift + right arrow
To seek backward 0.25 seconds, then pause, press Alt + Shift + left arrow
Control the volume of a video during a slide show
To increase the volume, press Alt + up arrow.
To decrease the volume, press Alt + down arrow.
To mute the sound, press Alt + U.
Show or hide the audio and subtitles menu
To toggle the audio and subtitles menu, press Alt + J.
You can show or hide the audio and subtitles menu for videos that have multiple audio tracks and/or subtitle tracks in supported formats.
Be sure to practice these shortcuts before running the presentation for a seamless show.
Subscribe to get more articles like this one
Did you find this article helpful? If you would like to receive new articles, JOIN our email list
More resources
How to Embed a YouTube Video in PowerPoint
How to Insert Video in PowerPoint (from a File on Your PC or a Shared Drive)
A Beginner's Guide to Video Formats in PowerPoint
Related courses
Microsoft PowerPoint: Introduction
Microsoft PowerPoint: Intermediate / Advanced
Microsoft PowerPoint: Design for Non-Designers
Microsoft PowerPoint: Accessible PowerPoint Presentations
Microsoft PowerPoint: Animations Bootcamp
VIEW MORE COURSES >
Our instructor-led courses are delivered in virtual classroom format or at our downtown Toronto location at 18 King Street East, Suite 1400, Toronto, Ontario, Canada (some in-person classroom courses may also be delivered at an alternate downtown Toronto location). Contact us at [email protected] if you'd like to arrange custom instructor-led virtual classroom or onsite training on a date that's convenient for you.
Copyright 2024 Avantix ® Learning
You may also like

How to Insert or Type E with an Accent Mark in PowerPoint (È, É, Ê, Ë, è, é, ê, or ë)
You can insert or type e with an accent mark in PowerPoint using built-in tools or keyboard shortcuts (including Alt code shortcuts). The letter e can be inserted with an accent in both upper or lower case in text boxes or placeholders on slides, the slide master or layouts. The following are common accents in upper or lower case – È, É, Ê, Ë, è, é, ê, or ë.

How to Fade a Picture or Part of a Picture in PowerPoint (Using a Gradient)
You can fade a picture in PowerPoint by drawing a rectangle shape on top of the picture and then filling the rectangle with a gradient from opaque to transparent. This technique is often used to fade an image into the background of a slide. Since the rectangle is placed on top of the image and then text may be placed on top of the rectangle, you may need to reorder the objects.

How to Lock an Image, Shape or Other Object in PowerPoint
You can now lock an image, shape or other object in PowerPoint. Objects can be locked in Normal View or Slide Master View. Only PowerPoint 365 users can lock objects to prevent moving and resizing. This is helpful if you want to select and move other objects on the slide or prevent others from moving or resizing an object. You can lock items using the context menu or the Selection Pane.
MORE POWERPOINT ARTICLES >
Microsoft, the Microsoft logo, Microsoft Office and related Microsoft applications and logos are registered trademarks of Microsoft Corporation in Canada, US and other countries. All other trademarks are the property of the registered owners.
Avantix Learning |18 King Street East, Suite 1400, Toronto, Ontario, Canada M5C 1C4 | Contact us at [email protected]

Our Courses
Avantix Learning courses are offered online in virtual classroom format or as in-person classroom training. Our hands-on, instructor-led courses are available both as public scheduled courses or on demand as a custom training solution.
All Avantix Learning courses include a comprehensive course manual including tips, tricks and shortcuts as well as sample and exercise files.
VIEW COURSES >
Contact us at [email protected] for more information about any of our courses or to arrange custom training.
Privacy Overview
Pin it on pinterest.
- Print Friendly
- Slidesgo School
- PowerPoint Tutorials
How to Use the Presentation Modes and the Screen Recording Features in PowerPoint

After designing all the slides for your presentation, the next and last step is presenting in front of your audience. In this new Slidesgo School tutorial, you’ll see how the presenter view works and how you can record your presentation .
Presentation Modes
Presentation modes — set up slide show, presentation modes — record slide show.
- There are different presentation modes in PowerPoint, besides the one you can find at the bottom of the screen.
- To access the presentation modes, go to the Slide Show tab.
- The first two options allow you to start the presentation from the beginning or from the currently selected slide.

- If you choose Present Online, an URL will be generated, which you can then share with your potential online viewers. After clicking this button, a new window will open, displaying info about the Microsoft Office online presentation service and a checkbox to enable remote download for your online audience. To enjoy this service, you need an Office 365 account. When you’re ready, click Connect to generate the URL.
- If you choose Custom Slide Show, you can select which slides to display in your presentation. First, create a new custom slide show and select the slides that you want to display. Then, click Add, enter the name of the presentation and click OK. This new custom presentation will appear on the list. Select it and click Show to begin the presentation.
- In the Set Up group you’ll find options to set up the presentation, hide slides, rehearse your presentation and even record it.
- Click Set Up Slide Show to adjust several settings regarding your presentation. You’ll find more information in the next section of this tutorial .
- If you click Hide Slide, the selected slide won’t show up during your presentation. Hidden slides will appear faded out on the list and their numbers will be crossed out.
- If you click Record Slide Show, you’ll be able to record your presentation from the beginning or from the current slide. We’ll go into detail in the last section of this tutorial.
- There are several checkboxes regarding whether to play narrations, use timings and show media controls.

- In the Monitors group you can choose which screen to display your presentation.
- The last group, Captions & Subtitles, is only available in Office 365. You’ll find options to enable subtitles, which will be generated out of your speech (so you’ll need to have a mic). There are settings to change the language and the position of the subtitles.
- Open your presentation in PowerPoint.
- Go to the Slide Show tab.
- In the Set Up group, click Set Up Slide Show. A new window will open, where you’ll find several options.
- In the top-left corner, under “Show type”, you can choose whether the presentation will be in fullscreen with speaker notes, windowed, or in fullscreen without speaker notes or the menu bar.

- Under “Show options” you can choose whether to show the presentation without narration or animations, or disable the hardware graphics acceleration (for better performance). You can also set the pen and laser pointer color.

- Under “Show slides”, you can choose which slides to show in your presentation. You can select all of them, a specific range or a custom slideshow.
- There are other settings to determine how to advance slides (manually or using timings), what the resolution will be and whether to use the presenter view.
- Click Record Slide Show. From the drop-down menu, select From the Current Slide or From the Beginning.
- A new window will open, along with the presentation in fullscreen mode. At the top-left you’ll find a button to start recording.
Do you find this article useful?
Related tutorials.

How to Use the Presenter View in Google Slides
Google Slides, like PowerPoint, has different presentation modes that can come in handy when you’re presenting and you want your slideshow to look smooth. Whether you’re looking for slides only, speaker notes or the Q&A feature, in this new Google Slides tutorial, you’ll learn about these and their respective settings. Ready? Then let’s explore the presenter view!

How to Download Google Slides Templates
When preparing a presentation, many people start panicking because they realize how much time it will take to edit each and every slide. Creating them from scratch, filling them in, looking for pictures, moving the elements...How stressful! But there is a solution that saves you a lot of time. We're sure that you've browsed the internet for templates, or basically, pre-established designs and elements, that can be downloaded for free and can be edited to your liking. Are we right? Then, we have some good news for you!

Discover our collection of printable templates
With the advance of technology, printing has become something that is no longer a necessity. Smartphones have made the paper format less and less frequent, but there are still certain cases in which having physical resources is much more convenient. Whether it's for taking notes, handing out assignments, making worksheets or handing out business cards or invitations, it's necessary to print your customized designs.From now on, in every Slidesgo printable presentation that you download, you will find the instructions for printing on the third slide. Depending on the style, colors or format of each presentation, we will tell you if you can...

How to Add Superscript and Subscript in Google Slides
Let’s take the most famous formula: E=mc^2, Einstein’s relativity equation. It wouldn’t be the same if it was E=mc2, right? Okay, yes, some people write it like that because it’s very famous and it won’t be misunderstood. But technically… It can! This is where the sophistication of superscript or subscript enters the room! Do you know how to write them in equations, copyright brands or even footnotes in your presentations? Let’s figure out how.
Convert video to any format
Record screen, webcam and sounds
Burn videos to DVD and Blu-ray
Blu-ray/DVD/4K video player
Edit videos with various options
Enhance video quality easily
Repair damaged video files
How to Play Video in PowerPoint + Ways to Fix Video Not Playing
PowerPoint is an excellent presentation program that enables users to make stunning projects. One of the great features of PowerPoint is the ability to insert videos into presentations. It offers two ways to add videos, from embedding a code from online sources and through saved videos in a folder. This post will teach you how to play videos in PowerPoint . Also, it will present some ways you need to do if you encounter your video is not playing. So what are you waiting for? Proceed to the following information.

PAGE CONTENT
Part 1. How to Play Video in PowerPoint
- Part 2. How to Make a Video Play Automatically in Powerpoint
Part 3. Why PowerPoint Video Not Playing and How to Fix
Part 4. best video player for windows & mac, part 5. faqs about playing videos in powerpoint.
This section will present a step-by-step process for playing videos using the program. It will assist you in playing a video from online sources and a saved video. Without further discussion, learn how to play the video in PowerPoint below.
1. For Online Videos
Step 1. To begin with, open PowerPoint using your desktop device. Once the program is opened, head to the Insert tab and select the Video button followed by Online Video .
Step 2. Insert window will appear on your screen. Here, add the link to the video you will use or want to add from online sources.
Step 3. A few minutes will be required to upload a video into the slide, which you can see on the left corner of your screen. It is also required to have a fast or stable connection to load the video quickly. Once done, you can play the video after a click or automatically based on your preferred method.

2. For Videos on PC
Step 1. Hit the Insert tab on the upper left corner of your screen. Next, select the Video button from the drop-down menu and pick Video on My PC , which is the option to add your video.
Step 2. The browser window will appear on your screen. The next thing you will do is search for the video you want to add or use. Once found it, click the Insert button to place your video on the slide.
Step 3. The video will be imported on the slide, with a playback menu, and can control the volume. If you want to play the video in full-screen mode, you can do that too. In addition, if you want to add another slide, head to the menu bar and click on the New Slide .

Part 2. How to Make a Video Play Automatically in PowerPoint
When you present your presentation, you may want your video to play automatically as soon as the slide appears. PowerPoint has a feature that enables users to play videos automatically once the slide, where the video is located, flashes on the screen. Do you want to know how this feature works? If so, we got your back, as we will teach you how to make a video play automatically in PowerPoint.
Step 1. Press on the video you want to auto-play. The video you selected will be highlighted with white marketing around the edges. If you cannot select the video by pressing it, it means the video was added with a master slide. To edit that, head to the top menu hit View , and then Slide Master . After that, look for the master slide with the video you want.
Step 2. With your chosen video, go to Video Format and then Playback , which will appear on the top menu bar, which is additional items.
Step 3. Under the Playback tab, look for the Start button, and a drop-down menu list will appear. From there, select the Automatically option, and your video will be automatically played when the slide is displayed on your screen.

You have created an impressive PowerPoint presentation, and you press F5 to test it before presenting it to your audience. Everything looks fine; however, PowerPoint cannot play the video you added or embedded. Most of the time, this issue happens because of using an unsupported video format or wrong settings. If you encounter the same problem, go through the solutions below to learn how to fix the PowerPoint video not playing issue.
1. Check Video Format
If you imported a video not supported by the program, the video cannot be played, or there is no audio. For instance, if your video file extension is . SWF ; this type of video file cannot be played on the program.
2. Redownload the Video
If your PowerPoint supports the video file format but still cannot play, there might be an issue with your video. You cannot play the video on the program for various reasons, such as corrupted storage location, missing specific files, etc.
3. Check PowerPoint Playback Settings
If you cannot find any problem with your video, you must proceed to check the PowerPoint playback settings. You can play the video automatically or wait to click it before it starts playing. With that, you must ensure the program is set to play the video according to your input mode or expectation.
4. Embed the Code for Youtube Videos
You need more than copying and pasting the link if you use a video from an online source, like Youtube. Instead, you must embed the video's code in your presentation.
5. Compress PowerPoint Media
If you are using a large video file, Powerpoint might have difficulty managing it. With that, consider compressing the video file you have added to your presentation. To do that, go to File , followed by Info , and then the Compress Media menu. You will see three options, which are Presentation quality/ Full HD (1080p) , Internet quality/ HD (720p) , and Low quality/ Standard (480p) .

You want to play your video without encountering a problem, without worrying if your video file is supported. Therefore, you must pick a program that provides the best viewing experience. Do you have in your mind what video player you will use? If so, we highly recommend Vidmore Player .
Free Download
Vidmore Player is a program that can play losslessly on Blu-ray or DVD, folders, ISO files, and several video formats. It supports Blu-ray disc types, such as B9-9, BD-25, BD-5, and more. It also supports popular audio and video formats, such as AVI, WMV, MP3, MOV, MPEG, MP3, and more. On top of that, it offers high-quality image playback and perfect sound processing.
You can also take a screenshot while viewing, which will be saved on your desktop folder. Besides that, you can adjust the video's volume according to your preference. Besides that, you can watch your video in different screen modes for a better viewing experience. In addition, you can add subtitles, modify effects, audio, and video track. Also, it offers customized options to control multimedia playback. Amazing, right?
Undoubtedly, Vidmore Player is the best program you can rely on to play videos without experiencing an issue.
- How to Record a PowerPoint Presentation with High Quality
- Plausible Ways to Trim Video in PowerPoint for Presentation
What are the supported video formats of PowerPoint?
The PowerPoint's suported video format are MP4, WMV, SWF, MPG, MPEG, AVI, and ASF.
What video format works best in PowerPoint?
The recommended video format for newer versions of PowerPoint is MP4 video format.
Is there a time limitation for videos inserted in PowerPoint?
Fortunately, there is no time limitation for videos in PowerPoint. However, you might experience a bit of lag if you use a long video.
What is the file size limit of PowerPoint videos?
The size limit for embedded videos is 50-100 megabytes, and for WAV files is 100 kilobytes.
How do I change the quality of a video in PowerPoint?
Head to File, Export, and then Create a video. After that, pick your desired quality, whether Ultra HD (4K), Full HD (1080p), and more.
Adding a video to your PowerPoint presentation is a nice touch that will make your project look more professional. However, users experienced some issues with PowerPoint videos not playing , and this post helped you resolve the problem. In addition, you can count on Vidmore Player to watch your videos without experiencing a problem. To have complete access to the program, remember to install it on your computer and get started.
Related Articles

Try Vidmore Player for Free
A universal media player for Blu-ray discs, DVDs, video files and music on Windows 11/10/8/7, Mac OS X 10.7 and higher
based on 137 user reviews

Other Languages
Select Your Language
- Video Converter
- Screen Recorder
- Vidmore Player
- DVD Creator
- Video Enhancer
- Video Editor
- Free Solutions
- Free Screen Recorder Online
- Free Video Converter Online
- Free Watermark Remover Online
- Free Background Remover Online
- Free Image Compressor Online
- Free Image Upscaler Online
- Support Center
PowerPoint Video Not Playing? Here’s How to Fix it Fast!
By: Author Shrot Katewa

It is annoying when you want to play a video during your presentation speech but PowerPoint just refuses to play the video! The video may either fail to work or display just the audio/video. There are actually several reasons why this could happen!
So, in this article, we will take a closer look at the various issues related to playing video in PowerPoint, and I will also provide you with a few quick solutions to each of the issues.
So, without further adieu, let’s get started!
1. Video Not Playing in Presentation Mode
Although Microsoft PowerPoint is one of the powerful presentation tools out there, it is not perfect. There may be more than a few reasons why video is not playing in the presentation mode of your PowerPoint.
The most common problem that users face is that the format of the media file is either not supported by PowerPoint, or the media file might have missing fragments, or the file may have a syncing issue, or the media file may just be corrupted.
In the following subsection, I will explain the possible solutions to a corrupted media file in your PowerPoint presentation.
1a. PowerPoint Video Cannot Play Media Error
There are two possible solutions to a corrupted file. You can either optimize the media compatibility or clear the temporary data on your Windows operating system. Both of the solutions are described below.
Optimizing media compatibility
Follow the simple steps given below to optimize the compatibility of the video file with your PowerPoint presentation.
Step-1: Go to “Info”
The first step of the process is to go to the “Info” section located in the “ File ” tab, which is the first tab in the ribbon of your PowerPoint window.
Step-2: Click on ‘Check Compatibility’
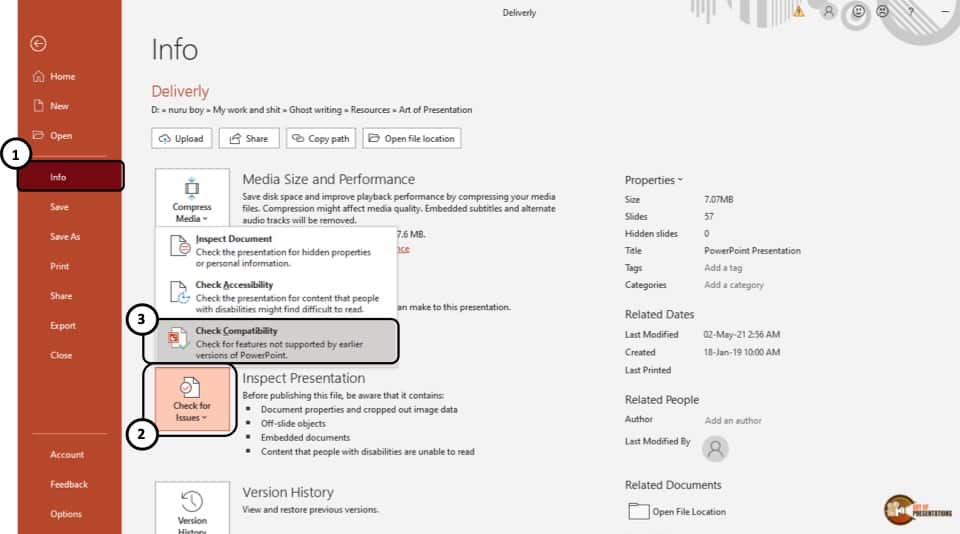
The next step is to click on the “ Check for issues ” button and select the “ Check compatibility ” option from the drop-down menu.
Step-3: Click on the “Ok” button
After you have selected the “ Check compatibility ” option, Microsoft PowerPoint will automatically detect the media files, report to you the issue with your video file, and try to fix it.
To finish optimizing the media file, click on the “ Ok ” button and the issue should be resolved.
Clearing the temporary files
Microsoft PowerPoint may fail to play your video files if there are too many temporary files on your Windows operating system. To clear these temporary files, follow the easy steps described below.
Step-1: Launch the “Run Prompt”
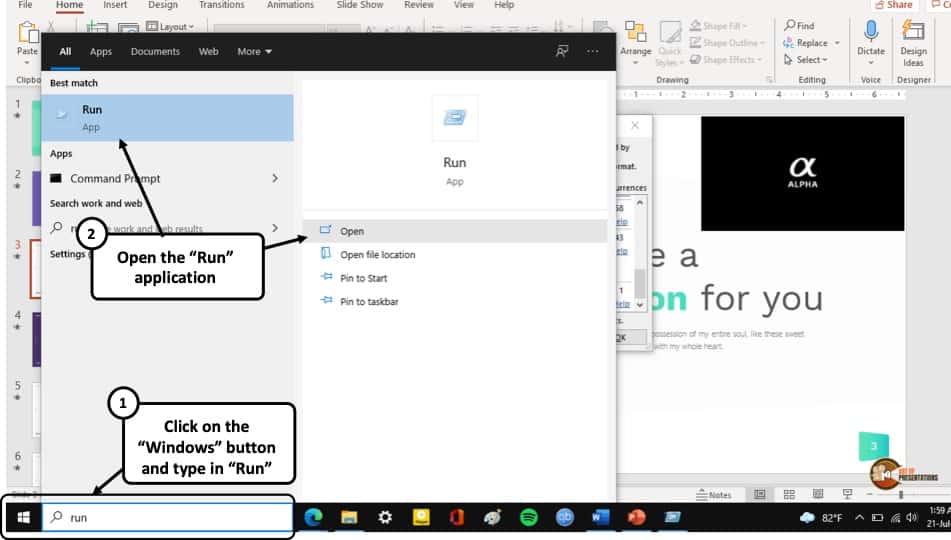
To being, go to the “ Start ” menu of your computer and launch the “ Run Prompt ”
Step-2: Type in the “%temp%” command
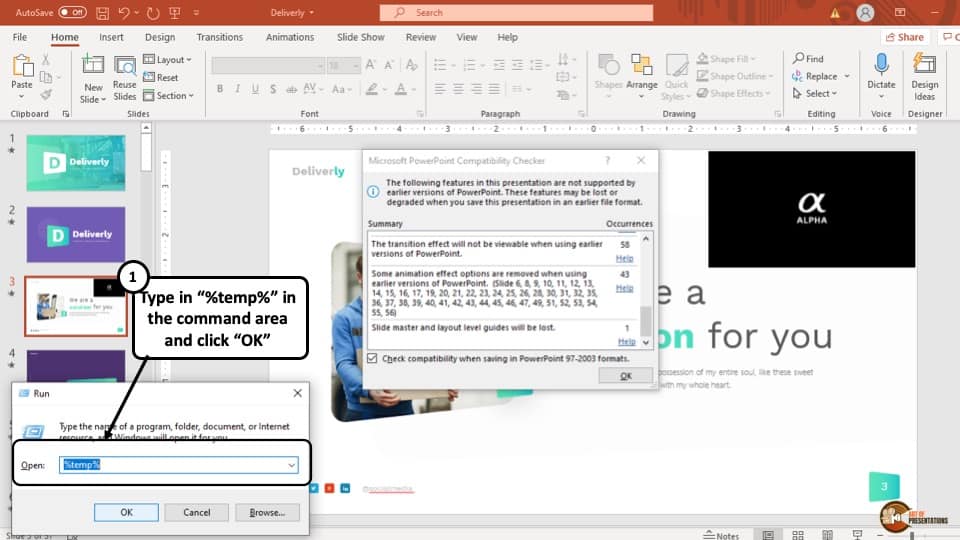
After you have launched the “ Run Prompt ”, type “%temp%” in the search box and hit the “ Ok ” button.
Step-3: Delete all the files
Once you have clicked on the “ Ok ” button, a new folder will open on your screen. This folder contains all the temporary files that are present on your computer.
Select all the files and delete them. Skip the files that are still in use and the video should be good to go.
2. YouTube Video Not Playing in PowerPoint
There are several reasons why a YouTube video may not play in your PowerPoint presentation. Some of the reasons why this may happen and possible solutions to them are given below.
1. The link used to embed the YouTube video was a shared link and not an embedded link. If you have entered the link that is used to share the video, then the video will not play in your PowerPoint presentation. To fix this issue, insert the embedded link of the YouTube video instead of the shared link.
2. The YouTube video that you embedded in your Presentation may not be available anymore. In order to avoid this issue, do not use videos that are in “ Private viewing only ” settings.
3. The embedded file may be in an unsupported format. Most versions of Microsoft PowerPoint supports “.wmv” files. Hence, videos that are in a different format may not play in your PowerPoint presentation. Make sure the video file is in the right format.
3. Video Only Plays Audio in PowerPoint
Sometimes, the video file only plays the audio of the video file in Microsoft PowerPoint.
This may happen either because the inserted video file is not supported by the PowerPoint software, or the file is too large. Another reason might be that the file is corrupted, or the Windows operating system is missing some necessary codecs.
Following are 3 possible solutions to these problems.
Solution 1 – Convert the video file
To convert the video file, follow the simple steps given below.
Step-1: Go to the “Info” section
The first step is to go to the “ Info ” section of the “ File ” tab which is located at the right-most corner of the ribbon of your PowerPoint presentation.
Step-2: Click on the “Media Size and Performance” option
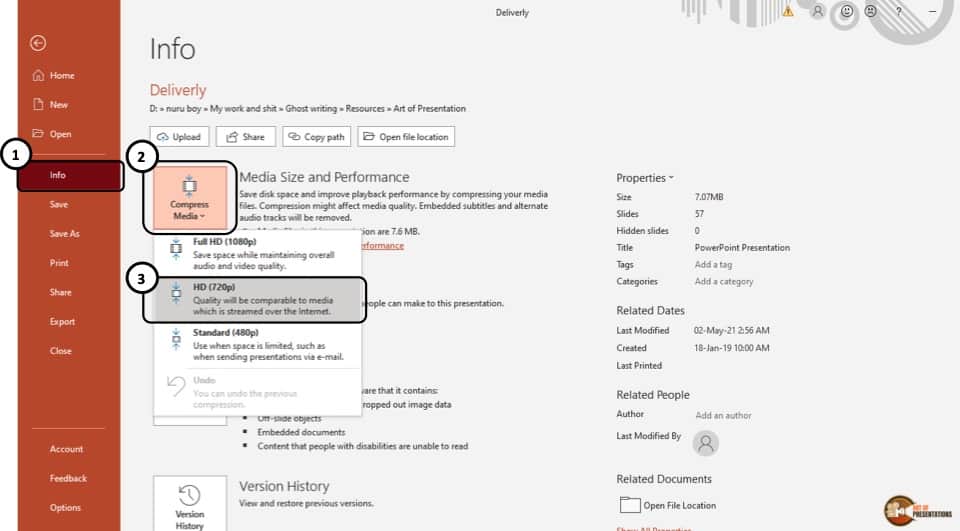
The second step is to click on the “ Media Size and Performance ” option which is the first option in the “ Info ” section
Step-3: Click on the “HD (720)” button
After clicking on the “ Media size and performance ” option, a drop-down menu will appear. From that drop-down menu, click on the “ HD (720) ” option.
This will compress the size of the video and convert it to a supported format.
Solution 2 – Clear temporary files
Like the previous issue, sometimes your computer may be working on too many temporary files, due to which the video file in your PowerPoint presentation may not be functioning properly.
Simply follow the steps described earlier in this article and delete all the temporary files operating in your Windows operating system.
Solution 3 – Install missing codecs
Right out of the box, Windows does not support every media codecs. It is possible that the video file in your PowerPoint presentation is only playing audio because some of the codecs in your Windows are missing.
To fix this issue, you can download a codec pack from the internet. Some of the best Codec packs are,
1. K-Lite Codec Pack
2. Media Player Codec Pack
3. X- Codec pack
4. Audio of the Video Doesn’t Work in PowerPoint
If the audio of the video in your PowerPoint presentation is not working, try all the solutions mentioned in the above section. If it still doesn’t work, then maybe the PowerPoint software is muted in your computer.
To make sure the audio of your PowerPoint is not muted, turn on the video in your presentation and follow the simple steps described below.
Step-1: “Right-click” on the “speaker/headphone” button
At first, you have to “ Right-click ” on the “ Speaker/Headphone ” volume button in the taskbar of your computer. It is the right-most button on the taskbar and its icon looks like a handheld speakerphone (as showcased in the image below)
Step-2: Select the “Open Volume Mixer” option
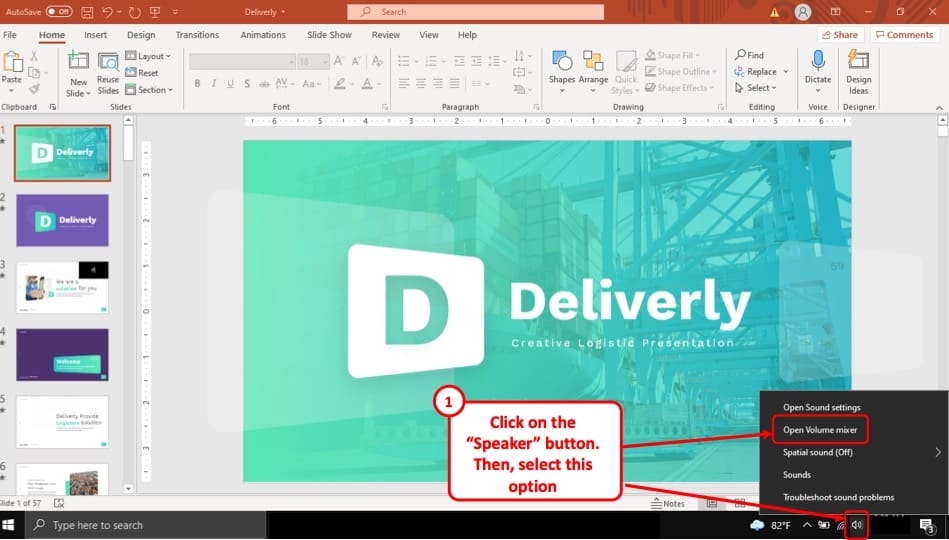
After you have opened the “ Speaker/Headphone ” menu from your taskbar, click on the “ Open Volume Mixer ” option which is the second option in the menu.
Step-3: Click on the volume icon under the PowerPoint section
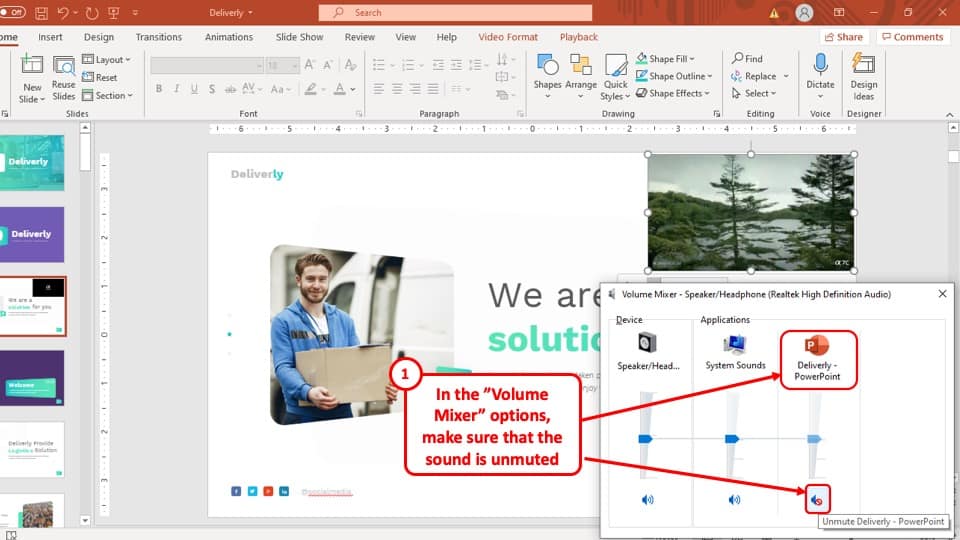
Once you have selected the “ Open Volume Mixer ” option, a pop-up window will appear on the bottom right corner of your screen.
Click on the small volume icon with a red cross over it, which will unmute the PowerPoint software on your computer.
5. Video Doesn’t Play Automatically
To play a video file in your PowerPoint presentation automatically, you have to change the playback settings of the video file.
This might sound a little difficult but the whole process is described in 2 simple steps below.
Step-1: Go to the “Playback” tab
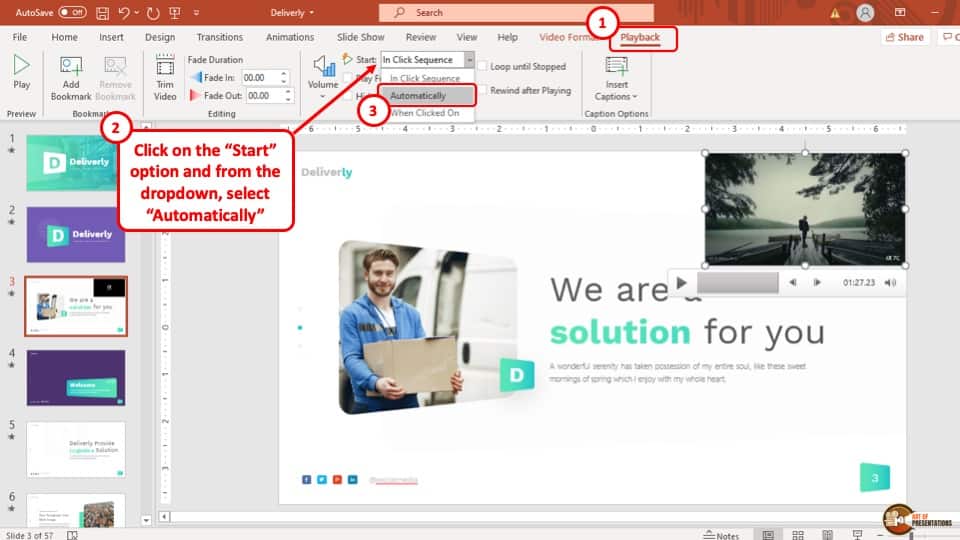
At first, turn on the video in your PowerPoint presentation. This will allow you to access the “ Playback ” tab which appears on the ribbon when a media file is played.
Step-2: Select the “Automatically” option
Now, select the “ Automatically ” option which is located in the “ Start ” drop-down menu of the “ Video Options ” section in the “ Playback ” tab.
The video should now play automatically when the slide is opened.
6. PowerPoint Export to Video Not Working
To fix videos not exporting in your PowerPoint presentation, you may have to optimize the media file using the method mentioned earlier in this article.
You might also have to update your PowerPoint software if it is outdated or repair it if needed. To learn more on how to update Microsoft PowerPoint, you can read one of our articles on this topic by clicking here .
I will discuss the process of repairing PowerPoint below:
Step-1: Go to “Add or remove programs”
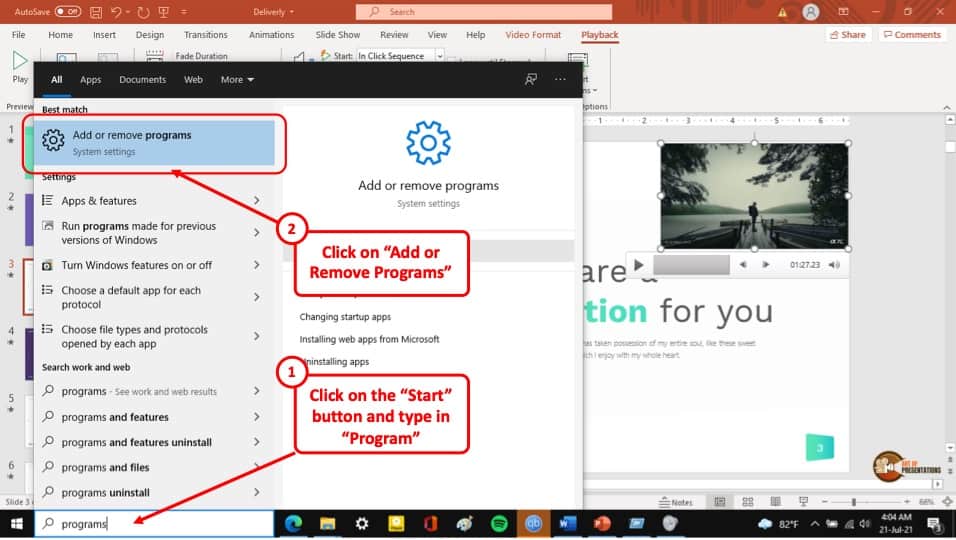
The first step is to go to the “ Start ” menu of your computer and launch the “ Add or remove programs ” tool.
Step-2: Click on the “Advanced Options” button
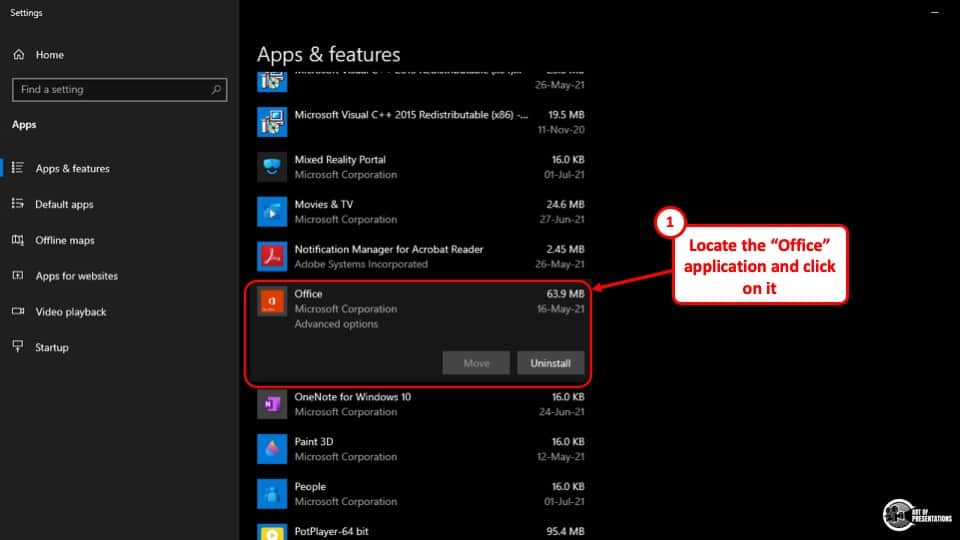
The second step is to find your Microsoft Office program and select the “ Advanced options ” button.
Step-3: Select the “Repair” option
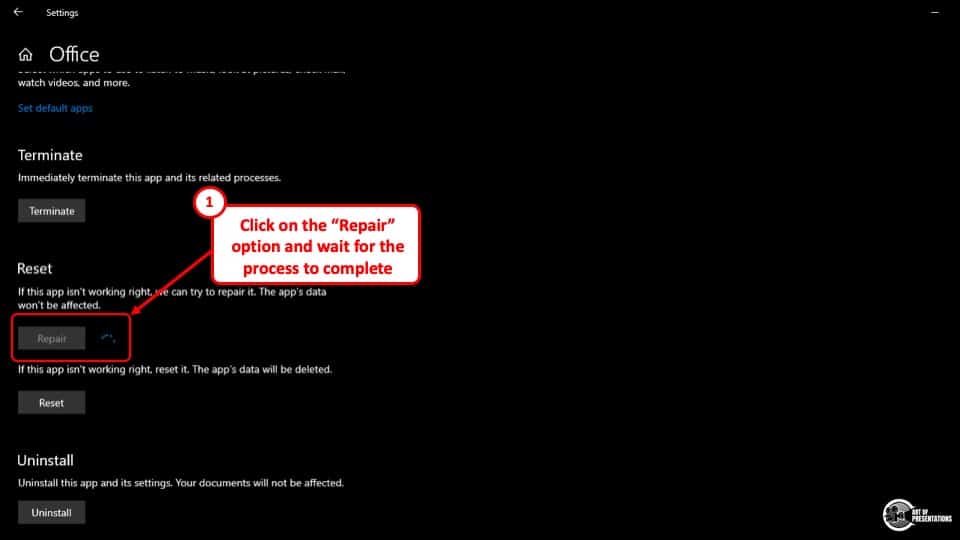
After you click on the “ Advanced Options ” button, you will be taken to a new window. From that window, under “ Reset ” select the “ Repair ” option.
Once the scanning and repairing are complete a tick mark will appear beside the “ Repair ” option, which will indicate that the repairing is complete.
7. How to Change Video Source in PowerPoint?
Unfortunately, there is no direct way to change the path of the source of a video in your PowerPoint presentation.
You can use a macro to fix this problem but honestly, it is easiest to simply re-attach the video to your PowerPoint presentation.
To change the video source in your PowerPoint presentation, delete the initial video, move the video file to the same folder as the PowerPoint presentation and insert the video again and the source of the video will change accordingly.
Credit to Benzoix (on Freepik) for the featured image of this article (further edited)
Set the 'play' options for a video in your presentation
You can use the playback options in PowerPoint to control how and when a video appears in your presentation. You can play a video in full screen mode or resize it to dimensions that you specify. You can also control the volume, play the video repeatedly (in a loop), and show the media controls.
These Play options aren't available for online videos, such as YouTube videos. They are only available for videos inserted from your computer, network, or OneDrive.
To control how your video plays, use options on the Playback tab of the PowerPoint ribbon. This tab appears on the ribbon when a video is selected on a slide.
(These options for a video are available after you embed or link to a video file from your computer .)
Play a video in the click sequence, automatically, or when clicked
Important: Set this option before adding any animations or triggers to your video. By changing this option, you will remove any animations that are associated with your video.
In Normal view, click the video frame on the slide.
On the Playback tab, in the Video Options group, from the Start list, select an option:
Tip: While a video is playing, you can pause it by clicking it. To resume playing the video, click it again.
Play a video full screen
You can play a video so that it fills the entire slide (screen) when you deliver your presentation. Depending on the resolution of your original video file, it might appear distorted when you enlarge it. Always preview your video before you include it in your presentation so that if the video appears distorted or blurry, you can undo the full screen option.
If you set the video to be displayed full screen and it is also set to start automatically, you can drag the video frame off the slide into the gray area so that it will not be visible on the slide or flash briefly before the video goes to full screen.
In Normal view, click the video frame on the slide that you want to play full screen.
Under Video Tools , on the Playback tab, in the Video Options group, select the Play Full Screen check box.
Resize a video
If you don't want to play a movie full screen, you can resize it to the dimensions that you want.
In Normal view, select the video that you want to resize.
Do one of the following:
To adjust the formatting:
Click a corner sizing handle until you see a two-headed arrow, and then drag to size the frame.
To keep the center of the video in the same place, hold down Ctrl while dragging. By default, this maintains the proportions (locks the aspect ratio) of the video as you drag.
Typically, most videos with a 640 x 480 resolution have a 4:3 aspect ratio, which is also the default aspect ratio for PowerPoint 2010 presentations. The default aspect ratio for presentations in PowerPoint 2013 and newer versions is 16:9. If the aspect ratios of the presentation and the video differ, your video will look distorted when it plays.
To specify precise height-to-width proportions of a video:
Click Size , and then under Scale , select the Lock aspect ratio check box.
Under Size and rotate , enter sizes in the Height and Width boxes, or under Scale , in the Scale Height and Scale Width boxes, enter the percentage of size that you want, relative to the video's original size.
Tip: To prevent videos from skipping when they are played, under Scale , select the Best scale for slide show check box.
Preview a video
In Normal view, click the video frame.
Click Play .
There is also a Play option in the Preview group, on both the Format and Playback tabs, under Video Tools .
Set the volume of a video
Under Video Tools , on the Playback tab, in the Video Options group, click Volume , and then choose one of the following:
Tip: You can also set the volume by using the volume slider on the play control bar.
Hide a video when not playing
While delivering your presentation, you can hide your video until you are ready to play it. However, you should create an automatic or triggered animation to initiate playback or you will never see the video play during the slideshow. For more information about creating an automatic or triggered animation, see Animate text or objects .
Under Video Tools , on the Playback tab, in the Video Options group, select the Hide While Not Playing check box.
Loop a video
To play your video repeatedly and continuously during your presentation, you can use the loop feature.
Under Video Tools , on the Playback tab, in the Video Options group, select the Loop until Stopped check box.
Rewind a video after playing
To rewind your video after playing during your presentation, do the following:
Under Video Tools , on the Playback tab, in the Video Options group, select the Rewind after Playing check box.
Show the media controls
To show the media controls during your presentation, do the following:
On the Slide Show tab, in the Set up group, select the Show Media Controls check box.
Play a video automatically or when clicked
Tip: Set this option before adding any animations or triggers to your video. Changing this option removes any animations that are associated with your video.
Figure: Specify how you want your video to start during your presentation
Under Video Tools , on the Playback tab, in the Video Options group, in the Start list, do one of the following:
To play your video when the slide containing the video appears in Slide Show view, select Automatically .
To control when you want to start the video by clicking the mouse, select On Click . (Then, when you're presenting in Slide Show view, you'll simply click the video frame when you're ready to play the video.)
Create a self-running presentation
Turn your presentation into a video
Add and play sounds in a presentation
Set the timing and speed of a transition

Need more help?
Want more options.
Explore subscription benefits, browse training courses, learn how to secure your device, and more.
Microsoft 365 subscription benefits
Microsoft 365 training
Microsoft security
Accessibility center
Communities help you ask and answer questions, give feedback, and hear from experts with rich knowledge.
Ask the Microsoft Community
Microsoft Tech Community
Windows Insiders
Microsoft 365 Insiders
Was this information helpful?
Thank you for your feedback.
How to Play Video in PowerPoint

If you’re trying to create an engaging and dynamic PowerPoint presentation, including video can be an effective way to do so. In this article, we’ll go over everything you need to know about how to play video in PowerPoint, covering aspects ranging from inserting a video to optimizing playback settings.
Table of Contents
Understanding Video Formats Supported by PowerPoint
Before we dive into how to insert a video in PowerPoint, it’s important to understand which video formats are supported. PowerPoint can accommodate various file types, including AVI, MPG, WMV, MOV, and MP4. But keep in mind that not all videos are compatible, so it’s best to double-check that your chosen video format is supported.
It’s also important to note that the video format you choose can affect the quality of the video when it’s played in PowerPoint. For example, if you choose a high-quality video format, such as MP4, the video will look crisp and clear when played in PowerPoint. However, if you choose a lower-quality format, such as AVI, the video may appear pixelated or blurry.
Another factor to consider when choosing a video format is the size of the file. Larger video files can take longer to load and may cause your PowerPoint presentation to run slowly. To avoid this, it’s best to compress your video file before inserting it into PowerPoint. Most video editing software, such as Adobe Premiere or iMovie, have built-in compression tools that can help you reduce the file size without sacrificing too much quality.
How to Insert a Video in PowerPoint
To insert a video in PowerPoint, follow these simple steps. First, navigate to the slide where you’ll want to add the video. Next, click on the Insert tab in the top menu bar and select Video. From there, you can either choose to add a video file from your computer or search for an online video to insert. Once you’ve selected your video, it will appear on the slide, and you can adjust the size and position to suit your needs.
It’s important to note that when adding a video to your PowerPoint presentation, you should always test it out beforehand to ensure that it plays smoothly and without any technical issues. Additionally, if you plan on presenting your PowerPoint in a different location or on a different computer, make sure to bring the video file with you or have access to it online to avoid any playback issues.
Adding YouTube Videos to Your PowerPoint Presentation
If you want to incorporate a YouTube video directly into your presentation, follow these steps. First, open the YouTube video and click the Share button. Then, click on the Embed tab, and copy the embed code. Next, go back to PowerPoint and click on the Insert tab, followed by Online Video. Finally, paste the embed code into the designated box and click Insert to add the YouTube video to your PowerPoint presentation.
How to Embed a Video in PowerPoint
If you have a video file that you want to embed within your presentation, rather than just inserting it onto a slide, you can do so by following these steps. Navigate to the slide where you want to embed the video, then click on the Insert tab and select Video. Once you’ve inserted your video, it becomes part of your PowerPoint presentation.
It’s important to note that embedding a video within your PowerPoint presentation can increase the file size significantly. This can make it difficult to share the presentation via email or other file-sharing methods. To avoid this issue, consider compressing the video file before embedding it within your presentation. You can also upload the video to a video hosting platform, such as YouTube or Vimeo, and then embed the video within your presentation using the video’s URL.
Adjusting Video Playback Settings in PowerPoint
Once you’ve added your video to a slide in PowerPoint, you can customize the playback settings to suit your needs. To do this, click on the video to select it, then click on the Playback tab that appears on the top menu bar. Here, you can adjust settings such as play mode, loop duration, and volume. You can also choose whether to start the video automatically or when clicked.
Another important setting you can adjust is the video’s poster frame. This is the image that appears on the slide before the video starts playing. To change the poster frame, select the video and click on the Playback tab. Then, click on the Poster Frame dropdown menu and choose either the current frame or a different image from your computer. This can be useful if you want to use a specific image to represent the video on your slide.
Tips for Optimizing Video Quality in PowerPoint Presentations
To ensure your videos look their best when playing in PowerPoint, try these tips. First, make sure your video is compressed properly to avoid any lag or delays. Additionally, use high-quality visuals and audio. It’s also recommended to use a higher resolution than the default, especially if you plan on projecting your presentation onto a large screen.
Another tip for optimizing video quality in PowerPoint presentations is to consider the file format of your video. MP4 is the recommended format for PowerPoint, as it is widely supported and provides good quality. If your video is in a different format, consider converting it to MP4 before inserting it into your presentation.
Finally, it’s important to test your presentation before delivering it to your audience. Make sure your video plays smoothly and looks good on the screen you will be using. If you encounter any issues, try adjusting the settings or compressing the video further. By taking the time to optimize your video quality, you can ensure that your presentation is engaging and professional.
Creating Customized Video Playlists in PowerPoint
If you have multiple videos that you want to display in a specific order, you can sequence them manually on individual slides within your presentation.
Troubleshooting Common Issues When Playing Videos in PowerPoint
If you encounter any issues when playing videos in PowerPoint, such as audio not playing or the video not displaying correctly, check that your video is compatible and that it’s compressed correctly. Additionally, try closing other programs and ensuring that your computer is running smoothly. If issues persist, consider seeking support from Microsoft or your IT department.
Another common issue when playing videos in PowerPoint is the video freezing or lagging. This can be caused by a slow internet connection or a large file size. To fix this, try downloading the video and inserting it into your presentation as a local file. You can also try reducing the video quality or compressing the file further.
It’s also important to note that some video formats may not be supported by PowerPoint. If you’re having trouble playing a video, check that it’s in a compatible format such as MP4 or WMV. If it’s not, you may need to convert the file using a video converter tool.
How to Record and Insert Your Own Videos into a Presentation
To create a more personalized presentation, you may want to record and insert your own videos. Videos must be recorded separately using a camera or recording software and then inserted into PowerPoint. Once inserted, you can adjust settings such as playback and volume.
It’s important to note that recording and inserting your own videos can significantly increase the file size of your presentation. This can make it difficult to share or upload to certain platforms. To avoid this issue, consider compressing your video file or uploading it to a separate video hosting platform and embedding it into your presentation.
Utilizing Advanced Video Editing Features in PowerPoint
If you want to take your video editing to the next level, consider using advanced features in PowerPoint. For example, you can add animations and transitions between slides with video, which can enhance visual appeal and engagement. Additionally, you can add effects like borders, shadows, and reflections to your videos.
Another advanced feature in PowerPoint is the ability to trim videos. This allows you to remove unwanted sections of your video and focus on the most important parts. However, keep in mind that advanced editing features like adjusting brightness, contrast, and saturation are not available within PowerPoint.
Integrating Interactive Videos into Your Presentation
While PowerPoint does not have built-in features for adding quizzes or surveys directly into videos or creating branching scenarios, you can still make your presentation interactive by asking questions and seeking audience participation during the video playback.
Enhancing Your Presentation with Audio and Visual Effects
Video is just one element you can use to spice up your PowerPoint presentation. Other multimedia elements, such as audio and visual effects, can take your presentation to the next level. For example, you can add background music or sound effects to enhance mood, or use animations and images to add visual interest.
When using audio in your presentation, it’s important to ensure that the sound quality is clear and consistent. You can also use audio to provide narration or commentary to your slides, which can help to explain complex ideas or concepts. Additionally, visual effects such as transitions and slide animations can help to keep your audience engaged and interested in your presentation.
However, it’s important to use these multimedia elements sparingly and strategically. Too many effects can be distracting and take away from the content of your presentation. It’s also important to consider your audience and their preferences when deciding which effects to use. For example, if you’re presenting to a group of professionals, you may want to use more subtle effects, while if you’re presenting to a younger audience, you may want to use more dynamic and engaging effects.
Best Practices for Sharing Your PowerPoint Presentation with Video Content
Finally, when sharing your PowerPoint presentation with video content, it’s important to consider best practices. Make sure anyone who will be viewing the presentation has the appropriate software and is able to access the video content. Additionally, test your presentation on other devices to ensure compatibility and smooth playback. Finally, consider sharing your presentation via a cloud-based platform, as this ensures accessibility and flexibility.
Using video in your PowerPoint presentations can bring them to life and engage your audience like never before. With these tips and tricks, you should be able to add and play video seamlessly, while also creating a more dynamic and interactive experience for viewers.
By humans, for humans - Best rated articles:
Excel report templates: build better reports faster, top 9 power bi dashboard examples, excel waterfall charts: how to create one that doesn't suck, beyond ai - discover our handpicked bi resources.
Explore Zebra BI's expert-selected resources combining technology and insight for practical, in-depth BI strategies.

We’ve been experimenting with AI-generated content, and sometimes it gets carried away. Give us a feedback and help us learn and improve! 🤍
Note: This is an experimental AI-generated article. Your help is welcome. Share your feedback with us and help us improve.

How to embed a video in PowerPoint from YouTube, PC, or Mac

Table of Contents
Videos can transform a plain PowerPoint presentation into a dynamic and memorable experience. They help you explain complex concepts visually, add a touch of emotion, and cater to different learning styles. Whether you choose online videos, YouTube videos, or files from your computer, this guide will show you how to embed a video in PowerPoint in a few easy steps.
How to embed a video in PowerPoint
For this guide, we’ll use screenshots from the free web-based version of Microsoft PowerPoint. Similar steps can be taken for other versions of PowerPoint, so long as they support the mentioned methods and web video links.

💡 Read more about embedding videos in the various versions of PowerPoint on Microsoft’s website.
Option 1: Embed a video from your device
This option works across all Microsoft PowerPoint versions — for Windows, PC, or Mac. Insert videos directly from your device for guaranteed playback and complete control over your presentation delivery.
- Click ‘Insert’ on the main tab/panel.
- Select ‘Video’ → ‘ This Device ’.
- Find the folder and double-click the file to insert the video.
💡Pro tip: Not all Vimeo videos are downloadable, but look for the download button—it means you can embed the video directly.

Option 2: Embed a YouTube video (or from online)
You can embed videos directly from YouTube, SlideShare, Vimeo, Stream, and Flip.
- Find the video you want, and copy the URL from the browser’s address bar. Alternatively, copy the video embed code (if available).
- Go back to PowerPoint and navigate to the slide you want to insert the video.
- From the ‘Insert’ tab, select ‘Video’ → ‘Online Video.’
- Paste the video link or embed code. (from Step 1)
- Click the Insert button.
Finding the YouTube video link for embedding (3 ways)
#1: Copy the URL from the browser address bar:

#2: Under the YouTube video’s ‘Share’ options, then copy the video link.
#3: If you wish to use the embed code, go to ‘Share’ → ‘Embed’ . Click the ‘Copy’ button to copy the entire code.
[Video] How to embed a YouTube video in PowerPoint
Note about using YouTube videos
Unlike videos embedded directly into your presentation file, online videos are hosted externally. You control them through the website’s video player, not PowerPoint’s built-in features (the video format tab will not be available).
Remember, a reliable internet connection is essential for smooth playback of online videos.
💡 Read more: Insert a video from YouTube or another site [Microsoft]
Option 3: Insert a video from Microsoft’s creative content library
For users of PowerPoint for the Web: Microsoft 365 offers a selection of royalty-free stock videos (and images). You can find and insert videos from the online library.
- Select ‘Video’ → ‘Stock Videos’ .
- Find the video you want and click ‘Insert.’

💡 You’ll need a Premium Microsoft Office membership to unlock the entire stock library.
How to play embedded videos in PowerPoint
Ready to rehearse your PowerPoint presentation? Embedded videos won’t start automatically, so you have time to check that the audio settings are correct. When ready, click the ‘Play’ button on the video embed frame.
▶️ Play an uploaded video (from PC, Mac)
Uploaded videos have more playback options than linked web videos. This option also does not require the internet or a stable connection during the presentation. Click on the ‘Play’ icon to start the video.

You’ll see this video playback tab with controls appear:

▶️ Play an embedded online video (from YouTube, Vimeo, etc)
You will need a stable internet connection during your PowerPoint presentation as the embedded video is directly streamed from the video platform. Click on the ‘Play’ icon to start the linked video.

💡 Note: When embedding online or YouTube videos, you’ll primarily use the streaming site’s controls (play, pause, volume). PowerPoint’s advanced editing features won’t work on these web videos.
Tips for embedding videos in PowerPoint
While videos add a powerful element to your presentations, there are some downsides worth considering, such as the risk of technical glitches and a larger PowerPoint file size.
Use these tips to keep your PowerPoint presentation smooth:
- Purpose: Ensure each video serves a clear purpose and enhances your message rather than being a distraction.
- Length: Keep videos short and focused to maintain your audience’s attention.
- Audio: Ensure the video’s audio is clear and at the right volume for your presentation.
- Manage video size: Large video files can make your presentation slow and challenging to share. Use online tools to compress media files without sacrificing significant quality.
- Prioritize reliability: If a smooth presentation is crucial, embed videos directly from your device to avoid internet dependency. Inserting a video from your device guarantees playback even without an internet connection.
- Test and rehearse: Review your presentation beforehand to ensure your videos play seamlessly.
Related article: Don’t Present Without These 16 PowerPoint Dos and Don’ts
Videos are a fantastic addition to your presentation toolbox. Embedding videos into your PowerPoint slideshow makes them more engaging and memorable. Videos grab attention, explain complex ideas, and make your presentation more impactful. They offer a powerful way to complement your core message and keep things interesting.
This short tutorial covers three options: directly from your device or computer, using Microsoft’s stock video library, or pasting a video file link from online platforms like YouTube.
Keep your audience captivated with a variety of content: videos, images, well-crafted text, and engaging delivery. Remember to rehearse beforehand for a smooth, successful presentation!
Frequently Asked Questions (FAQ)
What are the supported video formats.
Recommended: .mp4 (offers the best balance of compatibility, quality, and file size).
For older PowerPoint versions (2010 and earlier): Consider using .wmv for wider compatibility.
Other PowerPoint-supported video formats:
- .avi (may require additional codecs)
- .mpeg or .mpg
- .mov (for Mac users)
Why can’t I add a video to PowerPoint?
Common reasons and solutions:
- Unsupported file format: Make sure your video file is in a PowerPoint-compatible format (.mp4 with H.264 video and AAC audio is the safest bet).
- Outdated PowerPoint: Check and install available updates for your PowerPoint version.
- Incorrect embed code: Double-check you’ve copied and pasted the embed code correctly (beginning from <iframe> and ending with </iframe>). If the issue persists, the video platform may not support embedding.
- Older PowerPoint limitations (Windows only): If you’re using an older PowerPoint version on Windows, you might be restricted to embedding YouTube videos only. Consider updating PowerPoint or embedding the video file directly.
- Internet Explorer issues (Windows only): While not strictly necessary, some older video functionality might rely on Internet Explorer components. Ensure you’re using a supported IE version.
- Broken or removed video link: Verify that the linked video hasn’t been taken down or made private.
💡 Pro tip: Try Option 1 (Embed a video from your device) if the other methods don’t work.
For more info, read Why can’t I embed a video in PowerPoint? [Microsoft]
Can I use an older version of PowerPoint?
Yes, you can use earlier versions of PowerPoint or PowerPoint for the Web (free) . However, remember that limited support is available, potential compatibility issues with newer file formats or online features exist, and new features are missing.
Consider upgrading to Microsoft 365 if you prioritize security and support, need the newest features, or work with collaborators using newer versions.
Related article: Step-by-Step: How To Convert PowerPoint to Google Slides
Save Time and Effortlessly Create Presentations with SlidesAI

How-To Geek
How to make a microsoft powerpoint presentation into a video.
Share your presentations with anyone, even if they don't have PowerPoint!
Quick Links
Why convert a powerpoint to video, convert a powerpoint presentation to a video.
Microsoft PowerPoint presentations are great, but they are not as easily accessible as videos. Luckily, you can convert your presentations to videos with a built-in option. We'll show you how.
There are many reasons to turn a presentation into a video. Maybe you want to send someone a presentation but they don't have PowerPoint installed. Or, maybe you want to upload your presentation to a site that only accepts videos.
PowerPoint has a built-in option to convert presentations to videos. When you perform this conversion, all your original animations, transitions, and media items are preserved. Your resulting video also includes all recorded timings , narrations , ink strokes, and laser pointer gestures (though you can choose not to include these if you want).
Related: How to Burn Your PowerPoint to DVD
To turn a PowerPoint presentation into a video, first, open your presentation with the PowerPoint app on your Windows or Mac computer.
In the top-left corner of PowerPoint, click the "File" option.
From the sidebar that opens after clicking the "File" option, select "Export."
In the "Export" menu, click "Create a Video."
To the right of the "Export" menu, you will now see a "Create a Video" section. In this section, you will define the options for your video file.
First, choose the quality for your video by clicking the "Full HD" option.
You will see multiple video quality options. Select the one that you think works the best for you. Know that the higher the quality you select, the larger the file size of your video will be.
To include the recorded timings and narrations in your video, then beneath the video quality menu, click the "Don't Use Recorded Timings and Narrations" option.
Select the "Use Recorded Timings and Narrations" option. If this option is grayed out, that's because you don't have any recorded timings or narrations in your presentation.
You will now specify how long each slide appears in the video. Click the "Seconds Spent on Each Slide" box and enter the duration in seconds. By default, this duration is set to 5 seconds.
Finally, at the bottom of the "Create a Video" section, click "Create Video" to start making your video.
Your computer's standard "save" window will open. Here, select the folder to save your video in, type a name for your video, and click "Save."
PowerPoint will take you back to the main interface. At the bottom of this interface, you will see the progress of the conversion.
When your video is made, you will find it in the specified folder on your computer.
And that's how you make your presentations available to a wider audience by converting them to a video format!
Need your video in another format? Use VLC to convert your video to other formats.
Related: How to Convert a Video or Audio File Using VLC

How To Get Free Access To Microsoft PowerPoint
E very time you need to present an overview of a plan or a report to a whole room of people, chances are you turn to Microsoft PowerPoint. And who doesn't? It's popular for its wide array of features that make creating effective presentations a walk in the park. PowerPoint comes with a host of keyboard shortcuts for easy navigation, subtitles and video recordings for your audience's benefit, and a variety of transitions, animations, and designs for better engagement.
But with these nifty features comes a hefty price tag. At the moment, the personal plan — which includes other Office apps — is at $69.99 a year. This might be the most budget-friendly option, especially if you plan to use the other Microsoft Office apps, too. Unfortunately, you can't buy PowerPoint alone, but there are a few workarounds you can use to get access to PowerPoint at no cost to you at all.
Read more: The 20 Best Mac Apps That Will Improve Your Apple Experience
Method #1: Sign Up For A Free Microsoft Account On The Office Website
Microsoft offers a web-based version of PowerPoint completely free of charge to all users. Here's how you can access it:
- Visit the Microsoft 365 page .
- If you already have a free account with Microsoft, click Sign in. Otherwise, press "Sign up for the free version of Microsoft 365" to create a new account at no cost.
- On the Office home page, select PowerPoint from the side panel on the left.
- Click on "Blank presentation" to create your presentation from scratch, or pick your preferred free PowerPoint template from the options at the top (there's also a host of editable templates you can find on the Microsoft 365 Create site ).
- Create your presentation as normal. Your edits will be saved automatically to your Microsoft OneDrive as long as you're connected to the internet.
It's important to keep in mind, though, that while you're free to use this web version of PowerPoint to create your slides and edit templates, there are certain features it doesn't have that you can find on the paid version. For instance, you can access only a handful of font styles and stock elements like images, videos, icons, and stickers. Designer is also available for use on up to three presentations per month only (it's unlimited for premium subscribers). When presenting, you won't find the Present Live and Always Use Subtitles options present in the paid plans. The biggest caveat of the free version is that it won't get any newly released features, unlike its premium counterparts.
Method #2: Install Microsoft 365 (Office) To Your Windows
Don't fancy working on your presentation in a browser? If you have a Windows computer with the Office 365 apps pre-installed or downloaded from a previous Office 365 trial, you can use the Microsoft 365 (Office) app instead. Unlike the individual Microsoft apps that you need to buy from the Microsoft Store, this one is free to download and use. Here's how to get free PowerPoint on the Microsoft 365 (Office) app:
- Search for Microsoft 365 (Office) on the Microsoft Store app.
- Install and open it.
- Sign in with your Microsoft account. Alternatively, press "Create free account" if you don't have one yet.
- Click on Create on the left side panel.
- Select Presentation.
- In the PowerPoint window that opens, log in using your account.
- Press Accept on the "Free 5-day pass" section. This lets you use PowerPoint (and Word and Excel) for five days — free of charge and without having to input any payment information.
- Create your presentation as usual. As you're using the desktop version, you can access the full features of PowerPoint, including the ability to present in Teams, export the presentation as a video file, translate the slides' content to a different language, and even work offline.
The only downside of this method is the time limit. Once the five days are up, you can no longer open the PowerPoint desktop app. However, all your files will still be accessible to you. If you saved them to OneDrive, you can continue editing them on the web app. If you saved them to your computer, you can upload them to OneDrive and edit them from there.
Method #3: Download The Microsoft PowerPoint App On Your Android Or iOS Device
If you're always on the move and need the flexibility of creating and editing presentations on your Android or iOS device, you'll be glad to know that PowerPoint is free and available for offline use on your mobile phones. But — of course, there's a but — you can only access the free version if your device is under 10.1 inches. Anything bigger than that requires a premium subscription. If your phone fits the bill, then follow these steps to get free PowerPoint on your device:
- Install Microsoft PowerPoint from the App Store or Google Play Store .
- Log in using your existing Microsoft email or enter a new email address to create one if you don't already have an account.
- On the "Get Microsoft 365 Personal Plan" screen, press Skip For Now.
- If you're offered a free trial, select Try later (or enjoy the free 30-day trial if you're interested).
- To make a new presentation, tap the plus sign in the upper right corner.
- Change the "Create in" option from OneDrive - Personal to a folder on your device. This allows you to save the presentation to your local storage and make offline edits.
- Press "Set as default" to set your local folder as the default file storage location.
- Choose your template from the selection or use a blank presentation.
- Edit your presentation as needed.
Do note that PowerPoint mobile comes with some restrictions. There's no option to insert stock elements, change the slide size to a custom size, use the Designer feature, or display the presentation in Immersive Reader mode. However, you can use font styles considered premium on the web app.
Method #4: Use Your School Email Address
Office 365 Education is free for students and teachers, provided they have an email address from an eligible school. To check for your eligibility, here's what you need to do:
- Go to the Office 365 Education page .
- Type in your school email address in the empty text field.
- Press "Get Started."
- On the next screen, verify your eligibility. If you're eligible, you'll be asked to select whether you're a student or a teacher. If your school isn't recognized, however, you'll get a message telling you so.
- For those who are eligible, proceed with creating your Office 365 Education account. Make sure your school email can receive external mail, as Microsoft will send you a verification code for your account.
- Once you're done filling out the form, press "Start." This will open your Office 365 account page.
You can then start making your PowerPoint presentation using the web app. If your school's plan supports it, you can also install the Office 365 apps to your computer by clicking the "Install Office" button on your Office 365 account page and running the downloaded installation file. What sets the Office 365 Education account apart from the regular free account is that you have unlimited personal cloud storage and access to other Office apps like Word, Excel, and Outlook.
Read the original article on SlashGear .

Contribute to the Microsoft Teams forum! Click HERE to learn more 💡
March 14, 2024
Contribute to the Microsoft Teams forum!
Click HERE to learn more 💡
Top Contributors in Microsoft Teams: EmilyS_726 ✅
March 11, 2024
Top Contributors in Microsoft Teams:
EmilyS_726 ✅
- Search the community and support articles
- Microsoft Teams
- Teams for education
- Search Community member
Ask a new question
Playing embeded videos in powerpoint when sharing your screen in teams
Report abuse, replies (2) .
Don't share the PowerPoint in Teams - share your Desktop with the PowerPoint open in presentation mode. If you have sound, check the box on the share screen to Include computer sound.
4 people found this reply helpful
Was this reply helpful? Yes No
Sorry this didn't help.
Great! Thanks for your feedback.
How satisfied are you with this reply?
Thanks for your feedback, it helps us improve the site.
Thanks for your feedback.
- Independent Advisor
Question Info
- Finding and sharing files
- Norsk Bokmål
- Ελληνικά
- Русский
- עברית
- العربية
- ไทย
- 한국어
- 中文(简体)
- 中文(繁體)
- 日本語
IMAGES
VIDEO
COMMENTS
In Normal view, click the video frame on the slide. On the Playback tab, in the Video Options group, from the Start list, select an option: Option. When the video plays during a slide show. Automatically. The video plays automatically when the slide appears. On Click or When Clicked On. The video only plays when you click within the video frame.
Follow the step-by-step process below to see how you can resolve "PowerPoint video not playing in presentation mode". Step by step process - How to fix PowerPoint video not playing in presentation mode. Firstly, click on "Start". Find and launch the "Program" called "Run".
How to Insert Video in PowerPoint (from a File on Your PC or a Shared Drive) A Beginner's Guide to Video Formats in PowerPoint. Related courses. Microsoft PowerPoint: Introduction. Microsoft PowerPoint: Intermediate / Advanced. Microsoft PowerPoint: Design for Non-Designers. Microsoft PowerPoint: Accessible PowerPoint Presentations. Microsoft ...
On the PowerPoint window, in the left sidebar, click the slide in which you want to add a video. At the top of the PowerPoint window, click the "Insert" tab. In the "Insert" tab, under the "Media" section (which is to the extreme right side of the interface), click "Video." You'll now see an "Insert Video From" menu.
First, create a new custom slide show and select the slides that you want to display. Then, click Add, enter the name of the presentation and click OK. This new custom presentation will appear on the list. Select it and click Show to begin the presentation. Defining a custom slide show.
Find beautiful and engaging PowerPoint templates with Envato Elements: https://elements.envato.com/presentation-templates/compatible-with-powerpoint?utm_ca...
Without further discussion, learn how to play the video in PowerPoint below. 1. For Online Videos. Step 1. To begin with, open PowerPoint using your desktop device. Once the program is opened, head to the Insert tab and select the Video button followed by Online Video. Step 2. Insert window will appear on your screen.
Step-3: Click on the "Ok" button. After you have selected the " Check compatibility " option, Microsoft PowerPoint will automatically detect the media files, report to you the issue with your video file, and try to fix it. To finish optimizing the media file, click on the " Ok " button and the issue should be resolved.
To control how your video plays, use options on the Playback tab. This tab appears on the ribbon when you click on a video in a slide.
First, open the YouTube video and click the Share button. Then, click on the Embed tab, and copy the embed code. Next, go back to PowerPoint and click on the Insert tab, followed by Online Video. Finally, paste the embed code into the designated box and click Insert to add the YouTube video to your PowerPoint presentation.
️ Play an embedded online video (from YouTube, Vimeo, etc) You will need a stable internet connection during your PowerPoint presentation as the embedded video is directly streamed from the video platform. Click on the 'Play' icon to start the linked video.
In the top-left corner of PowerPoint, click the "File" option. From the sidebar that opens after clicking the "File" option, select "Export." In the "Export" menu, click "Create a Video." To the right of the "Export" menu, you will now see a "Create a Video" section. In this section, you will define the options for your video file.
Click on "Blank presentation" to create your presentation from scratch, or pick your preferred free PowerPoint template from the options at the top (there's also a host of editable templates you ...
As a workaround, set an Animation to play the video for With Previous or On Click. With Previous will start it within seconds of the slide coming up. On Click means just that. Clicking on the slide will start the video rather than advancing to the next. (So will the right-arrow key.)
As a workaround, you could choose "Desktop screen share" mode and include the system audio to transmit your system audio and embedded video to participants. Given the situation, If you have any suggestion on this, please send your feedback to the Microsoft product group by submitting your suggestion to Microsoft Teams UserVoice here: https ...