
How To Do A Proper PHD2 Calibration
Did you recently purchase your first astrophotography rig and a guiding setup?
Does your guiding graph in PHD2 look more like it’s monitoring your pulse instead of your guiding?
If so, then what I am about to cover is right up your alley.
In reality, PHD2 is pretty simple to use, but getting it set up correctly involves a little more than a simple click of a button.
In this post, I will explain what you need to know to properly calibrate the software before guiding the first time.
I’m also going to talk about how to troubleshoot common issues that are the main culprit of a failed calibration and bad guiding in general.
Table of Contents
PHD2 Calibration
Before PHD2 can effectively guide your mount, it needs to do a calibration. This is basically testing how your mount is responding to guide signals from the software.
The good news here is that you really only need to do this once. By default, PHD2 should remember your previous calibration and apply it next time you connect your equipment.
This is the case as long as you connect to the same PHD2 profile and don’t disconnect or move your guide camera relative to the guide scope.
When you do your first calibration, you must do it in the right part of the sky. PHD2 states that you should calibrate within 30 degrees of Dec 0.
The ideal spot is the intersection of the meridian and the Celestial Equator. If you are having a hard time figuring out where this is, I would recommend downloading Stellarium.
Using Stellarium will also make it easier to find the coordinates of a star in the area. Then all you need to do is slew to the star before you calibrate.
As soon as you do a calibration the first time, it’s important to review your graph and make sure that it calibrated correctly.
Sometimes PHD2 will just proceed with an ugly calibration without telling you a thing. If you just assume, you will be none the wiser and will likely have sub-optimal guiding as a result.
Let’s take a look at what the calibration graph looks like.
This can be accessed in the top menu under tools and review calibration data. I will go through all of the essential information on this calibration and explain what each variable means.

A certain margin of error here tends to be okay. However, some items are telltale signs that something is wrong with either your equipment or a setting.
The Calibration Graph
The first thing we want to look at here is the graph on the left. This is representative of what I would consider to be a pretty good calibration.
What you are looking for is a right angle on this graph with reasonably straight lines. I have never known it to be an issue if the lines don’t match up with the X and Y axis on the graph, as long as they are straight.
On the other hand, if your calibration results look more like a scatter chart, something went wrong. In this case, you want to re-calibrate before proceeding with your guiding.
The Number of RA and Dec steps
Generally speaking, these two numbers should be between 8 and 14 steps in each direction, according to PHD2’s website.
As I mentioned, a slight margin of error is acceptable as long as it doesn’t affect your guiding. If these numbers are wildly outside of the range mentioned above, there’s a good chance your calibration will fail altogether. I will touch more on this later.
RA and Dec Rate
The numbers on your chart may not be the same as mine, as they are mainly dictated by your guide rate. My guide rate here was set to 0.50x.
If there is a major difference between the actual and expected rates, there is an issue somewhere.
Most of the time, the issue is that your guide rate in PHD2, and the guide rate in your ASCOM software don’t match. This is a problem that needs to be corrected before you proceed with your guiding.
If the difference you see is only in your Dec rate, this is likely backlash in your mount. Before you resort to opening it up and tuning it, make sure to run the Guiding Assistant.
Both of these topics are covered here in 9 tips on how to improve PHD2 guiding .
Declination
This is the declination of where my scope was pointing when I did the calibration; as you can see, mine was not within 30 degrees of the celestial equator. Whoops.
My guiding was still pretty good in this case, but it’s a good idea to stay within the PHD2 guidelines now that you know what they are.
Focal Length
This is the focal length of your guide scope.
It’s not the diameter of the guide scope, and it’s definitely not related in any way to your main scope unless you are using an off-axis guider.
If this is wrong, it’s probably going to cause the following error that I will discuss.
Calibration Failed- Star did not move enough.
If you are getting this error message, it’s likely because you have your guide scope focal length or your guide camera pixel size set incorrectly.
Both of these numbers absolutely must be correct. PHD2 needs these two numbers to calculate the image scale of your guiding equipment. It uses the image scale and the calibration distance to calculate the correct value for the calibration steps.
When these settings are wrong, the calculation for the calibration steps is also going to be incorrect. As a result, the star will likely not move enough, and your calibration will fail.
To check these settings, click on the brain in the bottom left-hand corner and click on guiding.
If you realize that your focal length is incorrect and change it, make sure you still click on advanced.
If you don’t click advanced to open the calibration calculator, it will not re-calculate the correct calibration steps. If the calibration steps are left unchanged, the problem will persist.
PHD2 is a fantastic piece of guiding software and is pretty easy to use once you have it set up correctly.
Before you can start guiding, you need to make sure that your settings are correct and calibrate properly.
The vast majority of PHD2 guiding issues are caused by one of the three following things:
- The guide rate in PHD2 doesn’t match the ASCOM software guide rate
- The guide scope focal length is set incorrectly
- The guide camera pixel size is set incorrectly
Sources: https://openphdguiding.org/man-dev/Advanced_settings.htm
1 thought on “How To Do A Proper PHD2 Calibration”
- Pingback: 9 Tips on How To Improve PHD2 Guiding -
Comments are closed.
Trouble-shooting and Analysis
General guide to resolving problems, large/abrupt guide star deflections.
- Tiny movements of the various components in the guiding assembly as a result of the changing gravitational forces while the mount tracks the target object
- Dragging, binding, or snagging of cables, especially those that are connected to the guide camera
- Wind gusts or less commonly, effects from camera filter changes, auto-focusing, or mirror movement
- Use of mount features for backlash compensation - these should not be used with PHD2 guiding
Camera Timeout and Download Problems
In some cases, you may experience problems where guider images aren't downloaded or displayed. In extreme cases, this may even cause PHD2 or other camera-related applications to be non-responsive (i.e. to "hang"). This is nearly always due to hardware, camera driver, or connectivity issues, with one of the most common culprits being a faulty USB cable or device. It is highly unlikely to be caused by an application like PHD2 , so you should begin your investigation at the lower levels of the system.
To help detect these problems and avoid “hangs”, PHD2 uses a camera timeout/retry mechanism. This timeout value is set in the Camera tab of Advanced Settings and uses a default value of 15 seconds. This means that PHD2 will wait up to 15 seconds after the expected completion of the exposure to receive the image from the camera. This is a very generous amount of time and should work well for most cameras. When the timeout occurs, PHD2 will automatically disconnect the camera and try to re-connect. An alert message at the top of the screen will advise you of the timeout event and whether the reconnection attempt was successful. Regardless of whether the reconnection succeeded, you have a hardware problem of some kind that needs attention.
Here is an approach you can use to reproduce and then identify the problem:
Make sure you are running the latest version of PHD2 – often a development version – and the latest versions of the camera drivers. Some of the camera vendors issue frequent software changes that must be matched by corresponding changes in the software libraries used by PHD2. When these updates aren’t backward compatible, you have no choice but to run the latest versions of everything.
Confirm that the guide camera is basically functional - try using a short, direct cable from the camera to the computer and taking exposures with the native or test application that came with the camera.
Repeat step 2 but use PHD2 as the application. You can do this in the daytime by just connecting to the camera and looping 1-2 second exposures for a reasonably long time. The PHD2 display will often be all-white in daytime operation, but as long as the looping continues with no error messages, things are going ok. If you see problems in this step, it doesn’t mean it’s a PHD2 problem – it isn’t. The difference is that PHD2 is using the camera in single-exposure mode whereas most other apps use it in video streaming mode. The single-exposure mode involves more back-and-forth data traffic with the camera and can expose timing problems in the drivers.
If you can’t trigger a failure in step 3, add the imaging camera into the mix. Use your imaging application to loop exposures in parallel with what PHD2 is doing. This will help expose traffic and bandwidth problems in the USB system.
If no problems occur in step 4 over extended time periods, use the same USB cables and host computer that you were using when you first encountered problems. If you’re already doing this, you need to consider other possibilities:
- The problem may be temperature-related – perhaps it occurs in colder nighttime conditions but not during the daytime.
- The OS may be suspending one or more of the USB ports for power-conservation. This has become a more common problem with Windows 10 and later releases. Use the Windows device manager and find all the entries that refer to a USB “hub” or a USB controller. For each of these entries, open their properties dialog and click on the ‘power management’ tab. Disable any permissions that allow the OS to suspend the device for power management reasons.
- Make sure the power source on your test computer matches that of the computer you use for imaging. Both should be running on A/C power at this point.
- The problem may be triggered by loose cable connections on either end – the cables should not lose connectivity if the cable is moved around as it will be during imaging.
When you can replicate the timeout problem, the first place to look is the USB cable followed by the other USB components on your system. Sources of USB-related problems include the following:
- Low-quality or slightly damaged USB cables - in recent years, some of the camera vendors have started shipping low-quality USB cables with their cameras so you shouldn't assume the one you got with the camera will work. It’s also important to remember that we work in a hostile environment while imaging, and many of the components we use were not designed for cold, outdoor conditions. If you regularly tear down and reassemble your gear, the flexing of the cables can damage low-quality conductors. So something that worked just last week or last month may no longer be reliable. High-quality USB cables with 24AWG conductors and lengths no greater than 15 feet are recommended.
- USB-2 cameras and cables plugged in to USB-3 ports - t hose combinations are supposed to be backward-compatible but that’s only at the hardware level, the driver implementations can be adversely affected.
- USB port suspension by the OS (step 5b above)
- Marginal power delivery to the guide camera - y our main imaging camera probably has its own power supply but other devices like the guide camera are typically powered via the USB cable. Particularly with laptops and inexpensive computers, you may want to try using a powered USB hub to deliver power to the camera. This approach may also be required when operating in cold conditions or when using cables of maximum length.
- Use a Microsoft tool (USB View) for mapping the tree structure of USB ports and USB controllers.
- Try choosing ports that will keep your imaging and guide cameras on separate USB buses.
- Try using a different camera driver. Many vendors supply both an ASCOM and a native driver, so try the one you haven’t been using. It’s not uncommon for some of the ASCOM drivers to lag the native drivers in terms of bug fixes and compatibility
- See if the problem is related to overall USB bandwidth and try to reduce the total USB usage:
Calibration and Mount Control Problems
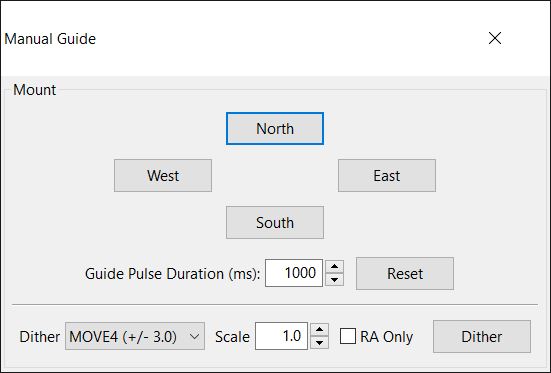
- Mount/connectivity problems or operational mistakes: These are the most common sources of the problem. The best tools for trouble-shooting them are the 'Manual Guide' dialog or the Star-Cross test, both under the 'Tools' menu and described in the Tools section of this help document. Simply use the directional controls in the 'Manual Guide' window to send commands directly to the mount while watching a star in the image display window. Use fairly large guide pulse amounts - at least several seconds - so you can clearly see if the mount is moving. Try to move the mount in all four directions and verify the target star is moving by roughly equal amounts. If the mount does not respond, you know you have either hardware or connectivity problems to resolve - nothing to do with PHD2 . Operationally, you cannot complete a calibration if you're pointing close to the celestial pole or if the mount isn't properly initialized, un-parked, and tracking at the sidereal rate. If you're using a Shoestring device to connect to the mount, watch its indicator lights to see if the commands are reaching it. Similarly, your ST-4 compatible guide camera may have indicator lights to show when guide commands are being received. If you're using an ASCOM connection to the mount, be sure the COM port assignments are correct and you've selected the correct ASCOM mount driver for your equipment. You can use some of the ASCOM-supplied tools like POTH to be sure the ASCOM driver is communicating correctly with the mount. It is best to use the latest version of the ASCOM driver for your mount to insure pulse-guiding support is complete.
- Incorrect calibration step-size: If you've used the new-profile wizard and have provided correct values for focal length, camera pixel-size, and mount guide speed, the "step-size" used in calibration should already be correct. You should confirm this, however, because beginners frequently enter incorrect values for these parameters. If you've defined or modified your profile by hand (a bad idea) or have changed guide speed settings in the mount, you may need to adjust the 'calibration step-size' parameter in the 'Guiding' tab of Advanced Settings . The help content there describes how this parameter is used, and you should be able to resolve the problem quickly. But if you've used the new profile wizard carefully and are seeing problems with too little or no guide star movement, the problem probably lies elsewhere.

- Too few steps (shown above) - resolving this issue can be easy assuming the mount is actually working correctly. Just adjust the calibration step-size downward until you get at least 8 steps in both the west and north calibrations. If you used the new profile wizard to set up your configuration, a good starting value for calibration step-size will already be set. In that case, the alert suggests you entered parameters incorrectly in the new-profile-wizard or the mount guide speed has changed. You should check these things and make sure they're right. If you find that the number of steps in RA and Declination are substantially different, you are probably seeing evidence of declination backlash unless you are using different guide speed settings on the two axes.
- Orthogonality error - the camera axes are normally computed independently even though they should be perpendicular. The angle calculations do not require great precision, but if they are significantly non-orthogonal, you should repeat the calibration. If you see repetitive alerts of this type and the axes are significantly non-orthogonal, you need to identify the problem and fix it. Common causes are bad polar alignment, large declination backlash, or large periodic error in RA. Any of these problems can cause the guide star to move significantly on one axis while PHD2 is trying to measure its motion on the other axis. If you suspect these problems, go ahead and accept the calibration, then run the Guiding Assistant to measure your polar alignment error, declination backlash, and RA tracking error. In other cases, the mount may not be moving at all, and the measured displacements of the star are just caused by seeing effects. This sort of problem should be obvious in the calibration graph at the left of the dialog. If the axis error is relatively small and you are convinced the hardware is working properly, you can avoid further alerts of this type by setting the option to 'Assume Dec orthogonal to RA' in the 'Guiding' tab of the Advanced Settings dialog. But you should do this only if the error is fairly small - otherwise, you are simply ignoring a serious problem.
- Questionable RA and Dec rates - assuming the guide speeds reported by the mount are accurate, the measured guide rate for right ascension should be related to the declination guide rate by approximately a factor of cosine (Declination). In other words, the apparent RA rate gets smaller as you move the scope closer to the pole. PHD2 won't try to identify which rate is incorrect - it is simply alerting you that something looks wrong with the rates. You can sanity check these rates yourself quite simply. If you are guiding at 1X sidereal rate, your declination guide rate should be approximately 15 arc-sec/sec; with a guide rate of 0.5X sidereal, the declination rate would be 7.5 arc-sec/sec, etc. A declination rate that is significantly smaller than the RA rate is often an indication of substantial declination backlash . Using a calibration that triggered this alert can lead to over-shooting in Dec guiding because the actual guide rate is probably larger than the measured one. To work around this problem, you should manually clear the Dec backlash before starting calibration. You can do this in either of two ways: 1) make sure the mount's last slew direction was north or 2) use the hand controller to manually move the mount north ('up' arrow) at guide speed for 10-20 seconds.
- Inconsistent results - if the calibration results are significantly different from your last-used calibration, an alert message will be generated. This may happen because you've made a change in your configuration. That doesn't imply a real problem, but you should probably consider creating a separate profile for the new configuration. By doing so, PHD2 will remember settings for each of your profiles, letting you switch between them easily. If you haven't made a configuration change, you should determine why the results are so different.

- Set the mount guide speed to 1X sidereal. Bring up the 'Manual Guide' tool in PHD2 and choose an initial value for 'Guide Pulse Duration' - start with, for example, 5 seconds.
- Start a 60 second exposure on the main camera.
- Send a 5-second pulse west, then two 5-second pulses east, then a final 5-second pulse west. This should return the star to its approximate starting position. You should wait about 5 seconds after sending each guide pulse to give the command time to complete before sending the next pulse.
- Now send a 5 second pulse north, then two 5-second pulses south, then a final 5-second pulse north. This should again return the star to its starting position.
- Wait for the main camera image to download and see what you get.
Lost-Star Events
- The screen will flash and a "beep" tone will sound. The sound can be disabled if you wish (Advanced Settings/Guide tab) but the screen will always flash
- No guide commands will be issued and the next guide camera exposure will be started
- Lost-star event messages will be sent to any imaging applications that are connected to PHD2
- Lost-star messages will be displayed in the status bar including the reason for the loss - low SNR, low HFD, low-mass, or mass-change
Alert Messages
Display window problems, hot-pixel and star-selection problems, restoring a working baseline.
- On the 'Algorithm' tab of the Advanced Settings dialog, you can individually reset parameters by looking at the tool-tip for each field. Hover your mouse cursor over the field and the default value will be displayed. Note that this is not accurate for the min-move settings, which depend on your image scale. This approach is best when you want to restore only a few settings.
- Click the 'reset' buttons on the 'Algorithm' tab for the selected RA and Dec guide algorithms. This is the recommended approach for resetting all the guiding parameters. The min-move settings will be reset to the values originally calculated by the new-profile-wizard. If you subsequently adjusted those settings by running the Guiding Assistant, you should repeat that process.
- Run the new-profile-wizard, accessed by clicking on the 'Manage Profiles' button in the 'Connection' dialog. Use the same camera and mount choices you already have and give the profile a new name. If you want to re-use the dark library and bad-pixel map from the old profile, connect to the new profile and use the 'Darks' menu to import those files from the old profile. Once you are satisfied with the new profile settings, you can delete the old one.
Poor Guiding Performance
Log analysis, guiding log contents.
The PHD2 guide log will contain zero or more sequences of calibration and zero or more sequences of guiding. Each of these sections has a header that provides most of the information about the guiding algorithms being used and the internal parameters used by PHD2 for guiding. At the start of either a calibration run or a guiding sequence, the last line of the header information defines a set of column headings. The meanings of those columns are shown below:
Calibration columns:
- dx, dy are offsets from the starting position, in pixels, in the camera coordinate system
- x, y are the camera x/y coordinates of the guide star at the end of each calibration step
- Dist is the total distance moved in the camera coordinate system (dist = sqrt(dx*dx + dy*dy). This is the value used by PHD2 to compute the calibration parameters
- dx, dy are the same as for calibration - offsets from the "lock position" of the guide star in the camera coordinate system
- RARawDistance and DECRawDistance - these are the transforms of dx and dy into the mount coordinates - in other words, they use the arbitrary angle of the guide camera to map from X/Y on the camera to RA/Dec on the mount
- RAGuideDistance and DECGuideDistance - these are the outputs from the various guiding algorithms. The guide algorithms operate on the "raw" distances and decide how far, if any, the telescope position should be adjusted in each axis. For example, with a "minimum move" parameter set, the "guide" distances can be zero even when the "raw" distances are non-zero.
- RADuration, RADirection, DECDuration, DECDirection - these are the values determined by the two "guide" distances above. The "durations" are the lengths of the guide pulses, in milliseconds, needed to move the mount by the distances specified by RAGuideDistance and DECGuideDistance
- XStep, YStep - step-adjustment durations for the adaptive optics device if one is being used
- StarMass - a brightness measure of the guide star image
- SNR - an internal "star-detection ratio" used by PHD2 - essentially a measure of how well the star can be distinguished from the sky background
- ErrorCode - an integer value representing the quality of the guide star measurement:
- 0 - no error
- 1 - star is saturated
- 2 - star has low SNR
- 3 - star mass is too low for accurate measurement
- 4 - star HFD is below Min-HFD value
- 5 - star HFD is above Max-HFD value
- 6 - star has drifted too near the edge of the frame
- 7 - star mass has changed beyond the specified amount (only if mass-checking is enabled)
- 8 - unexpected error
All distance values are in units of pixels. The header for the guiding section will show the image scale as it is known by PHD2, and that can be used to scale the pixel distance values into units of arc-seconds if desired.
Problem Reporting
- Try to reproduce the problem - if we have a clear set of steps to follow, we are more likely to find a solution quickly. If you can reproduce it, try to reduce things to the minimum number of steps. Remember, we won't have your hardware or computer environment when we try to reproduce it ourselves.
- Try to be complete about describing your configuration - operating system, equipment types, PHD2 version, etc.
- Upload the PHD2 log files from the session in which you encountered the problem - this is a critical step. Use the 'Upload log files' function on the 'Help' menu to do this -- it gives you an easy way to select the relevant log files and then uploads them to our server without constraints on file size. Attaching log files to forum messages is discouraged and will often not work at all because of the file sizes. If you can't reproduce the problem, try to estimate the time of day when you first saw it - this could help us find evidence in the debug log without having to sift through hundreds of lines of output. If you request help on the forum without uploading your log files, you will usually be asked to do so, thus adding an unnecessary delay in getting help.
5 Tips for Better PHD2 Guiding
PHD2 is a telescope autoguiding software that automates the process of tracking a guide star. This is an important aspect of deep sky astrophotography because it allows you to focus on capturing successful long exposure images and get the most out of your telescope mount .
PHD2 is easy enough for a beginner to use right away, yet also includes sophisticated guiding analysis tools that experienced users will appreciate. The software is available for Windows, Linux and Mac operating systems. The built-in help file inside PHD2 contains a wealth of information, or you can download the instruction manual here .

My autoguiding graph in PHD2 using the Sky-Watcher EQ6-R Pro telescope mount
PHD2 Guiding Settings for Astrophotography
I have found PHD2 Guiding to be an incredible tool for my backyard deep sky astrophotography. I have been using this software for a long time, starting with the original PHD “1” verion. The latest version of the software (PHD2) has been totally overhauled by a team of passionate developers that aim to make autoguiding even better.
Download the latest version of PHD2 Guiding
The guys over at the Astro Imaging Channel released an informative video featuring one of the team members of PHD who worked on the software. Andy Galasso quickly reveals just how passionate he is about the project, and how knowledgeable he is with the PHD guiding software.
The video is quite long, but contains a wealth of information about autoguiding with PHD:
The intelligent folks over at PHD can explain the full power of PHD2 guiding better than I can, but I thought I would share what I personally took away from this enlightening presentation. Before adjusting the settings in PHD2 Guiding, it is important to make sure that your equipment is prepared for imaging. This includes accurate Polar Alignment and balancing the weight of your payload.
How to use PHD2 Drift Alignment
Here are the top 5 tips I gathered from watching Andy explain exactly how to use PHD2 guiding for best results:
Use the Guiding Assistant

Find this feature under Tools > Guiding Assistant
As Andy puts it, you’ll want to observe an unguided star motion to see what you are up against. This gives you a window into the amplitude of the RA (Right Ascension) periodic error. Again, explore this tool for a more detailed insight into your particular mount’s characteristics.
The Right Ascension Max Drift rate displayed in the guiding assistant will display a recommended guide exposure length. Very handy!
Create a New Profile using the Wizard

The built-in equipment profile wizard in PHD2 guiding allows you to tell PHD exactly which hardware you are using. Here you can set all of the specific details of your gear. This includes entering in your guide scope focal length and autoguiding camera pixel size.
At this point it will also prompt you to build a dark frame library. You’ll want to make sure that PHD2 Guiding is making the necessary corrections relevant to your unique setup.
Use Auto Star Select
PHD 2 Guiding has an advanced feature that calculates the best possible star in your field of view to use for guiding. It will select a star based on algorithms to avoid over saturated or poorly sized stars. Why not let PHD choose the best possible star, rather than guessing yourself!
In the past, I would try to select a star that was “medium-sized” and near the center of the frame. This guessing game no longer takes place thanks to the auto star select feature within PHD2 Guiding.
Try using longer guide exposures
In the video, Andy explains that his tests show that using longer guide exposures results in fewer pulse corrections needed. This was a big eye-opener for me, as I had never given much thought to the guide exposure length I would use. Generally, my guide exposures were about 1 to 1.5 seconds. The diagram below illustrates how longer guide exposures can provide a smoother graph:

He recommends using longer guide exposures for improved performance. Earlier, I mentioned using the guiding assistant to give you a recommended guide exposure length. In the example used for Andy’s equipment, that was an exposure of 2.7 seconds. As a rule of thumb, do not expose so long that the stars begin to over saturate, or PHD will not be able to provide an accurate pulse correction.
Use the graph. Over/Under Correcting
When looking at the graph in PHD, remember that blue is RA , and red is DEC . If your graph displays a zigzag pattern like the one below, it is a good sign that you are over-correcting. Toggle the “corrections” check box to get a visual reference for exactly what PHD is doing.

If you are over correcting, the solution is to decrease the aggressiveness and increase your RA minimum motion. On the other side of the coin, if you are under-correcting, your graph will look like the image below:

For more information about autoguiding with PHD2 Guiding, please visit the Open PHD Guiding Google Group Forum or the Stark Labs Astronomy Software Forum on Yahoo . These forums offer answers to many of the troubleshooting issues you may experience while using PHD for astrophotography.
Clearly, I am still learning the ins and outs of this software myself. I hope to improve my knowledge of PHD2 this year to get the most out of this amazing free resource for astrophotographers.
Improved Autoguiding with the iOptron CEM60
In October 2017, I tested out a new astrophotography mount, the iOptron CEM60 . One of my main goals was to see if this mount could outperform my Sky-Watcher HEQ-5 Pro in terms of autoguiding, and overall tracking performance.
Have a look at the PHD2 graph I was able to achieve while imaging early on in my testing. The total RMS error was less than 1 second, and noticeably better than anything I had seen using the HEQ-5 Pro.
However, the fact that I was now pulse guiding via ASCOM to the mount directly may have made a difference as well. (This can be done on the Sky-Watcher HEQ5 as well)
PHD Guiding with the Sky-Watcher EQ6-R
A new telescope mount presents an opportunity to compare guiding performance. The Sky-Watcher EQ6-R was very impressive in terms of autoguiding performance right out of the gate. Using the default settings with PHD and the generic ST-4 mount connection, I was able to achieve an impressive guiding graph.
In the screenshot below, you’ll notice that the total RMS error is 0.16 (0.63″). This resulted in an incredibly sharp image with round, pinpoint stars in each frame. Autoguiding with a telescope mount like this means that you will never have to discard image exposures due to bad guiding, and elongated stars.

My PHD guiding graph using the Sky-Watcher EQ6-R mount
Related Posts:
- Using PHD2 Guiding with the Lodestar X2 Guide Camera
- Autoguiding Camera for the ASIair – ZWO ASI290mm Mini
- Astrophotography Resources: Software and Tools
Open PHD Guiding
- Use the forum search tools - most questions have been answered many times
- Read and follow the Best Practices Guide
- Use the New-Profile-Wizard to define and manage your equipment configurations
- Avoid making changes to guiding parameters without knowing exactly what they do
- After you get a good calibration run and a Guiding Assistant Run, per the Best Practices, run the Baseline Assessment

- Current Issue
- Submission guidelines
- Astrophotography Basics
- Binoculars and telescopes
- Readers images
- Wide Field Milky Way
- Star Parties
- Image Acquisition
Drift Alignment with PHD2
Last Updated on February 20, 2022 by John Rista
Welcome to my tutorial on using PHD2 and the bookmark technique to dial in extremely precise polar alignments.
Many of you may already be aware of the fact that PHD2 can be used to perform a polar alignment . What you may not be aware of is that polar alignment with PHD2 can be extremely accurate and that it can be done without necessarily having a line of sight on Polaris. For those of you who have an obstructed view, or live near the equator, aligning with PHD2 is a free, easy way to achieve very accurate polar alignment very quickly.
I am also sure some of you have tried PHD2 drift alignment and given up on it. You found it clunky, difficult to avoid cycling back and forth between one bad alignment and another, etc. You may have even put money into another tool to solve your alignment problems, tools that may rely on the (potentially inaccurate or imprecise) pointing accuracy of your mount for “iterative” alignment. This tutorial aims to introduce you to the key feature of PHD2 that alleviates these problems, making polar alignment easy, fast, and consistently effective…at dialing in VERY accurate PA: bookmarks.
If you’re like me, you’ve noticed the bookmark feature of PHD2 throughout your time using it, but never realized with a use for them. While trying to improve my PA a few weeks ago, early August 2014, I was struggling with PHD2 drift alignment while trying to move the guide star the right amount, relative to its previous position. It hit me at that point that bookmarks would be a perfect way of gauging how far, and in what direction, I needed to move the guide star, in order to properly refine my alignment. The key benefit of polar aligning with PHD2 is it requires only the adjustment of your altitude and azimuth adjustment knobs or bolts. This is a benefit, in that it means you can dial in an accurate polar alignment without having to rely on the pointing accuracy of your mount (which may be limited to 1-2’). This alignment technique does not require iteration between two stars and therefore does not require you to move the mount at all. At least, not beyond the initial pointing towards your alignment star (near the meridian and CE for azimuth, or horizon and CE for altitude). Once pointed, all adjustment is done purely with the alt/az adjustments on the mount. All of the frustrations with PHD2 drift alignment can be eliminated by using bookmarks. By marking the current position of the star before each adjustment with alt/az knobs, you have a clear gauge of where the star was, and after a couple of adjustments, you know exactly what effect turning your adjustment knobs one way or the other has on the star position relative to where it was. This takes a lot of the guesswork out of PHD2 drift alignment , which is probably the greatest source of frustration, and a key reason why it can be just as time-consuming as other methods. Bookmarks also help you define a shrinking range as you add more bookmarks, guaranteeing that, somewhere between two of those bookmarks lies a perfect polar alignment . With just a few iterations of drifting, placing bookmarks, and making smaller and smaller adjustments, you can dial in a polar alignment less than 0.5’ (<30”) off the NCP, and if you are persistent, within a few more iterations you could dial in a polar alignment less than 0.1’ (<6”). With a little bit of practice, performing fast, highly accurate polar alignment to ten arcseconds off the NCP can be achieved in *less than 15 minutes.* This screenshot shows the kind of tracking and guiding performance that is possible with a very accurate polar alignment :
Getting Started
First things first, you need to get PHD2 ready to use for drift alignment . You will need to start it up, point at a star near the meridian and celestial equator (for azimuth alignment, which the drift align wizard defaults to on startup), and calibrate PHD. Calibration must be performed before doing drift alignment . If you forget to calibrate, the drift align wizard will only momentarily display a message in the status bar indicating that calibration is required for the wizard to work. After calibrating, choose a high SNR star (over 10) within the middle quarter of the frame. It is important to choose a star here, as when you start adjusting, the star can move in any direction in the frame, by as much as a quarter of a frame initially. Picking a star near the edge could result in adjustments moving the star right out of the frame.
Before starting the drift alignment wizard, you should make sure that bookmarks are enabled (shown), and that you delete any existing bookmarks. This will assure that you don’t end up confused about which bookmarks mean what (especially if you had tried to drift align earlier, and ended up needing to repoint the mount.) It probably goes without saying, but saying it anyway for good measure: Make sure you are pointed a bit ahead of the meridian, and any of your mount’s stop limits, so you have time to perform drift alignment without running into a meridian or horizon limit during the process. It also helps to make sure that there are no trees or other obstructions that might find their way into the frame while your aligning. Finally, set your exposure time to 1 second, so you can see an immediate response to any adjustments you make. It also helps to set the history period to 200 ticks, and the y axis to 8. I’ve found that these settings are best for early drift checks…later on, when you require longer drift checks, you might want to up the period to 400 ticks.
Once all the above things are done, you’re ready to start the drift alignment wizard. You can find it in the Tools menu, Drift Align. You should see a window like this appear when clicking on that menu option:
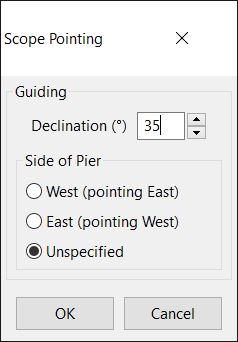
The Scope Pointing feature will only be accurate if you are using ASCOM Pulse Guiding. If you are using an ST-4 cable to connect your guide camera to the ST-4 guide port on your mount, the information here will not be accurate. If you are using ASCOM Pulse Guiding, you can even control your mount from within the PHD2 drift align window, and it will show you how close you are to the meridian and celestial equator, making it very easy to get right on top of it for really good drift check.
Drifting and Adjusting Click the “Drift” button, and let PHD start the drifting process. PHD will
automatically disable declination guiding, however, it will guide in RA. Let PHD drift for a good 20-30 seconds…anything less, and the information is bound to be highly inaccurate. Especially early on in the drift alignment process, the first 10-20 seconds of drifting will be erratic, and the indicators (trendline and the pink circle around your guide star) will jump around, possibly quite wildly, until they “settle” and normalize around a given trend.
Depending on your luck, you may find that your polar alignment is quite good, or you may find that it is quite bad. As a general rule of thumb, if your drift is out by more than about 8’, then you will need to tighten it up a bit before actually using bookmarks. The reason for this is an 8’ or larger will often require moving your chosen guide star right out of the frame (larger sensors, like the Orion SSAG, may be viable up to 10-15’). I find it’s best to try to get an initial polar alignment between 2-5’ with whatever initial routine you use, as this is usually sufficient to keep the guide star within the frame throughout the rest of the process.
Once you know the direction your guide star is drifting, and by how much, click the “Adjust” button in the drift align window. BEFORE you actually make any adjustments, click back into the PHD window, and on your keyboard type SHIFT-B. This will create a bookmark at the current position of your guide star:
For a better view of what a bookmark looks like, it’s the cyan-colored set of circles within the green guide star box:
Now you can make an adjustment with your azimuth knobs. You will see a pink circle around your guide star. This circle will follow the selected star once you hit align. This is supposed to be an indication of how far you need to move the guide star (with the azimuth knobs, not by moving the mount in RA or DEC!) in order to refine your polar alignment . It should be noted that this circle is only accurate when you are VERY close to the meridian/CE junction…within +/-5 in meridian offset and declination in the “Scope Pointing” box of the drift align window. If you are not using ASCOM Pulse Guiding, it may never be accurate, regardless, since it’s accuracy depends on PHD having an accurate reading of where the mount is currently pointing. If you are close to the meridian/CE junction, you can move the guide star from the center of its bookmark to the edge of the pink circle, and that should dial in a fairly decent PA. If you are not close enough to the meridian/CE (which is probably the case, if you need a good 10-15 minutes to align, your probably at 0 DEC, and off the meridian by 15 degrees), then you will want to move the star about a quarter of the size of the frame at most. I have found that moving the star enough that it’s drift “switches sides” helps you gauge, with pretty high accuracy, where to move the star on the second move to quickly dial in a good, sub arcminute polar alignment .
To clarify, if you started out pointing to the east of the meridian, drifting two arcseconds in the negative (red plot in PHD drifts above the midline in the graph, and the “ Polar alignment error:” indicator at the bottom left of the graph shows a negative number), you should initially try to adjust your guide star to drifting one to two arcseconds in the positive (red plot in PHD drifts below the midline in the graph, and the “ Polar alignment error:” indicator at the bottom of the graph shows a positive number). (NOTE: If you are pointing west, these directions may be reversed.) Let it drift for about 30 seconds, and when the polar alignment error indicator and trend lines settle, place another bookmark. Note: You may find that your first adjustment simply makes your original alignment of 2-5’ even worse. This simply means that you need to adjust the opposite direction. It is important to look for this, as knowing which direction to turn your azimuth or altitude adjustment knobs is important to quickly dialing in an accurate alignment. You now have “bookends”, as I call them. These two points should be your absolute outer boundaries. If you make any adjustment to the star that pushes it beyond these two points, you are pretty much guaranteed to end up with a worse polar alignment . Somewhere between these two points is a perfect polar alignment . The task now is to refine your alignment and use additional bookmarks to tighten the range within which you will find that perfect polar alignment .
Now that you have your bookends, you need to make another adjustment. If you started out with your first bookmark at around -2’ PA, and your second one at around -1’ PA, then you know that roughly midway between those two points is an accurate polar alignment . The simplest approach to making the next movement of your guide star is to move it midway between the first and second bookmarks. My recommendation is to try to move it close to, but not exactly to, the midway point. If the star is currently at bookmark 2, move it about 3/8ths of the way back towards bookmark 1.
Do some drift, and check your alignment. You may need to drift for a minute or two to get an accurate read. You should find that your PA is less than 1’ now, and if you’re lucky, it should be less than 0.5’ (30”):
Click the Adjust button again, use SHIFT-B to set a third bookmark. You should now have three bookmarks, with the third in-between the first two within the range for polar alignment . You should also notice that the pink PA adjustment circle is quite small, compared to originally when it was quite large (in the case of this tutorial, it started out almost larger than the entire field of view at over 9’ polar misalignment.)
Now, which direction you move the star next depends on the direction it was last drifting. If you started out with -2’ PA, then moved to +1’ PA, then moved about 3/8ths of the way back to bookmark 1, you should be around +0.5’. That means you would still want to move the guide star towards bookmark 1. If, for whatever reason, you noticed that your PA was something more like -0.5’, then you would want to move the guide star back towards bookmark 2.
Making this determination for which direction, between which two bookmarks, to move the guide star is critical each time you set a new bookmark, and are ready to make another adjustment. You need to know which two bookmarks define your “range” within which a better polar alignment may be found. With practice, it will become second nature to gauge the direction in which your guide star should be moved to improve your polar alignment , but for now, the general procedure laid out in the previous paragraph is how you make that determination. Assuming that your PA was off by +0.5’ at your last bookmark, make another small move towards bookmark 1 with your azimuth knobs. This move should be very small:
Your polar alignment , at this point, should be around 0.5’ or less. As such, your drift will be very low, and may already be acceptable to you. If so, you can simply call it good here, and start working on your imaging session. If you want to really eliminate declination drift as an issue (you may have persistent issues guiding in dec, your mount may simply not guide in dec well as in the case of the Celestron AVX mount, etc.), you can keep refining. You will need to drift for longer. About two minutes drift or more with this level of accuracy is necessary to really see which direction your drifting, so you know which direction to adjust. Drift for a few minutes, click adjust and place a bookmark, then make an adjustment in the appropriate direction. Each successive bookmark should get closer together, and the location of a true, perfect polar alignment should start to become clear. If it does, it should become quite obvious exactly where you need to place your guide star to get a highly accurate PA. Do so, and you should be able to forget about guiding in DEC at all for the nights imaging session. Here is the fifth move of the guide star, resulting in a polar alignment of 0.19’:
I wanted to see if I could dial in an even better alignment, so I made one final move, and let the star drift for a longer time to get a better read on the alignment. Final PA for this session ended up being 0.05’, or 3”:
Here are some full views of the PHD guide graph, showing the alignment and drift of the star over a period of several minutes:
It can also be useful to check the target graph, which is point sampling plot of the star centroids over time. I like to set it to 400 samples, to get a good statistical read, and gauge how the samples are distributed. In this case, over a period of about three minutes, the rough peak-to-peak distribution of the plots is about 2”, since the vast majority of the points fall within the 1” circle:
A significant amount of the points in this plot are within the 0.5” circle as well. If your exposures are less than three minutes, then you probably couldn’t hope for better than 1” P2P guided tracking. Finally, I also like to check my guiding RMS. If the overall is less than 0.5”, I consider that very good for shorter focal lengths (<1000mm) (I honestly don’t yet have enough experience with imaging at longer focal lengths to say how good it may be for imaging at say 2000mm or so.) In this case, it is 0.45”. DEC RMS is 0.25”, and RA RMS is 0.39”:
These are excellent for guiding alone. If you program and enable a PEC curve, these numbers should improve further, down into the 0.2x” range for everything, as PEC will take care of some significant sources of error, leaving behind more minor stuff.
Sometimes, once you start to dial in a really tight polar alignment , things stop behaving logically. You may expect that making a small adjustment in one direction will improve your PA…however once you make that adjustment, things seem worse. There can be a number of causes for this. For one, drift aligning on a night that has a consistent breeze, or any amount of wind faster than that, especially if it’s gusty, can make drift alignment quite a frustration. I’ve found that trying to dial in a PA better than 1’ on such nights is usually a fruitless endeavor, although with persistence, getting somewhere between 0.5’-0.75’ can be done. Sometimes, the relatively fast frame rate of 1s can become problematic at a finer drift scale. When your PA gets below 0.5’ (30”), you may want to reduce your frame rate to 2s. This should help alleviate seeing as a factor, and your drift should be more consistent. You will need to allow the star to drift for several minutes at least when doing this, in order to get an accurate read, but it can and usually will be much more accurate. It just slows down the process. Balance can play a big role in how easy it is to dial in polar alignments more accurate than 0.5’ as well. You need to make sure that the worm and ring gear in your declination axis remain engaged. If your imbalance is not significant enough, you may still experience what I call “declination bounce”, where your ring gear’s teeth effectively “bounce” off the worm teeth. This becomes a greater problem when your pointed close to the zenith…so if your meridian/CE junction is closer to the zenith, you may find that you need a greater amount of declination imbalance to eliminate bounce as a problem. Bounce will usually manifest as an oscillation in dec around the midline of the PHD2 graph. If you let your star drift for long enough (many minutes), you’ll eventually get an accurate read on your PA, and it may be quite good. Bounce simply increases the amount of time it takes to finish the drift alignment process, and in the long run, it can worsen your overall tracking performance in DEC (which kind of defeats the point of having such a good alignment in the first place). Finally, you may find that you have some drift in RA. A good drift align session will usually have bookmarks all lined up, probably along some diagonally oriented, but otherwise strait, vector. If your drifting a bit in RA, then your might find that your bookmarks also drift a little bit, along the diagonal oriented 90 degrees perpendicular to the angle of your azimuth adjustments. This isn’t a huge problem, but if the movement is significant enough, it can make it a little more difficult and time consuming to find that perfect spot where a really accurate polar alignment exists. If you plan to perform drift alignment in altitude, the last thing I’d stress is that you do your best to point as close to the horizon/CE junction as possible. If you point too far away from that point in the sky, PHD’s readings tend to lose accuracy. Point more than about 20 degrees away from that point in the sky, and PHD’s readings effectively become useless, as your drift will reflect both azimuth and altitude. Making “corrections” in altitude for that kind of drift has the potential to throw out your azimuth alignment. It may simply be luck, but I have found that my altitude alignment is not as important as my azimuth alignment. It may simply be that I dialed in a very good altitude alignment in the past, and it has stuck (the dial on the mount itself certainly seems to be pointing at almost the exact altitude I live at, 39 deg 58 min north, just a hair less than 40 deg north.) If you do not have a good altitude alignment, the closer you can find a guide star near the horizon/CE junction, less than 20 degrees away, preferably about 10 degrees away to allow for some lead time before the star disappears below the horizon, but close enough for an accurate read, the better. +
RELATED ARTICLES MORE FROM AUTHOR
Getting started : basic astrophotography, wide field astrophotography camera settings, latest articles, clear nights of frustration, neaf 2024 – april 20th and 21st, navigating the night sky: a beginner’s journey to perfecting polar alignment for optimal telescope..., zwo asi533mm-p 9mp cmos monochrome announced, star adventurer gti mount, follow us on instagram @practicalastrophotography, even more news, navigating the night sky: a beginner’s journey to perfecting polar alignment..., popular category.
- Image Acquisition 12
- Image processing 7
- Getting Started 7
- Astrophotography 5
- Learning Astrophotography 5
- Equipment Setup 4
- Destinations 4
You were not leaving your cart just like that, right?
Enter your details below to save your shopping cart for later. And, who knows, maybe we will even send you a sweet discount code :)
Insert/edit link
Enter the destination URL
Or link to existing content
- Privacy Overview
- Strictly Necessary Cookies
This website uses cookies so that we can provide you with the best user experience possible. Cookie information is stored in your browser and performs functions such as recognising you when you return to our website and helping our team to understand which sections of the website you find most interesting and useful.
Strictly Necessary Cookie should be enabled at all times so that we can save your preferences for cookie settings.
If you disable this cookie, we will not be able to save your preferences. This means that every time you visit this website you will need to enable or disable cookies again.
Automated page speed optimizations for fast site performance
- Alt-Az Mount Articles
- Visual Astronomy Articles
- Astrophotography Articles
Guiding the Panther Alt-Az mount with PHD2
Two simple terms you need to know
PHD2 was created with Equatorial mounts in mind. Therefore PHD2 uses the terms Right Ascension axis and Declination axis. When guiding an Alt-Az mount:
- Azimuth is equal to Right Ascension AZ = RA
- Altitude is equal to Declination ALT = DEC
How to connect the mount to PHD2
There are two ways to connect the mount and PHD2:
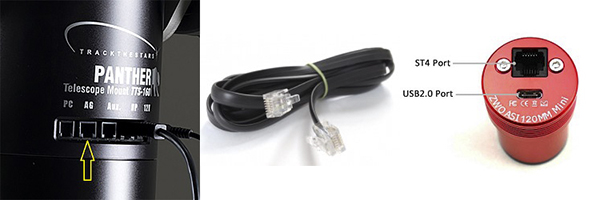
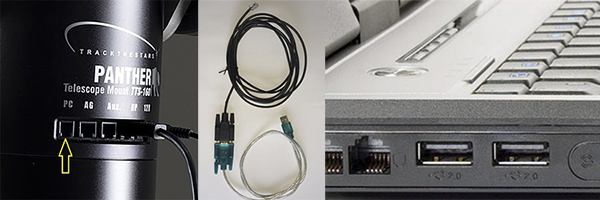
- Using PC interface and ASCOM driver You must install the ASCOM platform and the Ascom driver called: “ Meade LX200 Classic and Autostar #494, #495, and #497 ” Use a USB-to-Seriel adapter and the PC cable to connect the USB port on the computer to the PC port on the mount head.
ALWAYS connect ALL the cables before powering up the mount. Then power up the mount, align it and leave it in the operation screen.
Setting up PHD2 for Alt-Az guiding
Start PHD2 on the PC. Before starting to guide it is necessary to adjust some settings. In this article I will focus mainly on the settings that are important (different) when using an Alt-Az mount. I recommend you look at the user manual for PHD2 for a general description of the other settings.
This screen is shown at startup.
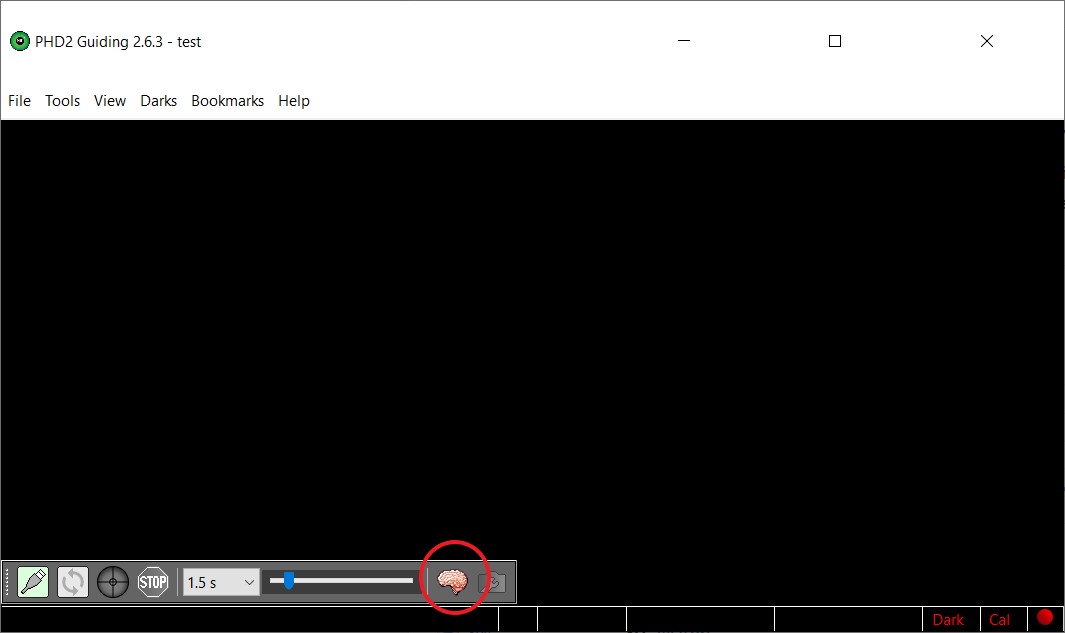
Click on the brain.
A new window with four tabs pops up. We will look at two of the tabs – guiding and algorithms :
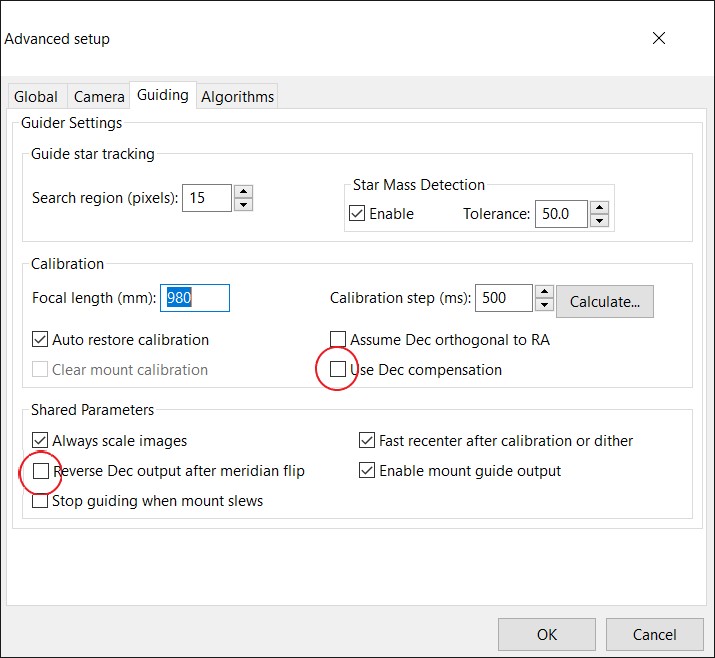
In the Guiding Tab be sure to adjust these settings:
- “ Use Dec compensation ” If you use the ST4 connection this setting must be ON If you use the PC/ASCOM connection this setting must be OFF
- “ Reverse Dec output after meridian flip ” Alt-Az mount do not flip. Must be OFF
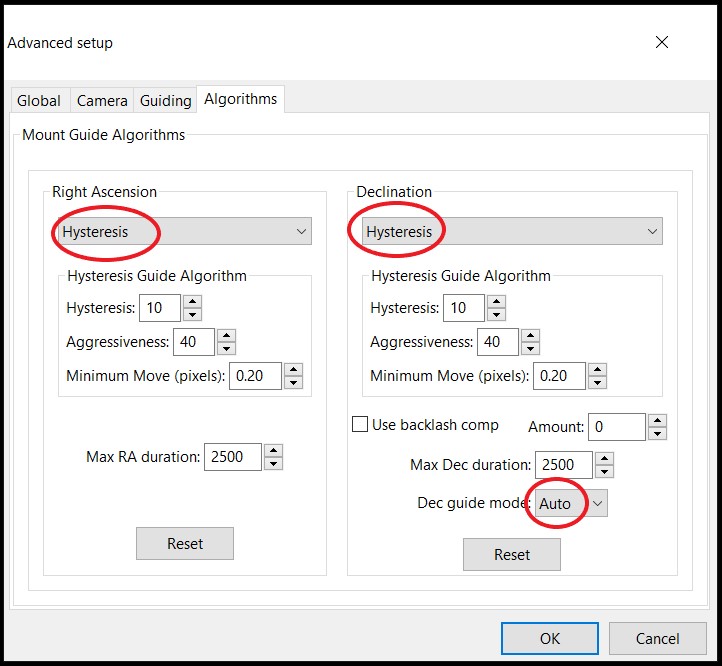
In the Algorithms Tab be sure to select:
- “ Hysteresis ” on both Right Ascension and Declination. On an Alt-Az mount both axis are tracking all the time. Therefore both axis must be guided as the RA axis on an equatorial mount. There is no backlash on an Alt-Az mount when guiding because the motors are never reversed.
- “ Auto ” as Dec guide mode – this is to allow guiding in both directions on the Alt axis.
Lets connect the equipment in PHD2
Click on the connector icon in the bottom left corner.
The Equipment connection window pops up.
- Select camera Select the guide camera you use
- Mount: Select ON CAMERA
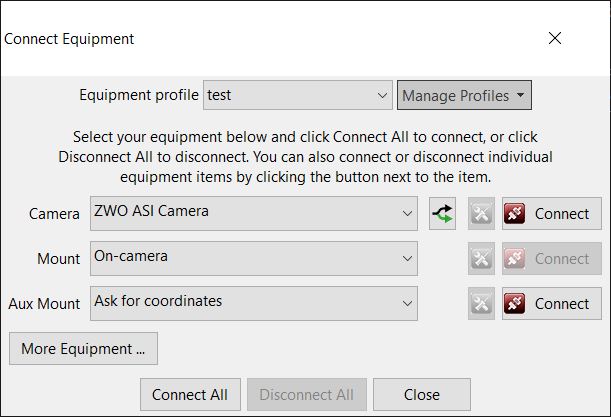
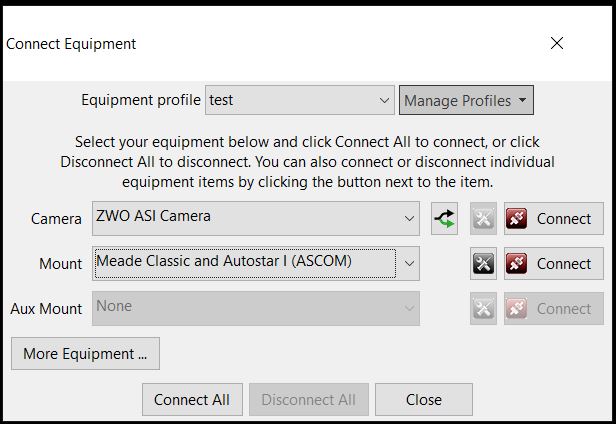
- Mount: Select Ascom driver: Meade Classic and Autostar I The port number of the seriel comm port on the PC must be correct. Click the toolbox icon to see the Ascom driver setup window. Change port number if connection is not succesful.
- Aux Mount: None
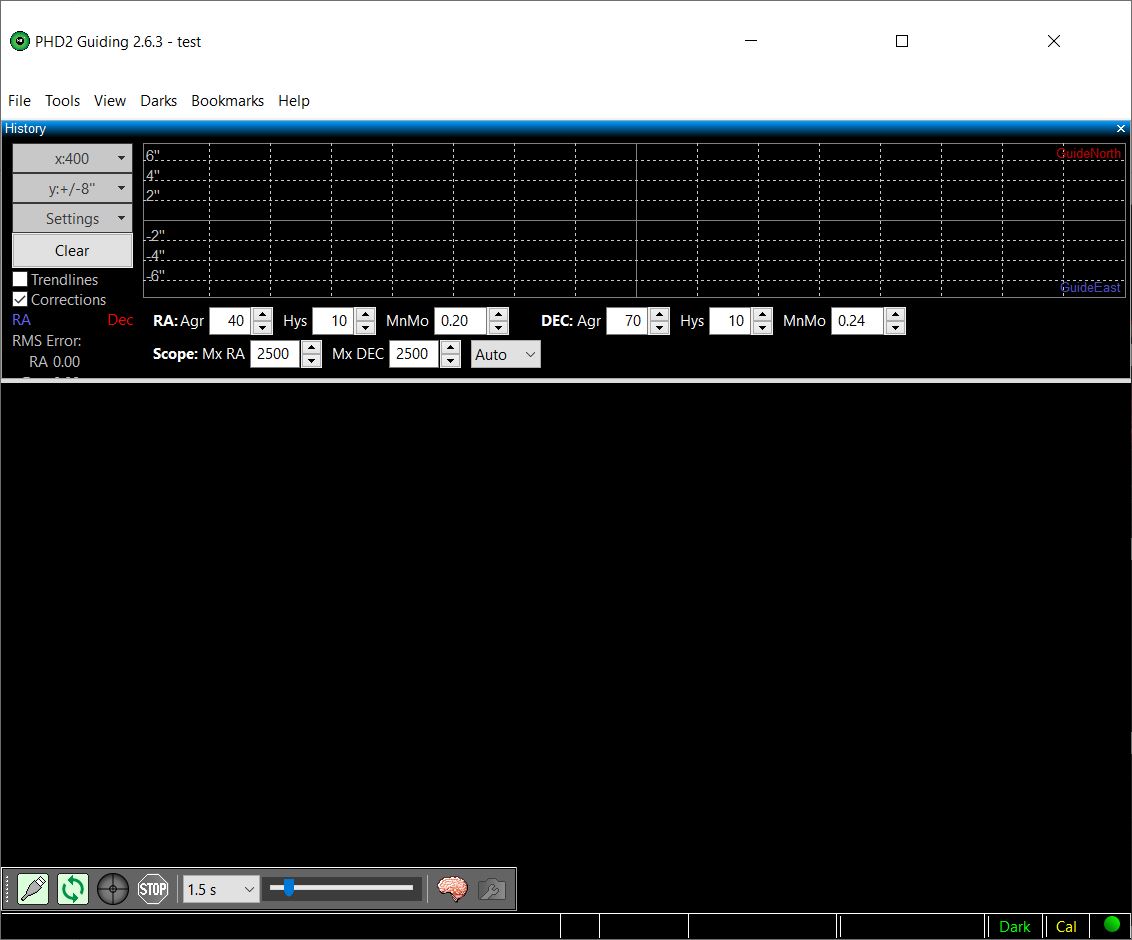
When camera and mount is connected PHD2 will show this screen:
Ready to calibrate the guider and guide
Calibration is the process where PHD2 moves the mount small distances in each direction and take images at each position. Based on this the PHD2 learns how the mount response to the guide commands and the finds the camera angle. Calibration is a completely automated process that only takes about a minute to perform.
Here follows the things you must be aware of to get a good calibration and a good guiding performance (again with main focus on the things related to Alt-Az mounts):
- Focus guide telescope carefully
- On the Panther Mount guide speed should be set to 10″/sec (this is selected in the setup menu)
- Calibrate on the same altitude as the target (just use actual guide star). If target is above 75 degrees in altitude calibrate at around 75 degrees.
- Calibration must be performed for each target if altitude changes more than 10-15 degrees. It only takes 1 minute to calibrate so why not.
- Just “Push Here Dummy” to start the calibration and guiding.
Appendix: Indoor testing of connections
Manual guide test at daytime/indoor.
When setting up new equipment it can be nice to complete as much as possible indoor not wasting clear sky. So when you have installed PHD2, Ascom and made all the settings it is nice to see if it works.
If you connect camera, mount head and the PC, you can follow this procedure for a basic check. If any step fails fix it before you move on:
- Align the panther mount with a “fake” alignment. Just pick any star (or the sun) that you know are above the horizon and make a one star alignment on it. The mount can point anywhere. The mount will now track and show steady equatorial coordinates (of the alignment star)
- Connect Camera in PHD2
- Connect mount – On camera if ST4 cable – Ascom driver if PC cable
- Now push one of the buttons. If you watch the Panther handpad you will see the coordinates change. We are talking few arc-seconds. And be aware that Right Ascension is displayed in time seconds – not arc-seconds – so the movement will be much smaller in RA.
- You must be able to see a movement in all four directions. No conclusions can be made on how much movement is seen, because that depends on other parameters not known in this test situation.
Enjoy the clear night sky.
posted in Alt-Az Telescope Mounts , Astrophotography
Get more out of your Alt-Az mount
Join the Alt-Az community on Facebook and learn tips and tricks from other Alt-Az mount users. Read about the latest updates on Alt-Az technology. Share yours and see others' astrophoto taken on Alt-Az mounts.
The TTS-160 Panther Telescope Mount
New Remote Alignment Video Guide
Watch the latest video on Track The Stars' official YouTube channel. In it Niels goes over the setup process and how to align your telescope mount from your couch.
- Using a Camera rotator to take perfect Astrophotos with no polar alignment needed 0
- Remote alignment of your Alt-Az mount for EAA and Astrophotography – No polar alignment hassle 0
- Messier Marathon 2023 – Visual and EAA 0
- Enjoy flexibility and the dark sky with a mobile observatory 0
- Alt-Az mount for EAA – a perfect match 0
- The Modern Alt-Az mount and Alt-Az astronomy
- Alt-Az Telescope Mounts
- Astrophotography
- Telescope Eyepieces
- Visual Astronomy
- +39 06 87153197
- [email protected]

- Extender OBS Pier Kit

- USER GALLERY
- SUPPORT PAGE
- Troubleshooting
- Video Tutorial
- SPACEWEATHER
The best guiding performance with our belt driven mounts comes by using the lowest possible guiding speed ( 0,2 / 0,4 ) , the shortest possible guide exposure ( 1 sec is ok ) and the lowest possible RA/DEC pulse guide duration (300 / 600).
Due to the Fast Reverse Belt Drive System fast pulse guide responding, it is strongly suggested to use a smoothed guide settings, to avoid overcorrections/oscillations. The above PHD2 guide parameters table can be used as starting values that must be adjusted on depending of the setup and the live performance, we also suggest to use the Off Axis Guider, specially with long focal length longer then 800 mm or/and mirror telescopes, to avoid differential mechanical flexure that can create issues on the final star shape quality. The below showed parameters refer to the Guidescope. It is importanto to note that in order to have good guide performance the Guide Scope focal length should be at least half the main scope. The guide camera pixel resolution should not be too poor compared to tha main camera.
|
| 600/800 | 400/600 | 250/400 | 200/300 |
|
| 100 | 90 | 80 | 70 |
|
| 0,00 | 0,00 | 0,00 | 0,00 |
| Lowpass2 | Lowpass2 | Lowpass2 | Lowpass2 | |
| Guide Exposure in seconds | 0,5 to 1 | 0,5 to 1 | 1 to 2 | 1 to 2 |
| RA/DEC Autoguide Speed | 0,50/0,60 | 0,35/0,45 | 0,25/0,35 | 0,15/0,25 |
Forum Latest Topics
- M-Due Won't Track - RA shows "Upper Limit Hit...
- by JethroXP
- 03 Aug 2024 17:17
- Poor guiding results - M-Zero
- by AlexN-Astro
- 02 Aug 2024 01:31
- Avalon LInear belts
- by Stefano82
- 01 Aug 2024 08:30
- Replacing belts necessary?
- 29 Jul 2024 10:23
- Getting Started Equipment Help and Advice
- Remember me Not recommended on shared computers
Forgot your password?
PHD2 Calibration and Guiding
- calibration
By jbrazio May 3, 2017 in Getting Started Equipment Help and Advice
Recommended Posts
I'm a newbie in this hobby and last week end I had the opportunity to start testing my setup with guiding.
I read a couple PHD2 tutorials and went on with it, I was successful taking 480sec exposures with round stars, so I pretty happy with my first attempt.
My question is related with the Calibration data produced by PHD2, please check bellow my data:

I'm not fully understanding the data..
1) I assume a perfect tuned mount RA and DEC should align with the 90º graph scale.
1.a) Is this the orthogonality error ?
2) If my assumption is right, how do I correct the deviation ?
3) What are the white dots ?
4) Why the read and green lines do not align with the dots ?
5) What should I conclude concerning the performance of my mount by looking at the data ?
I know.. a lot of questions..
Just a bit of context, my setup is a NEQ6 with an ED80 (0x85 reducer), for guiding I have a TSL80 (328mm) with an ASI120, btw the NEQ6 is fully stock.
Link to comment
Share on other sites.
Orthogonality error is how much the two axes are off being at a right angle, although I have never been able to get my head around the way PHD presents this info.
The angle you mention in (1) is dependant on how your guide camera is inserted. Twist the camera in the ST80 a bit and see if it improves or gets worse. Shouldn't make a lot of difference to the guiding, although you will need to recalibrate.
The white dots (3) are the return path (east or south movement).
(4) Imperfect polar alignment, slight imperfections in the mount/drive train, backlash &c mean the star doesn't always return by the same path. Try running guiding assistant tovsee what advice it gives, if you can bear to waste ten minutes or more imaging time.
(5) If you're happy with the results, round stars, crisp detail, then no don't be concerned.
Next time I'll check what the wizard has to tell me but it now makes more sense, if my camera was at a perfect 90º angle them PHD would plot something close to this:

And it would be possible to see the 6 deg ortogonal error between RA and DEC, the red and green lines are at less than 90 deg apart. Is this physical property of the mount unrelated with the "cone error" ?
I remove the guide camera from the guider scope every time I pack home so it's a good advice to know that it's required to calibrate between sessions if the position of the camera is changed, thumbs up.

skywatcher58gb
Hi 0x0539 and welcome, just a couple of points that I might throw in for consideration.
Firstly the setup you have using an ST80 guide scope, that's the setup I had initially, but always seemed to have trouble finding guide stars, when I did it was OK at best, but guiding would fail at times. Changed to a 50mm finder guider, this didn't seem sensible, 80mm down to 50mm, but I found guide stars no problem and had it guiding for hours at a time. It may be that the guide camera I have (QHY5-II) suited this size scope better, who knows!
Secondly a program I am considering and have downloaded the software for is SharpCap with polar align, a fellow imager has used this polar align feature and has had very good results. He has tested this with 9 minute exposures with hardly any star trailing on tracking only using an NEQ6 mount. The initial set up is using the guide camera for polar alignment prior to guiding and its polar accuracy is claimed to be down to seconds of arc.
Check this out on the SharpCap Polar Align web site and have a look at the tutorials, it seems quite simple to use.
PS - I have used PHD2 but as I am more used to PHD1 and I tend to stick to it, it seems less complicated as I am only interested in guiding and not all the bells and whistles that come with PHD2.
Happy imaging !
I made a mistake, my guider scope is not the Skywatcher but the TS one: TSL80; in the end them both burn down to the same thing as the ST80 is 400mm and the TSL80 is 328mm focal length.

The problem with my setup is that the TSL80+ASI120 has a FOV of 0.84° x 0.63° which is narrower than my imaging setup ED80+D7000 with a FOV of 2.63° x 1.73°; I do believe it should be the other way around for best results.. time will tell how it will perform. For polar alignment, at that night, I was testing Alignmaster and was able to archive a good alignment in the AZ but not so good in ALT which could be related with the orthogonal error I'm seeing in DEC (?).
Could the orthogonal error be less related with Polar alignment but instead more with the angle RA and DEC have when in the park position (weights down, scope up) ?

Your guidescope looks fine. The FOV is only due to the small sensor on the ASI120 but as long as you cn find guide stars that is not a problem.
I'm personally not keen on the adjustable rings and finderscope attachment as the can be a source of flexure but they will do for now. Just make sure everything is nice and tight.
The orthogonality error is likey due to polar alignment error causing drift in declination. The sign of this is that your RA leg does not retrace its West bound steps when returning East
After you've done a first polar alignment, redo your calibration.
When doing your calibration, use the calculator in the Brain, making sure you enter the correct values. The default is for 12 steps. Your calibration took 24 steps which is on the high side. This is not an issue in itself but may indicate some of the input values were incorrect.
As a general rule, you shoudl attach your guide log when you need help with PHD2. It contains a wealth of information for troubleshooting. You can also view it yourself using PHDLogViewer or PEMproLogViewer to analyse your guiding.
You might also consider rotating your guide camera so that it aligns more closely with the RA and Dec axes. This can be useful for troubleshooting later as it makes it easier to tell if things like star trails on your images are in RA or Dec direction.
This are my settings from the brain dialog box for the calibration steps, I see I had declination degrees at zero, does this make a big change ? All the other parameters seems to be correct for my guiding setup.

Here is the calibration when analyzed by PHDLogViewer:

And then on that night I did three test sessions, the last one using dither.
On session 2/3 I see a large spike in DEC.. what can that be ?

It would be easier and more sueful to attach the guide log instead of loads of screen shots.
One thing I can just amke out by squinting is that your guide rate wuld suggest that it is set to 0.1x rather than 0.2x.
It is odd that PHD2 isn't picking up the correct guide rate and declination in the calculator. The guide rate error explains why you are taking 24 steps instead of 12. The declination error of 0 degrees versus the -22 deg reported in the calibration is not that significant. Unfotunately I can't see what declination is reported whilst guiding on those screen shots.
The spike is most likely some sort of flexure. Hard to say more without more information.
Please have a look at the log files.
PHD2_GuideLog_2017-04-30_223800.txt
Overall you are getting pretty good performance from your mount. The exception is the big spikes in Dec. In fact they are not spikes but a big movement that PHD2 is able to pull back so it appears as a spike. The movement is only in declination so cable drag is less likely but should not be discounted. I'd start by looking at your balance. Another possibility is the gear mesh. Could be a bit slack giving you a large amount of backlash.
Is a reason why you are guiding at 0.1x sidereal? Most people would use 0.5x or 0.9x.
17 minutes ago, kens said: Is a reason why you are guiding at 0.1x sidereal? Most people would use 0.5x or 0.9x.
I can't recall where did I get this info from but I read somewhere that it was advised to use 0.20x sideral as guiding speed. Should I update the value on the calculator to be 0.5x ?
Last weekend I've modded my EQ6 to the Rowan belt kit, I'm hoping the next weekend, or the one after it, to test it's performance.
You would need to change it in EQMOD. I thought PHD2 would feed the value from EQMOD into the calculator but I could be mistaken. Whatever value you choose in EQMOD should also be entered into the calculator.
I'm also in the middle of belt-modding my EQ6. It should reduce the signature EQ6 122 second periodic error. This is quite prominent on your RA graph.
Oh ! I see in EQMOD ASCOM PulseGuide Settings which are set to 0.1 for both RA and DEC, will set them to 0.5x.
Should I also update the min pulse width from the default 20ms and the DEC backlash from 0ms ?
I've also tried PEM PRO and I can see the biggest spike is ~121 which is identified as Stepper Gear, just for the sake of curiosity since I'm now using belts.. would it be possible to physical tune this frequency on the mount by for instance adjusting the position of the stepper in relation to the idler gear ?

I am closely watching this thread as I am trying to iron out my neq6 graph.
You mentioned that you remove the guide cam from the guidescope. I would not do this if possible and leave as much intake as you can. If you need to remove image or guide cam then I would use a tipex pen and mark both the unit and mounting so you have two points of ref when it goes back together.
Have you tried using sharpcap's polar align as you might find this a quick and accurate way to polar align.
15 minutes ago, spillage said: sharpcap's polar align
I have been using a trial version of AlignMaster.
I was unaware of it, just saw a youtube video about the feature and it seems very simple to use.
I don't have a CCD on my imaging scope, I have a DSLR and Sharpcap will not connect to it would this mean I would have to *really* align my guiding scope with the imaging scope to use this feature ?
sharpcap will use your guide cam and scope to align not you main scope and camera.
1 hour ago, 0x0539 said: Oh ! I see in EQMOD ASCOM PulseGuide Settings which are set to 0.1 for both RA and DEC, will set them to 0.5x. Should I also update the min pulse width from the default 20ms and the DEC backlash from 0ms ? I've also tried PEM PRO and I can see the biggest spike is ~121 which is identified as Stepper Gear, just for the sake of curiosity since I'm now using belts.. would it be possible to physical tune this frequency on the mount by for instance adjusting the position of the stepper in relation to the idler gear ?
Leave the min pulse width and DEC backlash at their default values in EQMOD. Use the Guiding Assistant tool in PHD2 to work out out your PHD2 settings.
With the belt mod the 121 second spikes should be much reduced - at least thats what Im hoping for with mine. You should also have less Dec backlash.
With the normal gears, adjusting the mesh between the idler gear and stepper should help although I've never got it right. Apparently the trick is to use a piece of aluminium foil to get the spacing right. However, its almost impossible to adjust the mesh between the idler and the spur gear on the worm shaft as it is hidden away out of sight save for a tiny peephole in the casing.
This topic is now archived and is closed to further replies.
Recently Browsing 0 members
- No registered users viewing this page.
Similar Content
Connecting phd2 to a sbig relay box.
By cesco , June 30
- astrophotography
Tagged with:
- sbig relay box
IC2177 Seagull nebula
By Astrojuanma , August 18, 2023
- seagull nebula
- optolong l-extreme
- backyardastronomy

- Astrojuanma
- August 18, 2023
NINA & PHD2 mount disconnect issues
By Frostak , June 15, 2023
- star adventurer gti
- disconnects
- 1,379 views

- June 19, 2023
PHD2 Stars not moving enough for calibration
By Gumminess8083 , January 5, 2023
- 1,496 views
- Gumminess8083
- January 15, 2023
Guide Scope Requirements
By Dave Sheppard , December 27, 2022
- michael8554
- December 28, 2022
- Existing user? Sign In
- Code of Conduct
- Online Users
- All Activity
- Unread Content
- Unread Topics
- Content I Started
- Content I Posted In
- My Activity Streams
- Astronomy Tools
- Clear Outside
- Useful Links
- Astro Society Finder
- Create New...
Important Information
We have placed cookies on your device to help make this website better. You can adjust your cookie settings , otherwise we'll assume you're okay to continue. By using this site, you agree to our Terms of Use .
- Search Please fill out this field.
- Newsletters
- Sweepstakes
- Health & Safety
- Mental Health
Recognizing Red Flags in Teenage Behavior: A Guide for Parents and Caregivers
Teenagers can be moody. But sometimes these behaviors are more serious. Here's when to intervene if you notice red flag behaviors in your teen, and what to look for.
What Are Red Flag Behaviors?
Common red flags in teenage behavior, how to spot red flag behaviors in teens, keep lines of communication open.
- Watch for secrecy
Note changes in baseline behaviors
What to do if you notice red flags.
fcafotodigital / Getty Images
If your teenager often seems moody and volatile, you might be tempted to dismiss it as normal teenage behavior that will eventually pass. But sometimes the symptoms that most parents and caregivers of teenagers deal with are not just part of the normal changes all young people experience. Sometimes they could represent a more serious change to their behavior and personality.
When it comes to recognizing whether or not your teen’s mental health is suffering, most experts we talked with say that if your gut is telling you something is wrong, then likely something is wrong. And the sooner you address the issue, the better off your teen will be.
This is especially true since 1 in 5 teenagers have an impairing mental health disorder , says Helen Egger, MD , a child psychiatrist and co-founder of Little Otter, a mental health company. “Parents and other adults in the teen's life need to be aware of red flags that may indicate that a child is struggling.”
Here is what you need to know about red flag behaviors in teenagers, including how to recognize them and how to help.
Red flag behaviors aren’t going to be the same for everyone, but generally speaking they are any observable change in mood or behavior that causes you concern, says Eric Wood, PhD, LPC , director of TCU Counseling and Mental Health.
“I know this is not a scientific answer, but many parents just know if something is off with their teen,” he explains. “What’s off may not be the worst-case scenario, but in my experience, parents—because of their history with the teen—are usually correct.”
To make the process of recognizing red flags easier, he suggests using the acronym BAES, which stands for behaviors, appearance, emotions, and situations.
For instance, changes in behaviors might include isolating oneself from peers, poor academic performance , or overindulging on social media. Other red flags might include changes in appearance can range from a sudden shift in style of dress to failure to maintain hygiene, says Dr. Wood. Changes in emotions might include intense anxious or depressed moods, and changes in situations can include interacting with a new negative social group or experiencing a sudden social rejection from peers, he adds.
Identifying red-flag behaviors for mental health disorders in teens is a crucial part of early intervention and support, says Dr. Egger. Too often, parents and other adults dismiss these red flags as typical of the teenage developmental stage .
“While it is typical for teens to have strong emotions, some moodiness, and wish for privacy , it is not typical for these emotions and behaviors to be persistent and to interfere with the teen’s functioning at home or school,” says Dr. Egger.
When looking at potential red flags, keep in mind that you’re looking for a change in your child’s behaviors, emotions, appearance, and situation that lasts more than two weeks, happens nearly every day, occurs during different activities, and is adversely impacting your child’s functioning or the family’s functioning. If a parent notices any of these patterns, then it’s time to consider seeking help from a mental health professional. In the meantime, here is what Dr. Egger says to look for.
- Extreme fatigue: If your teen experiences persistent tiredness that is not alleviated by rest, this may be a sign of an underlying mental health issue like depression or anxiety.
- Sleep disruptions: When your teen has difficulty falling asleep, wakes up at night, cannot sleep in, or experiences day-night reversal where they are up during the night and asleep during the day, this is a red flag. Anxiety disorders, depression, PTSD, and other disorders are all associated with sleep disruption.
- Excessive worry: If your teen is experiencing anxiety and panic attacks or cannot seem to relax, this is a sign of an anxiety disorder that needs to be addressed.
- Persistent sadness: Irritability, hopelessness, loss of interest in previously enjoyed activities, and significant changes in appetite or sleep patterns are possible symptoms of depression that should not be ignored.
- Suicidal thoughts or remarks: Any comments about self-harm, hopelessness about the future, or remarks about wanting to die should be taken seriously and addressed immediately by a mental health professional. That includes when a teen says or writes actual threats, such as “I can't do this anymore,” “I am done,” or “I don't want to live anymore.”
- Appetite changes: Significant weight loss or gain, as well as changes in eating habits , can signal emotional distress and can be associated with depression, anxiety, or a primary eating disorder such as anorexia or bulimia.
- Extreme mood swings: Rapid and intense shifts in mood, such as going from very happy to very sad without an obvious reason, can be a sign of mood disorders.
- Withdrawal from social interactions: Avoiding friends, family, and social activities can be a symptom of depression or social anxiety.
- Difficulty paying attention: Attention difficulties can present as difficulties with school work, procrastination, unfinished tasks like homework or chores, extreme messiness, and commonly losing things or forgetting things. These attention difficulties can be a sign of ADHD , but depression, anxiety disorders, and PTSD can also present with attention difficulties.
- Sudden decline in academic performance: A noticeable drop in grades or a sudden lack of interest in schoolwork can indicate that a teen is struggling with depression, anxiety, or PTSD.
- Excessive screen time: Spending an excessive amount of time on social media or electronic devices, especially when it replaces face-to-face interactions, can be a sign of underlying problems such as anxiety, depression, or internet addiction.
- Changes in appearance: Showering less frequently, changing clothing styles, wearing the same thing over and over, refusing to brush or style their hair, wearing long sleeves or heavy sweatshirts even in hot weather, and other similar behaviors also can be a sign that something is amiss that should be investigated.
Helen Egger, MD
“If any of these behaviors are observed, it is important to communicate with your teen and seek guidance from a mental health professional to provide appropriate support and intervention,” says Dr. Egger.
It can be tricky for parents to know when to be concerned versus what is normal teenage angst, says Susan Tellone, RN, BSN, CSN, MSN, the clinical director of the Society for the Prevention of Teen Suicide.
“My rule of thumb is to give your teen about two weeks,” she says. “Everyone has a bad day or even a bad few days, but if that bad, sad, or low mood lasts for two weeks or more, parents, guardians, and caregivers should engage in a conversation with their teen about what they are experiencing. I often compare it to a physical health concern. If your child was in physical pain for two weeks, most people would bring the child to a doctor. It should be the same with mental health.”
Another way to spot red flag symptoms is to keep the lines of communication open . In fact, the lack of healthy communication can often exacerbate problems or cause feelings of isolation or loneliness.
Addressing any issues early also is key because it helps you and your teen identify thoughts and behaviors before they become entrenched. It also can help keep mental health issues from becoming more severe or persisting into adulthood—especially when they get the help they need.
“If your child is not receptive to discussing what they are experiencing with you, encouraging them to talk to someone about it is a great alternative,” says Tellone.
Susan Tellone, RN, BSN, CSN, MSN
“Parents should always reach out to a medical professional or use the 988 national hotline if the situation reaches a point where they are concerned about the safety or life of their child.”
At the end of the day, the important action to take is nudging your child to open up and discuss their emotions with people who they feel can best support them, she adds. It also can be helpful to tell them why you are checking in with them and discuss the behaviors you are observing.
“When you do this, you are explaining why you have become worried enough to ask these questions and begin an open and honest conversation,” says Tellone. “Talking to your child about how they are feeling can be difficult, but these red flag behaviors should not be ignored.”
Watch for secrecy
Another way to spot red flags is to trust your intuition, says Dr. Wood. Also, be on alert if your teen suddenly behaves secretively or avoids you in some way. In fact, some research studies have found that depression can lead to secrecy.
“There is a big distinction between privacy and secrecy, though,” explains Dr. Wood. “Parents should decide how much privacy they give a teen, but when a teen absolutely refuses to share something with a parent, that is usually a red flag in my experience.”
“It’s impossible to monitor everything that a teen is doing,” he continues. “However, if parents feel like they have to monitor everything, then this is a red flag.”
If your teen usually behaves one way—for instance always showers in the morning—and then seemingly out of nowhere starts behaving in the opposite way—stops showering altogether—that could be a red flag.
This might also look like withdrawal from friends, isolating in their room, opting out of social situations that they have enjoyed in the past, changes in sleep or eating habits, or even a sudden change in mood improvement for the better, explains Tellone.
Although you might have trouble keeping up, try to pay attention to your teen’s academic and social life. Teens experiencing stressful situations, like an embarrassing situation at school, getting into trouble with a teacher, or feeling rejected by friends, may lead to mental health concerns.
“Pay attention if they have overwhelming emotional pain or distress, frequent visits to the school nurse, unusual patterns of tardiness, absences from school, irritability, and loss of interest in activities,” Tellone adds.
Even physical pain can be a sign that something is wrong. In fact, complaining of physical aches or pains, having headaches, experiencing stomach cramps, or having digestive problems without a clear reason—and that doesn’t go away with treatment—could be a sign of a mental health condition.
Another tell-tale red flag behavior is when a teen says or writes actual threats, such as “I can't do this anymore,” “I am done,” or “I don't want to live anymore.”
If you notice that your teen is displaying red flag behaviors, start by talking to them about their mental health in a way that avoids making them feel judged.
“It is so helpful to give your child space to talk and validate their feelings, even if we don't fully understand them,” says Tellone. “Take a moment to try and understand their perspective. Listen without judgment and try to refrain from giving advice or trying to fix it. It is important for children to believe that—with our support—they themselves can begin to problem solve.”
“[And] if others such as teachers, coaches, peers, or siblings are raising concerns about your child’s emotions or behavior,” she adds, “take these concerns seriously.”
Here are more strategies for addressing mental health red flags with your teen.
- Seize the moment: When your teen provides an opening to talk, seize that moment and follow your child’s lead, Tellone says. “If you are being invited to talk with your teen, take it!” Give your teen your full attention, and listen without interrupting, she adds. “Show that you are genuinely interested in what they have to say.”
- Choose the right time and place: Find a quiet, private, and comfortable setting to have the conversation, Dr. Egger says. “Ensure there are no distractions and that both you and your teen have enough time to talk. Sometimes teens are more open when you talk with them side-by-side while doing an activity together like cooking or playing a game rather than face-to-face.”
- Be open and honest: Dr. Egger suggests approaching the conversation with sincerity and honesty. “Let your teen know that you are concerned because you care about their well-being. Use ‘I’ Statements and frame your observations in a way that focuses on your own feelings and concerns rather than accusing or blaming. For example, say ‘I’ve noticed you’ve seemed really sad lately, and I’m worried about you’ instead of ‘You’ve been so moody and difficult.’”
- Validate their feelings : At the same time, “Let them know that it’s OK to feel the way they do and that their feelings are valid,” he adds. Another way to validate your teen is to emphasize that mental health is an important aspect of overall health and that it’s normal (not shameful) to talk about it.
- Ask open-ended questions: Encourage your teen to share their thoughts and feelings by asking open-ended questions that require more than a yes or no answer, says Dr. Egger. “For example, ‘Can you tell me more about what’s been going on?’ or ‘How have you been feeling lately?’”
- Offer support: Let your teen know that you are there for them and willing to help, Tellone says. Discuss potential solutions or resources together, such as talking to a school counselor or seeing a mental health professional. This step is especially important because one study found that nearly 50% of kids with a mental health disorder did not receive treatment or counseling from a mental health professional.
- Follow-up: Continue to check in with your teen regularly. Let them know that your support is ongoing and that you are always available to talk.
Eric Wood, PhD, LPC
"Each red flag is a green light to say something,” says Dr. Wood. “The earlier you say something the better. Some parents worry about ‘making a big deal out of nothing.’ However, it’s not weird to check in with your teen, even if everything is OK. If the red flags continue to pile up, then intervene. Use all the resources that you have, including other family members, your church, counseling, their teachers, and their peers.”
Communication Strategies for Empowering and Protecting Children . J Pediatr Pharmacol Ther. 2016.
Early Intervention in Mental Health is Essential says NIMH Clinician: Research Studies & Novel Treatments in Youth Irritability Show Promise . Anxiety and Depression Association of America. 2023.
What Parents Don't Know: Disclosure and Secrecy in a Sample of Urban Adolescents . J Adolesc. 2016.
Depression . National Institute of Mental Health.
Study: One in Six U.S. Children Has a Mental Illness . American Academy of Family Physicians. 2019.
Related Articles
IMAGES
COMMENTS
PHD became a fixture of the amateur astronomy community with more than a quarter million downloads. From its inception, it has successfully embraced three seemingly conflicting objectives : ... Guide button Starts calibration, if needed, and then starts guiding on the selected stars. Stop button Stops both guiding and looping. Exposure duration ...
Before PHD2 can effectively guide your mount, it needs to do a calibration. This is basically testing how your mount is responding to guide signals from the software. The good news here is that you really only need to do this once. By default, PHD2 should remember your previous calibration and apply it next time you connect your equipment.
Let PHD2 auto-select the guide star (Alt-s). It can be hard to visually distinguish a hot pixel from a faint guide star when you're just peering at the display. Be sure you're using either a dark library or a bad-pixel map. Apply a 2x2 or even 3x3 noise reduction filter (brain dialog/camera tab).
Calibration and Mount Control Problems If you are just starting to use PHD2 or are connecting to new equipment for the first time, you may have trouble getting calibration done. The best way to minimize this risk is to use the Calibration Assistant, and beginners are strongly urged to do that.Calibration problems generally take one of two forms: 1) outright failures of the calibration because ...
Good guiding calibration is essential for high quality astrophotography. PHD2's Calibration Assistant has now been improved to provide an auto-slew function,...
Create a New Profile using the Wizard. The built-in equipment profile wizard in PHD2 guiding allows you to tell PHD exactly which hardware you are using. Here you can set all of the specific details of your gear. This includes entering in your guide scope focal length and autoguiding camera pixel size.
Read and follow the Best Practices Guide; Use the New-Profile-Wizard to define and manage your equipment configurations; Avoid making changes to guiding parameters without knowing exactly what they do After you get a good calibration run and a Guiding Assistant Run, per the Best Practices, run the Baseline Assessment
To do this, they auto-guide. Auto-guiding is the method by which a secondary camera is set to lock on to a target star, and the idea is - if it notices that it moves slightly, it nudges your mount back to where it should be (and these should be minute micro-movements in the realms of sub-pixels). ... we can then take PHD2 out for calibration ...
Page 1 of 2 - PHD2 guiding assistant and calibration help/advice - posted in Beginning Deep Sky Imaging: Yes, I know. Yet another post on PHD2 guiding assistant and calibration help. Im able to get around 6 minutes guiding or so with having acceptable shaped stars (slightly oblong vertical) but my graph is pretty spiky in both RA and DEC which is weird.
Click on the 'Brain' icon on the tool bar to bring up the advanced PHD settings. The "Calibration Step Size' determine the length of the calibration guide pulses. The default setting is 500ms (half a second). This may or may not be the right amount: - The bigger the pixel scale of your guiding rig, the longer the step size should be.
Joined: 23 Dec 2016. Loc: Nova Scotia. Posted 14 January 2021 - 09:01 PM. You need to recalibrate if the guide scope (or OAG) has been rotated since the last calibration, or if the guide camera or scope have been changed. If you are using an ST-4 connection to the mount, you need to calibrate for every new target.
Automatic adjustment of RA calibration to handle targets in different parts of the sky (declination compensation) Elimination of the ST-4 guide cable as a point of failure - this is a surprisingly common problem because the cables can be damaged or confused with similar-looking cables (e.g. telephone cables)
Drifting and Adjusting. Click the "Drift" button, and let PHD start the drifting process. PHD will. automatically disable declination guiding, however, it will guide in RA. Let PHD drift for a good 20-30 seconds…anything less, and the information is bound to be highly inaccurate.
take guide exposures. 3. The PHD2/Guide icon - used to start calibration, if needed, and then to start guiding on the selected star. 4. The Stop icon - used to stop both guiding and looping To the right of the stop icon is a pull-down list of exposure durations (0.01s - 15s). You use this control to quickly set the guide camera's exposure duration.
Here follows the things you must be aware of to get a good calibration and a good guiding performance (again with main focus on the things related to Alt-Az mounts): Focus guide telescope carefully; On the Panther Mount guide speed should be set to 10″/sec (this is selected in the setup menu) The Altitude of calibration star must be considered:
PHD2 guide parameters. The best guiding performance with our belt driven mounts comes by using the lowest possible guiding speed ( 0,2 / 0,4 ) , the shortest possible guide exposure ( 1 sec is ok ) and the lowest possible RA/DEC pulse guide duration (300 / 600). Due to the Fast Reverse Belt Drive System fast pulse guide responding, it is ...
If you hover over the "Guide" button, it advises you to Shift-Click to carry out a new Calibration, to replace the existing one. 2.Yes the new Calibration is stored in the PHD2 GuideLog and DebugLog and can be used on other days. Re-using depends on your setup. If your Driver and cabling allows PHD2 to see the mount's Dec, then it can adjust ...
The first thing to look at is the graph to the left, which shows the guide star movements as a result of the guide pulses that PHD2 sent during calibration. The lines show how the RA and Dec mount axes relate to the camera sensor X/Y axes - these lines should be roughly perpendicular but their overall orientation is unimportant.
The next tab is the Guiding tab. There you will need to enter your guide camera focal length as well as calculate your steps. To calculate your steps click the calculate button and a window will open. In that window enter your pixel size, guide scope focal length and the number of calibration steps you desire and click OK
The default is for 12 steps. Your calibration took 24 steps which is on the high side. This is not an issue in itself but may indicate some of the input values were incorrect. As a general rule, you shoudl attach your guide log when you need help with PHD2. It contains a wealth of information for troubleshooting.
Download 2024 PhD Program Planning Guide. PhD Program Planning Guide for students admitted Fall 2024 or later. Site footer content. Contact Us. UW-Madison School of Nursing Office of Academic Affairs Signe Skott Cooper Hall Suite 1100 701 Highland Avenue Madison, WI 53705; Map. Email: ...
Calibration • Re-do calibration only when necessary - Equipment change in existing profile (don't do this - use a separate profile instead) - Change in mount guide speed settings - Rotation of guide camera or OAG by more than a few degrees • Note: recalibration is still required if no ASCOM 'mount' or 'aux-mount ...
PHD2 is telescope guiding software that simplifies the process of tracking a guide star, letting you concentrate on other aspects of deep-sky imaging or spectroscopy. Easy-to-use, "push here dummy" guiding for beginners. Sophisticated guiding and analysis tools for experienced users. Extensive support for commonly-used equipment.
When looking at potential red flags, keep in mind that you're looking for a change in your child's behaviors, emotions, appearance, and situation that lasts more than two weeks, happens nearly ...
PHD Guiding: Calibration Steps - posted in Experienced Deep Sky Imaging: Someone in another post referred to a seminar presented by Craig Stark about his PHD Guiding program (available on-line here). I found it to be really helpful and informative, but theres one point that Im a bit unclear on. Im hoping that someone can help clarify this point for me.Craig mentions that there is really only ...