
- PRESENTATION SKILLS

Managing your Presentation Notes
Search SkillsYouNeed:
Presentation Skills:
- A - Z List of Presentation Skills
- Top Tips for Effective Presentations
- General Presentation Skills
- What is a Presentation?
- Preparing for a Presentation
- Organising the Material
- Writing Your Presentation
- Deciding the Presentation Method
- Working with Visual Aids
- Presenting Data
- Managing the Event
- Coping with Presentation Nerves
- Dealing with Questions
- How to Build Presentations Like a Consultant
- 7 Qualities of Good Speakers That Can Help You Be More Successful
- Self-Presentation in Presentations
- Specific Presentation Events
- Remote Meetings and Presentations
- Giving a Speech
- Presentations in Interviews
- Presenting to Large Groups and Conferences
- Giving Lectures and Seminars
- Managing a Press Conference
- Attending Public Consultation Meetings
- Managing a Public Consultation Meeting
- Crisis Communications
- Elsewhere on Skills You Need:
- Communication Skills
- Facilitation Skills
- Teams, Groups and Meetings
- Effective Speaking
- Question Types
Subscribe to our FREE newsletter and start improving your life in just 5 minutes a day.
You'll get our 5 free 'One Minute Life Skills' and our weekly newsletter.
We'll never share your email address and you can unsubscribe at any time.
When you start to give presentations, you will realise that you also have to work out how to manage your text.
Whether you’re confident enough to speak with very brief notes, or you need a full text, you need to consider how you record it to remind you what you’re going to say.
There are various examples of ways you might choose to manage your text.
These include:
Full Text Notes
Notes on Cue Cards
Keywords on Cue Cards
Full text script.
The main advantage of this method is that the entire text is in front of you so you cannot forget what you want to say.
The disadvantage, however, is that you will pay less attention to the group or audience whilst reading the text. If you are speaking to a small group, this method might be overly formal, as written text sounds very formal when spoken out loud. If you read a prepared text, you should know what you are going to say very well so that you can maintain eye contact with your listeners whilst not losing your place.
Reading the text is not always an easy option as it can sound stilted and rather unnatural. Remember to engage with your audience as much as you can.
When reading from a full-text script it is also much harder to change what you’re going to say halfway through, if you see that your audience is starting to fidget.
To help, you can use big bold headings to guide your eyes through the text so that you can skip sections if you want.
Notes Pages from a Slide Package
Most presentation packages, including PowerPoint, have an option to create a page of ‘Slide Notes’.
You can use these to write out more or less detailed points about what you plan to say in relation to every slide that you use.
The advantage is that everything that you want to say is tailored to your slides. However, the packages are not very sophisticated: you cannot, for instance, highlight sections, or play with the font size very easily. This means that it can be hard to identify quickly and visually the most important points to make.
You will also end up with a sheaf of papers, which can get a bit flappy and hard to handle. This can come across as somewhat unprofessional.
To use cue cards, write your main points on separate index cards and, underneath each point, write the supporting material in a concise way.
When using Cue Cards...
Use only one side of the card and number the cards so that you can easily reorder them if you drop them.
On the bottom of each cue card, write a link statement to lead you into the next point.
The advantage of using cue cards is that you are speaking directly to the audience, which increases your rapport with them.
Small index cards also look more professional than large sheets of paper which may prove difficult to handle. The disadvantage is that you have to write them by hand since PowerPoint and similar packages don’t offer an option for ‘keycards’, only ‘Notes pages’.
To avoid losing your thread, ensure that you are familiar with the main points of your argument and the links between one idea and the next so that you become less reliant on the cards.
Further simplify the information on the cue cards by drawing out keywords that will remind you of the key points that you wish to convey.
The advantages of using keywords on cue cards are the same as above but their use increases spontaneity and rapport with the audience even further.
However, if you become side-tracked, it is easy to lose the thread and possibly miss key points. It’s best only to use this method if you are very familiar with your subject and feel confident in making the presentation.
Mind maps are diagrams used to represent words, ideas, tasks, or other items linked to and arranged around a central key word or idea. Mind maps are used to generate, visualize, structure, and classify ideas, and can be used as notes to aid a presentation.
The advantages of using a mind map are similar to those of using keywords on cue words but it is easier to illustrate complex relationships than with keywords.
However, again, using mind maps as a presentation aid requires you to be familiar with the subject material and a confident speaker. When presenting it can be difficult to keep track of your progress through a mind map, but it can be very helpful if you want to interact with your audience, as you can just reorder your points to fit the session.
It’s up to you!
When you’re giving a presentation, it’s up to you to choose a method of handling your notes that works for you.
Whatever you do, someone is sure to judge you on it, so you simply have to make sure that you’re comfortable, and don’t worry what anyone else says.
The important thing is to get your points across confidently and competently, and not to show off.
Continue to: Working with Visual Aids Deciding the Presentation Method
See also: Preparing for a Presentation Writing Your Presentation Coping with Presentation Nerves Dealing with Questions
How to Add Notes to PowerPoint Presentations: A Comprehensive Guide

Sara Wanasek

Presenting a slideshow can be a daunting task, especially when you’re speaking to a large audience. Thankfully, most presentation software comes equipped with the ability to add notes to your slides, making it easier for you to stay on track and deliver a seamless presentation – no full memorization needed.
In this blog, we will explore two different ways that you can to add notes to PowerPoint:
- Presentation notes that you prepare in advance and only you can see or
- Adding live notes to your presentation for your audience to see
By leveraging these techniques, you’ll be able to engage your audience effectively and deliver memorable presentations. Let’s dive in.
How to Add Presenter Notes in PowerPoint
Presenter Notes in PowerPoint are notes that you can view on your screen while you are presenting. Your audience will not see these notes, just you, so you can stay on track, remember important points, and deliver your information clearly and easily. Presenters, here’s everything you need to know to add notes to PowerPoint.
Add Notes in Edit Mode
Notes can be added to any slide in PowerPoint. Follow these steps:
- Start by clicking on the Notes button located beneath each slide. If you don’t see it, click on the View tab at the top of the screen and then click on Notes Page.
- Begin typing your notes for that slide, providing additional details, reminders, or cues to guide your presentation.
- Repeat the process for each slide you want to add notes to.
Once you’ve added your notes, you’re ready to deliver your presentation with confidence!

Present with Notes
Now that your notes are added to your presentation, let’s learn how to use them during the presentation. Do note that to present with the Presenter Notes, you will need to be connected to another screen or projector.
- First, select the Slide Show tab in the PowerPoint ribbon
- In the Set Up section, click the check box for Presenter View
- Enter Presentation Mode! You should see your presentation on one screen (such as your projector) and your notes displayed on the other screen (such as your laptop).
⚠️ If the Presenter view appears on the wrong screen, you can swap this by clicking on the Display Setting on top of the Presenter view screen.

As you move through your slides, your notes will automatically advance with the slides, keeping you right on track.
Print Notes
If you prefer a physical copy of your notes to present with or want to share it with your audience, you can print them from PowerPoint.
To do this go into File → Print → and under Settings , choose Notes Pages . Now, you can Print .
Presenting with notes in your PowerPoint presentation helps you stay on track, maintain confidence, engage your audience, adapt to unexpected situations, and appear professional and organized, ultimately leading to a smoother, more impactful delivery. But what if you want to further explain a concept with notes and annotations during your presentation? You can with annotation tools! →
Add Notes During a Presentation
Need to add notes to aid your presentation and help your audience understand, follow along, and stay engaged? Presenter tools such as annotations are great tools to help your presentation delivery and pace. By interacting with your slide information throughout your presentation, you can encourage active learning and audience participation in the presentation. There are a few ways you can add notes to PowerPoint:
Add Notes to Any Slide
During your presentation, you can add notes in two main ways:
1.You can use PowerPoint’s built-in simple pen and highlighter to add notes to your slide. This is found in the bottom left corner of the screen click on the pen and choose your color to begin drawing.
2. For sightly more advanced pen tools, text boxes, and shapes, you can use the free PowerPoint add-in ClassPoint, to add notes to PowerPoint sides . Once downloaded, ClassPoint , an audience engagement tool, will add a toolbar at the bottom of your presentation screen with these additional annotation & presentation tools .
This gives you different thickness options and color options for the pens , highlighters , shapes , and text boxes on your slide.
Insert Whiteboard Slides
Did you know you can even add a blank whiteboard slide into your PowerPoint presentation while you are presenting? With ClassPoint, it’s true!
Perfect for when you run out of space, want to brainstorm, or have fresh details to convey to the audience.
To add a whiteboard slide to your presentation, click on the Whiteboard icon on the ClassPoint toolbar. From there, choose a template provided, or add your own whiteboard background design . This slide will be opened & inserted right into your presentation and you can begin adding your notes. All annotations added will be saved once you exit out of the presentation mode.
Add disappearing laser ink
With ClassPoint’s presentation toolbar, you can also use the laser pointer to write with disappearing ink!
Although this will not save to your slide, it is a great way to help your audience follow along and make connections to your slide information.
Share Notes
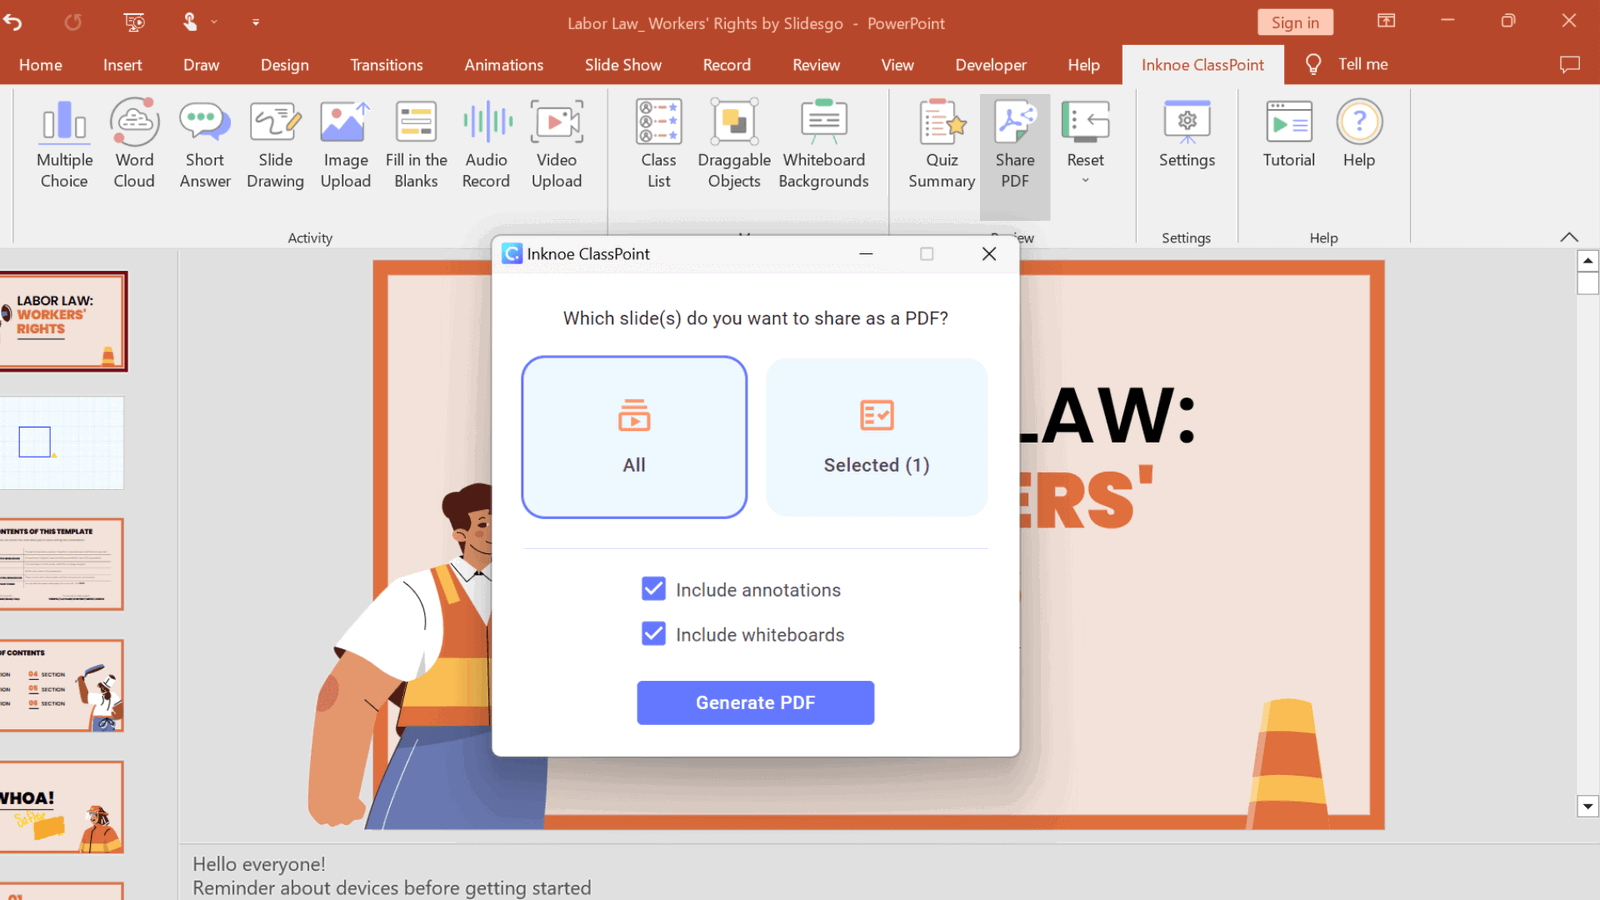
Just like when you printed your Speaker Notes above, you can also share all the notes you added to your PowerPoint slides. Print your presentation, or share it with your audience via a QR code.
Click on the Share PDF icon on the ClassPoint tab in the PowerPoint ribbon. Select to include the whiteboard and annotations that you made and click Generate . A QR code will appear that your audience can scan to access your PowerPoint slides and see all the notes you have added!
Overall, adding annotations to your PowerPoint presentation is a great way to enhance your message, engage your audience, and make your presentation more effective. So if you haven’t tried it before, why not give it a go and see the difference it can make to your next presentation?
Adding notes to your presentation is a simple but effective way to elevate your overall performance. Whether you’re adding notes in edit mode or during your presentation, PowerPoint offers a variety of tools to help make your presentation a success. Start implementing these strategies with ClassPoint, and watch as your presentations become more engaging and impactful than ever before!
About Sara Wanasek
Try classpoint for free.
All-in-one teaching and student engagement in PowerPoint.
Supercharge your PowerPoint. Start today.
500,000+ people like you use ClassPoint to boost student engagement in PowerPoint presentations.
- Meta Quest 4
- Google Pixel 9
- Google Pixel 8a
- Apple Vision Pro 2
- Nintendo Switch 2
- Samsung Galaxy Ring
- Yellowstone Season 6
- Recall an Email in Outlook
- Stranger Things Season 5
How to add notes to your Microsoft PowerPoint slides

When you present a slideshow, it’s likely that you have more to say than what displays on the slides. You may want to expand on the text you’ve included, or if the slide only contains visuals, explain them further.
Add speaker notes to a slide in PowerPoint
Hide notes while editing a slideshow, view speaker notes during a slideshow.
Luckily, Microsoft PowerPoint provides a built-in feature for speaker notes. This allows you to add notes to each slide and then see them in Presenter View when you start the show.
What You Need
Microsoft PowerPoint
Open your PowerPoint presentation and select the first slide where you want to add notes.
Step 1: Go to the View tab and choose either Normal or Outline View . This allows you to see your slide along with the note you plan to add.
If you’re wondering how to add a note in PowerPoint without changing the view, the short answer is: You can’t. But if you prefer not to use Normal or Outline View, you can check out the Notes Page view in the same section of the ribbon.
While still technically a “view,” this displays your slide and a text box for your note as a printed page, as shown below.
Step 2: Display the Notes panel below the slide if it’s not visible using one of the following:
- Click the Notes button in the Status Bar at the bottom.
- Move your cursor to the bottom of the window. When you see the two-sided arrow, drag up until the panel displays.
Step 3: When the panel is empty, you’ll see “Click to Add Notes” within it. Place your cursor in the box and type your note.
Step 4: You can apply simple formatting to your note using the tools on the Home tab or in the floating toolbar. This is handy if you want to add bullet points or emphasize the font with bold, italics, or an underline.
Step 5: If you have a lengthy note within the panel, you’ll see a scrollbar appear on the right so that you can move down and see the entire note. You can also drag up on the panel to enlarge it.
If you want your slide in full view as you're assembling or editing your slideshow, you can hide the presenter notes. This does not delete them; it merely moves the notes panel out of view.
Do one of the following to hide your notes:
- Drag the notes panel downward until it no longer displays.
When it’s time to present your slideshow, you can use Presenter View to see your speaker notes. This allows you to view the notes for each slide on your monitor while presenting the slideshow on another. Your audience will not see your notes.
Step 1: Go to the Slide Show tab. On Windows, check the box for Use Presenter View in the Monitors section of the ribbon. On Mac, click the Presenter View button in the Start Slide Show section.
If you’ve already started the slideshow, you can still turn on Presenter View. Click the Three Dots in the Presenter Toolbar and choose Show Presenter View (Windows) or Use Presenter View (Mac).
Step 2: You’ll then see your notes display on the right side of the screen, with your slide on the left. As you advance each slide, the notes will display accordingly.
Step 3: The text for your note wraps automatically to the next line, and you have a scrollbar to move through those lengthy notes.
To adjust the font size for the notes, use the buttons below the notes panel.
Whether you want to add notes to PowerPoint to talk through your slideshow or simply as references while you assemble your slides, be sure to take advantage of this built-in feature.
For additional ways to work in Microsoft PowerPoint, check out how A.I. can help you create your slideshows .
Editors’ Recommendations
- How to set an ‘Out of Office’ message in Microsoft Teams
- How to keep your Microsoft Teams status active
- How to convert Google Slides to PDF
- How to buy Microsoft Office: all methods, explained
- How to embed a YouTube video in PowerPoint
- How-To Guides

While PowerPoint is widely used to develop presentations, Google Slides has become a popular alternative. Part of what makes it so popular is that it's free to use, as is other Google software such as Google Docs and Google Sheets – which is a stark contrast to the premium price you'll pay for Microsoft Office and PowerPoint.
If you're looking to jump ship from PowerPoint to Slides, Google makes it easy to do so. In fact, it takes little more than a few clicks to convert a PowerPoint to Google Slides. Whether you need to change the format for a coworker or want to permanently switch to the free platform, here's a look at how to convert your PowerPoint deck into a Google Slides presentation.
Few communication applications are as versatile as Microsoft Teams. Along with allowing you to send quick messages to teammates or launch a video chat, the software is fully integrated with Office 365 so you can optimize its performance. One of its most useful features, however, is the ability to create a new team. This lets you group people together so they can chat about certain projects or goals without spamming everyone in your organization.
Knowing how to make a new team and how to properly organize teams makes it easy for a company to enhance productivity and streamline communication. When used effectively, Microsoft Teams is useful for both in-office and remote workers, ensuring everyone stays on the same page regardless of location.
PowerPoint makes it easy to give a great presentation thanks to intuitive software that lets anyone craft an eye-catching deck. What's even better, however, is the option to use Presenter View. This lets you leave notes for yourself that can be viewed on your computer screen while everyone else is only seeing your presentation.

Everything You Need to know About Notes in PowerPoint
- Post author: Jacob Stauttener
- Post published: October 11, 2021
- Post category: Presentations
- Post last modified: August 15, 2022
- Reading time: 23 mins read
Please Share This Share this content
- Opens in a new window
Do you have a presentation to make and find yourself wondering how to add notes to PowerPoint?
Adding notes to your PowerPoint Presentation is a simple and effective way to make presenting easier. In this article, we will go over how you can add notes to PowerPoint, tips on using those notes, and how to print some fancy PowerPoint notes.
Now, let’s get right into it!
Why Would I Want Notes in my PowerPoint?
PowerPoint Slides are not meant to be your script. They are meant to enhance your message and help guide the attention of your audience. Generally, you want the audience’s focus to be on you and your spoken word – not your slides.
The temptation for many first starting with PowerPoint is to place all of the information they need to discuss on the slides. The problem with this is that the audience begins to read your slides and lose concentration on the words from your mouth. When the audience reads your slides ahead of you, they often lose their interest fast and their attention is split between your words and what is on the slide.

PowerPoint gives you a simple way to add notes to your slides that your audience never sees. These notes are there to help you so you never have to use your presentation deck as your script. Instead, you the notes section.
So, how do we add notes to PowerPoint?
How to Add Notes to PowerPoint
Microsoft made adding notes to PowerPoint extremely easy. All you have to do is go down to the bottom of the screen where it says “Click to add notes”. Once you click there, you can add in your notes for the presentation.

I recommend that you use this for a point form. For my videos made from converted PowerPoint files, I like to write my full script there. I have also seen marketing, communications and presentation professionals use this space for stage and technical directions too.
What to do if you Don’t See the Notes Section
If you don’t see the notes section, there is a little tab at the bottom of the screen that you can click to make the notes appear.

I want to point out that the you can adjust the separating bars between sections. You can change the size of the notes area by hovering over the line and then clicking, holding and dragging that line to resize the area.

Different Views and Adding Notes
Speaking of different views, you don’t need to write out all your notes on the default slide design page (also known as the “Normal” View). You can also access these notes in the “Outline View” and the “Notes Page” too.

Personally, I like editing my notes in the “Normal View”. Remember that you can resize your notes window by hovering over the bar above it. When you see the two sided arrow, click and drag to resize the window. That will give you ample room to edit your notes while viewing your slides. The “Notes Page” is also a good view for editing your notes.
How Should I Write Up my Notes in PowerPoint?
How you write up your notes for your presentation is completely up to you. My opinion is that the best method is to write out a series of point form notes that remind you of your salient points and to act as a guide to keep you on track. This way, you don’t get off track, cover everything you want and maximize your potential interaction with the audience.
To me, so long as you know the content, this is the best way to present to your audience as it allows flexibility in your delivery to cater to the room. It his harder to adjust to your delivery if your presentation is fully scripted out.
- My opinion – point form notes are the best
- State only your salient points
- Use as a guide to stay on topic and to remember important points
- There are also plenty of reasons to fully type out your presentation script
While I prefer bullet point scripts when I present, your support crews would likely prefer that you stick to a fully written script with stage directions. This helps the show go smoothly for larger events where you have people helping the presenter in the delivery of their message. When the presenter follows a full script completely it helps everyone involved in that delivery stay on track and not miss queues such as when to change the slide, join in the conversation, or adjust an AV setting (like lighting).
As mentioned earlier, you could add stage directions in the PowerPoint notes section for the presenter or tech crew. Let’s talk a little bit about that now.
Use Your Notes for Stage Directions Too
Using the Notes section of PowerPoint, you can add in reminders for yourself (and anyone helping) about stage and technical directions. Perhaps you have an external video that you want queued up or a secondary source shown for a live demo. You can add this there to keep everyone on track. If you have multiple presenters delivering different parts of the presentation to your audience, you can also use the Notes section to direct who will be presenting each part.
[Square Brackets] are a common way to differentiate the spoken script words from the presentation directions. Italics also work well .
Highlights will show up in your handouts “Notes Page”, but they don’t generally show in other modes of PowerPoint. I advise sticking to Square Brackets, Italics or whatever you find already works with you and your support staff.
Again, how you choose to write your script in PowerPoint notes is up to you. As a presenter, I prefer bullet points. When I use PowerPoint to create hobby videos, I like to use a full written script. While supporting presenters as a media technician, I prefer a fully scripted notes section with stage directions.
You will have to find what works best for you. Now, let’s chat about how to actually use the notes section of PowerPoint when it comes to Presenting, Recording and printing Handouts.
How to use PowerPoint Notes – Presenting, Recording and Handouts
Now that we have the notes in our presentation, how do we use them? Microsoft gave us three effective ways to use these notes. You can use them as your speaker notes while you present to an audience, notes while you record a presentation, and as part of a handout for your audience. Let’s go through how to do all three of these uses for PowerPoint notes.
How to Present with Speaker Notes
Just like adding notes, presenting with speaker notes is extremely easy. All you have to do is present in Presenter view with two screens. This second screen could be your home monitor, a TV at the office or a projector at a convention center.
To make sure that your presentation is set up to take advantage of presenter view, go to “Slide Show”. From there, make sure that “Use Presenter View” is selected. When you go to show the presentation, the computer will automatically set up one screen with the presenter’s view and the other with the full screen slides.

You can change which screen the slides show on by changing the “Monitor”. The other will become your Presenter View screen.
A Quick Look at the Presenter View
This is a fantastic tool for both anyone who has to control a PowerPoint presentation in front of a live audience or anyone presenting to a virtual audience too. As a media technician I use this view all the time. It is great for following the scripts of the presenters and also works out great while running webcasts too. The only problem about this view is that you need two monitors to get the option to function.

The screen shot above shows a PowerPoint deck that I turned into a video for a YouTube channel. This is the presentation showing in “Presenter View”. The slide is on the left, the next slide is on the right and under it is my script (or the notes section).
When you go to record your slide deck, you can also still access your notes. Let me demonstrate below.
How to Record with Speaker Notes
To record a presentation, you go to “Slide Show” followed by “Record Slide Show”.

There you will find the notes on a toggle button near the top middle of your screen.

I find this one annoying to use because it is so small, but its location forces you to look almost directly into your laptop’s webcam (as most laptops have it located at the top of the computer screen). If you are recording video with you content in PowerPoint, this is a huge bonus! I can’t think of a better place to put the script other than right under the camera for giving the audience the impression that you are talking to them when you are reading your script.

How to Print Speaker Notes with Slides in PowerPoint
Even though we live in a paperless society, we still need to make printouts and hand outs. You can make them electronically (as PDFs) or physically on paper. One great way to access your notes is through the Notes Page. You can find this by clicking on “View” and then “Notes Page.”
If you have any presenters that want a printed copy of the notes for the podium (or technical or communications staff that also need the notes), I recommend that you print off the slide deck’s “Notes Page”.

To print your notes, select “File” and then “Print”. Here you will find a drop down for the slide layout. It likely says “Full Page Slides” to start. Change this to “Notes Pages”. You will see an image of the printer page further down in the article when I show you how to make fancy handouts with this same view.
Below is how the printout will look by default. Personally I find this layout very straight forward to work with.

“But wait, you mentioned I can turn this view into good looking handouts. How do I do that?”
Creating Impressive Handouts with Notes – Altering the Layout of Handout Notes in PowerPoint
Now let’s look at how to take the notes (or script) of your presentation and turn that into a nice handout to give to your audience.
As a tip, I like to back up my files before I mess around with the layouts, but that is up to you on whether you do that or not.

To print, I went to “File” and then “Print”. On the print screen, I make sure that I choose the “Notes Pages” under the settings.

You can then print these handouts as PDF files or as physical copies.
Creating PowerPoint Handouts with Word
As with all things computers, there are usually multiple ways to doing things. Sometimes, those ways lead to different results but cover the same end goal. Here is another way to do handouts. This time, we utilize Microsoft Word.
You may want to back up your work before you go through with this just to be on the safe side.

As a note, the function to export PowerPoint to Word takes a lot of memory. If you run into problems or see the message “PowerPoint couldn’t write to Microsoft Word,” restart your computer. Then run the Export with all other programs closed. If that still does not work, split the PowerPoint into two separate presentations. One with the first half of the slides and the other with the second half. Export both of those presentations and then combine them in Word.
Relevant Links…
In this post, I made reference a few times to my hobby videos On top of Tech Presenters, I run another website focused on tabletop gaming. That website also has a YouTube channel connected to it. I made all of my early videos on that channel using PowerPoint. Now I use video editors instead, but it is surprising how much you can do with PowerPoint.
If you are interested in video editors, check out my article “ The Best Free Video Editors Out There For the PC” . You can also find more PowerPoint Tips right here on Tech Presenters. One article that I would like to direct your attention to is “ The Hottest PowerPoint HotKeys for Presenters “. Be sure to check that article out for some HotKeys that could help you present better in front of an audience.
Turning back to this article, the PowerPoint files that I screen captured are from the videos listed below. I made them using PowerPoint and even wrote my scripts into the notes section of the program.
- LED Lamp Review for Painting, Building and Photographing Miniatures – Lamp by GameCraft Miniatures
- 28mm WW2 Soviet Train Station Review – MDF Terrain by Things from the Basement soon on Kickstarter
- Monster Scenery Terrain Review – Broken Ground – Pre-painted terrain for miniature gaming and RPGs
On top of these videos, I also have a related Website called Must Contain Minis .
For those wondering, I am using Office 365 on Windows 10.
Now, let’s finish up this article.
Bringing it Together…
In this article, we went over how to add notes to PowerPoint. Not only that, but we went further and also discussed how to use the notes during presentations, for recording and for printing off handouts.
As a presentation support professional, I find coupling my slides with notes extremely handy. As a presenter, these notes help me stay on track and to make sure that I cover all of the important points that I wanted to make. Knowing how to use these notes, and how to get the most out of them, really helps in delivering the best presentations that you can.
Personally I like to keep back up files and older versions of my files in case I run into any problems. In general, I am pretty cautious in my approach and there is not harm in keeping multiple files. Just make sure that you name them well and work on the newest version. I figured I would leave that reminder here. If you are playing around with the layout of your notes page or messing around with what appears on them, it might be a good idea to keep a back up to go to in case things don’t work as intended.
Until next time, Happy Presenting Everyone!!!
You Might Also Like

How Do I Embed a Video in PowerPoint? Great Advice for 2023!

How to Make Bullet Points Show 1 by 1 in PowerPoint

Presentation Tips for Webcasts and Online Meetings
This post has one comment.
Pingback: How to Make Bullet Points Show 1 by 1 in PowerPoint - Tech Presenters
Comments are closed.
By continuing to use this website, you consent to the use of cookies in accordance with our Cookie Policy.
Blog > All about notes in PowerPoint Presentations
All about notes in PowerPoint Presentations
08.06.21 • #powerpoint #tips.
Not only is a well-prepared PowerPoint presentation essential, but also a red thread and a fluent presentation. With the help of notes in PowerPoint, this is no longer a problem! In this blog post, we will not only explain how you can add powerpoint notes, but also how you can edit them and make good use of them during a presentation. We will also show you how to print out the notes and how to delete them again.
Inserting and editing notes in PowerPoint
- First open your presentation.

There are two ways you can print out the notes. With the slides or without.

Print notes with the slides

Print notes without the slides
Using notes during a presentation.

If you want to share your PowerPoint on Zoom without showing the audience your notes, there are several options. A very simple and straightforward option would be to simply print out your notes. If you have two monitors, PowerPoint will automatically set up the Presenter View for you. If you do not have a second screen, you only have to go to the three dots at the very bottom left during the presentation, there you can easily display the speaker view under "Speaker view".
Now, turn the tables! - Let your attendees take private notes
With the help of SlideLizard (a cool software for live audience interaction in PowerPoint), your participants can make private notes directly on their own smartphones during the presentation. These notes remain linked to the slides and at the end of the presentation, all participants receive their own notes via email. In addition, your audience can mark the most important slides with a star to make them easier to find again later. Moreover, with SlideLizard you can add live polls & quizzes directly in your PowerPoint. You can try SlideLizard for free today !

Deleting notes in PowerPoint
Of course, there is also the option of deleting the notes. You can delete them directly on the respective slides or you can delete them all at once. Proceed as follows:

Keyboard shortcuts for notes in PowerPoint
| Action | Shortcut |
|---|---|
| Starting the presentation in speaker view | Alt + F5 |
How can I add notes in PowerPoint?
To add notes in PowerPoint, go to "Notes" in the "View" tab or you can also insert notes via the status bar at the bottom right with just one click.
How do I print notes in PowerPoint?
Go to "Print" in the "File" tab. Then select "Notes pages" in the print layout instead of "Full page slides".
How can I use the notes in PowerPoint during my presentation?
In order to see your PowerPoint notes during your presentation, you must check the box "Use Presenter View" in the tab "Slide Show" beforehand. They will then be displayed automatically during your presentation.
Related articles
About the author.

Miriam Rapberger
Miriam supports SlideLizard in the area of marketing and design. There she uses her creativity for blog posts, among other things.

Get 1 Month for free!
Do you want to make your presentations more interactive.
With SlideLizard you can engage your audience with live polls, questions and feedback . Directly within your PowerPoint Presentation. Learn more
Top blog articles More posts

The 5 best PowerPoint-Plugins in 2022

20 Poll Ice Breaker Questions to ask in your next Presentation

Get started with Live Polls, Q&A and slides
for your PowerPoint Presentations
The big SlideLizard presentation glossary
Audience demographics.
Audience Demographics are the characteristics of listeners like age, gender, cultural backgrounds, group affiliations and educational level. The speaker has to consider all these characteristics when adapting to an audience.
Visual Communication
If there are used images or videos for communication, it is visual communication. Visual Communication is almost used everywhere like on television, posts on social media (Instagram, Facebook), advertisement.
Informative Presentations
An information presentation is created when no solution is currently available. Facts, data and figures or study results are presented and current processes are described.
TOK Presentation
The Theory of knowledge (TOK) presentation is an essential part of the International Baccalaureate Diploma Program (IB). The TOK presentation assesses a student's ability to apply theoretical thinking to real-life situations.
Be the first to know!
The latest SlideLizard news, articles, and resources, sent straight to your inbox.
- or follow us on -
We use cookies to personalize content and analyze traffic to our website. You can choose to accept only cookies that are necessary for the website to function or to also allow tracking cookies. For more information, please see our privacy policy .
Cookie Settings
Necessary cookies are required for the proper functioning of the website. These cookies ensure basic functionalities and security features of the website.
Analytical cookies are used to understand how visitors interact with the website. These cookies help provide information about the number of visitors, etc.
How-To Geek
How to use speaker notes in powerpoint.

Your changes have been saved
Email Is sent
Please verify your email address.
You’ve reached your account maximum for followed topics.
Winamp Music Player Is Now on iPhone and Android
Perplexity just stole chatgpt's best feature and is doing a better job, how new cars are slowing you down, quick links, add speaker notes in powerpoint, use speaker notes during a powerpoint presentation.
Adding speaker notes to a PowerPoint presentation provides reference material for the speaker when they're presenting a slideshow, allowing them to stay on track without forgetting key message points. Here’s how to add and use speaker notes.
To add speaker notes in PowerPoint, you’ll first need to be in the Normal view. If you’re not already there, you can switch to Normal view by going to the “View” tab and then selecting “Normal” in the “Presentation Views” group.

Next, in the pane on left, select the slide where you'd like to add speaker notes.

Next, click the “Notes” button at the bottom of the window.

A small box reading “Tap to Add Notes” will appear beneath the slide. For Mac users, this will say “Click to Add Notes.”

Now, simply type the speaker notes for that slide. Repeat this process for each slide you'd like to add notes to.
There are two ways to use speaker notes during a presentation: by presenting on a secondary monitor or by printing out the speaker notes .
Using a Secondary Monitor
It’s safe to assume that most presentations will be presented on a secondary monitor. If this is the case for you, there’s not a whole lot you really need to do.
Related: How to Add an Extra Monitor to Your Laptop
The first thing you need to do is change the view to Slide Show. You can do this by selecting the Slide Show icon at the bottom-right corner of the window.

In this view, the audience will see only the slides as you’re going through the presentation. However, on your primary monitor, you’ll see the current slide, a preview of the upcoming slide, and your speaker notes for the current slide.

This is a convenient way to have a virtual copy of the speaker notes while you’re giving a presentation, but it never hurts to have a hard copy.
Printing the Speaker Notes
To print the speaker notes of your presentation, first select the “File” tab in the Ribbon.

Related: How to Print Multiple PowerPoint Slides to Each Piece of Paper
In the pane on left, select the “Print" button.

In the “Settings” group, select the option that says “Full Page Slides.”

A drop-down menu will appear. Here, select “Notes Pages” in the “Print Layout” group.

Finally, click “Print.”

You’ll now have a physical copy of your speaker notes.
- Microsoft Office
- Office 2016

- VisualStory®
- Duarte DataStory®
- Presentation Principles™
Slide:ology®
Slide Design
- Speaker Coaching
- Presenting Virtually™
- Illuminate™
- Adaptive Listening™
- Team training
- Learning journeys
- Brand and product storytelling
- Keynotes and events
- Sales enablement
- Communication systems
- Accelerator Lab™
- Our culture
- Our leaders
- Case studies
- Media mentions
Guides and tools
- Learner support
Everything you need to know about using speaker notes in PowerPoint®

Chariti Canny
Through preparing for our training , Slide Design , we realized there’s a feature that many presenters don’t realize plays a key role in slide design and speaker support: speaker notes in PowerPoint®.
To use your speaker notes in PowerPoint most effectively during your next talk, follow the tips below.
What are speaker notes in PowerPoint?
Speaker notes in PowerPoint help presenters recall important points, such as key messages or stats, as they give a presentation. The speaker note panel lives at the bottom of your screen in Normal view, although some users may have this section hidden.
Use the speaker notes to add more nuanced information about a slide’s graphics, or instructions for how to click through an animation. It can also be handy to add links to important files or just use this space as a general note taking section—like someone would use a scratch piece of paper.
What are the benefits of speaker notes in PowerPoint?
You are the storyteller, and your slides are your support, forming the atmosphere and emphasizing your key points. Because there’s a limit to how much information people can process at one time— they will either listen to you or read your slides —it’s important to show only information essential for your story.
Speaker notes in PowerPoint allow you to move nonessential text and stats off your slides so that your audience can fully absorb your message. Having the info in the speaker notes allows you to be ready should your audience ask questions about your data, or other points in your presentation that may require additional information.
Though speaker notes should be a somewhat simplified version of what you are saying, using them for the high-level points of your script will help you match your talk track to what’s happening on the slide behind you.
Spending a little time structuring speaker notes in PowerPoint can also be an easy way to turn your presentation into a dual-purpose file. Not only can you use your file to present, you can use it as a standalone document that can be effectively shared without you presenting. This more advanced feature is described below.
How do I add speaker notes in PowerPoint?
There are two ways to add speaker notes in PowerPoint.
Method One: Directly edit in slide editing mode (aka Normal View). Click the notes section of the window and begin typing. If the notes are hidden, click the Notes button found in options on the bottom right of the PowerPoint screen.

Method Two: Edit your notes in Notes View. Click on the View tab in the ribbon and click Notes Page. Here you have more room on the screen to write your notes and adjust the font size and layout.
How should you write speaker notes in PowerPoint?
We typically advise speakers not to write their script word-for-word in the speaker notes section, as this can tempt a presenter to break a connection with an audience, as well as begin to sound inauthentic.
The first bullet point of your speaker notes can convey that overarching idea, and your other points can support it. I call these speaking touchpoints, and often they are short words or phrases that will remind me of what I want to say.
If one of your supporting concepts involves telling an anecdote or story, you can trigger your memory by leaving a note to yourself in brackets. For example, you could type:
- As a company, we’ve been through difficult times before
- [Story: 2008 financial crisis]
It’s also important to keep these simple because the space to view them is limited. Though, there are times when a more elaborate note needs to be included. I’ve found that including a very important phrase in full is one of my favorite things about speaker notes. We often spend a lot of time crafting that pivotal moment, the pace of it, and the wording. Leave room to easily see it in presenter view.
Once, I sat through a presentation where the presenter stayed on one slide for quite some time. He was telling a long story that was coming back to resolve and tie together various points of information on the slide. To help himself stay on track, he wrote about six key speaking touchpoints in a list in the speaker notes, duplicated the slide (so it looked the same to the audience), then completed his next few speaking touchpoints for the slide. When he reached the bottom of the first six touchpoints he clicked the slide without missing a beat and continued the talk track. The audience had no idea that he just moved slides and he was able to use his notes, even though they were long.
The speaker notes are also an opportunity to include “stage directions.” These can be anything from reminding yourself to click and advance an animation, gesture to a co-speaker or member of the audience, or even take a breath and pause.
How do you project speaker notes in PowerPoint during a presentation?
PowerPoint is set up to show notes only to the speaker when a presentation is connected to another output, such as a monitor, a projector, a video conferencing app, etc. Just select the Slide Show tab and click Presenter View to enable a display that only you can see on your computer.

You’ll see your slides, speaker notes, and even a timer, but your audience will only see slides projected on a monitor or screen.
How else can I use my speaker notes in PowerPoint?
I mentioned that you can structure the notes pages to act as a standalone document that can be shared without you presenting. This is a more advanced way to use notes, but extremely valuable.
Let’s say your presentation wowed your audience so much that they requested copies of your slides so they can reference them later, or share with others. Because you created a presentation meant to be shown, not read, chances are that your file won’t make sense to someone who wasn’t in the room.

Unless, of course, they can read and make sense of your speaker notes. Speaker notes can be used to create beautiful presentation artifacts for your audiences. By giving people a physical reminder of your presentation content, they’ll keep thinking about your talk long after you give it, and they’ll more easily share your message with others.
David Allen, the author of the bestselling series Getting Things Done , leaves information behind after his talks to ensure that his audience remembers his key principles and methodologies.
After we created a cinematic presentation for David, we translated the rich, evocative images and layouts of his presentation into handouts that anyone could read and understand.
How can I use speaker notes in PowerPoint to create handouts?
Here’s how to do it:
1. Click on View in the ribbon and select Notes Page. You’ll see that the slide visual takes up the top half of the page and the text below the slide defaults to a bulleted list.

This basic note layout is extremely modifiable. Not only can the Notes Master be adjusted, but each Notes Page itself can have text, charts, quotes, and images added as separate and additional content to augment what’s on the surface slide.
2. To make changes that will impact the basic structure of all your notes pages, navigate to the Notes Master View: View tab > Master > Notes Master.
3. Make changes to the layout in the Notes Master, keeping in mind that changes here will be reflected on all the notes pages. In the image below, an example of a default Notes Master is shown at left, with a modified master page at right.

You can scale your slide thumbnail to any size and place it anywhere on the master. Headers, footers, and the note placeholder can be moved into any position you’d like. You can add objects to the Notes Master, but remember that objects added in Notes Master will appear on every slide’s notes page. Thus, you must be strategic about what you add. To that point, adding a logo or some other universal image would make sense in the Notes Master.
4. Once the Notes Master has been restructured, return to Notes View: View tab > Notes Page.
5. For each page, add any custom graphics, data, text, or other items that relate to that slide. Remember, these will not appear on the slides; they only appear in these notes.
In the layouts we created for David Allen below, we placed a small image of the slide on the top left of the page and a graphic and quote at the top right.

How do I print speaker notes in PowerPoint?
Perhaps you’d rather print out your notes instead of viewing them digitally on a monitor. Or maybe you’ve gone the extra step and customized your notes and now you’re ready to distribute them to your audience.
1. Click the File tab and select Print to open the print dialog.
2. Pull down the second menu within the Settings options. PowerPoint defaults to the Full Page Slides option, and you’ll need to switch it to Notes Pages option.

Now you can print the file in Notes View to give a hard copy to your audience.
*Note: Image resolutions may be slightly less in printed or PDF Notes View. Text and shapes will remain the same.
By putting thought into how you prepare, use, and re-use your speaker notes, you ensure that your message resonates long after you and your audience leave the room.

Check out these related courses
Presentation Principles™
Learn presentation basics
Follow a step-by-step method to write compelling stories, amplify ideas visually, and present with confidence while learning at your own pace.
Turn ideas into visuals
Use visual thinking and design principles to transform information into effective and memorable graphics for presentations.
Build effective slides
Create attractive slide decks using presentation software, even if you’re not a designer. Our training, tips, and tricks will help you work smarter, faster, and more efficiently.
Create “skimmable” documents
Build helpful pre-reads and impactful leave-behinds with presentation software to support knowledge sharing and decision-making.
Check out these related resources

Walking decks 101: A beginner’s guide and why you need one
Learn everything you need to know about walking decks, what they are, how to use one, and all the use cases for one.

How to design and deliver an investor pitch deck that gets funded
Learn tips and tricks to use for your investor pitch deck from the experts in presentation design and persuasive communication.

Part II: What would Duarte do – Your most pressing questions answered
Get your slide design questions answered with insider tips from three world-class Duarte presentation designers.

What would Duarte do: Slide design makeovers
Get insider tips from three world-class Duarte presentation designers as they provide live slide makeovers and teach you the secrets to engaging and memorable slides.

What sets a top presentation design agency apart from the rest?
The presentation design agencies do more than just “clean up your slides.” Learn the difference between hiring a presentation designer, a basic presentation design company, and a premium presentation design agency.

The Glance Test™
Your audience should be able to understand the main point of your slide in 3 seconds or less. Quickly test your slide’s glance-power with this free tool.

May 9, 2022
Edit your notes in Presenter view in PowerPoint
Victoria Tran
- Add our blog to your RSS feed reader" href="/rss/blog.xml" data-bi-name="RSS Subscription" data-bi-id="rss_feed" data-bi-bhvr="120" data-bi-socchn="RSSSubscription" title="Microsoft 365 Insider Blog RSS" target="blank" class="d-inline-block">
Hey, Officer Insiders! My name is Victoria Tran, and I’m a Program Manager on the PowerPoint team. I’m thrilled to share that you can now edit notes in Presenter view in PowerPoint for Windows. No more switching to Editor view to type or change your notes, even during a presentation!
Edit notes in Presenter view
Accessing and editing your slide content whenever the need arises is a key part of the PowerPoint workflow. Whether you’re making an important edit to your speaker notes during a presentation rehearsal or jotting down feedback during your presentation, the ability to edit notes in Presenter view increases your productivity and eliminates the need to toggle between views.
We are excited to add this highly requested feature and expand the use of PowerPoint notes. In the future, we’ll continue to add support for editing notes in other views, such as Teleprompter view.
How it works
Ready to edit notes in Presenter view?

NOTE: You can also press the F6 key to select the Notes pane in Presenter view. When a white outline appears around the pane, press Enter and start typing to make any updates you want.
Known issues
Presenter view currently only allows basic formatting of notes, such as bold, italics, and underlining (via keyboard shortcuts). Formatting such as text color, highlighting, and other options aren’t yet available.
Tips and tricks
- If you are using keyboard commands to navigate through your slides during a presentation, make sure the text insertion point is not showing in the Notes pane. If it is, the arrow keys will move the insertion point around in the pane instead of navigating the slides.
- If you have two monitors, a full-screen slide will show on one monitor and Presenter view on the other monitor, featuring a view of the next slide, your speaker notes, a timer, and more. If you have just one monitor, you can press Alt + F5 to try out Presenter view.
Availability
We will be rolling the edit notes in Presenter view feature out to Office Insiders running Beta Channel Version 2204 (Build 15225.20000) or later.
Don’t have it yet? It’s probably us, not you.
Features are released over some time to ensure things are working smoothly. We highlight features that you may not have because they’re slowly releasing to larger numbers of Insiders. Sometimes we remove elements to further improve them based on your feedback. Though this is rare, we also reserve the option to pull a feature entirely out of the product, even if you, as an Insider, have had the opportunity to try it.
We want to hear from you! Please click Help > Feedback to submit your feedback about this feature.
Learn what other information you should include in your feedback to ensure it’s actionable and reaches the right people. We’re excited to hear from you!
Sign up for the Office Insider newsletter and get the latest information about Insider features in your inbox once a month!
Sorry, JavaScript must be enabled to use this app.
We use essential cookies to make Venngage work. By clicking “Accept All Cookies”, you agree to the storing of cookies on your device to enhance site navigation, analyze site usage, and assist in our marketing efforts.
Manage Cookies
Cookies and similar technologies collect certain information about how you’re using our website. Some of them are essential, and without them you wouldn’t be able to use Venngage. But others are optional, and you get to choose whether we use them or not.
Strictly Necessary Cookies
These cookies are always on, as they’re essential for making Venngage work, and making it safe. Without these cookies, services you’ve asked for can’t be provided.
Show cookie providers
- Google Login
Functionality Cookies
These cookies help us provide enhanced functionality and personalisation, and remember your settings. They may be set by us or by third party providers.
Performance Cookies
These cookies help us analyze how many people are using Venngage, where they come from and how they're using it. If you opt out of these cookies, we can’t get feedback to make Venngage better for you and all our users.
- Google Analytics
Targeting Cookies
These cookies are set by our advertising partners to track your activity and show you relevant Venngage ads on other sites as you browse the internet.
- Google Tag Manager
- Infographics
- Daily Infographics
- Popular Templates
- Accessibility
- Graphic Design
- Graphs and Charts
- Data Visualization
- Human Resources
- Beginner Guides
Blog Beginner Guides How To Make a Good Presentation [A Complete Guide]
How To Make a Good Presentation [A Complete Guide]
Written by: Krystle Wong Jul 20, 2023

A top-notch presentation possesses the power to drive action. From winning stakeholders over and conveying a powerful message to securing funding — your secret weapon lies within the realm of creating an effective presentation .
Being an excellent presenter isn’t confined to the boardroom. Whether you’re delivering a presentation at work, pursuing an academic career, involved in a non-profit organization or even a student, nailing the presentation game is a game-changer.
In this article, I’ll cover the top qualities of compelling presentations and walk you through a step-by-step guide on how to give a good presentation. Here’s a little tip to kick things off: for a headstart, check out Venngage’s collection of free presentation templates . They are fully customizable, and the best part is you don’t need professional design skills to make them shine!
These valuable presentation tips cater to individuals from diverse professional backgrounds, encompassing business professionals, sales and marketing teams, educators, trainers, students, researchers, non-profit organizations, public speakers and presenters.
No matter your field or role, these tips for presenting will equip you with the skills to deliver effective presentations that leave a lasting impression on any audience.
Click to jump ahead:
What are the 10 qualities of a good presentation?
Step-by-step guide on how to prepare an effective presentation, 9 effective techniques to deliver a memorable presentation, faqs on making a good presentation, how to create a presentation with venngage in 5 steps.
When it comes to giving an engaging presentation that leaves a lasting impression, it’s not just about the content — it’s also about how you deliver it. Wondering what makes a good presentation? Well, the best presentations I’ve seen consistently exhibit these 10 qualities:
1. Clear structure
No one likes to get lost in a maze of information. Organize your thoughts into a logical flow, complete with an introduction, main points and a solid conclusion. A structured presentation helps your audience follow along effortlessly, leaving them with a sense of satisfaction at the end.
Regardless of your presentation style , a quality presentation starts with a clear roadmap. Browse through Venngage’s template library and select a presentation template that aligns with your content and presentation goals. Here’s a good presentation example template with a logical layout that includes sections for the introduction, main points, supporting information and a conclusion:

2. Engaging opening
Hook your audience right from the start with an attention-grabbing statement, a fascinating question or maybe even a captivating anecdote. Set the stage for a killer presentation!
The opening moments of your presentation hold immense power – check out these 15 ways to start a presentation to set the stage and captivate your audience.
3. Relevant content
Make sure your content aligns with their interests and needs. Your audience is there for a reason, and that’s to get valuable insights. Avoid fluff and get straight to the point, your audience will be genuinely excited.
4. Effective visual aids
Picture this: a slide with walls of text and tiny charts, yawn! Visual aids should be just that—aiding your presentation. Opt for clear and visually appealing slides, engaging images and informative charts that add value and help reinforce your message.
With Venngage, visualizing data takes no effort at all. You can import data from CSV or Google Sheets seamlessly and create stunning charts, graphs and icon stories effortlessly to showcase your data in a captivating and impactful way.

5. Clear and concise communication
Keep your language simple, and avoid jargon or complicated terms. Communicate your ideas clearly, so your audience can easily grasp and retain the information being conveyed. This can prevent confusion and enhance the overall effectiveness of the message.
6. Engaging delivery
Spice up your presentation with a sprinkle of enthusiasm! Maintain eye contact, use expressive gestures and vary your tone of voice to keep your audience glued to the edge of their seats. A touch of charisma goes a long way!
7. Interaction and audience engagement
Turn your presentation into an interactive experience — encourage questions, foster discussions and maybe even throw in a fun activity. Engaged audiences are more likely to remember and embrace your message.
Transform your slides into an interactive presentation with Venngage’s dynamic features like pop-ups, clickable icons and animated elements. Engage your audience with interactive content that lets them explore and interact with your presentation for a truly immersive experience.

8. Effective storytelling
Who doesn’t love a good story? Weaving relevant anecdotes, case studies or even a personal story into your presentation can captivate your audience and create a lasting impact. Stories build connections and make your message memorable.
A great presentation background is also essential as it sets the tone, creates visual interest and reinforces your message. Enhance the overall aesthetics of your presentation with these 15 presentation background examples and captivate your audience’s attention.
9. Well-timed pacing
Pace your presentation thoughtfully with well-designed presentation slides, neither rushing through nor dragging it out. Respect your audience’s time and ensure you cover all the essential points without losing their interest.
10. Strong conclusion
Last impressions linger! Summarize your main points and leave your audience with a clear takeaway. End your presentation with a bang , a call to action or an inspiring thought that resonates long after the conclusion.
In-person presentations aside, acing a virtual presentation is of paramount importance in today’s digital world. Check out this guide to learn how you can adapt your in-person presentations into virtual presentations .

Preparing an effective presentation starts with laying a strong foundation that goes beyond just creating slides and notes. One of the quickest and best ways to make a presentation would be with the help of a good presentation software .
Otherwise, let me walk you to how to prepare for a presentation step by step and unlock the secrets of crafting a professional presentation that sets you apart.
1. Understand the audience and their needs
Before you dive into preparing your masterpiece, take a moment to get to know your target audience. Tailor your presentation to meet their needs and expectations , and you’ll have them hooked from the start!
2. Conduct thorough research on the topic
Time to hit the books (or the internet)! Don’t skimp on the research with your presentation materials — dive deep into the subject matter and gather valuable insights . The more you know, the more confident you’ll feel in delivering your presentation.
3. Organize the content with a clear structure
No one wants to stumble through a chaotic mess of information. Outline your presentation with a clear and logical flow. Start with a captivating introduction, follow up with main points that build on each other and wrap it up with a powerful conclusion that leaves a lasting impression.
Delivering an effective business presentation hinges on captivating your audience, and Venngage’s professionally designed business presentation templates are tailor-made for this purpose. With thoughtfully structured layouts, these templates enhance your message’s clarity and coherence, ensuring a memorable and engaging experience for your audience members.
Don’t want to build your presentation layout from scratch? pick from these 5 foolproof presentation layout ideas that won’t go wrong.

4. Develop visually appealing and supportive visual aids
Spice up your presentation with eye-catching visuals! Create slides that complement your message, not overshadow it. Remember, a picture is worth a thousand words, but that doesn’t mean you need to overload your slides with text.
Well-chosen designs create a cohesive and professional look, capturing your audience’s attention and enhancing the overall effectiveness of your message. Here’s a list of carefully curated PowerPoint presentation templates and great background graphics that will significantly influence the visual appeal and engagement of your presentation.
5. Practice, practice and practice
Practice makes perfect — rehearse your presentation and arrive early to your presentation to help overcome stage fright. Familiarity with your material will boost your presentation skills and help you handle curveballs with ease.
6. Seek feedback and make necessary adjustments
Don’t be afraid to ask for help and seek feedback from friends and colleagues. Constructive criticism can help you identify blind spots and fine-tune your presentation to perfection.
With Venngage’s real-time collaboration feature , receiving feedback and editing your presentation is a seamless process. Group members can access and work on the presentation simultaneously and edit content side by side in real-time. Changes will be reflected immediately to the entire team, promoting seamless teamwork.

7. Prepare for potential technical or logistical issues
Prepare for the unexpected by checking your equipment, internet connection and any other potential hiccups. If you’re worried that you’ll miss out on any important points, you could always have note cards prepared. Remember to remain focused and rehearse potential answers to anticipated questions.
8. Fine-tune and polish your presentation
As the big day approaches, give your presentation one last shine. Review your talking points, practice how to present a presentation and make any final tweaks. Deep breaths — you’re on the brink of delivering a successful presentation!
In competitive environments, persuasive presentations set individuals and organizations apart. To brush up on your presentation skills, read these guides on how to make a persuasive presentation and tips to presenting effectively .

Whether you’re an experienced presenter or a novice, the right techniques will let your presentation skills soar to new heights!
From public speaking hacks to interactive elements and storytelling prowess, these 9 effective presentation techniques will empower you to leave a lasting impression on your audience and make your presentations unforgettable.
1. Confidence and positive body language
Positive body language instantly captivates your audience, making them believe in your message as much as you do. Strengthen your stage presence and own that stage like it’s your second home! Stand tall, shoulders back and exude confidence.
2. Eye contact with the audience
Break down that invisible barrier and connect with your audience through their eyes. Maintaining eye contact when giving a presentation builds trust and shows that you’re present and engaged with them.
3. Effective use of hand gestures and movement
A little movement goes a long way! Emphasize key points with purposeful gestures and don’t be afraid to walk around the stage. Your energy will be contagious!
4. Utilize storytelling techniques
Weave the magic of storytelling into your presentation. Share relatable anecdotes, inspiring success stories or even personal experiences that tug at the heartstrings of your audience. Adjust your pitch, pace and volume to match the emotions and intensity of the story. Varying your speaking voice adds depth and enhances your stage presence.

5. Incorporate multimedia elements
Spice up your presentation with a dash of visual pizzazz! Use slides, images and video clips to add depth and clarity to your message. Just remember, less is more—don’t overwhelm them with information overload.
Turn your presentations into an interactive party! Involve your audience with questions, polls or group activities. When they actively participate, they become invested in your presentation’s success. Bring your design to life with animated elements. Venngage allows you to apply animations to icons, images and text to create dynamic and engaging visual content.
6. Utilize humor strategically
Laughter is the best medicine—and a fantastic presentation enhancer! A well-placed joke or lighthearted moment can break the ice and create a warm atmosphere , making your audience more receptive to your message.
7. Practice active listening and respond to feedback
Be attentive to your audience’s reactions and feedback. If they have questions or concerns, address them with genuine interest and respect. Your responsiveness builds rapport and shows that you genuinely care about their experience.

8. Apply the 10-20-30 rule
Apply the 10-20-30 presentation rule and keep it short, sweet and impactful! Stick to ten slides, deliver your presentation within 20 minutes and use a 30-point font to ensure clarity and focus. Less is more, and your audience will thank you for it!
9. Implement the 5-5-5 rule
Simplicity is key. Limit each slide to five bullet points, with only five words per bullet point and allow each slide to remain visible for about five seconds. This rule keeps your presentation concise and prevents information overload.
Simple presentations are more engaging because they are easier to follow. Summarize your presentations and keep them simple with Venngage’s gallery of simple presentation templates and ensure that your message is delivered effectively across your audience.

1. How to start a presentation?
To kick off your presentation effectively, begin with an attention-grabbing statement or a powerful quote. Introduce yourself, establish credibility and clearly state the purpose and relevance of your presentation.
2. How to end a presentation?
For a strong conclusion, summarize your talking points and key takeaways. End with a compelling call to action or a thought-provoking question and remember to thank your audience and invite any final questions or interactions.
3. How to make a presentation interactive?
To make your presentation interactive, encourage questions and discussion throughout your talk. Utilize multimedia elements like videos or images and consider including polls, quizzes or group activities to actively involve your audience.
In need of inspiration for your next presentation? I’ve got your back! Pick from these 120+ presentation ideas, topics and examples to get started.
Creating a stunning presentation with Venngage is a breeze with our user-friendly drag-and-drop editor and professionally designed templates for all your communication needs.
Here’s how to make a presentation in just 5 simple steps with the help of Venngage:
Step 1: Sign up for Venngage for free using your email, Gmail or Facebook account or simply log in to access your account.
Step 2: Pick a design from our selection of free presentation templates (they’re all created by our expert in-house designers).
Step 3: Make the template your own by customizing it to fit your content and branding. With Venngage’s intuitive drag-and-drop editor, you can easily modify text, change colors and adjust the layout to create a unique and eye-catching design.
Step 4: Elevate your presentation by incorporating captivating visuals. You can upload your images or choose from Venngage’s vast library of high-quality photos, icons and illustrations.
Step 5: Upgrade to a premium or business account to export your presentation in PDF and print it for in-person presentations or share it digitally for free!
By following these five simple steps, you’ll have a professionally designed and visually engaging presentation ready in no time. With Venngage’s user-friendly platform, your presentation is sure to make a lasting impression. So, let your creativity flow and get ready to shine in your next presentation!
Discover popular designs

Infographic maker

Brochure maker

White paper online

Newsletter creator

Flyer maker

Timeline maker

Letterhead maker

Mind map maker

Ebook maker
- SUGGESTED TOPICS
- The Magazine
- Newsletters
- Managing Yourself
- Managing Teams
- Work-life Balance
- The Big Idea
- Data & Visuals
- Reading Lists
- Case Selections
- HBR Learning
- Topic Feeds
- Account Settings
- Email Preferences
What It Takes to Give a Great Presentation
- Carmine Gallo

Five tips to set yourself apart.
Never underestimate the power of great communication. It can help you land the job of your dreams, attract investors to back your idea, or elevate your stature within your organization. But while there are plenty of good speakers in the world, you can set yourself apart out by being the person who can deliver something great over and over. Here are a few tips for business professionals who want to move from being good speakers to great ones: be concise (the fewer words, the better); never use bullet points (photos and images paired together are more memorable); don’t underestimate the power of your voice (raise and lower it for emphasis); give your audience something extra (unexpected moments will grab their attention); rehearse (the best speakers are the best because they practice — a lot).
I was sitting across the table from a Silicon Valley CEO who had pioneered a technology that touches many of our lives — the flash memory that stores data on smartphones, digital cameras, and computers. He was a frequent guest on CNBC and had been delivering business presentations for at least 20 years before we met. And yet, the CEO wanted to sharpen his public speaking skills.
- Carmine Gallo is a Harvard University instructor, keynote speaker, and author of 10 books translated into 40 languages. Gallo is the author of The Bezos Blueprint: Communication Secrets of the World’s Greatest Salesman (St. Martin’s Press).
Partner Center
- Speech Writing
- Delivery Techniques
- PowerPoint & Visuals
- Speaker Habits
- Speaker Resources
Speech Critiques
- Book Reviews
- Browse Articles
- ALL Articles
- Learn About Us
- About Six Minutes
- Meet Our Authors
- Write for Us
- Advertise With Us
How to Use Notes in a Speech: A Guide for Speakers
Only one of the following statements is true. Do you know which one?
- You should never use notes because you will look unprepared.
- You should always use notes because memorization weakens your delivery.
- You should never use slide text as notes.
In this article, we identify scenarios where a full script is warranted or where memorization is advisable. For all your speaking scenarios in the middle, we discuss 21 tips for using notes effectively .
Full Script, Notes, or Nothing at all?
A previous Six Minutes article ( how to read a speech ) identified several speaking scenarios where reading a full script may be required or preferred :
You are speaking at a highly formal occasion (e.g. a commencement speech) You are delivering a particularly emotional speech (e.g. a wedding speech, a eulogy) You are forced to read word-for-word by lawyers or campaign managers (e.g. a corporate statement; a political speech) A speechwriter has written your speech. Life prevented you from preparing adequately. (Don’t let this happen often… your speech really would go better if you prepare.) You are a brand new speaker, and you haven’t developed the confidence yet to go without a script.
Likewise, there are speaking scenarios where it is highly desirable to avoid any notes and memorize your speech instead:
- You are giving a TED talk (or speaking at a similar “ballroom” event) where you’ve got twenty minutes or less. These events set a high bar for preparation.
- You are pitching to investors, potential customers, potential employers, or any type of career-shaping presentation . I would include many academic and industry conferences in this group, although some may have a less rigorous culture.
- You are offering a short toast .
- You are completing a course speech assignment, and you are not allowed to have notes.
- Your speech is so short (~ six minutes or less) that you ought to be able to deliver without notes.
If we eliminate those two extremes (full script and no notes at all), we are left with a majority of speaking scenarios where using notes is perfectly acceptable . These include:
- You are teaching a course, which is several hours or days in length.
- You are delivering a keynote address or some other lengthy speech at a conference.
- You are delivering a lunch-time seminar.
- You are addressing a service club or community group.
- You are delivering a webinar.
- You are doing a routine presentation at your workplace.
- Any other scenario where your speech is too long to memorize, but not formal enough to demand a full script .
If you are ever concerned about the culture and expectations for an event at which you are speaking, consult with the organizers. If this isn’t possible, err on the side of caution and be prepared to present either without notes or with absolute minimal notes.
Tips for Using Notes Effectively
If you decide to use notes for your presentation, you still have several choices to make. What medium do you choose? Can you use slide bullets for notes? Does it matter how your notes are formatted? What messages can you pass yourself within the notes? How do you deliver with notes in a way that doesn’t hamper your impact?
Choose the medium that suits your style.
“ The purpose of notes is to jog your memory, not provide lengthy passages to read. ”
- Use a classic: index cards. Many speakers–from elementary school students to career professionals–swear by index cards. If this is what you like, invest in a good hole punch and link all the cards together with a metal ring. This prevents the disastrous “Oh my! My cards are out-of-order” phenomenon.
- Go big (or at least letter-sized). Some people prefer using legal pads or standard letter-sized paper. The main advantage is that you can fit more on a page, so you won’t need to flip pages very often. For many presentations, a single one-sided page is all you’ll need. [This is my personal preference.]
- Go little: sticky notes. I’ve seen a couple professional trainers work from a large cardboard “palette” covered with many little colored sticky notes, each with a word or phrase. As each topic was covered, the trainer adeptly moved the corresponding note to the “done” pile to keep track of what they had covered. This allows a highly adaptive presentation style where you can cover content in an audience-driven order or not-at-all.
- Go digital with a tablet. There are countless note-taking or outline apps that can do the job for you. Some people love that it’s paper-less; others worry about the device staying charged long enough to be useful. Having to “swipe” your device back on from a black screen every time you need to consult your notes could be annoying, for you and your audience.
- Use presentation software… but do it properly. If you are presenting visuals, then the notes feature of your presentation software (e.g. PowerPoint) can be used in two distinct ways. In the first method, you can print out a set of “notes pages” which combine the slide content with your notes content. In the second method, you can use “Presenter View” to display your slides for the audience and, simultaneously, your slides and notes for you. For a well-rehearsed speaker, this can work very well. (Don’t show up at the event expecting to learn it on the fly!) Finally, do not ever use text on slides themselves as your notes. Audiences universally hate this.
Design your notes for easy consumption.
“ Do not ever use text on slides themselves as your notes. Audiences universally hate this. ”
- Minimize the words. Remember that the purpose of notes is to jog your memory, not provide lengthy passages to read. Don’t use sentences; use keywords or phrases instead. For example, you might distill an entire talk into short notes like “crutch metaphor”, “dentist story”, or “personnel strategy”. Verbose notes leads to two equally bad outcomes: [1] lots of reading, and [2] a high likelihood that you’ll get lost in your notes.
- Maximize scan-ability. Regardless of which medium you choose, be sure to type or print as neatly as possible. The last thing you need to do during your presentation is to decipher a messy or handwritten notes page. Use the largest font you can, and plenty of white space.
- Format wisely to provide clues. Used strategically, formatting such as bold, italics, underline, and color or size variations allows you to convey meaning to your future self.
- Adjust with colored pens or highlighters. Let’s say you’ve got a nicely printed notes page, but while rehearsing you realize that it’s missing a few words or some emphasis. A little touch-up with a colored pen or highlighter will fix it. Avoid using light pencils as it can be hard to read and it is prone to smudge.
- Use meaningful layout. Mirror your speech outline in the notes. Assuming you’ve distilled each point (paragraph), anecdote, or story down to a few words, these can still be displayed in a hierarchy that mirrors your speech outline.
- Organize in whatever style works for you. Don’t be afraid to use any organization scheme that works for you. One of my speaking mentors sometimes uses a single-page mind map as her “notes” page. I don’t think this method would work for me, but it worked wonderfully for her. Experiment!
Use notes for strategic purposes.
- Use notes for other people’s words. You can memorize quotations or a short excerpt of another work (e.g. a poem, story, or news article). However, there’s virtually no down side to reading it from your notes instead. An added bonus is that it signifies the respect you have for the other author.
- Aim for precision. Similarly, facts, statistics, and definitions can be memorized (and definitely should be if they are used in your speech opening), but it’s often safer to just put them in your notes. Reading a statistic from a note (as opposed to memorizing it) signals that you value truth and precision over appearing polished and “smart”.
- Remind yourself to interact with audience. In the past, I was prone to forgetting things like polling the audience, or doing a brainstorm exercise on a flip chart. (I think these items are easy to forget because they are always skipped during rehearsal.) So, I developed a habit of inserting clues like “[POLL AUDIENCE!!!]” or “[FLIP CHART]” in my notes to remind me.
- Remind yourself about timing or logistics. When I teach courses that last several hours, my lesson plan includes a rough timing breakdown which tells me that I should complete the first section in twenty minutes, or complete the group exercise by the ninety minute mark, and so on. I insert these timing reminders right into my notes, and I do the same for other logistical reminders such as “[STRETCH BREAK]” or “[DISTRIBUTE 2nd HANDOUT]”.
- Spell unfamiliar words phonetically to aid pronunciation. In a 1963 speech from Berlin, U.S. President John F. Kennedy uttered the famous phrase “ Ich bin ein Berliner ” (I am a Berliner). President Kennedy desired to pronounce this phrase correctly, so he wrote the words out phonetically: “ Ish bin ein Bearleener ” (his handwriting is shown in the photograph below). Though I don’t recommend handwriting today, I’ve often used this trick as a Master of Ceremonies to avoid pronunciation mistakes when introducing other speakers.
Handwriting of President John F. Kennedy to indicate the correct pronunciation of several speech phrases.
Deliver with confidence.
- Don’t apologize for having notes. It’s okay to have notes. Really! I cringe whenever a speaker apologizes for “needing” notes… not because the apology is so tragic, but rather because it usually signifies a lack of confidence. Prepare and deliver to the best of your ability, and skip the apologies.
- Practice with your notes, and revise as necessary. Just as with visuals, props, or anything else you intend on having with you during your presentation, rehearse with your notes. As you practice, add keywords to your notes if there’s a point, a story, a transition, or anything else you tend to forget. If you’ve never used “Presenter Mode” with slides before, then practice!! I’ve seen dozens of people launch into this mode without any prior preparation, and it usually kills a few minutes pointlessly.
- Glance at your notes at natural breaks. When you are speaking, try to keep your eyes up on your audience. Take advantage of natural pauses to refer briefly to your notes. For example, when I teach courses, I tend to glance down just after I change the slide. At that moment, the audience will direct their attention to the new slide, so this is a perfect opportunity. Once you’ve finished, bring your head back up and begin speaking again.
- Avoid glancing at your notes at critical moments. Your opening, closing, and any other “core moment” should be delivered with confidence, and glancing at your notes at this time will detract.
- Put your notes down… if there’s a place to put them. If you carry your notes around, it can be a visual or auditory distraction. Also, if you’ve got anything in your hands for a long period of time, it tends to limit natural gestures. If there’s a lectern, table, or any convenient surface, that will work. But if there is literally no where to put the notes, then just hold your notes in your hand. (Don’t put them on the floor. Bending down repeatedly will lead to awkward moments that are best avoided.)
Put in into Practice
Think about the next presentation you are scheduled to deliver.
- Are notes appropriate for this setting?
- How can you improve the content of your notes?
- Do you have quotations, facts, or other content that can go into notes to lessen your cognitive burden?
- Is today the day you will learn how to use Presenter Mode in your presentation software?
Please share this...
This is one of many public speaking articles featured on Six Minutes . Subscribe to Six Minutes for free to receive future articles.
Add a Comment Cancel reply
E-Mail (hidden)
Subscribe - It's Free!
| Follow Us |
Similar Articles You May Like...
- Never Read Your Speech… Never?
- How to Make Reading a Speech Not Like Reading a Speech
- The 7 Deadly Sins of Public Speaking
- 10 Presentation Bad Habits My College Students – And You – Must UN-Learn (Part 2)
- Speech Critique: Suki Kim (TED 2015)
- How to be a Confident Speaker with a Speech Disorder
Find More Articles Tagged:
Recent tweets.
Was talking to a client this afternoon about using notes when #presenting. Here is another great article from… https://t.co/M6Coa1JM6i — Mel Sherwood – Pitch & Presentation Specialist (@MelSherwood_) Dec 7th, 2018
How to Use Notes in a Speech: A Guide for Speakers https://t.co/la3tPHC7vG by @6minutes #nsa19 — Joel Heffner ✍🏼 (@JoelHeffner) Feb 12th, 2019
Featured Articles
- Majora Carter (TED, 2006) Energy, Passion, Speaking Rate
- Hans Rosling (TED, 2006) 6 Techniques to Present Data
- J.A. Gamache (Toastmasters, 2007) Gestures, Prop, Writing
- Steve Jobs (Stanford, 2005) Figures of speech, rule of three
- Al Gore (TED, 2006) Humor, audience interaction
- Dick Hardt (OSCON, 2005) Lessig Method of Presentation
Books We Recommend
| [ ] | [ ] | [ ] |
| [ ] | [ ] | [ ] |
| [ ] | [ ] | [ ] |
| Follow Six Minutes |
Six Minutes Copyright © 2007-2019 All Rights Reserved.
Read our permissions policy , privacy policy , or disclosure policy .
Comments? Questions? Contact us .
Introducing presenter notes: 6 key benefits of speaker notes
Create beautiful charts & infographics get started, 08.09.2022 by anete ezera.
Practicing your presentation is a time-consuming process. Especially if you’re trying to learn the text by heart. It’s definitely not easy to memorize every talking point, and with the added pressure of public speaking, it’s simple to forget certain details. By writing down your talking points, your presentation will be well-organized, and you won’t forget the details. However, flashcards or paper notes aren’t the best solutions either. It’s easy to get lost in sticky notes and lose the connection with the audience as you’re clearly looking in another direction. Luckily, you can avoid this hassle by simply using presenter notes (aka speaker notes) in Infogram!
Infogram’s team is proud and excited to introduce presenter notes, a feature that simplifies presenting and improves the quality of your future presentations . Keep reading to discover what speaker notes are, the benefits of speaker notes, and speaker note examples.
Click to jump forward: What are speaker notes (aka presenter notes)? Benefits of speaker notes Examples of speaker notes
What are speaker notes (aka presenter notes)?
Speaker notes or presenter notes are hidden notes in your slides , infographics , and other projects that help you remember key talking points and other information while you present. Speaker notes are only visible to you (the presenter), so when you present a slide , infographic , dashboard , or other visual content to your audience, you’ll be able to see speaker notes next to the content while they remain hidden from others.
As a result, you’ll be able to communicate your points to the audience without any disruptions.
In the example below, you can see how easy it is to write down speaker notes and present your slides to others while having your notes right in front of you.

Try it out now!
Benefits of speaker notes
Speaker notes or presenter notes have a lot of benefits that ultimately improve the quality of your presentations. Starting from the look of the presentation to the way you appear in front of your audience, speaker notes help you make a great impression with your presentation. Not to mention, speaker notes can even increase your productivity and improve workflow.
#1 Speaker notes improve your content
Imagine: You don’t use any notes. How do you deliver your talking points to the audience? In many cases, presenters try to write everything down in their presentation slides. You’ve probably seen some presentations that have text-heavy slides and thus are difficult to digest.
The visual content of your presentation (such as slides, infographics, and dashboards) should be used as supplementary visual aids, not the script of your presentation. It’s common for people to write down every talking point in a presentation slide, but it’s unnecessary and clutters the slide. It’s a common mistake, but one that you definitely want to avoid.
With speaker notes, you can write down all your talking points in the notes area and leave the presentation slide for other, more important content you want to share with your audience.
#2 Speaker notes help you remember information
One of the most obvious benefits of speaker notes is that it helps with remembering important information.
It’s common to feel stressed when presenting. Stress impacts our brain function and can lead to forgetting certain things. That’s why it’s important to have speaker notes next to you when presenting.
With speaker notes, you’ll have the written information next to you on screen when presenting. You won’t have to search for paper notes somewhere on your desk or scroll down a Word document as you’re presenting. You’ll always have your information next to the specific slide you’re presenting.
#3 Speaker notes replace inconvenient alternatives
Flashcards, sticky notes, and other types of paper notes are helpful but can cause confusion if they get mixed up. The last thing you want is to start searching for the right paper note while presenting. You’ll appear less confident, and it can throw you off track when presenting.
By switching to speaker notes, you won’t have to spend time looking for the notes, you’ll have them all in front of you on screen.

#4 Speaker notes help you stay focused and on point
When you’re talking about a subject you’re passionate about, it’s easy to drift away from your talking points. You might be excited to share insightful details about a project, but it can derail you from the main points you’re trying to make. In some cases, you might have a strict time limit for your presentation, so staying focused and on point is crucial.
With presenter notes, it’ll be much easier for you to stay on point as you’ll have the outline of your presentation right in front of you. When writing down your notes, take into consideration the time limit of your presentation and practice your speech with the notes next to you. This way you’ll have a better understanding of how much time you have for each point.
#5 Speaker notes make you appear more convincing
Confidence comes from assurance. When you’re sure about what you’re presenting and know the content of your presentation, you appear more confident to your audience.
Presenters who read the text from paper notes, who drift away from the main topic, or simply forget certain information are less persuasive. Presenters who look at the screen when presenting online, who know their content, and who stay on point have a greater impact on their audience because they look engaged and more relaxed.
With speaker notes, you can appear more confident and convince your audience more effectively with the content you share.
#6 Speaker notes improve productivity
Efficient tools help us save time when creating and presenting content. When you save time, you’re more efficient and can increase your productivity.
Using speaker notes is easy and can save you time when creating your presentation. As you have your slide next to you when writing down your presentation notes, you’ll have a better overview of the talking points you want to mention. Also, presenting becomes more efficient as you spend less time thinking about what you have to say next and spend more time focusing on the present moment.
Discover other Infogram tools that help you and your team accomplish more in our article on increasing productivity .
Example of speaker notes
If you’re wondering how to create presenter notes, and how to use presenter view on Zoom without showing notes, read our support article on presenter notes . Also, the visual example below illustrates how speaker notes show up when sharing a screen on your video conferencing app.

Presenter notes are great for remembering important information, staying on point while presenting, decluttering your presentation slides, and more. Now you can create and deliver insightful and beautiful presentations without paper notes or spending hours practicing your presentation speech. Simply go to Infogram , choose a template, or start from scratch, and write down your presenter notes.
Interested in discovering how Infogram can enhance your team’s work? Join a brief Zoom session with our Infogram representative to explore key features, get answers to your questions, and understand how we can assist. It’s quick, informative, and just like a coffee break chat. Schedule your call now!
Get data visualization tips every week:
New features, special offers, and exciting news about the world of data visualization.
Join more than 200,000 readers and receive the latest data visualization news, tips and trends every week.
Ai for charts: get ai-powered suggestions for the best chart type, how to write an ai prompt: pro tips to unlock ai potential, scale your workflow with infogram’s ai data visualization tool.
Notes Master in PowerPoint (Everything You Need to Know!)
By: Author Shrot Katewa

There are times when I often forget to talk about every single point that I had planned for when giving a presentation. This is not an uncommon phenomenon. That is exactly when PowerPoint notes can come in handy! But, to leverage the power of notes in PowerPoint, you need to understand the notes master in PowerPoint thoroughly.
The notes master in PowerPoint is a feature that allows you to control the settings of the notes section of PowerPoint. It allows you to change layouts, font size, font type, font style, and much more. To enable the Notes Master in PowerPoint, click on the “View” ribbon and then on “Notes Master”.
Through this article, I am going to talk about how you can use the Notes Master for making presenter notes. I’m also going to share the type of problems you might face in the Notes Master and how you can solve them. Plus, I’ll also provide you with some ninja tips to make this tool helpful for you!
So, let’s get started!
What are Presenter Notes in PowerPoint?
When you are presenting in front of an audience, they will either look at the information written on the presentation slide or listen to what you are saying.
If there is too much information on the presentation slide, it will be hard for the audience to process all the information. This is why presentation design often follows a minimal design style.
But, keeping minimal text on the slide can also be a problem – now your audience needs to pay close attention to what you are saying in order to understand the context of the presentation. While that is great if you want to grab their attention, this also means you need to make sure that you don’t miss out on a point! This is where presenter notes can come in handy.
Presenter Notes, also known as speaker notes, are the key points, important messages, or information in a summarized format on an individual slide. Making the notes handy helps the presenter to deliver his or her message clearly to the audience.
Presenter Notes helps the presenter navigate each slide while providing relevant information for that particular slide.
Think of the presenter Notes as a scratch piece of paper, where you can put all the key messages or important stats so that the audience can understand what you are saying.
You can also use presenter Notes to add more information about your presentation slide’s animations or to add important links and how to navigate through your PowerPoint slides.
What is Notes Master in PowerPoint?
Notes Master is a powerful tool in the Microsoft PowerPoint application that allows you to create, edit, and customize your presenter Notes.
The note Master is located in the “View” tab inside the PowerPoint application. Select the “View” tab. Now choose “Notes Master” from the “Master Views” group. This will open the Notes Master menu.
What Can You Do with Notes Master?
You can use notes master to create, edit, and customize the settings and appearance of your presenter notes in the PowerPoint application.
The notes master also allows you to customize the appearance of your speaker notes when they are printed out.
For instance, you can change the page layout, text format, text color, page orientation of the presenter notes using the Notes Master tool. This truly is a powerful editing tool that gives you complete control over the appearance of your presenter note section.
How to Use Notes Master in PowerPoint?
To use the notes master for your presentation slide, first, you have to open the notes master tool. To do that, follow the steps given below –
Step 1 – Click on the View Tab
The first thing is to open your PowerPoint slides presentation. Once the slide is open in the PowerPoint application, click on the “ View ” tab located in the menu bar of your PowerPoint application.
Step 2 – Choose Notes Master
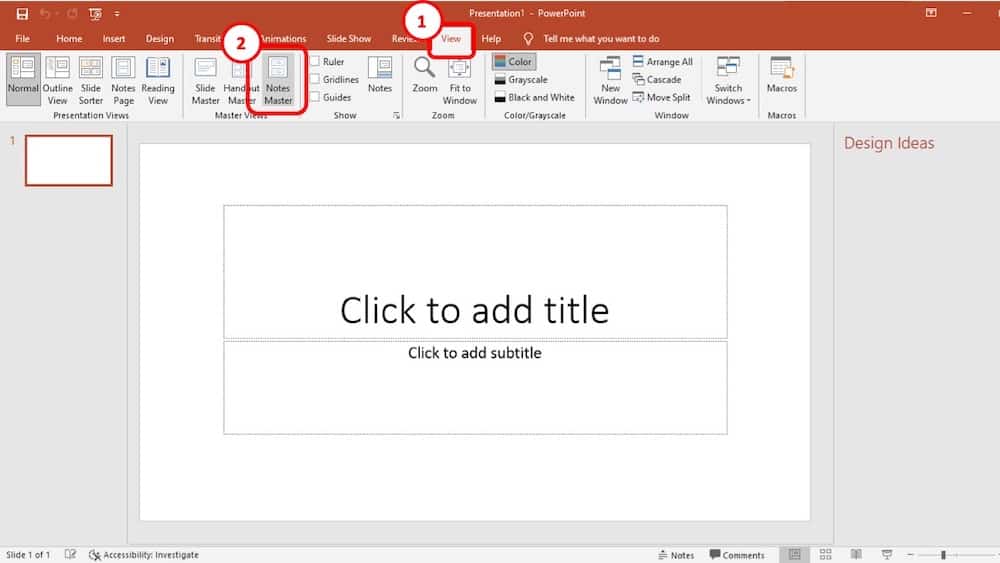
Clicking on the “ View ” tab will open a command window. From there, choose the “ Notes Master ” from the “ Master Views ” group. This will open the “Notes Master” menu.
Step 3 – Customize the Notes Master
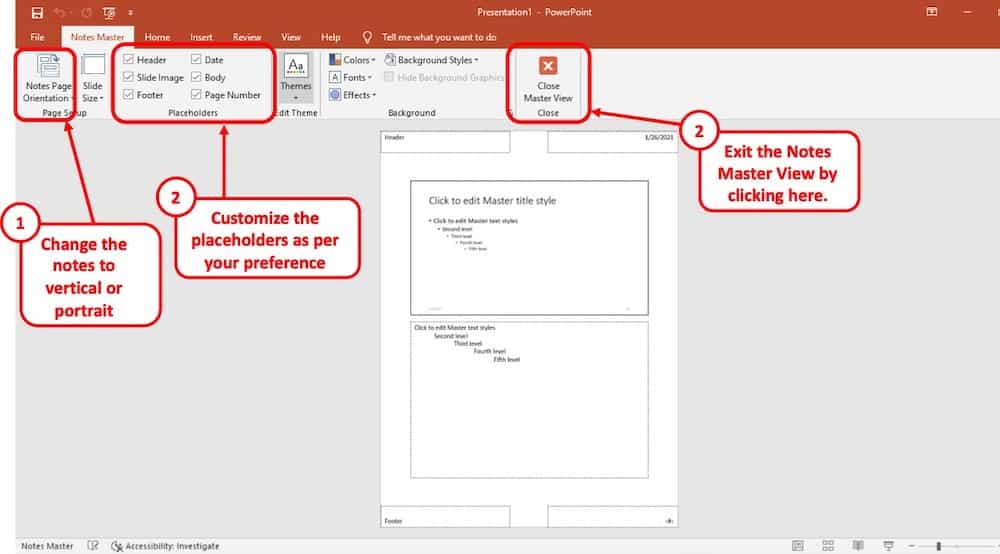
From the notes master editor menu, you can customize your presenter notes.
To do that, first, check the placeholders that you want to use and uncheck those that you don’t want in your presenter Notes. There are several parameters included in the “Placeholder” group. These are- date, slide image, body, header, page number, and footer.
You can view the changes that you make in the Notes Master preview section (the white section displayed).
You can also change the presenter note page orientation into either landscape or portrait mode. There are also some additional editing tools like text font size, text color, background style, and much more that you can mess around with to make your Notes much more attractive.
Once you are done customizing your presenter notes pages you can close the “Notes Master” menu. To do that, just simply click on the “Close Master View” button located on the Notes Master menu.
How to Print PowerPoint Presentation Notes?
Now that you know how to customize your notes in a PowerPoint presentation, it is time for you to add notes to your slides.
Once you have created your notes in the PowerPoint presentation slides, you can easily print them along with the slides and prepare for giving the presentation even when you are not in front of a computer.
Step 1 – Click on the File Option
To print notes in PowerPoint, click on the “File” tab located in the top left corner of your screen.
Step 2 – Click on Print from the Options on the Left
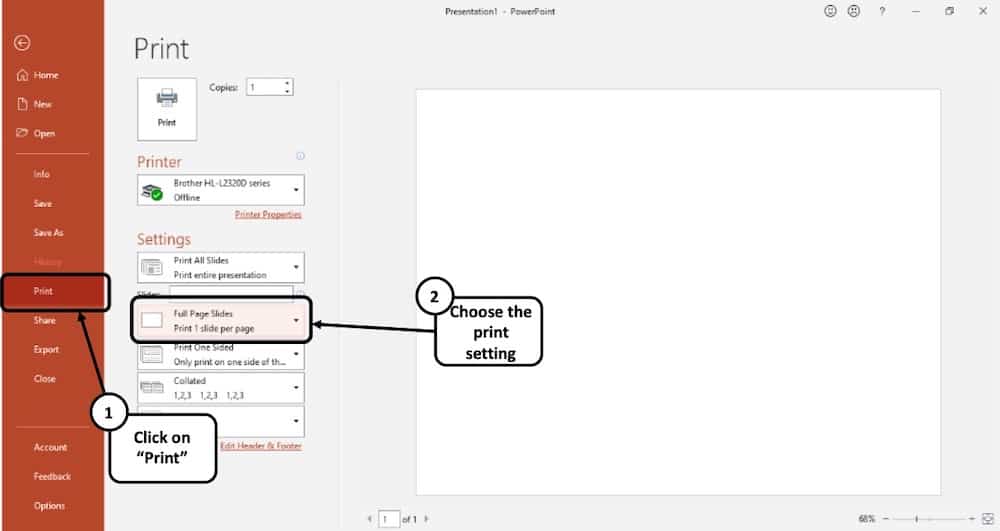
When the file option is clicked from the menu bar, a new window will be presented. From there, select “Print”. Another window will open as a result.
Step 3 – Choose the “Notes Pages” Print Layout Option
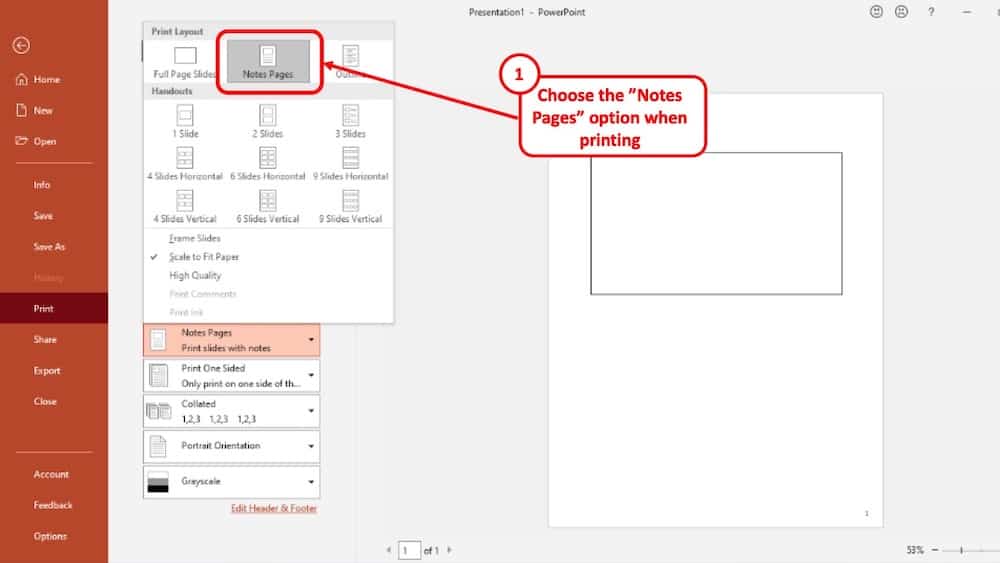
From the new window, choose the “Full Page Slides” located in the “Settings” menu. From there, select “Note Pages” as your print layout. You will see a preview of how your presenter note pages will look like.
Step 4 – Click on Print
If you want to make changes to any other print settings, you can do that too. Once you are done, all you have to do is to click on the “Print” button. And your Notes will be printed.
How to Apply Notes Master to All Slides?
Like other Master tools in the PowerPoint, any changes in the Notes Master command menu will be applied to all the slides in the presentation file. But the Notes Master tool is still undergoing some development and it is still missing some features.
When you are using this tool, sometimes many random things can happen to your note pages. For example, if you change anything in the Notes Master menu, it may not be applied to all slides. And Notes Master has no feature that you can use to apply the changes to all the slides at once. In such a case, you will need to apply Notes Master to individual slides.
This can be quite bothersome and time consuming if there are a lot of slides in the presentation file and you need to check each slide and apply the changes individually. But there is an alternative method that you can use to apply Notes Master to all slides using a Microsoft Visual Basic script.
To use this method, follow the step-by-step guide given below:
First, go to the “ Developer ” tab located on the top of your screen. The developer menu will open.
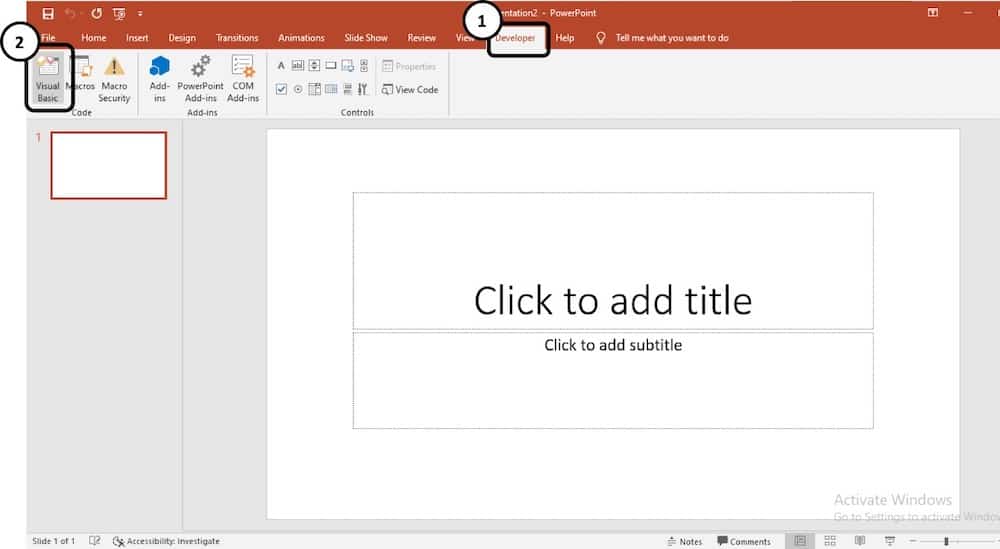
From the developer menu, click on the “ Visual Basic ” option. A new window will open.
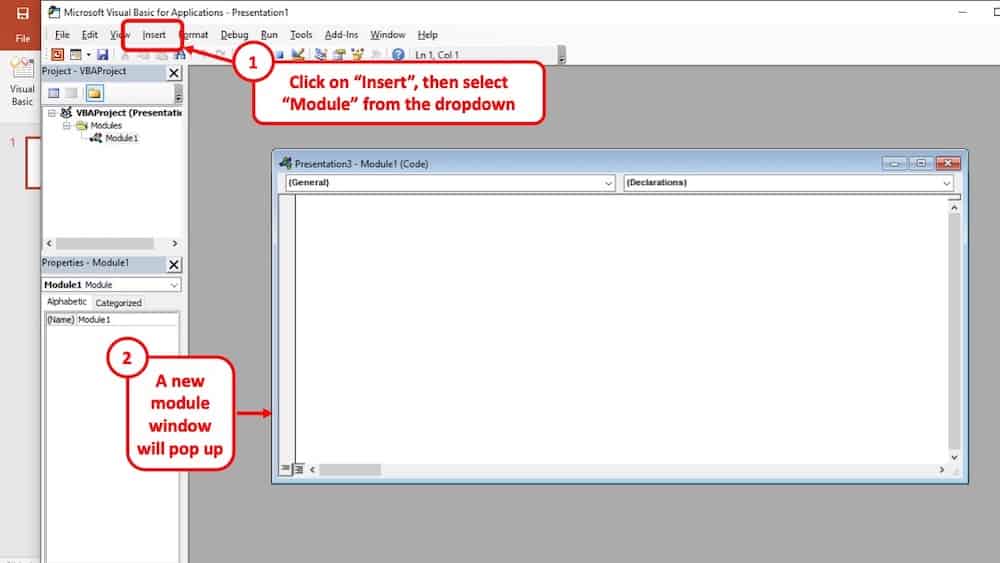
From the new window, click on “ Insert ” located on the top left corner of the screen. From the dropdown menu, select “ Module ”. An editor window will open.
In the editor window, paste the following Microsoft Visual Basic script:
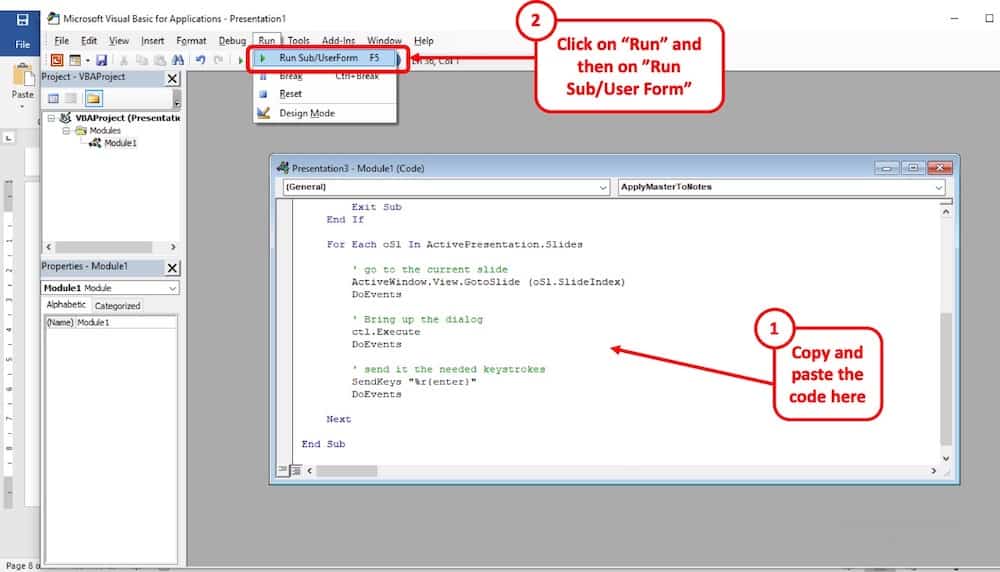
After pasting the script to the editor window, press “ F5 ” or click on “ Run>Run Sub/UserForm ” It will take some time to reapply Notes Master to all the slides depending on the number of slides in the presentation file. Once the reapply process is done, you will see that your problem is solved.
Note: This method works on Microsoft PowerPoint version 2007 or above. For some of you, you might notice that the “Developer” tab is missing in your PowerPoint application. In this case, read the following section to enable the developer tab in PowerPoint.
How to Enable the Developer Tab in PowerPoint?
In order to expedite certain processes in PowerPoint, you can always use the visual basic codes through the developer tab just as we showcased in the previous example. But, you often don’t get to see the “Developer” tab by default in PowerPoint.
In fact, I covered this topic of Enabling Developer Tab in PowerPoint in thorough detail a little while ago. Please go through this article as it also includes the process for PowerPoint on Mac!
[Tutorial!] How to Enable Developer Tab in PowerPoint?
In case you prefer reading on this page, below is a summarized version of the steps that you need to take to enable the developer tab in PowerPoint.
Step 1: First, click on the “File” tab located in the top left corner of the application. A new window will open.
Step 2: From there, select “Options” located in the bottom left corner of the application.
Step 3: Now from the newly opened window, select the “customize ribbon” option. From there, locate “Customize the ribbon” and under that select “Main Tab.”
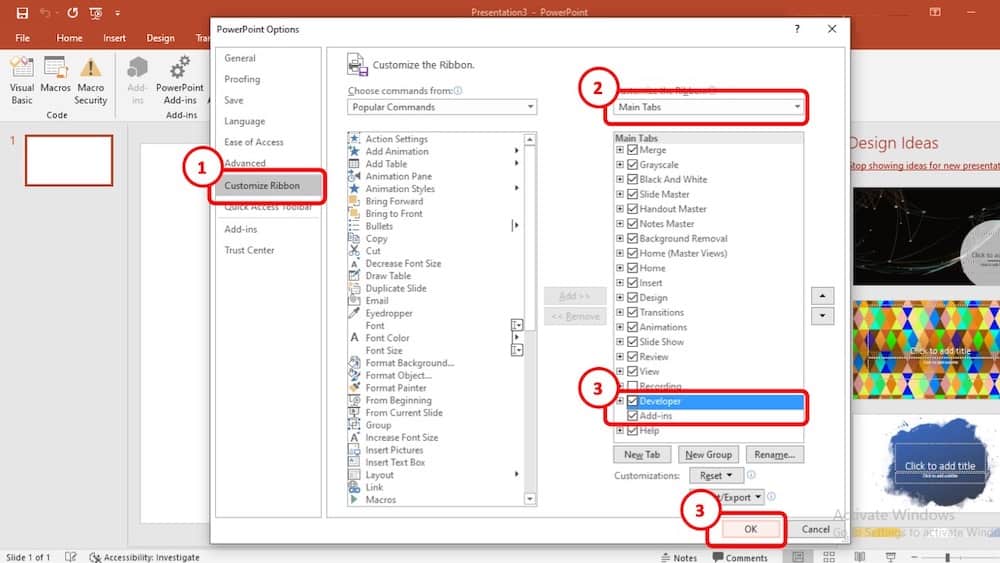
Step 4: Now locate the “Developer” tab and make sure that there is a checkmark beside it. Now press “Ok”. Now if you return to your presentation slide, you will notice that the “Developer” tab has been added to your PowerPoint application’s ribbon.
How to Reset Notes Master in PowerPoint?
As mentioned before, Notes Master is still a bit buggy. Sometimes you might see that the size of your note page is not what you set earlier or some texts or graphics in the slide might appear in some weird spots in your presenter Notes. In these circumstances, resetting the Notes Master can solve these problems.
Here’s how to reset notes master in PowerPoint –
- Go to the “View” Ribbon.
- Select “Notes Master”
- Uncheck all options under “Placeholders”
- Then, recheck all options under “Placeholders”
- Set the “Notes Page Orientation” as Portrait
In case you need visual aids, here’s the step-by-step process with pictures.
Open the presentation slide, go to the “ View ” tab located on the main ribbon of your PowerPoint application. Select “ Notes Master ” from there.
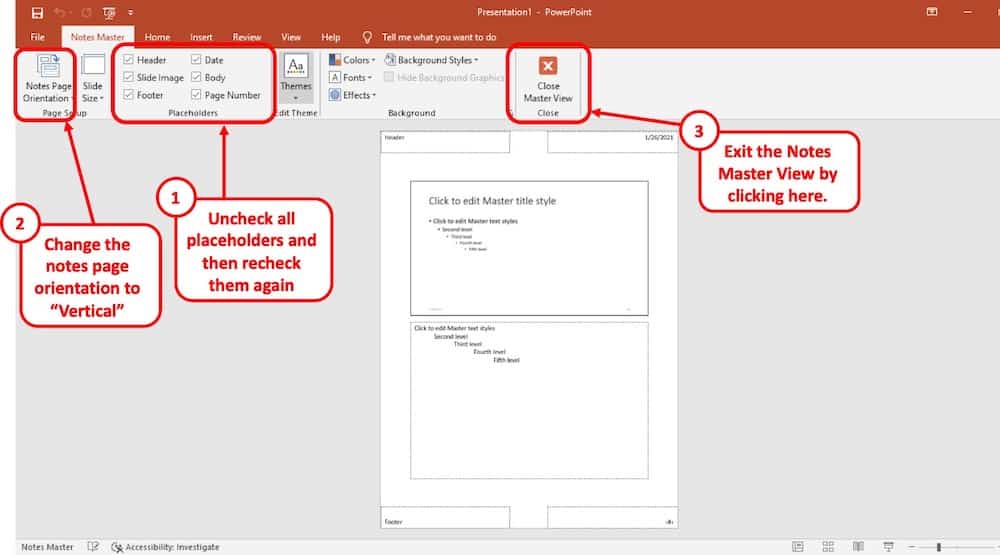
Uncheck all the options that are grouped under “Placeholder” and make sure that you check them again. This should reset the Notes Master in the PowerPoint application.
Make sure that the “Notes Page Orientation” of the “Notes Master” is set to “ Portrait ” as that is the default orientation of the notes master in PowerPoint.
How to Present PowerPoint without Showing Notes?
Presenter Notes will allow you to keep track of the key points and important stats of your presentation. But you need to make sure that your Notes remain hidden while you are presenting in front of an audience. And to do that, follow the steps given below:
Step 1: First, you will need to connect the projector screen or a second display to your computer. The second display or projector screen will be the one that your audience will be able to see.
Step 2: Now Open the “Display settings” from the control panel. From there, make your computer monitor your primary display by simply checking the “Make this my main display” option.
Step 3: Now choose “Extend These Displays” from the display settings window and close it.
Step 4: Now open your PowerPoint presentation slide and click on the “Slide Show” tab located on the main ribbon of the application.
From there, checkmark the “Use Presenter View” located in the “Monitors” cluster. You will see that the monitors are added on the “Monitors” option.
From there, select the secondary monitor or projector screen as your presentation display.
Step 5: Now press the slide show icon located on the taskbar of the PowerPoint application.
As a result, the presentation display will only show the slides whereas you will be able to see both the slides and Notes on your computer monitor.
Notes Master vs. Handout Master – What’s the Difference?
Notes Master and handout Master in the Microsoft PowerPoint application are more or less similar when it comes to customization and formatting Notes. However, there are some key differences present between them.
How does Notes Master Compare to Handout Master?
Notes Master tool is designed to create, edit, and customize presenter Notes. The Notes created in the presentation slide can help the speaker to keep track of key points while presenting his or her slides in front of an audience. Typically, each note page contains only one slide.
On the other hand, “Handout Master” is a tool created to make audience handouts. These handouts contain key points from the presentation slide which can help the audience to understand the presenter’s message much more clearly. Handouts usually contain more than one slide per page.
Notes Master or Handout Master – which is better?
The editing options are somewhat similar for both handout Master and Notes Master. However, Notes Master offers more placeholder options to format note pages. And Notes are typically helpful to only the presenter. In this regard, Notes Master is better compared to handout Master.
However, you should use handout Master if and only if you need to include texts and graphics for the audience handouts. But the features and functionality are almost similar for both Notes Master and handout Master. So, even if you only know how to use Notes Master, you will face no problem using the handout Master.
How to Fix Notes Master in PowerPoint?
Notes Master has a lot of bugs. They can be quite bothersome. These bugs can occur randomly. Some of these bugs include changing the note page layout or changing the page size and orientation. In such a case, you will need to troubleshoot Notes Master in PowerPoint.
To fix the page size, follow the steps given below:
Step 1: Frist, go to the “File” tab and select “Print>Print Properties.” From there, change the paper size to anything other than the “Letter” size. Now click “Ok” and return to your presentation slides.
Step 2: Follow the same methods explained in step 1 to change the page size. But this time set the page size to “Letter” and press “Ok.”
Step 3: Now go to the “View” tab and select “Notes Master.”
Step 4: When you are using the Notes Master, right-click on an empty space of your note page, and from the context menu click on “Notes Master Layout.” A dialogue box will open.
Step 5: From the dialogue box, uncheck everything and press “Ok.”
Step 6: Now repeat the process explained in step 4 and step 5. But this time, check all the options in the dialogue box and click “Ok.”
Then close the Notes Master view.
This should fix your problem with note page size problem. But your page layout will still appear a bit messy.
In order to fix the note page layout, follow these steps:
Step 1: Click on the “View” tab and select “Notes Master.”
Step 2: Now right-click on an empty space on the note page. This will open a context menu. From there select “Notes Layout>Reapply Master.”
Make sure that you check the “Body” and the “Slide image.” Otherwise, you will lose the note that you made previously in the presentation file. If they are checked by default, leave them as they were and proceed to the next step.
Step 3: Now press “Ok.” This will fix your note page layout.
Important Note: You will need to apply this method to the note pages individually. Because PowerPoint still doesn’t have the feature to apply Notes Master to all the slides at the same time.
Final Thoughts
After going through the entire article, I hope that you have learned everything there is about making speaker Notes using the Notes Master tool in the PowerPoint application. Put a lot of thoughts into how you can prepare your presenter Notes. This will make the presentation seem much more professional and you will be able to deliver your message clearly.
Image Credit for Featured Image
- Study resources
- Calendar - Graduate
- Calendar - Undergraduate
- Class schedules
- Class cancellations
- Course registration
- Important academic dates
- More academic resources
- Campus services
- IT services
- Job opportunities
- Safety & prevention
- Mental health support
- Student Service Centre (Birks)
- All campus services
- Calendar of events
- Latest news
- Media Relations
- Faculties, Schools & Colleges
- Arts and Science
- Gina Cody School of Engineering and Computer Science
- John Molson School of Business
- School of Graduate Studies
- All Schools, Colleges & Departments.
- Directories
- Future students
- Current students
- Alumni & friends
- Faculty & staff
Student Success Centre
- Math- & science-based learning support
- Writing assistance
- Conversation sessions
- Learning resources
- Learning Specialists
- When you're in failed standing
- Career Development
- Communication & Digital Capabilities
- Innovation & Entrepreneurship
- Leadership & Collaboration
- Growth & Balance
- Financial Literacy
- SkillXchange
- StartupReady
- Career counselling and advising
- Career events and job fairs
- Job search resources
- Online job bank
- Resumés & cover letters
- What can I do with my degree in ...
- Alumni services
- Employer services
Preparing presentation notes
Good notes are key to a successful presentation.
The following information is arranged to show you how GOOD speaking notes should look. DO NOT WRITE FULL SENTENCES IN YOUR NOTES.
If you have full sentences, you may be very tempted to READ the notes instead of telling the audience the information. Reading an oral presentation sounds robotic and does not lead to audience engagement.
Good presentation notes are written in short phrases and key words (see below). They are arranged in a way that helps you remember the main ideas and details, and prompt you along as you TELL the audience your information.
Introduction Body of presentation Conclusion
Introduction
Give your thesis:
- Example: According to The Book of Lists, what is the greatest human fear in North America?
- Speaking before a group!
Some anxiety is good because . . . But too much anxiety causes problems . . .
To control anxiety and give a good talk, do 2 things (thesis)
- Prepare your material.
- Practice your delivery.
This presentation….= Prepare your materials (outline of presentation)
- Select a topic.
- Determine purpose.
- Analyze audience.
Body of presentation
Pepare you material:.
- Select a topic and a clear purpose - Here's how . . .
- Brainstorm a list of topics that you know and care about.
- Choose a topic from the list. If topic is too broad, narrow it down. Brainstorm questions your audience might have.
- Determine purpose: to inform/teach or persuade/convince.
- Write it down = purpose statement …specific: I want to teach my audience how to make a very good oral presentation by breaking the process down into easy steps.
Analyze the audience - keep their needs in mind as you design your talk:
- Find out who they are.
- Determine their attitude to the topic and to you (positive/negative?).
- Estimate their knowledge about the topic (novice/expert?).
- Gather ideas on topic to meet audience's needs and your purpose.
- Organize ideas in chunks of information (main points).
- Categorize and label ideas.
- Develop a few main points relating to purpose (3-5).
- Map or outline ideas in a hierarchy (tree).
- Write out introduction and conclusion. Intro should create interest, reveal topic, and preview main points.
Sum up and give implications:
Good preparation = confident and = a good talk…also reduces your anxiety!
- Choose a topic and get started early.
- Determine a clear purpose and plan to fulfill it.
- Know your audience and keep them in mind as you gather ideas and organize them.
- Rehearse your talk often using a speech outline.
- DO NOT read your presentation; tell the information.
- Sum up by repeating main points + suggesting implications or action for the audience.
Prepare a speech outline similar to this model:
- Write main points clearly with lots of space in between.
- Consider breaking up talk on numbered file cards (do not write full sentences; continue with notes with indenting and spacing even though you are using cards).
- Highlight important points and add instructions for delivery.
Practice your delivery:
- Rehearse your talk using your cue cards.
- Practice your talk aloud until you really know it (but do not memorize it!).
- Practice out loud and practice with your PowerPoint slides.
- Practice it before friends or family.
© Concordia University
The #1 note taking app for students
Be better prepared for your exams and score higher ✨

What Students Say

“ Amanote allows me to take notes on slides in an intuitive way that really helps me as a visual learner. It has made my note-taking and revision so much more efficient. ” const t="undefined"!=typeof HTMLImageElement&&"loading"in HTMLImageElement.prototype;if(t){const t=document.querySelectorAll("img[data-main-image]");for(let e of t){e.dataset.src&&(e.setAttribute("src",e.dataset.src),e.removeAttribute("data-src")),e.dataset.srcset&&(e.setAttribute("srcset",e.dataset.srcset),e.removeAttribute("data-srcset"));const t=e.parentNode.querySelectorAll("source[data-srcset]");for(let e of t)e.setAttribute("srcset",e.dataset.srcset),e.removeAttribute("data-srcset");e.complete&&(e.style.opacity=1,e.parentNode.parentNode.querySelector("[data-placeholder-image]").style.opacity=0)}} Polly Hooton University of Cambridge

“ Amanote enables me to take lecture notes much more effectively. I love how it combines the speed of taking notes on the computer with the convenience of being able to annotate lecture slides directly, and studying Econometrics, the easy to use math mode is extremely useful for me. ” const t="undefined"!=typeof HTMLImageElement&&"loading"in HTMLImageElement.prototype;if(t){const t=document.querySelectorAll("img[data-main-image]");for(let e of t){e.dataset.src&&(e.setAttribute("src",e.dataset.src),e.removeAttribute("data-src")),e.dataset.srcset&&(e.setAttribute("srcset",e.dataset.srcset),e.removeAttribute("data-srcset"));const t=e.parentNode.querySelectorAll("source[data-srcset]");for(let e of t)e.setAttribute("srcset",e.dataset.srcset),e.removeAttribute("data-srcset");e.complete&&(e.style.opacity=1,e.parentNode.parentNode.querySelector("[data-placeholder-image]").style.opacity=0)}} Anton Grahed London School of Economics (Graduated 🎓)

“ Being obsessed with taking meticulous notes, Amanote really was a game changer for me. I also love that I could take notes on each individual slide and annotate it as I went so when I was studying later I always knew what notes lined up to each part of the slide. ” const t="undefined"!=typeof HTMLImageElement&&"loading"in HTMLImageElement.prototype;if(t){const t=document.querySelectorAll("img[data-main-image]");for(let e of t){e.dataset.src&&(e.setAttribute("src",e.dataset.src),e.removeAttribute("data-src")),e.dataset.srcset&&(e.setAttribute("srcset",e.dataset.srcset),e.removeAttribute("data-srcset"));const t=e.parentNode.querySelectorAll("source[data-srcset]");for(let e of t)e.setAttribute("srcset",e.dataset.srcset),e.removeAttribute("data-srcset");e.complete&&(e.style.opacity=1,e.parentNode.parentNode.querySelector("[data-placeholder-image]").style.opacity=0)}} Georgia Tippett University of Auckland

“ Being able to see my slides, notes and all of the annotations tailored to my liking make it easier to study! Other note-taking apps do only the half of the things that Amanote can accomplish. ” const t="undefined"!=typeof HTMLImageElement&&"loading"in HTMLImageElement.prototype;if(t){const t=document.querySelectorAll("img[data-main-image]");for(let e of t){e.dataset.src&&(e.setAttribute("src",e.dataset.src),e.removeAttribute("data-src")),e.dataset.srcset&&(e.setAttribute("srcset",e.dataset.srcset),e.removeAttribute("data-srcset"));const t=e.parentNode.querySelectorAll("source[data-srcset]");for(let e of t)e.setAttribute("srcset",e.dataset.srcset),e.removeAttribute("data-srcset");e.complete&&(e.style.opacity=1,e.parentNode.parentNode.querySelector("[data-placeholder-image]").style.opacity=0)}} Daysi Franco Emerson College
Take notes in context
Annotate a wide range of course materials and boost your productivity

🧠 Keep your learning organized

🪄 Generate summaries

📃 Print or Export

🌛 Protect your eyes

All the features you need
Amanote is delivered with a large set of features that ease your note taking and your study.
Formula & tools
Note sharing
Pencil Compatibility
Get a free access
Check if your institution has Amanote
Ready to boost your productivity? Get started today 👇
PowerPoint 101: The Ultimate Guide for Beginners

Are you struggling with PowerPoint? You need a quick design in PowerPoint but don't know where to start? Don't worry, you have nothing to be ashamed of.
In this article, we're going to refresh the most important PowerPoint basics so you can take advantage of this Microsoft software and create high-impact presentations at any time!
Millions of users worldwide use Microsoft 365 services , making PowerPoint the presentation design software with the highest market share. And with good reason! PowerPoint's features stand out for its usability and originality . We can tell you that PowerPoint is pretty intuitive software, and it's a great option to choose when working with presentations on a daily basis. So, are you ready for a quick PowerPoint 101 class?
Let ' s see what you ' re going to learn today with this PowerPoint Guide :
What is PowerPoint?
What are the best uses of powerpoint, powerpoint basics: what are the components of powerpoint workspace, mastering powerpoint: what are the main features of powerpoint, what are powerpoint templates and where to find them, time to practice how to make a presentation in powerpoint.

Microsoft PowerPoint is a presentation design software that is part of Microsoft 365 . This software allows you to design presentations by combining text, images, graphics, video, and animation on slides in a simple and intuitive way.
Over time, PowerPoint has evolved and improved its accessibility to users. For this reason, it has been adapted to the main operating systems and modalities:
- PowerPoint Online
Additionally, you can use Word and Excel in this online version. That way, you'll be able to make real-time changes in the cloud without fearing losing your files. Sounds great, right?
PowerPoint has a versatile range of uses. Here's a list of the different tasks you can complete with this presentation design software:
- Business presentations or Pitch decks.
- Marketing, Sales and HR plans.
- Project briefs and timelines.
- Inductions to new employees.
- Seminars and educational classes.
- Professional portfolio of photos or designs.
- Presentations of a research summary.
- Presentations for special occasions.
These are just a few examples of the multiple possibilities this Microsoft software offers. Your imagination is the only limit!
Stay tuned as we continue with this PowerPoint 101 Guide...

In order to deeply understand this presentation design software, you need to recognize its main components. Now it's time to learn about the PowerPoint basics!
A quick note before going any further: when opening PowerPoint, some of the commands in the ribbons will look grayish and won't be highlighted when you hover the mouse over them.
This happens since some commands need to be selected in order to function. For example, if you want to change the color of a text, you first need to select it.
That being said, let's start with this Guide for PowerPoint beginners:
PowerPoint Main Window
The first aspect to learn is PowerPoint Main Window. To facilitate the explanation, we've organized its main elements with numbers from 1 to 10:

Based on that, the main components of PowerPoint window are the following:
1. Quick Access Toolbar: allows you to customize commands to have them at hand. You only have to select it and go to "More commands."
2. Title Bar: shows you the name of your file and other "Suggested options" like Slide Master View . These options will vary depending on the use you give to the commands.
3. File Tab: you will see the Home Menu (PowerPoint backstage) by selecting it. There, you can create a new presentation, save it, print it, export it, and many other options.
4. The Ribbon: it's where PowerPoint tabs and tools are. These tools can also be called "commands" or “features.”
5. More Button or Down Arrow: these arrows allow you to view more tools or layout options in PowerPoint.
6. Slides Pane: shows your slides in thumbnail size. By right-clicking, you can access additional options for customizing each slide. Perfect for PowerPoint beginners!
7. Slide: PowerPoint's blank canvas and the frame to be seen when presenting the file.
8. Placeholders: they are dotted boxes that will store your content.
9. Status Bar: allows you to view the slide number, grammatical errors, speaker notes, and the comments on your file.
10. Zoom: allows you to enlarge or minimize your PowerPoint workspace. The range goes from 10 to 400%.
PowerPoint Tabs
The PowerPoint tabs are the control desk of your presentation . Since PowerPoint's features are too many, they're organized in tabs.
You can come and go between tabs as you need. Once you click on a tab, it will open its ribbon, and there, you'll be able to see all the tools related to that particular category.
This PowerPoint tutorial for beginners will give you an overview of all PowerPoint tabs . Pay attention to the following list:
- Transitions Tab
- Animations Tab
- Slide Show Tab
- Recording Tab
1. Home Tab
The Home tab is the most common tab of PowerPoint. This is the tab you'll probably use the most if you're designing a presentation deck from scratch.

It allows you to add new slides and change the text characteristics : font, size, boldness, underlining, alignment, etc. If you've ever used Microsoft Word, these features will be familiar to you.
Also, you will find commands to edit the characteristics of the geometric shapes you insert. This includes: fill color, line color, sharpe effects, among others.
2. Insert Tab
The Insert tab is exactly what its name says it is. In this ribbon, you'll find all the options concerning adding a new element to your PowerPoint presentation .

You can insert a picture, some geometric shapes, icons, WordArt graphics, among others. We can tell you that this tab is really helpful for PowerPoint beginners!
For example, if you have a lot of data in PowerPoint , you could add a chart or diagram to show your information in a more visual way. Also, you can embed videos or music into PowerPoint really easily.
- PowerPoint tip for beginners: To be able to write text on your slides, you need a text box. So, if you're designing your presentation from scratch, remember to go first to the Insert tab and add a text box to start writing.
3. Design Tab
If you are one of those people who enjoy choosing the design of a PowerPoint presentation, this tab will be your favorite.

The Design tab offers a wide range of premade designs , allowing you to get more polished slides. Even better, if you explore its ribbon, you can adjust the color palette and change the overall style of your PowerPoint deck.
The PowerPoint interface, as this basic PowerPoint Tutorial, is really intuitive. We believe that you won't have any problem with this tab!
4. Transitions Tab
Using transitions in PowerPoint is a dynamic way to move from one slide to the next during a presentation. This feature is PowerPoint's stamp, so don ' t miss it!

Some PowerPoint transitions are really classic, like wiping the old slide to present the new one. Others are somewhat over the top, like the “Vortex” or the “Airplane” effect.
If you click on each kind of transition, you'll see a preview on how it would look when presenting. Really cool, right?
5. Animations Tab
In case you want to add special effects for certain elements in your slides , the Animations tab in PowerPoint will interest you.

Like the Transitions tab, you will find various animation effects in this ribbon. It's a matter of trying and choosing the best one according to your needs!
6. Slide Show Tab
As its name says, the Slide Show tab is about presenting your slides . We really like that it gives you several options to show up your presentation!

Considering that you're a PowerPoint beginner, you're not likely to use the Slide Show tab very much.
But if you're curious about this command, you must read our article: How to Make a PowerPoint Slideshow that Runs Automatically?
7. Review Tab
The Review tab is not often used by PowerPoint beginners either.
However, if your job is related to writing or if you work at an international company, this tool can be extremely useful!

With this tab, you can check the slide's spelling, translate the text in real-time, and add comments to your slides . This last function can be helpful to give feedback to a colleague.
8. View Tab
This View tab allows you to change the view of your PowerPoint slides and make handouts from them, among other things.

As you can see, the majority of its commands are really specific. So you won't have any issues while designing, test and see!
In this section, our favorite command for PowerPoint beginners is Slide Master . Explore more about this tool in our guide!
9. Recording Tab
In the last versions of this design presentation software, PowerPoint added the Recording tab. As its name says, it allows you to record all your presentation slides .

This ribbon has advanced commands, so the most common action for a PowerPoint beginner is to take a screenshot or record the screen sequentially .
10. Help Tab
Finally, there is the Help tab. If you have any problem or question concerning how to use PowerPoint, you may go here to look for a solution.
In the latest versions, Windows has added a “Show Training” option. You can click this command to practice the PowerPoint basics since it will download training templates.

As a beginner in PowerPoint, you must recognize the objective of each PowerPoint tab to be able to master the software . But, in order to conduct an outstanding presentation deck, you also need to dominate its most important features. Let's see some of them in the next section!
If you feel ready to delve deeper into PowerPoint's tools, this section is for you.
As you may know , 24Slides specializes in creating outstanding presentations for any Design Project . So, we asked one of our experts about her favorite PowerPoint features, and we want to share them all with you!
Carmen Navarrete , Graphic Designer at 24Slides, highlighted the following features that will make your presentations stand out from the crowd:
PowerPoint Feature #1: Crop to Shape
This first PowerPoint feature is simple but effective!
Let's see how to use it:
- First, choose an image you want to cut and insert it into your workspace.
- Once inserted, select it with the mouse.
- Go to the "Picture Format" tab.
- Press the arrow of the "Crop" button (right side of the screen).
- Select "Crop to Shape."
- Choose your favorite shape and customize your PowerPoint presentation!

PowerPoint Feature #2: Merge Shapes
If you don't like any figure enough, you can create one from scratch!
This is possible thanks to the "Merge Shapes" option. Follow these steps to unleash your creativity:
- First choose an image you want to cut.
- Check the list of PowerPoint shapes (Insert tab > Shapes).
- Choose two or three figures you want to merge (they can be the same figure).
- Select the figures you are going to merge (see the image).
- Once selected, go to the "Shape Format" tab.
- Press the "Merge Shapes" option and the type of merge you want (test and choose!).

- A new figure will appear, and you must fill it with the image from the first step.
- Stay on the Shape Format tab and go to "Shape Fill" (button in the middle of the ribbon).
- Select "Picture Fill" and browse for your image.
- Select the image to fill your new figure, and that's it!

- PowerPoint tip for beginners: When your merged figure is ready, paste the image to the background of your slide to achieve a better result. This way, you can use your image as a canvas and see if both elements fit well.
PowerPoint Feature #3: Insert Icons
This PowerPoint feature is quite easy to follow for PowerPoint beginners!
Just follow these steps:
- Go to the Insert tab.
- Select the "Icons" option.
- A Microsoft 365 library will open, where you can search for the required icon.
- Now, you must insert it into your presentation and adapt it to your design.
- If you have an active Microsoft 365 subscription, you'll have access to a larger number of icons in PowerPoint.
- PowerPoint tip for beginners: If you want to learn more about icons in PowerPoint, read our article on How to Use Icons to Make Amazing PowerPoint Presentations .
PowerPoint Feature #4: Insert SmartArt
PowerPoint's SmartArt is one of the most popular and accessible tools to dominate while learning about PowerPoint basics.
To use it in your slide deck, you must:
- Select SmartArt.
- See all SmartArt categories and choose your favorite based on your needs.
- Add the text you have prepared and adapt it to your presentation.

We want to give you some ideas to master this SmartArt tool in PowerPoint: you can make timelines , flowcharts , and even a Venn diagram in just a few seconds. Try and see!
PowerPoint Feature #5: Remove Background
If you don't know how to use Photoshop and want to remove the background from an image, in this PowerPoint 101 Guide, we show you how:
- First choose the image you want to remove the background from.
- Insert the image in the PowerPoint workspace.
- Select the image and go to the "Picture Format" tab.
- Select "Remove Background" (first option on the left).
- You can keep and remove parts of the image with the first two tools of the ribbon (see image).
- Keep in mind that all the sections highlighted in purple will be deleted.

- We recommend zooming in to keep or remove parts of the image with more detail.
- Once you're done, press the "Keep Changes" button.
- Finally, adapt the new image to your PowerPoint presentation.

- PowerPoint tip for beginners: Choose a high-contrast photo or image for best results. In other words, the outline of the person or object you want to cut out must have clear edges and cannot blend with the image's background color.
PowerPoint Feature #6: Add Speaker Notes
The latest PowerPoint feature is a command you can use to prepare your speech before presenting to an audience.
Learning how to add speaker notes in PowerPoint is simple:
- Select the slide that needs some notes.
- Usually, there is a footer below the slide, but if not, you will have to activate it.
- Go to the View tab and select "Notes."
- The Speaker Notes section will appear, and you can add whatever you want!

- PowerPoint tip for beginners: In case you want to practice your entire presentation and have a lot of notes, go to the View tab and select "Notes Page" (fourth command). You'll be able to see all your Speaker Notes faster!
PowerPoint Feature #7: PowerPoint Translator
If you've ever wondered how to translate your PowerPoint Slides, we'll explain the step by step here:
- Go to the Review tab.
- Select the text you want to translate.
- Press the “Translate” button.
- A panel will open on the right side of the screen.
- Choose the language you need and you'll see the translation in real-time.
- If you press Insert, the text will change to the new translation!
PowerPoint Feature #8: Screen Recording
The process of recording your screen in PowerPoint is straightforward and intuitive. Let's see:
- Go to the “Record” or “Recording” tab.
- Press the "Record Slide Show" button or the “From Beginning” button (depending on your PPT version).
- A new window will open.
- Select the red record button and start recording!
- When you're done, select “Export.”
- By default, the video will be 1080p. If you want to lower the video quality, go to "Customize export."
- Name the video, save it to a folder and that's it!
As you may have noticed, this software has endless PowerPoint design options for beginners. We encourage you to try and test each functionality!
However, we're clear that PowerPoint has different features, so it can be hard to know where to start. That's why understanding PowerPoint basics is crucial if you truly want to master this software!
Our PowerPoint 101 Guide continues; stay tuned to discover more great stuff about this Microsoft software. Keep reading!
A PowerPoint template is a pre-made design that you can use for your own means, and that will save you a lot of time!
Templates in PowerPoint are a great resource for designing since all the structure is already done, and you only have to update the content . We can tell you they're the perfect resource for PowerPoint beginners!
They can be incredibly specific. For example, there are templates for a SWOT analysis or a complete Marketing report. Otherwise, templates can also be very general, with several slides with a similar design.
If you struggle with the artistic part of designing presentations, downloading PowerPoint templates will be a life changer!

How to download PowerPoint templates for free?
If you didn't know, 24Slides has an extensive repository of PowerPoint templates. But how to obtain them? It's really simple:
- First, create an account on our Free Templates Website with the button “Register” (that way, you can download everything without problems!).
- Think about the graphics you need and the ideal structure for your presentation deck (you can also change the color palette later!).
- Download it in PowerPoint format (if you prefer it in Google Slides format, you'll also find this type in our repository).
- Edit and change everything you need for your PowerPoint presentation!
24Slides Designers specialize in business and corporate PowerPoints, but you'll also find other types of templates on our website: Data templates, Timelines, Roadmaps, Matrixes, Diagrams, and more.
Keep in mind that a well-designed PowerPoint deck helps you communicate stronger messages to your audience . Don't waste this opportunity to make your presentation shine!

If you want to learn more about how to master PowerPoint, do not miss the last section. We'll show you some PowerPoint basics from the software itself!
A PowerPoint 101 Guide wouldn't be that useful with no examples. So, if you enjoy the step-by-step guides, this section is for you.
Below, we'll show you how to make a simple PowerPoint presentation. But first, here are some tips to be more efficient in the process:
- Be clear about what type of presentation you're going to create (is it corporate, playful, or more creative?).
- Make a draft with the most important information you need to add and, thus, generate a good structure in your presentation .
- Get inspired by examples on the internet , but adapt them to your needs and audience.
- If you will create a business presentation, keep in mind your brand identity .
- Make sure your PowerPoint works , you may need to update to the latest version or pay for the subscription.
Step 1: Make a draft to structure your presentation
As we said before, writing a draft or script of your content will be vital to start on the right foot as a PowerPoint beginner.
This advice is so important that we choose it as the first step to learning how to make a PowerPoint presentation. Remember: Planning is key!

Regarding the process of planning, we share some good practices:
- If your presentation will be very long , write down all subtitles and content in a Word document. This will help you organize your ideas and give a correct sequence to your narrative. In addition to avoiding redundancies in the message you want to communicate.
- If your presentation will use many visual resources , we recommend choosing high-quality images. This will help you have a starting graphic base. Some good free image repositories are Freepick , Unsplash , and Adobe Stock .
- If your presentation is based on data , have all your results summarized or your most relevant conclusions at hand. The idea of making a PowerPoint presentation is to show your information in the simplest way possible for your audience.
Step 2: Create a new document in PowerPoint
Once you check that all the functions are working fine with the software, please open it and go to the File tab. If you've ever used Word or Excel, you'll probably find this Home Menu familiar.
In short, this is the main page of PowerPoint, where you can create a new presentation or open an older one. Let's see:

In order to follow this part of our PowerPoint Tutorial correctly, take into consideration the following points:
- On the lower side of the screen, you'll find your recently opened PowerPoint files. This option is great for saving some time.
- If you don't find the presentation you're looking for, click on the “Open” option at the left bar and find older files.
- Don't forget to save your presentation with a relatable name so you won't lose sight of it!
Step 3: Choose the perfect design for your presentation
With your information ready in a draft, it's time to choose the design of your PowerPoint slide deck. You must imagine that the available design options are endless!
For practical reasons, you have three options regarding the design:
- Start a design from scratch (very difficult for a PowerPoint beginner).
- Choose an established PowerPoint design or layout.
- Download a PowerPoint template and modify some details.
Don't worry if you don't know how to continue! In this PowerPoint 101 class, we're going to explain step by step the second option:
How do you set a default design in PowerPoint?
- First, go to the Design tab.
- Open the list of options by clicking on the third arrow.
- Choose the design you like the most for your PowerPoint presentation.

If you want to explore more PowerPoint designs, there is a way to research online. For that, you only need to:
- Go to the File tab (first tab, next to the Home tab).
- Select "More themes" (see image).

- Use the search engine and write the keyword you want (it can be related to your business or it can be a color).
- Check the list of PowerPoint themes and choose your favorite.
- Wait a few minutes while it loads and keep designing in PowerPoint!

How do you change the layout of one slide in PowerPoint?
In this PowerPoint 101 Guide, you will also learn how to configure the layout of each slide.
Keep in mind that to have a high-impact presentation, you must adapt your slides' design to the type of content you'll add. And using layouts is perfect for this purpose.
To change the layout type in PowerPoint, follow these steps:
- Right-click on the slide you want to change.
- Select the "Layout" option.
- You will find more than ten layout models.
- Choose the one that best suits your content.
- Repeat these steps for each slide (if you wish or require).

How do you customize your slides in PowerPoint?
The design process in this PowerPoint 101 Guide doesn't stop there.
You also can customize your presentation's color palette , font style, background format , and graphics effects .
Just go to:
- Design tab > Variants.
- Select Colors, Fonts, Effects or Background Styles (as you need).
- If you're inspired and want to create your own background in PowerPoint, select Background Styles > Format Background.
- Finally, custom your slides as you want!

Step 4: Add all your information to your presentation
Now, it's time to add all your information to your slides. If your script is long, take your time to copy each part of it.
In this PowerPoint Tutorial, we're going to show how our design is going so far. We design at your side!

Step 5: Add transitions or animations to your presentation
The stamp of PowerPoint is its transitions and animations! Naturally, our PowerPoint 101 has considered these essential commands.
If you want to add them to your presentation and make your speech more fluid, follow these steps:
- Go to the tabs section of PowerPoint.
- Select "Transitions" or "Animations" and try your favorite effects.
- Remember that if you select Transitions, these will modify the entire slide, while Animations can be added to each element individually.
When choosing one Animation, you can eliminate it if you aren't 100% convinced. You only need to:
- Select the Animation number that appears on the corner.
- Press the "Delete" or "Backspace" button on your keyboard.
- Choose another Animation in PowerPoint if you want!

This “PowerPoint for dummies” is full of tips and tricks! So here is one more: Don't overuse transitions or animations in PowerPoint ; they can make your presentation slower and unprofessional . Use this tool in a subtle way!
Step 6: Refine the final details
As always, every final product must be reviewed. Especially if you're learning the PowerPoint fundamentals with us.
We recommend reviewing each slide of your PowerPoint presentation one final time. In this process, you will be able to:
- Add icons if your presentation requires it.
- Change any image or illustration if they don't convince you.
- Change transitions or animations.
- Customize your presentation's color palette .
- Proofread your slides' text or add more information.
- Add speaker notes to your presentation.

Step 7: Slideshow your presentation
When your presentation is finished, it's essential to know how to make a PowerPoint slideshow. This way, you can see your slides from the exact same perspective your audience will see them.
To slideshow your presentation in PowerPoint, follow these simple steps for PowerPoint beginners:
- Position yourself on your first slide.
- Go to the bottom right of the software.
- Select the "Slide Show" button (see image).
- Have a look of your presentation by clicking on each slide or pressing the right arrow on your keyboard.
- To go out from the Slide Show mode, you have to press the ESC key.

Now you can present your slides like an expert!
When you master this presentation design software, you'll be able to create amazing things in PowerPoint : infographics, diagrams, charts, pitch decks, business cards, calendars, you name it!
This was our PowerPoint Guide for beginners. We hope that our compilation today will be useful for conducting more professional presentations in the future and, why not, achieve all your goals!
Don't forget to share this PowerPoint 101 Guide with your co-workers or whoever you want!

Want to boost your beginner PowerPoint skills? Check out this content:
- How to Work with Multiple Images in PowerPoint
- How to Add a Timer to Your Powerpoint Presentations
- PowerPoint Charts, Graphs, & Tables Made Easy | Tips & Tricks
- How To Use PowerPoint Design Ideas - All Questions Answered!
- 36 Fun Icebreakers for Your Next Presentation
- The Cost of PowerPoint Presentations: Discover the hidden expenses you might overlook!
Create professional presentations online
Other people also read

Tutorial: Save your PowerPoint as a Video
How To Convert Google Slides To PowerPoint and Vice Versa

How To Add Animations To PowerPoint
Critical PowerPoint Shortcuts – Claim Your FREE Training Module and Get Your Time Back!
How to Make a PowerPoint Presentation (Step-by-Step)
- PowerPoint Tutorials
- Presentation Design
- January 22, 2024
In this beginner’s guide, you will learn step-by-step how to make a PowerPoint presentation from scratch.
While PowerPoint is designed to be intuitive and accessible, it can be overwhelming if you’ve never gotten any training on it before. As you progress through this guide, you’ll will learn how to move from blank slides to PowerPoint slides that look like these.

Table of Contents
Additionally, as you create your presentation, you’ll also learn tricks for working more efficiently in PowerPoint, including how to:
- Change the slide order
- Reset your layout
- Change the slide dimensions
- Use PowerPoint Designer
- Format text
- Format objects
- Play a presentation (slide show)
With this knowledge under your belt, you’ll be ready to start creating PowerPoint presentations. Moreover, you’ll have taken your skills from beginner to proficient in no time at all. I will also include links to more advanced PowerPoint topics.
Ready to start learning how to make a PowerPoint presentation?
Take your PPT skills to the next level
Start with a blank presentation.
Note: Before you open PowerPoint and start creating your presentation, make sure you’ve collected your thoughts. If you’re going to make your slides compelling, you need to spend some time brainstorming.
For help with this, see our article with tips for nailing your business presentation here .
The first thing you’ll need to do is to open PowerPoint. When you do, you are shown the Start Menu , with the Home tab open.
This is where you can choose either a blank theme (1) or a pre-built theme (2). You can also choose to open an existing presentation (3).
For now, go ahead and click on the Blank Presentation (1) thumbnail.

Doing so launches a brand new and blank presentation for you to work with. Before you start adding content to your presentation, let’s first familiarize ourselves with the PowerPoint interface.
The PowerPoint interface

Here is how the program is laid out:
- The Application Header
- The Ribbon (including the Ribbon tabs)
- The Quick Access Toolbar (either above or below the Ribbon)
- The Slides Pane (slide thumbnails)
The Slide Area
The notes pane.
- The Status Bar (including the View Buttons)
Each one of these areas has options for viewing certain parts of the PowerPoint environment and formatting your presentation.
Below are the important things to know about certain elements of the PowerPoint interface.
The PowerPoint Ribbon

The Ribbon is contextual. That means that it will adapt to what you’re doing in the program.
For example, the Font, Paragraph and Drawing options are greyed out until you select something that has text in it, as in the example below (A).

Furthermore, if you start manipulating certain objects, the Ribbon will display additional tabs, as seen above (B), with more commands and features to help you work with those objects. The following objects have their own additional tabs in the Ribbon which are hidden until you select them:
- Online Pictures
- Screenshots
- Screen Recording
The Slides Pane

This is where you can preview and rearrange all the slides in your presentation.
Right-clicking on a slide in the pane gives you additional options on the slide level that you won’t find on the Ribbon, such as Duplicate Slide , Delete Slide , and Hide Slide .

In addition, you can add sections to your presentation by right-clicking anywhere in this Pane and selecting Add Section . Sections are extremely helpful in large presentations, as they allow you to organize your slides into chunks that you can then rearrange, print or display differently from other slides.

The Slide Area (A) is where you will build out your slides. Anything within the bounds of this area will be visible when you present or print your presentation.
Anything outside of this area (B) will be hidden from view. This means that you can place things here, such as instructions for each slide, without worrying about them being shown to your audience.

The Notes Pane is the space beneath the Slide Area where you can type in the speaker notes for each slide. It’s designed as a fast way to add and edit your slides’ talking points.
To expand your knowledge and learn more about adding, printing, and exporting your PowerPoint speaker notes, read our guide here .
Your speaker notes are visible when you print your slides using the Notes Pages option and when you use the Presenter View . To expand your knowledge and learn the ins and outs of using the Presenter View , read our guide here .

You can resize the Notes Pane by clicking on its edge and dragging it up or down (A). You can also minimize or reopen it by clicking on the Notes button in the Status Bar (B).
Note: Not all text formatting displays in the Notes Pane, even though it will show up when printing your speaker notes. To learn more about printing PowerPoint with notes, read our guide here .
Now that you have a basic grasp of the PowerPoint interface at your disposal, it’s time to make your presentation.
Adding Content to Your PowerPoint Presentation
Notice that in the Slide Area , there are two rectangles with dotted outlines. These are called Placeholders and they’re set on the template in the Slide Master View .
To expand your knowledge and learn how to create a PowerPoint template of your own (which is no small task), read our guide here .

As the prompt text suggests, you can click into each placeholder and start typing text. These types of placeholder prompts are customizable too. That means that if you are using a company template, it might say something different, but the functionality is the same.

Note: For the purposes of this example, I will create a presentation based on the content in the Starbucks 2018 Global Social Impact Report, which is available to the public on their website.
If you type in more text than there is room for, PowerPoint will automatically reduce its font size. You can stop this behavior by clicking on the Autofit Options icon to the left of the placeholder and selecting Stop Fitting Text to this Placeholder .
Next, you can make formatting adjustments to your text by selecting the commands in the Font area and the Paragraph area of the Home tab of the Ribbon.

The Reset Command: If you make any changes to your title and decide you want to go back to how it was originally, you can use the Reset button up in the Home tab .

Insert More Slides into Your Presentation
Now that you have your title slide filled in, it’s time to add more slides. To do that, simply go up to the Home tab and click on New Slide . This inserts a new slide in your presentation right after the one you were on.

You can alternatively hit Ctrl+M on your keyboard to insert a new blank slide in PowerPoint. To learn more about this shortcut, see my guide on using Ctrl+M in PowerPoint .
Instead of clicking the New Slide command, you can also open the New Slide dropdown to see all the slide layouts in your PowerPoint template. Depending on who created your template, your layouts in this dropdown can be radically different.

If you insert a layout and later want to change it to a different layout, you can use the Layout dropdown instead of the New Slide dropdown.
After inserting a few different slide layouts, your presentation might look like the following picture. Don’t worry that it looks blank, next we will start adding content to your presentation.

If you want to follow along exactly with me, your five slides should be as follows:
- Title Slide
- Title and Content
- Section Header
- Two Content
- Picture with Caption
Adding Content to Your Slides
Now let’s go into each slide and start adding our content. You’ll notice some new types of placeholders.

On slide 2 we have a Content Placeholder , which allows you to add any kind of content. That includes:
- A SmartArt graphic,
- A 3D object,
- A picture from the web,
- Or an icon.
To insert text, simply type it in or hit Ctrl+C to Copy and Ctrl+V to Paste from elsewhere. To insert any of the other objects, click on the appropriate icon and follow the steps to insert it.
For my example, I’ll simply type in some text as you can see in the picture below.

Slides 3 and 4 only have text placeholders, so I’ll go ahead and add in my text into each one.

On slide 5 we have a Picture Placeholder . That means that the only elements that can go into it are:
- A picture from the web

To insert a picture into the picture placeholder, simply:
- Click on the Picture icon
- Find a picture on your computer and select it
- Click on Insert
Alternatively, if you already have a picture open somewhere else, you can select the placeholder and paste in (shortcut: Ctrl+V ) the picture. You can also drag the picture in from a file explorer window.

If you do not like the background of the picture you inserted onto your slide, you can remove the background here in PowerPoint. To see how to do this, read my guide here .
Placeholders aren’t the only way to add content to your slides. At any point, you can use the Insert tab to add elements to your slides.
You can use either the Title Only or the Blank slide layout to create slides for content that’s different. For example, a three-layout content slide, or a single picture divider slide, as shown below.

In the first example above, I’ve inserted 6 text boxes, 3 icons, and 3 circles to create this layout. In the second example, I’ve inserted a full-sized picture and then 2 shapes and 2 text boxes.
The Reset Command: Because these slides are built with shapes and text boxes (and not placeholders), hitting the Reset button up in the Home tab won’t do anything.
That is a good thing if you don’t want your layouts to adjust. However, it does mean that it falls on you to make sure everything is aligned and positioned correctly.
For more on how to add and manipulate the different objects in PowerPoint, check out our step-by-step articles here:
- Using graphics in PowerPoint
- Inserting icons onto slides
- Adding pictures to your PowerPoint
- How to embed a video in PowerPoint
- How to add music to your presentation
Using Designer to generate more layouts ideas
If you have Office 365, your version of PowerPoint comes with a new feature called Designer (or Design Ideas). This is a feature that generates slide layout ideas for you. The coolest thing about this feature is that it uses the content you already have.
To use Designer , simply navigate to the Design tab in your Ribbon, and click on Design Ideas .

NOTE: If the PowerPoint Designer is not working for you (it is grey out), see my troubleshooting guide for Designer .
Change the Overall Design (optional)
When you make a PowerPoint presentation, you’ll want to think about the overall design. Now that you have some content in your presentation, you can use the Design tab to change the look and feel of your slides.
For additional help thinking through the design of your presentation, read my guide here .
A. Picking your PowerPoint slide size
If you have PowerPoint 2013 or later, when you create a blank document in PowerPoint, you automatically start with a widescreen layout with a 16:9 ratio. These dimensions are suitable for most presentations as they match the screens of most computers and projectors.
However, you do have the option to change the dimensions.
For example, your presentation might not be presented, but instead converted into a PDF or printed and distributed. In that case, you can easily switch to the standard dimensions with a 4:3 ratio by selecting from the dropdown (A).
You can also choose a custom slide size or change the slide orientation from landscape to portrait in the Custom Slide Size dialog box (B).

To learn all about the different PowerPoint slide sizes, and some of the issues you will face when changing the slide size of a non-blank presentation, read my guide here .
B. Selecting a PowerPoint theme
The next thing you can do is change the theme of your presentation to a pre-built one. For a detailed explanation of what a PowerPoint theme is, and how to best use it, read my article here .
In the beginning of this tutorial, we started with a blank presentation, which uses the default Office theme as you can see in the picture below.

That gives you the most flexibility because it has a blank background and quite simple layouts that work for most presentations. However, it also means that it’s your responsibility to enhance the design.
If you’re comfortable with this, you can stay with the default theme or create your own custom theme ( read my guide here ). But if you would rather not have to think about design, then you can choose a pre-designed theme.
Microsoft provides 46 other pre-built themes, which include slide layouts, color variants and palettes, and fonts. Each one varies quite significantly, so make sure you look through them carefully.
To select a different theme, go to the Design tab in the Ribbon, and click on the dropdown arrow in the Themes section .

For this tutorial, let’s select the Frame theme and then choose the third Variant in the theme. Doing so changes the layout, colors, and fonts of your presentation.

Note: The theme dropdown area is also where you can import or save custom themes. To see my favorite places to find professional PowerPoint templates and themes (and recommendations for why I like them), read my guide here .
C. How to change a slide background in PowerPoint
The next thing to decide is how you want your background to look for the entire presentation. In the Variants area, you can see four background options.

For this example, we want our presentation to have a dark background, so let’s select Style 3. When you do so, you’ll notice that:
- The background color automatically changes across all slides
- The color of the text on most of the slides automatically changes to white so that it’s visible on the dark background
- The colors of the objects on slides #6 and #7 also adjust, in a way we may not want (we’ll likely have to make some manual adjustments to these slides)

Note: If you want to change the slide background for just that one slide, don’t left-click the style. Instead, right-click it and select Apply to Selected Slides .
After you change the background for your entire presentation, you can easily adjust the background for an individual slide.

Inside the Format Background pane, you can see you have the following options:
- Gradient fill
- Picture or texture fill
- Pattern fill
- Hide background
You can explore these options to find the PowerPoint background that best fits your presentation.
D. How to change your color palette in PowerPoint
Another thing you may want to adjust in your presentation, is the color scheme. In the picture below you can see the Theme Colors we are currently using for this presentation.

Each PowerPoint theme comes with its own color palette. By default, the Office theme includes the Office color palette. This affects the colors you are presented with when you format any element within your presentation (text, shapes, SmartArt, etc.).

The good news is that the colors here are easy to change. To switch color palettes, simply:
- Go to the Design tab in the Ribbon
- In the Variants area, click on the dropdown arrow and select Colors
- Select the color palette (or theme colors) you want
You can choose among the pre-built color palettes from Office, or you can customize them to create your own.
As you build your presentation, make sure you use the colors from your theme to format objects. That way, changing the color palette adjusts all the colors in your presentation automatically.
E. How to change your fonts in PowerPoint
Just as we changed the color palette, you can do the same for the fonts.

Each PowerPoint theme comes with its own font combination. By default, the Office theme includes the Office font pairing. This affects the fonts that are automatically assigned to all text in your presentation.

The good news is that the font pairings are easy to change. To switch your Theme Fonts, simply:
- Go to the Design tab in the Ribbon
- Click on the dropdown arrow in the Variants area
- Select Fonts
- Select the font pairing you want
You can choose among the pre-built fonts from Office, or you can customize them to create your own.
If you are working with PowerPoint presentations on both Mac and PC computers, make sure you choose a safe PowerPoint font. To see a list of the safest PowerPoint fonts, read our guide here .
If you receive a PowerPoint presentation and the wrong fonts were used, you can use the Replace Fonts dialog box to change the fonts across your entire presentation. For details, read our guide here .
Adding Animations & Transitions (optional)
The final step to make a PowerPoint presentation compelling, is to consider using animations and transitions. These are by no means necessary to a good presentation, but they may be helpful in your situation.
A. Adding PowerPoint animations
PowerPoint has an incredibly robust animations engine designed to power your creativity. That being said, it’s also easy to get started with basic animations.
Animations are movements that you can apply to individual objects on your slide.

To add a PowerPoint animation to an element of your slide, simply:
- Select the element
- Go to the Animations tab in the Ribbon
- Click on the dropdown arrow to view your options
- Select the animation you want
You can add animations to multiple objects at one time by selecting them all first and then applying the animation.
B. How to preview a PowerPoint animation

There are three ways to preview a PowerPoint animation:
- Click on the Preview button in the Animations tab
- Click on the little star next to the slide
- Play the slide in Slide Show Mode
To learn other ways to run your slide show, see our guide on presenting a PowerPoint slide show with shortcuts .
To adjust the settings of your animations, explore the options in the Effect Options , Advanced Animation and the Timing areas of the Animation tab .

Note: To see how to make objects appear and disappear in your slides by clicking a button, read our guide here .
C. How to manage your animations in PowerPoint

The best way to manage lots of animations on your slide is with the Animation Pane . To open it, simply:
- Navigate to the Animations tab
- Select the Animation Pane
Inside the Animation Pane, you’ll see all of the different animations that have been applied to objects on your slide, with their numbers marked as pictured above.
Note: To see examples of PowerPoint animations that can use in PowerPoint, see our list of PowerPoint animation tutorials here .
D. How to add transitions to your PowerPoint presentation
PowerPoint has an incredibly robust transition engine so that you can dictate how your slides change from one to the other. It is also extremely easy to add transitions to your slides.
In PowerPoint, transitions are the movements (or effects) you see as you move between two slides.

To add a transition to a PowerPoint slide, simply:
- Select the slide
- Go to the Transitions tab in the Ribbon
- In the Transitions to This Slide area, click on the dropdown arrow to view your options
- Select the transition you want
To adjust the settings of the transition, explore the options in the Timing area of the Transitions tab.
You can also add the same transition to multiple slides. To do that, select them in the Slides Pane and apply the transition.
E. How to preview a transition in PowerPoint

There are three ways to preview your PowerPoint transitions (just like your animations):
- Click on the Preview button in the Transitions tab
- Click on the little star beneath the slide number in the thumbnail view
Note: In 2016, PowerPoint added a cool new transition, called Morph. It operates a bit differently from other transitions. For a detailed tutorial on how to use the cool Morph transition, see our step-by-step article here .
Save Your PowerPoint Presentation
After you’ve built your presentation and made all the adjustments to your slides, you’ll want to save your presentation. YOu can do this several different ways.

To save a PowerPoint presentation using your Ribbon, simply:
- Navigate to the File tab
- Select Save As on the left
- Choose where you want to save your presentation
- Name your presentation and/or adjust your file type settings
- Click Save
You can alternatively use the Ctrl+S keyboard shortcut to save your presentation. I recommend using this shortcut frequently as you build your presentation to make sure you don’t lose any of your work.

This is the standard way to save a presentation. However, there may be a situation where you want to save your presentation as a different file type.
To learn how to save your presentation as a PDF, see our guide on converting PowerPoint to a PDF .
How to save your PowerPoint presentation as a template
Once you’ve created a presentation that you like, you may want to turn it into a template. The easiest – but not technically correct – way, is to simply create a copy of your current presentation and then change the content.
But be careful! A PowerPoint template is a special type of document and it has its own parameters and behaviors.
If you’re interested in learning about how to create your own PowerPoint template from scratch, see our guide on how to create a PowerPoint template .
Printing Your PowerPoint Presentation
After finishing your PowerPoint presentation, you may want to print it out on paper. Printing your slides is relatively easy.

To open the Print dialog box, you can either:
- Hit Ctrl+P on your keyboard
- Or go to the Ribbon and click on File and then Print

Inside the Print dialog box, you can choose from the various printing settings:
- Printer: Select a printer to use (or print to PDF or OneNote)
- Slides: Choose which slides you want to print
- Layout: Determine how many slides you want per page (this is where you can print the notes, outline, and handouts)
- Collated or uncollated (learn what collated printing means here )
- Color: Choose to print in color, grayscale or black & white
There are many more options for printing your PowerPoint presentations. Here are links to more in-depth articles:
- How to print multiple slides per page
- How to print your speaker notes in PowerPoint
- How to save PowerPoint as a picture presentation
So that’s how to create a PowerPoint presentation if you are brand new to it. We’ve also included a ton of links to helpful resources to boost your PowerPoint skills further.
When you are creating your presentation, it is critical to first focus on the content (what you are trying to say) before getting lost inserting and playing with elements. The clearer you are on what you want to present, the easier it will be to build it out in PowerPoint.
If you enjoyed this article, you can learn more about our PowerPoint training courses and other presentation resources by visiting us here .
🔒 Unlock the PowerPoint Shortcuts Trusted by Industry Leaders KKR, American Express, HSBC, and More!
Join over 114,880 professionals from diverse fields including consulting, investment banking, advertising, marketing, sales, and business development who have supercharged their PowerPoint game with our proven methods.
✅ Customize compelling presentations effortlessly.
✅ Master time-saving techniques for faster deck creation.
✅ Boost your career prospects with top-notch PowerPoint skills.
Get FREE access to the Critical PowerPoint Shortcuts module of our premium training course by entering your name and email below.
DISCLAIMER: PC Users Only!
We respect your privacy and will keep your info safe and confidential.
About The Author

Popular Tutorials
- How to Strikethrough Text (l̶i̶k̶e̶ ̶t̶h̶i̶s̶) in Word, Excel & PowerPoint
- How to Make Animated Fireworks in PowerPoint (Step-by-Step)
- Strikethrough Shortcut (l̶i̶k̶e̶ ̶t̶h̶i̶s̶) for Word, Excel & PowerPoint
- How to Create a Flash Card Memory Game in PowerPoint (Like Jeopardy)
- Keyboard Shortcuts Not Working: Solved
PowerPoint Tutorial Categories
- Strategies & Opinions
- Shortcuts & Hacks
- Pictures, Icons, Videos, Etc.
- New Features
- Miscellaneous
- Charts & Data Viz
We help busy professionals save hours and gain peace of mind, with corporate workshops, self-paced courses and tutorials for PowerPoint and Word.
Work With Us
- Corporate Training
- Presentation & Template Design
- Courses & Downloads
- PowerPoint Articles
- Word Articles
- Productivity Resources
Find a Tutorial
- Free Training
- For Businesses
We help busy office workers save hours and gain peace of mind, with tips, training and tutorials for Microsoft PowerPoint and Word.
Master Critical PowerPoint Shortcuts – Secure Your FREE Training Module and Save Valuable Time!
⌛ Master time-saving expert techniques.
🔥 Create powerful presentations.
🚀 Propel your career to new heights.
We value your privacy – we keep your info safe.
Discover PowerPoint Hacks Loved by Industry Giants - KKR, AmEx, HSBC!
Over 114,880 professionals in finance, marketing and sales have revolutionized their PPT skills with our proven methods.
Gain FREE access to a full module of our premium PowerPoint training program – Get started today!
We hate spam too and promise to keep your information safe.
You are currently viewing a placeholder content from Facebook . To access the actual content, click the button below. Please note that doing so will share data with third-party providers.
Knowt AI PowerPoint Summarizer
Upload any PPT & Kai will make notes & flashcards instantly. In < 30 seconds Kai will study your slides and tell you all the important stuff in it.
Drag & drop a PowerPoint or Google Slides file to upload
Tap to upload a PowerPoint or Google Slides file
select files
Or upload from Google Drive
2,000,000 +
students & teachers
1,400,000 +
notes created
235,000,000 +
flashcards created
Learn your powerpoints faster with our AI-powered PPT Summarizing Tool
The ppt summarizer built to help you learn..
It’s as simple as sending a text to Kai, and he’ll explain anything in your PPT to you like a tutor would.
Take practice tests generated from your PPT
Kai will read through your PPT and create a test that highlights the key concepts.
Upload a PPT now
Upload video
Upload PPTs from any site in seconds
Use our Chrome extension to upload a PPT from any webpage to Knowt in seconds.
Download the chrome extension
Do more in less time with the Knowt PPT Summarizer
We're all about helping you learn better, but quicker.
Instant PPT Summaries
Kai will read through your PPT, find the key details, and make you a summary of the important stuff.
AI PPT Summarizer
Flashcards ready for you
Kai will read through your PPT, find the key details, and make flashcards for you to practice.
Upload a PPT
Mark up your PPT with annotations and comments
Our PDF editor lets you write directly on your uploaded files.

I loved knowt for vocab flashcards! Especially to import from quizlet with a link literally chefs kisss.

I used knowt to study for my apush midterm and it saved my butt! The import from quizlet feature helped a ton too. Slayed that test with an A!! 😻😻😻
Trusted by millions across the globe
Our community of students and teachers trust Knowt to create and study on.
Knowt helped me tremendously with my AP exams, World History and Chem in particular. Taking notes and immediately having a study guide created was such a life saver when I was on a time crunch. I did way better than I expected thanks to Knowt!!

Knowt’s quiz and spaced repetition features have been a lifesaver. I’m going to Columbia now and studying with Knowt helped me get there!

This app really came in clutch when AP exams were around the corner. Especially with the spaced repetition method, it helped me remember the important concepts. :)

Knowt has been a lifesaver! The learn features in flashcards let me find time and make studying a little more digestible.

Absolutely excellent. Easy to use, much more visually pleasant than Cram and no rudimentary features are behind a paywall. It’s simply excellent.

I used Knowt to study for my APUSH midterm and it saved my butt! The import from Quizlet feature helped a ton too. Slayed that test with an A!! 😻😻😻

I loved the AI for flashcard writing, it saves so much time! The unique spaced repetition can really come in clutch for last minute studying and helps you remember everything!

I love Knowt so much! The platform is a dream and seeing all of the new features each update makes me so happy! Thank you, Knowt, for being so amazing :)

Knowt has been an absolute life-saver for me - no other revision methods worked for me. It’s also incredible considering Knowt is free! The variety of tools available is perfect for any learning or revision type. Thanks, Knowt!
Endless ways to use Knowt
Not a PowerPoint person? No problem -- you can do so much more.
Make flashcards from PDFs
Kai will read your PDF, find the key details for you and make notes and flashcards for you to practice
AI PDF Summarizer

Video Summarizer
Kai will watch your lecture videos, turn them into notes and flashcards instantly.
AI Video Summarizer
AI Flashcards
You can make flashcards and study them for free with learn mode, spaced repetition, and more.
Make flashcards from notes
You can take notes and Kai will make flashcards from them instantly.
Oh you’re an explorer?
We have over 2 million resources across various exams, and subjects to refer to at any point.
Browse by exam
Knowt AP Hub
AP Study Guides
Knowt IB Hub
IB Study Guides
Knowt GCSE Hub
GCSE Study Guides
Explore top flashcards
Explore top notes, explore subjects, engineering, social studies.
Spotlight: Folderr (Workflow automation) .
- My Saved AIs

SlideNotes is a tool designed to automatically convert slide presentations into written notes. By simply uploading a PowerPoint or PDF file, SlideNotes generates a corresponding set of text notes that can be easily reviewed and shared.
This is particularly useful for those who prefer to read and reference information in textual format rather than relying solely on visual aids.SlideNotes is touted for being a fast, comprehensive, and easy-to-use tool.
It offers a quick solution to creating concise notes from lengthy slides, making it an ideal tool for students, educators, and business professionals alike.
The tool is capable of identifying important keywords and phrases in the presentation and summarizing them in a logical, coherent manner in the generated notes.Overall, SlideNotes helps to streamline the process of creating usable notes from presentations, ultimately saving time and improving productivity.
Its ability to convert multiple file formats and its user-friendly interface make it a valuable addition to anyone's toolkit.
Community ratings
How would you rate slidenotes.
Help other people by letting them know if this AI was useful.

Feature requests
1 alternative to SlideNotes for Presentation summaries
Most impacted jobs

Pros and Cons
If you liked slidenotes.
People also searched
- Builder dashboard

Subscribe to our exclusive newsletter, coming out 3 times per week with the latest AI tools. Join over 470,000 readers.
To prevent spam, some actions require being signed in. It's free and only takes a few seconds.
Pardon Our Interruption
As you were browsing something about your browser made us think you were a bot. There are a few reasons this might happen:
- You've disabled JavaScript in your web browser.
- You're a power user moving through this website with super-human speed.
- You've disabled cookies in your web browser.
- A third-party browser plugin, such as Ghostery or NoScript, is preventing JavaScript from running. Additional information is available in this support article .
To regain access, please make sure that cookies and JavaScript are enabled before reloading the page.
Community Member
First time visit profile message with url to edit your profile
Choose content type
Create a post from the types below.
Creating engaging online presentations with keynote.
Transform your online presentations into captivating experiences with the power of Keynote. Discover how to craft visually stunning and engaging presentations that keep your audience hooked from start to finish.
Why Keynote for Online Presentations?
Online presentations are now commonplace. Whether it's a teacher delivering a lecture, a workshop facilitator conducting professional development, or a graduate student defending their thesis, Keynote offers numerous advantages for creating engaging presentations. Features like speaker text formatting and playing the slideshow in a window enhance the presentation experience. This post provides tips for using Keynote effectively for remote presentations, including professional development sessions, online classes, and research presentations.
Optimizing Keynote for Online Delivery
Play Slide Deck in Window
- Select Play → Window → Play Slideshow to play the slide deck in a resizable window. This is useful when using a web conferencing app to share your screen, allowing you to tile your web conferencing windows in a control center format.

- Display speaker notes in a window by selecting Show Presenter Display in Window if they don’t appear automatically. Adjust the text size for better readability on your device. More information on this and other Keynote features can be found in the Apple Education Learning Center .
Modify Speaker Note Text Formatting
- Emphasize key information by adjusting text formatting. For example, if you want to accentuate a word, you can bold or change the color of the text.

- Use different text colors to distinguish parts if you have a co-presenter.
- Use brackets and colors to give yourself stage directions or to indicate the speaker. This can be particularly helpful if the timing of your slides is important.
Enhancing Slide Content with Visuals
Using Shapes and Images Effectively
- Rely on shapes and images to convey metaphorical or informational meaning, reducing text on slides.
- Keynote offers a wealth of shapes and clip art, which can be modified in size and color, and animated subtly to create movement.
- Avoid using unnecessary images or shapes that serve only as eye candy. If in doubt, large-font words or phrases work best.
💡 Accessibility Tip : Explicitly describe shapes, images, clip art, or animations in your presentation to draw attention to their conceptual meaning and aid visually impaired participants.
Customizing Rehearsal Display
- Customize your rehearsal display to show the current slide, the next slide, and speaker notes. This feature is crucial for maintaining the flow of your presentation.
- Use speaker notes to emphasize the core message you convey through your script.
- Use large fonts, high-contrast colors, and minimal text to improve readability on small screens.
- Ensure text fills the screen in large font sizes. Think in phrases or short sentences rather than bullet points. Place detailed information in the speaker notes and share it contextually, perhaps with examples or anecdotes.
Other Considerations for Maximizing Online Impact
Simplify and Engage
- Cut the number of slides and simplify content.
- Break content into smaller chunks and pause between sections to check for understanding or questions.
- Start with an icebreaker or a quick poll to engage your audience from the beginning.
Leverage Interactive Features
- Use chat or Q&A features actively. Encourage participants to ask questions or share thoughts during the presentation. Have a co-host monitor the chats to avoid getting sidetracked. When you ask for responses, pause to engage directly, acknowledge, read out loud, and comment on them.
Use Appropriate Text Formatting
- Use large, readable fonts and avoid overly decorative fonts. Ensure text contrasts well with the background.
Ready to elevate your online presentations with Keynote? Start experimenting with these tips today and transform your next remote session into an engaging and impactful experience. Share your experiences and any additional tips you have in the comments below! Let's learn and grow together.
This action is unavailable while under moderation.
You might also like

iPad Generation 9 Classroom Features Spotlight
5 tips to create your own App prototype using Keynote
Keynote for Mac: Present
Loading page content
Page content loaded
250032751020
250012991027
Insert a video
Supported file types: .mov, .mp4, .mpeg. File size: up to 400MB.
Add a still image to display before your video is played. Image dimensions: 1280x720 pixels. File size: up to 5MB.
Make your video more accessible with a closed caption file (.vtt up to 5MB).
Insert an image
Add an image up to 5MB. Supported file types: .gif, .jpg, .png, .bmp, .jpeg, .pjpeg.
Add details about your image to make it more accessible.
Add a caption below your image, up to 220 characters.
This action can’t be undone.
Error message, are you sure you want to continue your changes will not be saved..
Sorry, Something went wrong, please try again
This post contains content from YouTube.
Sign in to continue..
You’ve already liked this post
Attach up to 5 files which will be available for other members to download.
You can upload a maximum of five files.
Choose language
Accept the following legal terms to submit your content.
I acknowledge that I have the rights to post the material contained in this reply.
Review the Apple Education Community Terms of Use and Privacy Policy
Your reply includes attachments that must be reviewed.
This content won’t be publicly available until it clears moderation. Learn more
Not a member yet? Join for free when you sign in.
Sign in to create a post.
Collaboration features of the Forum are currently available in the following countries: Australia, Canada, Ireland, New Zealand, United Kingdom, United States. Learn more

Sign in to like this content.

Sign in to post your reply.

Sign in to follow.

This action is unavailable.
Some actions are unavailable in your country or region.
Please complete your registration.
You must complete your registration to perform this action.
This account may not publish.
This account has been restricted from publishing or editing content. If you think this is an error, please contact us.
Some actions are unavailable outside of your Apple Group.
Do you want to stay logged in?
trending now in US News

Obama knew in advance of Clooney’s bombshell call for Biden to...

Eerie details emerge after husband kills wife, daughter in...

Nursing student, 22, found beaten to death, days after judge...

Trump slams 'rat' George Clooney after actor called on Biden to...

Embattled Biden set to hold 'big-boy' press conference in bid to...

Ex-Kanye West muse Amber Rose says she'll speak at Republican...

ABC News exec was ‘furious’ after George Stephanopoulos said...

New Mexicans aren't happy to see 'narcissistic' Alec Baldwin in...
Breaking news, biden sticks to teleprompters as he gives nato chief medal of freedom to kick off 75-year summit.
- View Author Archive
- Get author RSS feed
Thanks for contacting us. We've received your submission.
WASHINGTON — President Joe Biden read carefully from teleprompters Tuesday in a speech kicking off NATO’s annual summit — before presenting the alliance’s secretary-general Jens Stoltenberg with the Presidential Medal of Freedom in recognition of his service.
The 81-year-old president spoke with only a few minor verbal stumbles — at one point grasping for the pronunciation of “Ukraine” — as congressional Democrats debated Biden’s political fate following his confused debate performance on June 27.

“[Russian President Vladimir] Putin’s war of aggression against Ukraine continues and Putin wants nothing less than Ukraine’s total subjugation and to end Ukraine’s democracy, to destroy Urains, Urains, Ukraine’s culture, and to wipe Ukraine off the map,” Biden said.
“We know Putin won’t stop in Ukraine, but make no mistake, Ukraine can and will stop Putin.”
Biden spoke just minutes after Rep. Mikie Sherrill (D-NJ) joined other House Democrats demanding that he end his campaign for a second term over concerns about his mental acuity.
The incumbent took thinly veiled digs at former President Donald Trump in his speech to NATO leaders — including quoting former President Ronald Reagan while arguing against a pullback from NATO and aid for Ukraine.

“The American people know all the progress we’ve made in the past 75 years has happened behind the shield of NATO,” Biden said.
“The American people understand what would happen if there was no NATO: another war in Europe, American troops fighting and dying, dictators spreading chaos, economic collapse, catastrophe … As President Reagan put it, and I quote ‘If our fellow democracies are not secure, we cannot be secure.'”
Trump, 78, has voiced skepticism about $175 billion appropriated by Congress in Ukraine war funding since early 2022 and has pledged to personally negotiate an end of the war if he defeats Biden in the Nov. 5 election
Biden ended his speech by calling Stoltenberg to the stage of the Andrew W. Mellon Auditorium — the venue that hosted the signing of the North Atlantic Treaty on April 4, 1949 — to present him with the highest US civilian honor.

“Today, NATO is stronger, smarter and more energized than when you began,” Biden said. “And a billion people across Europe and North America, indeed the whole world, will reap the rewards of your labor for years to come in the form of security, opportunity and greater freedom.”
Biden will face a test of his improvisational speaking skills Thursday at a press conference that aides say will feature at least three reporters — with press secretary Karine Jean-Pierre repeatedly referring to the event as a “big boy press conference” in recent public statements.
The president thus far has stuck closely to prepared remarks as he seeks to halt mounting calls for him to step aside to allow for a new Democratic presidential nominee.

Biden said in a Monday letter to Democrats in Congress that “I wouldn’t be running again if I did not absolutely believe I was the best person to beat Donald Trump in 2024.”
“We have 42 days to the Democratic Convention and 119 days to the general election,” Biden wrote . “Any weakening of resolve or lack of clarity about the task ahead only helps Trump and hurts us.”
But Democrats continued to express concern on Capitol Hill, where defenders and critics of the president failed to reach consensus at meetings Tuesday as throngs of journalists waited outside for updates.
What to know about the fallout from President Biden's debate performance:
- President Biden’s poor performance in the first 2024 presidential debate has left even some Democrats unsure of his fitness for office and future as the party’s candidate.
- Former President Barack Obama admitted that Biden had a “bad” debate, while his rival former President Donald Trump suggested that he was in a “trance” and “choked.”
- Biden told a crowd at a North Carolina rally the day after the debate that he doesn’t “debate as well as I used to” — but insisted that he can still “do this job.”
- The New York Times editorial board called on the president to serve the country by dropping out of the race. The Atlanta Journal-Constitution published a similar editorial a day later.
- Biden gathered with his family at Camp David to assess the campaign’s future, with his son Hunter reportedly pushing for him to stay in the race. Family members questioned whether the president’s top advisers should be fired after the disastrous debate.
- In a pre-taped interview with ABC anchor George Stephanopoulos , Biden claimed that his “bad episode” at the debate was the result of a cold and not any cognitive issues.
- Biden has rejected calls for him to step down from fellow Democrats, insisting to Stephanopoulos that he is the most qualified to win the election. At a Wisconsin rally, he declared that he is “running and going to win again.”
Sherrill on Tuesday afternoon said in a statement that “because I know President Biden cares deeply about the future of our country, I am asking that he declare that he won’t run for reelection and will help lead us through a process toward a new nominee.”
Reps. Adam Smith (D-Wash.), Angie Craig (D-Minn.), Rep. Mike Quigley (D-Ill.), Rep. Lloyd Doggett (D-Texas), Rep. Raúl Grijalva (D-Ariz.) and Rep. Seth Moulton (D-Mass.) also have issued public statements calling for Biden to step aside.
Reps. Jerry Nadler (D-NY), Mark Takano (D-Calif.) and Joseph Morelle (D-NY) reportedly said on a Sunday conference call that they want Biden to end his candidacy, but have not publicly confirmed their positions and Nadler on Tuesday said he would stand by Biden since he’s not relinquishing the nomination.
Other Democratic lawmakers, including Reps. Jared Golden of Maine and Marie Gluesenkamp Perez of Washington have said publicly they expect him to lose to Trump.
Sens. Jon Tester (D-Mont.), Michael Bennet (D-Colo.) and Sherrod Brown (D-Ohio) reportedly expressed concern at a Democratic lunch Tuesday that Biden would lose to Trump. Sen. Mark Warner (D-Va.) reportedly drafted a yet-to-be-published letter calling on Biden to step aside and other elected Democrats, such as Massachusetts Gov. Maura Healey, have all but called on Biden to exit the race.

Advertisement

Cooking up a great prompt: Getting the most from Copilot
Prompts are how you ask Copilot for Microsoft 365 to do something for you — like creating, summarizing, editing, or transforming. Think about prompting like having a conversation, using plain but clear language and providing context like you would with an assistant.
1. Tell Copilot what you need
|
"Give me a concise summary of recent news about [Product X]." |
“Write a session abstract of this /[presentation].” |
|
“Check this product launch rationale for inconsistencies.” |
"Create a value proposition for [Product X].” |
|
“Create an onboarding presentation based on this /[document].” |
"What's the latest on [Project X].” |
2. Include the right prompt ingredients
To get the best response, it’s important to focus on some of the key elements below when phrasing your Copilot prompts.

3. Keep the conversation going
Following up on your prompts help you collaborate with Copilot to gain more useful, tailored responses.
|
Lead with broader requests, then give specific details about the content. |
Ask for a summary of a specific file, then ask relevant questions to gain deeper insights. |
|
Request a meeting recap, then ask for more information about what you should know. |
Ask Copilot to translate a sentence to one of the supported languages, then ask for more context or a regional dialect. |
|
Ask Copilot to write a story, then guide it by giving more specific, relevant details. |
Present a technical problem, then narrow it down, or ask for step-by-step guidance. |
Helpful hints to keep in mind
Know Copilot’s limitations Copilot is limited to your current conversation, so give lots of details.
Be professional Using polite language improves Copilot’s response.
Communicate clearly Pay attention to punctuation, grammar, and capitalization.
Use quotation marks This helps Copilot know what to write, modify, or replace for you.
Start fresh Avoid interrupting and type “new topic” when switching tasks.
Copilot Lab

Need more help?
Want more options.
Explore subscription benefits, browse training courses, learn how to secure your device, and more.

Microsoft 365 subscription benefits

Microsoft 365 training

Microsoft security

Accessibility center
Communities help you ask and answer questions, give feedback, and hear from experts with rich knowledge.

Ask the Microsoft Community

Microsoft Tech Community

Windows Insiders
Microsoft 365 Insiders
Was this information helpful?
Thank you for your feedback.
IMAGES
VIDEO
COMMENTS
Add speaker notes to your slides When you're creating a presentation, you can add speaker notes to refer to later while delivering the slide show in front of an audience.
Explore options for managing your notes during presentations, from having a full text through to brief notes on cue cards, or even a mind map.
Discover how to add speaker notes in PowerPoint and impress your audience with your presentation skills. Follow our easy guide and tips to get started.
Improve your presentation delivery and audience engagement with Presenter notes & live annotations. Learn how to easily add notes to PowerPoint.
Speaker notes are helpful for talking points as you present a slideshow. In Google Slides, you can add notes to each slide, edit or remove them as needed, and of course, display them during the presentation.
Add speaker notes to a slide in PowerPoint Open your PowerPoint presentation and select the first slide where you want to add notes. Step 1: Go to the View tab and choose either Normal or Outline ...
Start the presentation and see your notes in Presenter view Using Presenter view is a great way to view your presentation with speaker notes on one computer (your laptop, for example), while only the slides themselves appear on the screen that your audience sees (like a larger screen you're projecting to).
Adding notes to your PowerPoint Presentation is a simple and effective way to make presenting easier. In this article, we will go over how you can add notes to PowerPoint, tips on using those notes, and how to print some fancy PowerPoint notes.
Add speaker notes in PowerPoint. Print with and without slides. View notes in the presenter view. Remove all notes of a presentation.
Adding speaker notes to a PowerPoint presentation provides reference material for the speaker when they're presenting a slideshow, allowing them to stay on track without forgetting key message points. Here's how to add and use speaker notes.
Speaker notes in PowerPoint® play a key role in slide design and speaker support during a presentation. To use your speaker notes in PowerPoint most effectively during your next talk, follow these tips.
Edit notes in Presenter view Accessing and editing your slide content whenever the need arises is a key part of the PowerPoint workflow. Whether you're making an important edit to your speaker notes during a presentation rehearsal or jotting down feedback during your presentation, the ability to edit notes in Presenter view increases your productivity and eliminates the need to toggle ...
A good presentation drives action. Discover the top qualities of effective presentations to guide you in delivering a compelling one.
What It Takes to Give a Great Presentation. Summary. Never underestimate the power of great communication. It can help you land the job of your dreams, attract investors to back your idea, or ...
Use presentation software… but do it properly. If you are presenting visuals, then the notes feature of your presentation software (e.g. PowerPoint) can be used in two distinct ways. In the first method, you can print out a set of "notes pages" which combine the slide content with your notes content.
Speaker notes or presenter notes have a lot of benefits that ultimately improve the quality of your presentations. Starting from the look of the presentation to the way you appear in front of your audience, speaker notes help you make a great impression with your presentation. Not to mention, speaker notes can even increase your productivity ...
The notes master in PowerPoint is a feature that allows you to control the settings of the notes section of PowerPoint. It allows you to change layouts, font size, font type, font style, and much more. To enable the Notes Master in PowerPoint, click on the "View" ribbon and then on "Notes Master".
Good presentation notes are written in short phrases and key words (see below). They are arranged in a way that helps you remember the main ideas and details, and prompt you along as you TELL the audience your information. Introduction Body of presentation Conclusion
Amanote is the notes maker app developed especially for higher ed students. Take beautiful aesthetic notes on your course material and study better.
Millions of users worldwide use Microsoft 365 services, making PowerPoint the presentation design software with the highest market share. And with good reason! PowerPoint's features stand out for its usability and originality.
Just getting started with PowerPoint? Learn how to make a PowerPoint presentation for the first time, following our step-by-step guide.
The Knowt AI PPT Summarizer is a PPT Summarizing Tool build specifically for students to learn and understand their readings better. It saves students lots of time by outlining the key information from each slide in your powerpoint, elimininating all the fluff. Once you upload your slides and generate a summary from your PPT, you can also make ...
SlideNotes is a tool designed to automatically convert slide presentations into written notes. By simply uploading a PowerPoint or PDF file, SlideNotes generates a corresponding set of text notes that can be easily reviewed and shared. This is particularly useful for those who prefer to read and reference information in textual format rather than relying solely on visual aids.SlideNotes is ...
Ace your courses with our free study and lecture notes, summaries, exam prep, and other resources
Transform your online presentations into captivating experiences with the power of Keynote. Discover how to craft visually stunning and engaging presentations that keep your audience hooked from start to finish.
The 81-year-old president spoke with only a few minor verbal stumbles — at one point grasping for the pronunciation of "Ukraine" — as congressional Democrats debated his political fate …
Having great, clear, prompts will get you better results with generative AI like Microsoft Copilot. This article gives you a clear 3-step guide on making your prompts better.