
View Options in PowerPoint – A Complete Beginner’s Guide!
By: Author Shrot Katewa

There are many different types of presentations view available in PowerPoint including Normal View, Outline View, Presenter View, and Slide Show View to name a few. All these views serve different purposes and it is important to know how to use them appropriately to get the most out of PowerPoint!
In this article, we will talk about what each type of view does in PowerPoint and how to access them so that you can choose the best for your needs! So, let’s get started!
[ A Quick Note Before We Begin – for this article, I will be using one of the presentation templates from Envato Elements . With Envato Elements, you get access to thousands of presentation designs with unlimited downloads so you never run out of options again. Plus, you get free previews so you know exactly what you’re getting before buying! It is also very affordable. Check out their pricing here ]
1. What are the Different Type of View Options Available in PowerPoint?
Microsoft PowerPoint is equipped with a variety of Slide View options that can be used for different purposes.
These are the different view options available in PowerPoint –
- Normal View
- Slide Sorter View
- Notes Page View
- Reading View
- Outline View
- Slide Show View
- Presenter View
- Slide Master View
2. How to Access the Different View Modes in PowerPoint?
To access the different view modes in PowerPoint, you have to click on the ‘View’ tab in the ribbon. The 2-step process is described below.
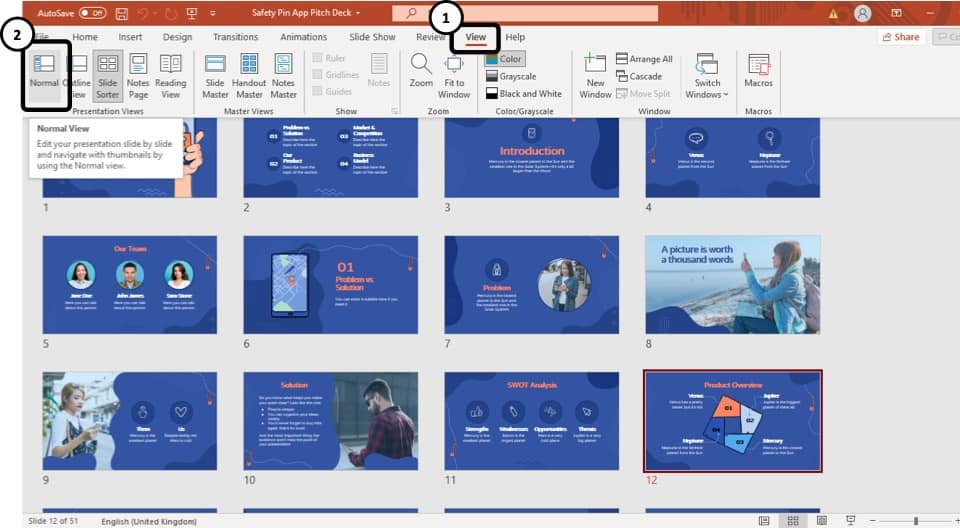
Step-1: Click on the ‘View’ tab
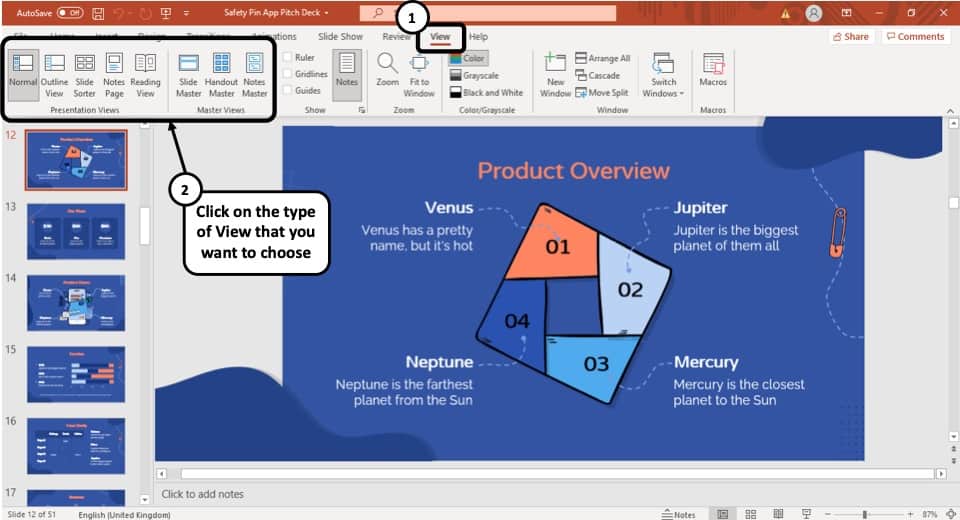
At first, select the ‘View’ tab, which is the second to last tab in the ribbon section of your PowerPoint Window.
Step-2: Select your preferred ‘View Mode’
Once you have access to the ‘View’ tab, you can select your preferred view mode such as the Outline View , Slide Sorter view, Slide Master view, etc. from the Presentation View section or the Master View section. (as shown in the image in step 1)
3. What is the Purpose of Various View Modes in PowerPoint?
Each view mode in PowerPoint has its own purpose. Let’s go through the purposes of the different slide view options one by one below –
1. Normal View
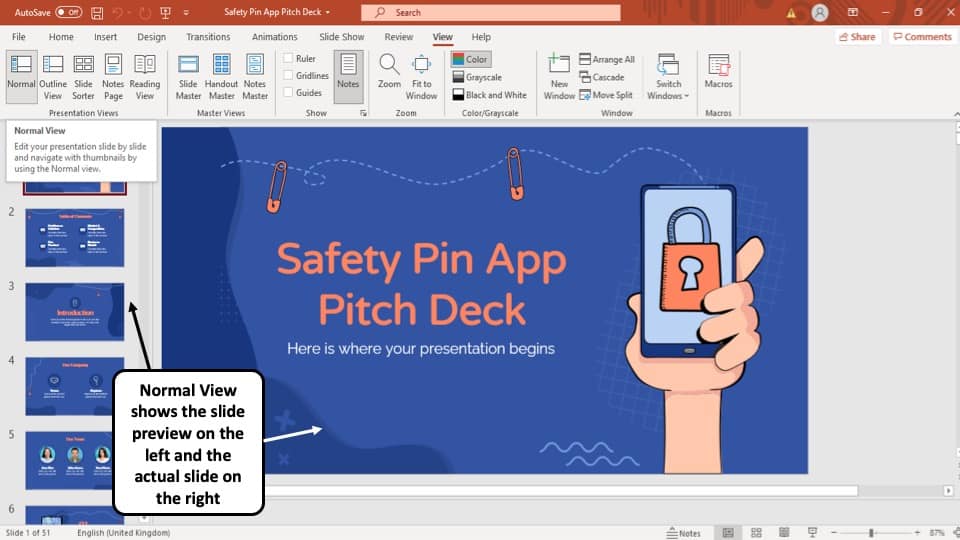
The ‘Normal View’ option is the first option in the ‘Presentation Views’ section of the ‘View’ tab. It is the most commonly used viewing option and is also the default slide view for PowerPoint.
The slides appear on the left of the PowerPoint window in the ‘Slide Navigation’ bar. Thumbnails of the slide are represented as boxes in the ‘Slide Navigation’ bar with its consecutive serial number to the left of it.
The main function of normal view mode in PowerPoint is to navigate through slides in a vertical grid while allowing you to add, design, or edit the slides while getting a preview of the slides on the left.
2. Slide Sorter View
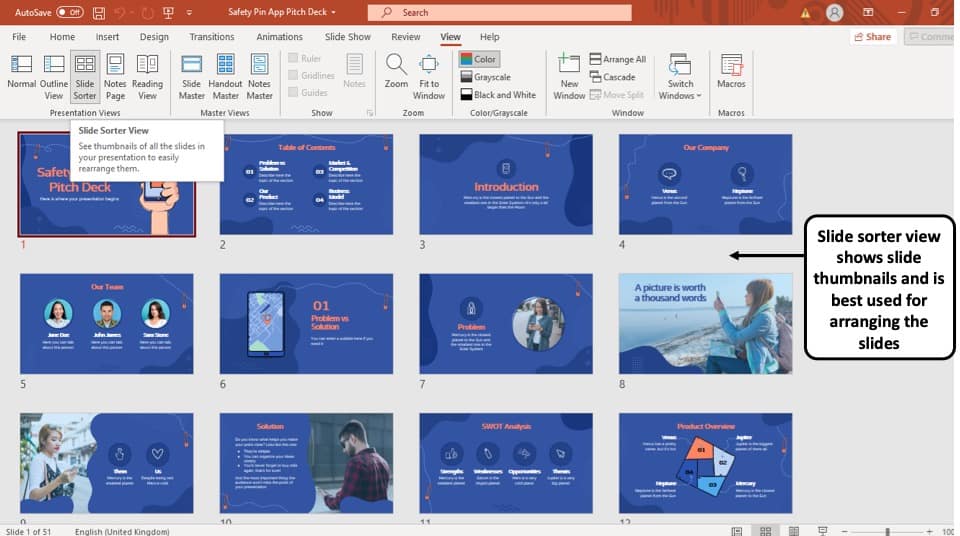
The ‘Slide Sorter’ option gives you an overview of all the slides in your PowerPoint presentation.
The slides are represented as thumbnails as a grid of boxes arranged side by side. The serial number of the slide is given on the bottom left corner of the slide thumbnail.
This option serves the purpose of viewing the slides together in one window making it easier to rearrange and organize them in a quick fashion.
3. Notes Page View

The ‘Notes Page View’ option gives you the view of each slide and its speaker notes in one page.
In this view, the slides appear at the top and the speaker notes are given on the bottom of the two sections. The serial number of the slide is not shown in this view. You can also edit speaker notes from here.
The main purpose of the notes page view in PowerPoint is to preview what each page will look like before you print the slides with speaker notes.
4. Reading View:
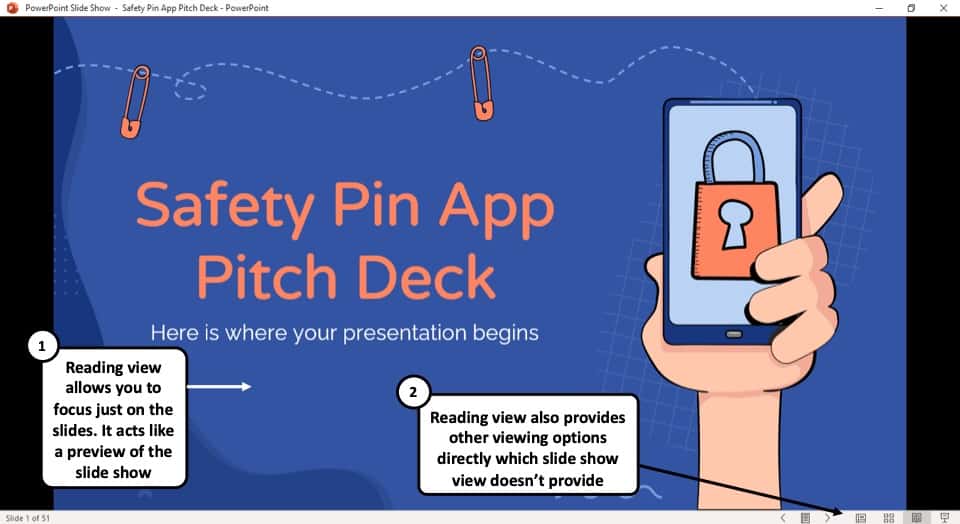
The Reading View option allows you to view your PowerPoint presentation without going into Full Screen mode. All the transitions and animations can be seen in this view. The serial number of the slide is given at the bottom right corner of the window.
It is used to preview the slide and review the slides with full focus. This mode also makes other view options easily accessible, which is not the case in ‘Slide Show’ mode where the presentation is shown in the full screen, and the options are not visible on screen.
The reading mode is actually more useful for word documents, as it allows the reader to focus just on the text. In my opinion, it adds little value to a PowerPoint presentation.
5. Outline View:
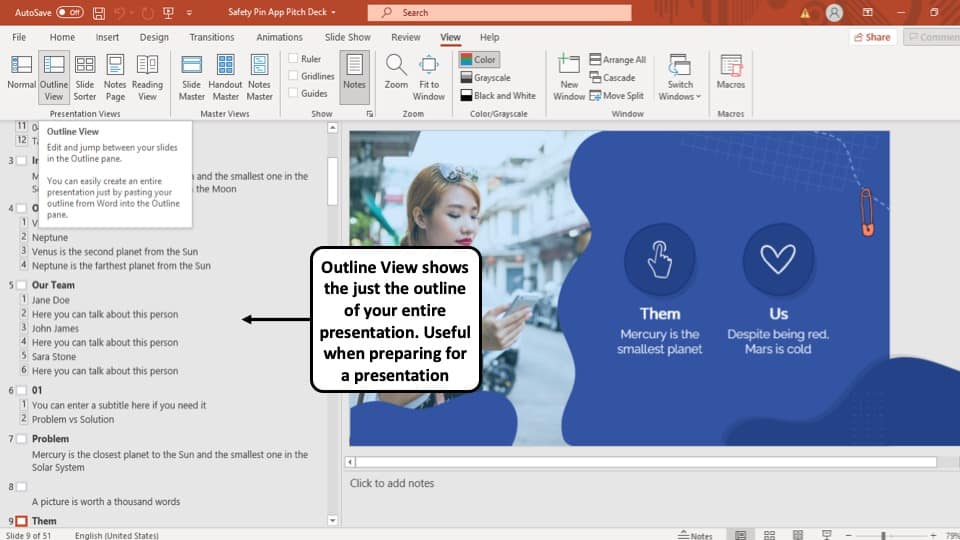
The ‘Outline View’ shows you the entire outline of your PowerPoint presentation in the ‘Slide Navigation’ bar.
In this view, there is no thumbnail of the presentation. Instead, there is an outline of all the data present in that slide. The serial number of the slide is at the left followed by a small white box that represents a slide and then the outline of that slide.
You can also create an entire slide in the pane of this view by copy and pasting data from Microsoft Word. However, you will have to design the slide separately once the data has been added to each slide.
6. Slide Show View:

The Slide Show View is the view that your audiences are going to see. This view shows each slide of your PowerPoint presentation in full screen.
All the transitions, animation, and multimedia files in your PowerPoint presentation are played here. Consecutive slides can be accessed using the direction keys on your keyboard or by clicking once on the slide.
7. Presenter View:
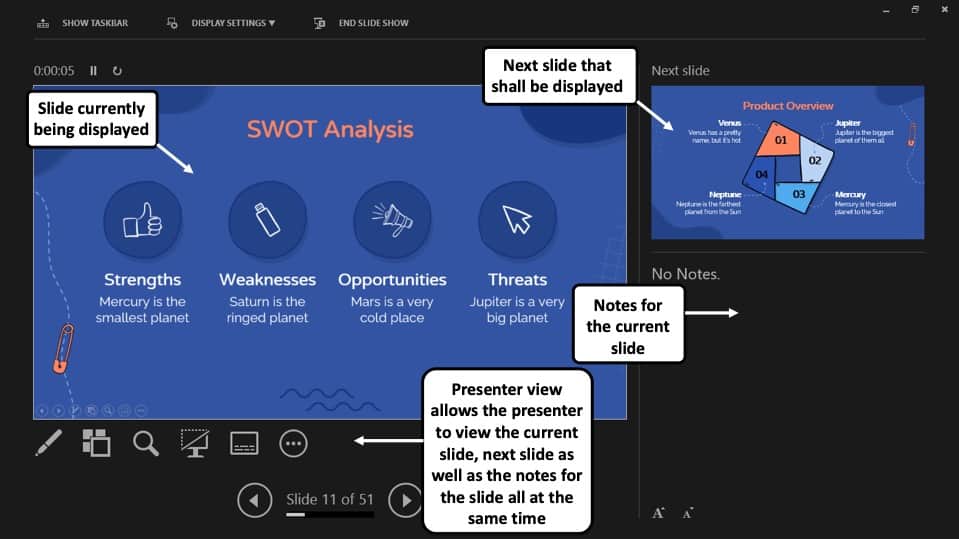
This is the view that you as a presenter are going to see while the audience is seeing the ‘Slide Show’ view.
Although you can give a presentation even in the slide show view, but it is always recommend to deliver the presentation using the “Presenter View” mode in PowerPoint as it provides you with additional features and benefits!
This view mode in PowerPoint will split the screen in multiple windows. The window on the left represents the current slide that is being displayed (the one that is visible to your audience).
The window in the top right section indicates the next slide in the queue. Whereas, the notes section displays the notes or key points made by each slide. Both, the notes section as well as the next slides window are only visible to the presenter and not to the audience!
The purpose of the “ Presenter View ” is to give the presenter all the aids to be prepared for the next slide and highlight the key points to be made on the current slide while delivering the presentation.
8. Slide Master View:
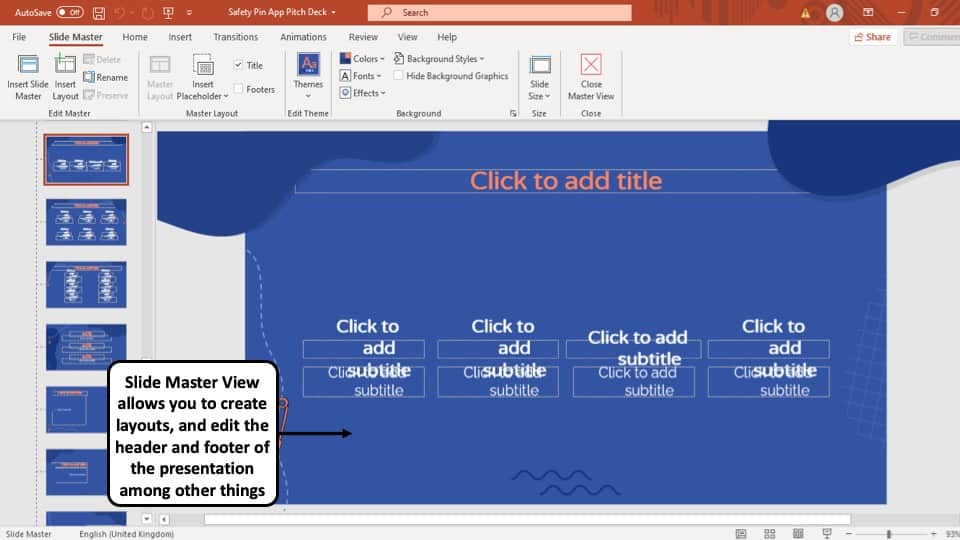
This view gives you a view of all the layouts used on the slides of your PowerPoint presentation.
The ‘ Slide Master View ’ option allows you to edit all the aspects of the layouts in your presentation such as fonts, background, color, and pretty much everything you can think of.
You can edit all the slide layouts of the presentation. Furthermore, you can also edit the header and footer of the presentation using the “ Slide Master View ” in PowerPoint.
4. How to Open the Presenter View in PowerPoint?
There are 2 different ways you can enter into Presenter View in PowerPoint –
- Using Slide Show View
- Using the short cut key i.e. Alt+F5
If you are using the Office 365 version of PowerPoint , you can actually directly access the “Presenter View” in the View section. Simply click on “View”. Then, click on “Presenter View”
Let’s look at both the methods quickly –
Method 1 – Using the Slide Show View
Step-1: Click on the ‘Slide Show’ button at the bottom right corner of the screen
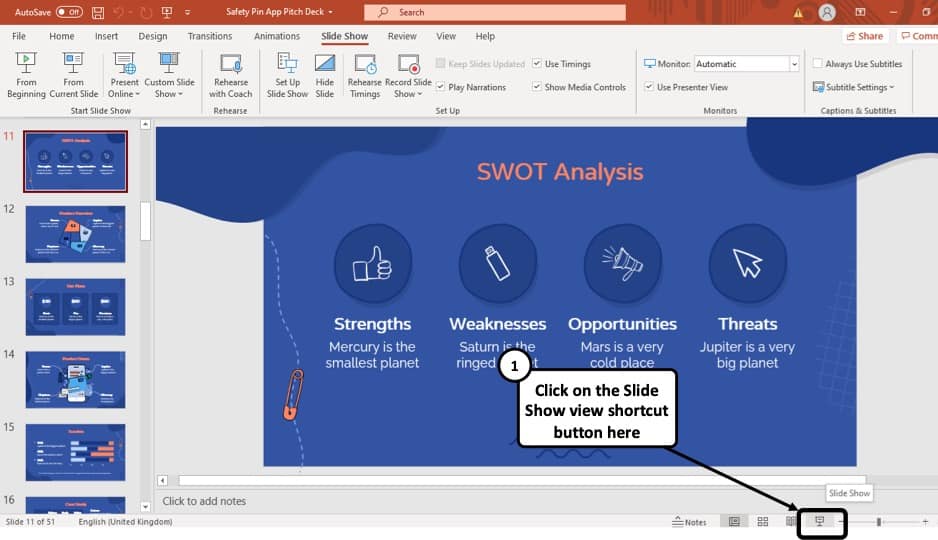
At first, you have to click on the ‘Slide Show’ button that looks like a projector screen which is located at the bottom right corner of your PowerPoint window. (as indicated in the image above)
Step-2: Right-click and choose “Show Presenter View”
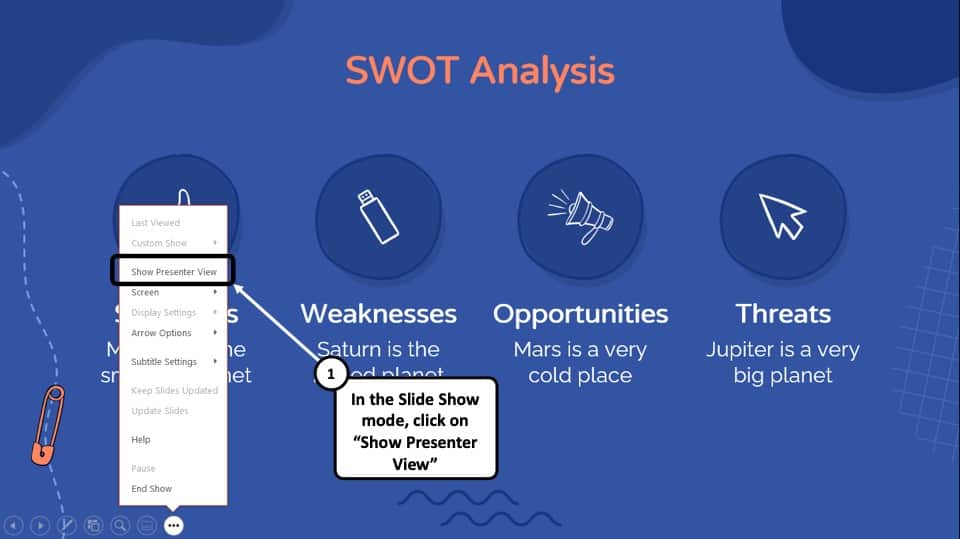
Once you are in the ‘Slide Show’ mode, using your mouse right-click anywhere on the screen. From the menu that appears, choose the “ Show Presenter View ” option
Method 2 – Using the Keyboard Shortcut
Alternatively, you can press ‘ Alt + F5 ’ on your keyboard and that will immediately open the ‘Presenter View’ mode.
The keyboard shortcut to open the “Presenter View” in PowerPoint on Mac is “Option+Enter” key.
5. How to Change PowerPoint Back to Normal View?
To change your PowerPoint back to ‘Normal View’ from ‘Slide Show’ mode, ‘Presenter View’ option or the ‘Reading View’ option, all you have to do is simply press the ‘ESC’ button on the keyboard of your computer. This will take you back to Normal View.
If you are using any other view apart from these 3 view modes in PowerPoint, you need to do the following –
If you are in a different viewing option, such as ‘Slide Sorter’ option, or the ‘Reading View’ option then you have to select the ‘Normal View’ option from the ‘View’ tab instead of the ‘Slide Sorter’ option or the different slide view option you are currently on.
More PowerPoint Related Topics
- How to Crop a Picture in PowerPoint? [Complete Step-by-Step Tutorial!]
- How to Give a Presentation on Zoom? A Helpful Resource!
- What is a Presentation Clicker? [And How to Use it!]
- How to Convert a PowerPoint to PDF? [A Simple Guide!]
- PowerPoint vs Google Slides: Which is Better? [ULTIMATE Test!]
- How to Change Bullet Style in PowerPoint? A Complete Guide
Credit to Pressahotkey (via Freepik) for the featured image of this article
How to use Presenter View in PowerPoint
- Categories: PowerPoint productivity , Presentation skills
- Comments: 1

Think of PowerPoint’s Presenter View like the cockpit of an aeroplane (or airplane for our American readers!). Like an experienced pilot, you have all the controls you need at your fingertips when you’re navigating your slides, whether you’re presenting online or in person, helping you give a seamless presentation and leave your audience seriously impressed.
Presenter View in PowerPoint works best if you have two monitors. On one monitor, you can display your slides for your audience to see. On the other, you have your own private view (which isn’t visible to your audience), where you can see your notes and the upcoming slide while you’re presenting.
How to start using Presenter View in PowerPoint:
– Open your presentation. – Select Slide Show in the top ribbon. – Make sure Presenter View is selected in the Monitors section. – Choose from the dropdown menu which monitor you want your presentation to appear on. (Presenter View will automatically appear on whichever monitor you don’t choose.) – When you’re ready to start presenting, click From Beginning in the Start Slide Show section of the PowerPoint ribbon, or click the Slide Show icon in the bottom right of the screen, or hit the Alt + F5 keys on your keyboard to start your presentation in Presenter View.

PowerPoint Presenter View’s most useful features (by number!):
- This is your current slide. This shows you what your audience can see. This should be the same content that is displayed on your other monitor. The timer in the top-left corner lets you keep an eye on how long you’ve spent on the slide so far, helping you to pace your presentation. You can pause or reset the timer using the icons to the right.
- Here you can see your speaker notes. While we don’t generally recommend that you read out your speaker notes like a script (because it can make you sound like a monotonous robot and make your audience disengage very quickly), it can be useful to have some prompts in the speaker notes so that you know what happens with each mouse click and so that you don’t forget the key points on each slide. You can use the font icons in the bottom left of this panel to make your speaker notes larger or smaller.
- The tracker shows you how far through your presentation you are. Click the forward or back arrows to navigate to your next or previous animation. Hitting the forward or back keys on your keyboard will do the same thing.
- This is a preview of your next animation or next slide. This shows you what’s coming up next, which helps you to transition seamlessly from one slide to another.
- The Pen and laser pointer: This allows you to write on or highlight a particular part of your slide as you present. Adding ink annotations while you’re presenting won’t change your original slides – you can choose whether to keep or discard your annotations when you end your slide show.
- The See all slides tool: Click this to view thumbnails of all the slides in your presentation without your audience seeing. This means you can jump straight to a specific slide without flicking through all the slides in between.
- The Zoom tool: Use this to magnify a specific part of your slide. This is handy if you need to draw your audience’s attention to a particular detail.
- The Black or un-black tool: Use this to blank out the screen the audience sees. This is helpful whenever you want to release your audience’s attention from the slide content and back to you (e.g., during a Q&A). You can choose whether you want the blank screen to be black or white by clicking on the More slide show options icon at the far-right end of the toolbar.
- Toggle subtitles: Use this to turn automated subtitles on or off. You can adjust subtitle settings (such as language and where the subtitles appear on your slide) by clicking on the More slide show options icon.
- Click Show taskbar to open another program on your private monitor. This can be useful if you need to pull up another document without changing what your audience sees.
- Select Display settings to swap the monitors your slides and Presenter View appear on.
- Click End slide show when you’ve finished presenting. Hitting the Esc key on your keyboard will also close Slide Show mode and Presenter View.
And there you have it! Now you know everything there is to know about PowerPoint’s Presenter View. Give it a try next time you present – you might find it helps you to navigate and deliver your slides more confidently.
And for more tips on presenting, check out our ULTIMATE guide to presentation skills .
Related articles
7 steps towards presenting inclusively.
- Presentation skills
The goal of presenting inclusively is to make sure none of your audience are excluded due to their background or abilities. Even if you think you know your audience – many people could be experiencing invisible disabilities or situational limitations that could affect their ability to participate. But taking steps to ensure your presentation is inclusive and accessible is likely to benefit everyone!

5 presentation resolutions for 2024 (with BrightSlide!)
- PowerPoint productivity
Here are five things you should commit to doing this year powered by our productivity and design PowerPoint add-in BrightSlide!

Presentation tips & tricks advent calendar
- Presentation skills / Visual communication
It’s finally here, the holiday season! As the nights grow longer and the air grows colder, we know that all you want to do is settle down near a roaring fire, and snuggle up under the blankets with a good book PowerPoint presentation. Well BrightCarbon are here to help, with our festive presentation advent calendar.

Also you can resize the sections (next slide preview, notes etc) if necessary: https://imgur.com/a/2NnYECf
Leave a Reply Cancel reply
Save my name and email in this browser for the next time I comment.
Join the BrightCarbon mailing list for monthly invites and resources
You guys are amazing! Looks awesome, and works great. Perfect! Mila Johnson InComm

How to Change the Powerpoint Default Presentation Screen
Is there a particular view in Powerpoint that you like to use, and you’re tired of having to switch to it anytime you open a presentation or create a new one? If so, then knowing how to change the Powerpoint default presentation screen is something that could improve the way you use Microsoft’s presentation software.
Fortunately, Powerpoint for Office 365 has a setting that lets you specify which view should be used whenever you open a presentation in the program.
Our article below will show you where to find this setting so that you can select your preferred view from a handful of options. This includes options like various Normal view configurations, Outline, Slide Sorter, and more. This is a really handy setting for people that don’t like the default view and want to use one of the many other possibilities within Powerpoint.
How to Change the Default Display Setting in Powerpoint for Office 365
- Launch Powerpoint.
- Click File .
- Select Options .
- Choose Advanced .
- Click Open all documents using this view , then select one.
Our guide continues below with additional information on changing the display settings for your slide show in the Powerpoint window, including pictures of these steps.
How to Set a Default View in Powerpoint for Office 365 (guide with Pictures)
The steps in this article were performed in Microsoft Powerpoint for Office 365. By adjusting this setting you will be affecting a default setting within the application. Once you make this change, all future existing and new slideshows will open using the view that you have specified.
Step 1: Open Powerpoint.
Step 2: choose the file tab at the top-left of the window..

Step 3: Click the Options button at the bottom-left of the window.

Step 4: Select the Advanced tab.

Step 5: Scroll down and click the dropdown menu to the right of Open all documents using this view , select the desired view, then click the OK button.

Our tutorial continues below with additional discussion about the Microsoft Powerpoint change default presentation screen process.
More Information on the Powerpoint – Change Default Monitor Steps
The options available for the default view selection are:
- The view saved in the file
- Normal – outline, notes and slide
- Normal – thumbnails, notes and slide
- Normal – outline and slide
- Normal – thumbnails and slide
- Normal – notes and slide
- Normal – slide only
- Outline Only
- Slide Sorter
Now if you close the current presentation and open another one, it will open with the view that you specified.
If you change this setting a few times and ultimately determine that you would rather go back to the original setting, then simply change the selection in step 5 above to The view saved in the file option.
If you are looking to learn how to change the Powerpoint default presentation screen because your computer has multiple monitors, then that is going to require a different set of steps that we discuss further below.
Note that the Slide Show tab has a number of other options concerning the display of your current theme.
- If you have multiple monitors connected to your computer, such as if you use two monitors normally and use one monitor for one application for one task and a second screen for something else, then you might want to specify that. If you click the drop down menu to the right of Monitor you can select screen options by either choosing Automatic, or one of the listed monitors.
- Under the monitor selection is a check box for Use Presenter View. If you enable that setting then you are going to enter a full screen mode for your presentation where you see the current slide, any speaker notes that you added, as well as a small preview of the next slide. if you turn off Presenter View then you are only going to see your presentations the same way that your audience sees them.
When you click the Design tab at the top of the window you are able to see a list of the available themes. if you click on one of those themes you can apply it to the current presentation.
However, by right-clicking on one of those themes you will see some additional options, including one to Set as Default Theme. Choosing that option will apply the selected theme as the default option for new slides that you create the next time you create a new presentation.
Would you like to disable all of the animations in a slideshow that you are working on? Find out where to make this change so that you can present and edit without any of the animations that exist in the presentation.

Kermit Matthews is a freelance writer based in Philadelphia, Pennsylvania with more than a decade of experience writing technology guides. He has a Bachelor’s and Master’s degree in Computer Science and has spent much of his professional career in IT management.
He specializes in writing content about iPhones, Android devices, Microsoft Office, and many other popular applications and devices.
Read his full bio here .
Share this:
- Click to share on Twitter (Opens in new window)
- Click to share on Facebook (Opens in new window)
- Click to email a link to a friend (Opens in new window)
- Click to share on LinkedIn (Opens in new window)
- Click to share on Reddit (Opens in new window)
- Click to share on Pinterest (Opens in new window)
- Click to share on Tumblr (Opens in new window)
Related posts:
- How to Duplicate a Slide on Google Slides
- How to Hide a Slide in Google Slides
- How to Delete a Slide on Google Slides
- How to Change Slide Dimensions in Google Slides
- How to Embed Video in Powerpoint 2013
- How to Remove Text Box in Powerpoint 2016
- How to Make a Square Picture a Circle in Powerpoint 2013
- How to Change Slide Orientation in Powerpoint 2013
- How to – Powerpoint Vertical Slide Setting in Powerpoint for Office 365
- How to Change the Default Save Location in Powerpoint 2010
- How to Hide a Slide in Powerpoint 2013
- How to Make a Picture Transparent in Powerpoint 2013
- How to Add a Formatted Slide to Your Slideshow in Powerpoint 2013
- How to Duplicate a Slide in Powerpoint 2016
- How to Number Slides in Google Slides
- How to Delete Slide Numbers in Powerpoint 2013
- How to Delete a Slide in Powerpoint 2013
- How to End With the Last Slide Instead of a Black Screen in Powerpoint 2013
- How to Add a Comment to a Slideshow in Powerpoint 2013
- How to Flip a Picture in Powerpoint 2013
Unsupported browser
This site was designed for modern browsers and tested with Internet Explorer version 10 and later.
It may not look or work correctly on your browser.
- Presentations
How to Work With Views in Microsoft PowerPoint
- Bahasa Indonesia
The many views of PowerPoint will help you prepare for your big presentation.
You're probably accustomed to views like Normal view. But in this tutorial, you'll learn more ways of working with your presentation such as Slide Sorter view, shown here:

Master PowerPoint Views
Here are the most popular views in PowerPoint:
- Normal View . The default PowerPoint workspace, which includes thumbnails for each slide and a larger view of a single slide in the center.
- Outline View . Shows your presentation in an outline style, which is great for reviewing content.
- Slide Sorter View . Perfect for reviewing the order of your slides and re-sequencing them.
- Reading View . An in-window preview of how your presentation will appear, including transitions and animations.
Need Help? Download Our eBook on Making Great Presentations (Free)
We also have a useful compliment to this tutorial. Quickly grab it before you read on. Download our FREE eBook: The Complete Guide to Making Great Presentations . It'll help you write, design, and deliver the perfect presentation.

How to Work With PowerPoint Views (Quick Video Tutorial)
PowerPoint is a great tool for creating presentations. Views allow you to make edits, reorders slides, edit notes, and work efficiently in PowerPoint. Learn how to use PowerPoint Views in this short video:

Working With Microsoft PowerPoint Views
In the rest of this tutorial, I cover more details about the major views in PowerPoint for mastering your presentation files and how to get the most out of them. I also touch on more views you can use in PowerPoint as well.

The Bravo PowerPoint Template has over 50 unique slides. It has picture placeholders that make adding images to the slide easy. Plus, this template comes with icons and device mockups.
How to Change Views in PowerPoint
To change views, find the View button on PowerPoint's ribbon and click on it. Then, find the section on the left labeled Presentation Views. This tutorial will walk you through each of these views and how you can use them.

Now that you know how to switch views, let's find out more about the different PowerPoint views and why you should work through them while building a presentation.
How to Use PowerPoint Normal View
Normal View is typically the default view for working in Microsoft PowerPoint. This is a general purpose, do-it-all view that you're likely accustomed to. You can think of it as the primary editing view in PowerPoint.
On the left side of PowerPoint's Normal View are thumbnails for each of the slides. You can click to switch between slides, and even drag and drop to reorder them right inside of the sidebar.

I use Normal View in PowerPoint as a starting point for my presentations. It's a general view for creating your presentations from. The stage area is used for building and styling your slides, and you can easily move to a different slides from the sidebar.
After I've spent time putting together my content, it might be time to rethink the sequence of the material. That's where Slide Sorter View comes into play.
Normal View is the default view in PowerPoint, but if you're working in another view you can switch back to Normal View in PowerPoint. Click on View in the PowerPoint ribbon. Then Click the Normal icon.
Using PowerPoint Outline View
The Outline View in PowerPoint shows your presentation in a traditional, easy-to-read outline. This view puts your main points in the sidebar.

When you switch to Outline View , the sidebar changes its focus to the content of your slides. The sidebar doesn't show all the text from the slides, just the major points from your presentation. You can even double click in the sidebar on the outline text to update the slide itself.
I like to use Outline View to review the major points that my presentation should make. As I'm working in Outline View , I'm asking myself a few key questions, like:
- Are my main ideas clear?
- Do I focus on them, and not the details?
Outline View is perfect for this purpose, as it leaves only your key points showing in the sidebar.
Slide Sorter View in PowerPoint
You've nailed down the content in Normal View , and now it's time to think about the order that you'll present your slides.
Slide Sorter View is a helpful way to re-order the slides in your PowerPoint presentation. Click on Slide Sorter to enter into this view.

When you switch to Slide Sorter View , all your slides will be represented as thumbnails on the stage. You can even change the size of the slides by pulling the zoom slider and view your slides large enough to read their contents.

The great thing is that you can drag and drop these thumbnails to reorder your presentation. I'm often surprised by how much my presentations benefit from simple reordering of the slides.
There's a presentation principle called BLUF, or "bottom line up front." Basically, lead off with the most important point in your entire presentation. Your audience may not have the patience or attention span to follow multiple slides to a conclusion
When you switch to Slide Sorter View , it's a great time to apply the BLUF principle. Make sure that the bottom line (most important facts) are at the very beginning of the presentation. If you've buried the heart of the presentation deep in the slides, drag and drop the key slides closer to the front.
5. PowerPoint Notes Page View
Speaker notes are one of my favorite PowerPoint tools. Instead of writing your notes down on notecards, you can add them to each slide. You can add speaker notes from either Normal View , or more easily in Notes Page View .
Best of all, these notes won't be viewable to your audience when presenting. You can either print note pages, or they'll be visible in Presentation View (more on that in a moment.)

When you're working in PowerPoint Notes Page View , you'll see the notes you've added to a slide underneath it. You can also double click in the box and add notes on the fly. This preview is what you'll see when you print your notes pages.
If you'd like to find out more about the power of speaker notes, check out this 60 second tutorial on how to use them to your advantage:

6. When to Use Reading View
You've nailed the sequence, content, and speaker notes for your presentation. Now, it's time to review what your audience will see with PowerPoint Reading View .

Once you enter Reading View , your PowerPoint presentation will cover the entire window. You can use the arrow keys on your keyboard to switch slides. As you progress through the presentation, PowerPoint will play any transitions or animations that you've added to your slides.
Reading View should be your final step while preparing for your presentation in PowerPoint. I always go through each slide in my deck to make sure it appears exactly the way I expect.
To leave Reading View , press the Escape key on your keyboard. There's one more view worth checking out.
7. Presentation View in PowerPoint
Presentation View is what you'll use when sharing your PowerPoint slide deck with an audience. In practice, Presentation View is very similar to what you'll see in Reading View . Use Presentation View when you're ready to share.

One option worth checking out is Use Presenter View , which you can toggle on from the Slide Show tab. Presenter View is great for dual display options, such as when you're using an external monitor. Your screen will show a preview of the slide, as well as the speaker notes and next slide.

Make Great Presentations (Free eBook Download)
We've got the perfect complement to this tutorial, which will walk you through the complete presentation process. Learn how to write your presentation, design it like a pro, and prepare it to present powerfully.
Download our eBook: The Complete Guide to Making Great Presentations . It's available for free with a subscription to the Tuts+ Business Newsletter.

Recap and Keep Learning
Think of the various PowerPoint views in this tutorial as different ways to view your presentation. Here's a possible workflow:
- Build your PowerPoint presentation in Normal View .
- Re-sequence the slides in Slide Sorter .
- Review content in Outline View .
- Preview the presentation in Reading View .
PowerPoint sometimes gets a bad rap as an ineffective tool, but when used correctly, it's great for building visual aids for your presentation. If you want to learn more about PowerPoint, check out the resources below:
- Envato Elements has over 350 templates for PowerPoint available for a flat rate with unlimited download.
- The PowerPoint in 60 Seconds series has a great selection of easy-to-learn skills for PowerPoint.
- If you want to learn more about how to build great-looking slides, check out How to Get Started With Using SmartArt .
More PowerPoint Templates
As you experiment with PowerPoint views, you may be looking for other PowerPoint templates to work with. Here are some curated lists of templates:

The Top Source for PowerPoint Templates (With Unlimited Use)
Envato Elements is a top source for premium PowerPoint templates . It has more than just PowerPoint templates. It has many digital assets. They include images, audio, font, and more.

A subscription is a good value if you make PowerPoint presentations often. To become a subscriber, you need to pay a low monthly fee and have unlimited access to any digital asset you want.
Using a premium template saves you time because it's already mostly made. All you need to do is add your information and images. But if you’re a creative person and are worried that with a premium template, you won’t get to be creative, then don’t be. A good template is fully customizable. You can change the colors, font, or anything else you need.
Use a Premium PowerPoint Template in Your Next Project Today!
Now that you know more about the different views in PowerPoint. Knowing how to use the different views can help you fully use PowerPoint. If you use PowerPoint, try signing up for Envato Elements.
Editorial Note : This tutorial was originally published in March of 2017. It's been updated for accuracy with help from Sarah Joy.

Home Blog PowerPoint Tutorials How to Work with Presenter View in PowerPoint
How to Work with Presenter View in PowerPoint

Not all presenters have excellent memory recall or the ability to speak flawlessly to the audience without any cues. However, many of them are good at hiding it by using Presenter View in PowerPoint. It is a presentation mode that enables the presenter to hide speaker notes and presentation controls from the audience while leveraging the various handy features offered by PowerPoint.
How to Use Presenter View in PowerPoint
To start using Presenter View, ensure it’s enabled before you begin your slideshow. If you are new to this feature, we recommend using this option to familiarize yourself with the various navigation options for this presentation mode. This might also be helpful if the PowerPoint templates you are accustomed to using might have animations that you might want to preview in this mode to understand when to give the next visual cue.
How to Enable Presenter View in PowerPoint
To enable PowerPoint presenter view, go to the SlideShow tab and make sure the Use Presenter View option is enabled. This will ensure that you can access Presenter View when you switch your slides to SlideShow mode.

Adjust Display Settings
You can swap between the presenter view and slideshow mode or duplicate the slideshow to exit the Presenter View from the Display Settings menu from the top toolbar.

Navigate Slides in Presenter View
Like any standard PowerPoint presentation in SlideShow mode, you can navigate between slides by using the arrow keys or with a presentation remote. Presenter View also provides slide navigation buttons to move the slides back and forth.

View Taskbar in Presenter View
The Show Taskbar option at the top enables viewing the taskbar. This can be helpful if you require using the taskbar, such as to view your battery charge, see the time, enable or disable another app from the taskbar menu, etc.

Reset or Pause the Timer
Once you start your presentation in Presenter View, a timer starts showing how much time you have spent in slideshow mode. This is an excellent way to understand how much time you have consumed for your session and to keep an eye out for good timekeeping. You can also hit Pause or reset the timer anytime.

Change the Size of the Speaker Notes
How to view notes in PowerPoint while presenting? If you have any speaker notes added to your slides, they will appear in Presenter View on your screen. You can increase or reduce the size of the text via the two options at the bottom of the speaker notes pane.

Using Annotation Tools in Presenter View
PowerPoint annotation tools can be accessed from the bottom toolbar in Presenter View. The Pen and Laser Pointer Tools button gives you access to the pen, ink colors, laser pointer, and eraser and also allows you to show or hide the mouse pointer via Arrow Options .

View All Slides in Presenter View
If you need to go back and forth to find a relevant slide for an ongoing discussion or query during your presentation, you can view all slides in Presenter View via the See all slides option.

Zoom Slides using Presenter View
PowerPoint’s Zoom feature lets presenters quickly pick a portion of the slide to zoom into. Presenter View allows you to leverage this feature by instantly selecting a portion of the slide to enlarge it after selecting Zoom into the slide option. To exit the Zoom mode or hit the Esc key.

Black or Unblack SlideShow
Sometimes, you might want to turn the screen blank for a while, such as during a mid-presentation break. The Black or Unblack SlideShow option blanks the slides for your audience while continuing to show you all navigation options via Presenter View.

Toggle Subtitles in Presenter View
One of the most revolutionary features introduced by Microsoft for PowerPoint over the past decade has been Live captions. This feature enables subtitles by converting speech to text as you present. You can toggle Live subtitles on or off while in presenter view to help your audience read what you speak.

Toggle Camera in Presenter View
Like subtitles, you can also toggle the camera on or off in Presenter View.

End Slideshow in Presenter View
There are different ways to end or exit a SlideShow from Presenter View. You can hit the Esc key or click End Slide Show . Similarly, you can click the three dots at the bottom and select End Show .

More Slideshow Options
Other than the various visibility prominent menus available to navigate, annotate, and present your slides, you can also find a few additional options via More slideshow options , which are accessible via the three dots at the bottom toolbar. These include adjusting the position of the subtitles, turning your screen white or black, ending the slideshow, etc.

How to Use Presenter View on a Single Screen
While Presenter View can be enabled to work with dual monitors, you can also use Presenter View on a single monitor with remote meeting apps like Zoom. A simple method for switching to Presenter View on a single monitor is to click the three dots ( More slideshow options ) at the bottom in SlideShow mode and select Show Presenter View .

You can also switch to Presenter View on a single monitor anytime using the ALT+F5 hotkey.

The presenter can easily manage a PPT in presentation mode, with the utility to view speaker notes, annotate or zoom slides, toggle subtitles or camera on or off, and keep your audience engaged via better slideshow management. However, if you’re new to this presentation mode, a bit of practice might help you avoid confusion when presenting before an audience in Presenter View for the first few times. For more information, check our article about PowerPoint presentation shortcuts .
Like this article? Please share
PowerPoint Tools, Presentation Skills Filed under PowerPoint Tutorials
Related Articles

Filed under Presentation Ideas • August 22nd, 2024
How to Write a Presentation Script
The script of a speech is a vital aspect for a presentation’s success. Join us here to learn the process of writing a presentation script.

Filed under PowerPoint Tutorials • July 30th, 2024
How to Add a Timer to PowerPoint
Generate expectations for your presentation introductions by mastering how to add a timer to PowerPoint. Step-by-step instructions + templates.

Filed under Google Slides Tutorials • July 25th, 2024
How to Hide a Slide in Google Slides
Hiding a slide in Google Slides is a task that takes less than a minute. Learn how to quickly implement this tool for your presentations in this article.
Leave a Reply

May 9, 2022
Edit your notes in Presenter view in PowerPoint
Victoria Tran
- Add our blog to your RSS feed reader" href="/rss/blog.xml" data-bi-name="RSS Subscription" data-bi-id="rss_feed" data-bi-bhvr="120" data-bi-socchn="RSSSubscription" title="Microsoft 365 Insider Blog RSS" target="blank" class="d-inline-block">
Hey, Officer Insiders! My name is Victoria Tran, and I’m a Program Manager on the PowerPoint team. I’m thrilled to share that you can now edit notes in Presenter view in PowerPoint for Windows. No more switching to Editor view to type or change your notes, even during a presentation!
Edit notes in Presenter view
Accessing and editing your slide content whenever the need arises is a key part of the PowerPoint workflow. Whether you’re making an important edit to your speaker notes during a presentation rehearsal or jotting down feedback during your presentation, the ability to edit notes in Presenter view increases your productivity and eliminates the need to toggle between views.
We are excited to add this highly requested feature and expand the use of PowerPoint notes. In the future, we’ll continue to add support for editing notes in other views, such as Teleprompter view.
How it works
Ready to edit notes in Presenter view?

NOTE: You can also press the F6 key to select the Notes pane in Presenter view. When a white outline appears around the pane, press Enter and start typing to make any updates you want.
Known issues
Presenter view currently only allows basic formatting of notes, such as bold, italics, and underlining (via keyboard shortcuts). Formatting such as text color, highlighting, and other options aren’t yet available.
Tips and tricks
- If you are using keyboard commands to navigate through your slides during a presentation, make sure the text insertion point is not showing in the Notes pane. If it is, the arrow keys will move the insertion point around in the pane instead of navigating the slides.
- If you have two monitors, a full-screen slide will show on one monitor and Presenter view on the other monitor, featuring a view of the next slide, your speaker notes, a timer, and more. If you have just one monitor, you can press Alt + F5 to try out Presenter view.
Availability
We will be rolling the edit notes in Presenter view feature out to Office Insiders running Beta Channel Version 2204 (Build 15225.20000) or later.
Don’t have it yet? It’s probably us, not you.
Features are released over some time to ensure things are working smoothly. We highlight features that you may not have because they’re slowly releasing to larger numbers of Insiders. Sometimes we remove elements to further improve them based on your feedback. Though this is rare, we also reserve the option to pull a feature entirely out of the product, even if you, as an Insider, have had the opportunity to try it.
We want to hear from you! Please click Help > Feedback to submit your feedback about this feature.
Learn what other information you should include in your feedback to ensure it’s actionable and reaches the right people. We’re excited to hear from you!
Sign up for the Office Insider newsletter and get the latest information about Insider features in your inbox once a month!
Sorry, JavaScript must be enabled to use this app.
How-To Geek
How to change an entire presentation's formatting in powerpoint.

Your changes have been saved
Email is sent
Email has already been sent
Please verify your email address.
You’ve reached your account maximum for followed topics.
4 Reasons the Free Version of Microsoft 365 is Good Enough
8 useful pcie cards to put in your secondary pcie slot, lenovo’s new wireless keyboard works with everything.
If you’re wanting to reuse a PowerPoint presentation but would like to clear the slideshow's formatting, there’s no need to do it slide by slide---you can do it all at once. Here’s how.
First, open the PowerPoint presentation with the formatting you want to edit. To illustrate the before and after, here’s what we’ll be working with in this example.

Looking even closer, here are the formats our current slideshow is using:
- Colors: Gallery
- Headings: Gill Sans MT
- Body: Gill Sans MT
- Effects: Gallery
- Background Style: Style 10
- Background Graphics: Wooden Flooring

Once you’re ready to reformat, select the “ Slide Master ” option in the “Master Views” group of the “View” tab.

The first child slide is selected by default. Be sure to choose the parent slide above it, or the changes won’t take place for every slide.

If you want to assign a new theme to the presentation, you can do that here. Select “Themes” from the “Edit Theme” group and choose your desired theme from the drop-down menu.

Each theme comes with its own unique set of fonts, colors, effects, and so on---and there's certainly no shortage of items to choose from. If you want to stick with your current theme but change some of the individual formatting options, you can do so with the options available in the “Background” group.

Here are the different options available for reformatting:
- Colors: Changes all the colors used in your presentation, as well as the color options available in the color picker.
- Fonts: Changes all the headings and body fonts used in the presentation.
- Effects: Changes the appearance (shading, border, etc.) of objects in your presentation.
- Background Styles: Choose the background style for the selected theme.
- Hide Background Graphics: Hide (or unhide) background graphics that come with a theme. This can only be used on each slide type in the Master view.
To make changes, select the option from the menu and choose your desired change from the menu that opens. For example, if we wanted to change our colors from “Gallery” to “Green Yellow,” we’d select “Colors” from the “Background Group” and then choose “Green Yellow” from the drop-down menu.

Related: How to Change the Default Font in PowerPoint
Repeat these steps for whichever options you’d like to change. We’ll make the following changes to our slideshow in this example:
- Colors: Green Yellow
- Headings: Calibri
- Body: Calibri
- Effects: Glossy
- Background Styles: Style 10
- Hide Background Graphics: Title Slide only
Once you’ve made the desired changes, select the “Close Master View” button in the “Close” group.
Related: How to Create a Custom Template in PowerPoint

You’ll now see the changes applied throughout the entire presentation.
And a closer look shows all the finer details.

That’s all there is to it!
- Microsoft Office
- Office 2016
- What is a slide master? Article
- Add, rearrange, duplicate, and delete slides in PowerPoint Article
- Apply a slide layout Article
- Add color and design to your slides with Themes Article
- Start with a template Article
- Get design ideas for slides Article
- Customize a slide master Article
- Change the page orientation in PowerPoint between landscape and portrait Article
- Organize your PowerPoint slides into sections Article
- Add a DRAFT watermark to the background of slides Article
- Create, merge, and group objects on a slide Article
- Guides for arranging things on a slide in PowerPoint Article
- Change the order in which stacked objects, placeholders, or shapes appear on a slide Article
- Rotate or flip an object Article

Change the page orientation in PowerPoint between landscape and portrait

Select the Design tab:

Near the right end, select Slide Size , and then click Custom Slide Size .

In the Slide Size dialog box, select Portrait , then select OK .

In the next dialog box, you can select Maximize to take full advantage of the space available, or you can select Ensure Fit to make sure that your content fits on the vertical page.
On the Design tab, click Slide Size .

Click Page Setup .

In the Page Setup dialog box, under Orientation , click the orientation that you want:

There are separate orientation settings for Slides (projected on-screen) and for Printed notes, handouts, and outlines .
Click the Design tab of the toolbar ribbon, and then, near the right end, click Slide Size .
On the Slide Size menu that appears, select Custom Slide Size .

The Slide Size dialog box opens.
In the Slide Size dialog box, select Portrait , and then select OK .

When PowerPoint for the web is unable to automatically scale your content, it prompts you with two options:
Maximize : Select this option to increase the size of your slide content when you are scaling to a larger slide size. Choosing this option could result in your content not fitting on the slide.
Ensure Fit : Select this option to decrease the size of your content when scaling to a smaller slide size. This could make your content appear smaller, but you’ll be able to see all content on your slide.

Use portrait and landscape orientation in the same presentation
Change the size of your slides
Rotate a text box, shape, WordArt, or picture

Need more help?
Want more options.
Explore subscription benefits, browse training courses, learn how to secure your device, and more.

Microsoft 365 subscription benefits

Microsoft 365 training

Microsoft security

Accessibility center
Communities help you ask and answer questions, give feedback, and hear from experts with rich knowledge.

Ask the Microsoft Community

Microsoft Tech Community

Windows Insiders
Microsoft 365 Insiders
Was this information helpful?
Thank you for your feedback.
COMMENTS
Select the Slide Show tab. Select the Use Presenter View checkbox. Select which monitor to display Presenter View on. Select From Beginning or press F5. In Presenter View, you can: See your current slide, next slide, and speaker notes. Select the arrows next to the slide number to go between slides. Select the pause button or reset button to ...
Keep reading to find out more about using Presenter View in PowerPoint and the best features to try out.. Turn On PowerPoint Presenter View. In PowerPoint for macOS, simply click on Presenter View on the Slide Show tab to kick off the presentation in Presenter view. Turn on Presenter View by clicking on Presenter View on the Slide Show tab.. You'll see the Presenter View interface on one screen.
Presenter view lets you take advantage of the dual monitor capability of a computer to separate what the audience sees from the mechanics of running a slideshow. The audience views your slides on the main screen, while you control the show with the Presenter view on another screen that only you can see. The Presenter view is like a dashboard ...
Deliver your presentation on two monitors. On the Slide Show tab, in the Set Up group, click Set Up Slide Show. In the Set Up Show dialog box, choose the options that you want, and then click OK. If you choose Automatic, PowerPoint will display speaker notes on the laptop monitor, if available. Otherwise, PowerPoint will display speaker notes ...
To access the different view modes in PowerPoint, you have to click on the 'View' tab in the ribbon. The 2-step process is described below. Step-1: Click on the 'View' tab. At first, select the 'View' tab, which is the second to last tab in the ribbon section of your PowerPoint Window. Step-2: Select your preferred 'View Mode'.
Check the box beside the "Use Presenter View." Select from the "Start Slide Show" section to start your presentation "From the Beginning." Click the three dots menu on your full-screen slideshow view and select "Show Presenter View." When your presentation displays "Presenter View," you can scroll and use it for your speech.
On the other, you have your own private view (which isn't visible to your audience), where you can see your notes and the upcoming slide while you're presenting. How to start using Presenter View in PowerPoint: - Open your presentation. - Select Slide Show in the top ribbon. - Make sure Presenter View is selected in the Monitors section.
Ctrl+I to change the cursor to the highlighter pen. E to erase the drawings. Esc will return your cursor to the normal arrow. If you want to change any options of these drawing tools, you can do so in the drawing tool interface in Presenter View. Here is the section of my video that shows this tip. Interact with the slide in Presenter View
Launch Powerpoint. Click File. Select Options. Choose Advanced. Click Open all documents using this view, then select one. Click OK. Our guide continues below with additional information on changing the display settings for your slide show in the Powerpoint window, including pictures of these steps.
In this video, LearnKey expert Natasha Nelson demonstrates options for presenting a slide show in Microsoft PowerPoint 365.
Click "Slide Show.". Click "Set Up Show.". Check the box "Show Presenter View" in the dialog box which opens. This opens a navigation panel on the presenter's monitor which allows the presenter to easily manage the multiple screens. Click the monitor you want the slide show presentation to appear on under the "Display Slide Show ...
In this screencast, you'll learn how to present a PowerPoint slideshow with Presenter View. Download unlimited PPT templates with Envato Elements: https://...
Slide Sorter view. You can get to Slide Sorter view from the task bar at the bottom of the slide window, or from the View tab on the ribbon. Slide Sorter view (below) displays all the slides in your presentation in horizontally sequenced, thumbnails. Slide show view is helpful if you need to reorganize your slides—you can just click and drag ...
To change views, find the View button on PowerPoint's ribbon and click on it. Then, find the section on the left labeled Presentation Views. This tutorial will walk you through each of these views and how you can use them. Click on the Views tab on the PowerPoint ribbon to find the option to change presentation views.
A simple method for switching to Presenter View on a single monitor is to click the three dots ( More slideshow options) at the bottom in SlideShow mode and select Show Presenter View. You can also switch to Presenter View on a single monitor anytime using the ALT+F5 hotkey. The presenter can easily manage a PPT in presentation mode, with the ...
1. To open , click the Slide Show tab and select the Use Presenter View check box. 2. Start your slide show. 3. Click the Notes pane in the lower right corner of the PowerPoint window, then start typing. NOTE: You can also press the F6 key to select the Notes pane in Presenter view. When a white outline appears around the pane, press Enter and ...
If you prefer, however, you can specify that PowerPoint open in a different view, such as Slide Sorter view, Slide Show view, Notes Page view, and variations on Normal view. Click File > Options > Advanced. Under Display, in the Open all documents using this view list, select the view that you want to set as the new default, and then click OK.
Here are the different options available for reformatting: Colors: Changes all the colors used in your presentation, as well as the color options available in the color picker. Fonts: Changes all the headings and body fonts used in the presentation. Effects: Changes the appearance (shading, border, etc.) of objects in your presentation. Background Styles: Choose the background style for the ...
PowerPoint has a Monitor setup UI under Slide Show / Monitors. But it only allows the selection of the monitor to use for the Audience View and not the monitor used for the Presenter View. So I can get the audience view of the slide show to appear on the right monitor but the Presenter View is appearing on a monitor chosen by PowerPoint, not me ...
Download your presentation as a PowerPoint template or use it online as a Google Slides theme. 100% free, no registration or download limits. Content PowerPoint
Select the Design tab: Near the right end, select Slide Size, and then click Custom Slide Size. In the Slide Size dialog box, select Portrait, then select OK. In the next dialog box, you can select Maximize to take full advantage of the space available, or you can select Ensure Fit to make sure that your content fits on the vertical page. See ...
Press Command-Q to exit the Visual Basic Editor. From the Tools menu choose Macro > Macros. Select the Test macro and click Run. Your presentation should now be running in a window that you might be able to move to any screen. You can adjust the number of pixels by changing the Width and Height settings in the Macro.