
14 Best Steps on How to Make an Assignment on MS Word

Nowadays, it is very common for students to complete their assignments using Microsoft Word. Thus, they look up how to make an assignment on MS Word. Because of the numerous options provided by MS Word, it might be difficult for a beginner to handle. All you have to do is become familiar with MS Word’s options before moving on to the assignment.
Here in this blog, we will explain 14 best steps you need to follow in order to know how to make an assignment on MS word.
How to make an assignment on MS word
Table of Contents
Yes, we understand that completing an assignment is challenging for most students. Because some of them are worried about completing the task like write my paper , and even if they aren’t worried, they don’t know how to use Microsoft Word effectively, which can be disastrous for many. Similarly, we are publishing this blog to teach you how to make an assignment in Microsoft Word.
Yes, we understand that completing an assignment is challenging for most students. Because some of them are worried about completing the task, and even if they aren’t worried, they don’t know how to use Microsoft Word effectively, which can be disastrous for many. This blog is being published to teach you how to make an assignment in Microsoft Word.
1. Setting the layout of the page for your assignment
On the Toolbar, select the Page Layout tab. Likewise, Page Setup options will appear.
2. Set Margins
Set the margins as follows (Standard measure for the margin):
- Bottom: 2.5cm
- Left: 2.5cm (or 3.2cm)
- Right: 2.5cm (or 3.2cm)
3. Setting Orientation of the page
- Orientation: Portrait
4. Setting Size
- Set to A4 unless otherwise specified.
5. Setting styles
Go Back to the Home tab, You will find the Styles options in the right of the toolbar you will need to use these steps to set the headings and paragraph text for your work.
6. For Headings
Always use the first three headings (Heading 1,2 and 3)
- H1: Arial 14 pt bold
- H2: Arial 12 pt bold, italics
- H3: Arial 10.5-11 pt bold
And the text type should be Normal text
- Times New Roman 12 pt (or equivalent)
7. To set the headings styles for your work, you will have to
- Click the small Styles icon/button.
- Select/highlight the style to modify (e.g. ‘H1’), and then right-click >Modify. Likewise, the Modify Style dialog box will appear.
- Under Formatting, You can change the font style and size as per your need.
- Click OK.
8. Setting up your assignment as the one document
Also, your Work, including the title page and references ( not the Assignment Attachment form*), must be aggregated as a single word (.docx) report.
Therefore, it is simpler to make one record, embed your significant headings, and enter the content from that point. But, if you decide to make separate documents while setting up your task (for example, a different record for references), you will need to copy and paste the final contents into the one-word document and finalize the formatting there.
*The assignment attachment structure is either submitted electronically as a different document or attached to a submitted printed copy.
If you face any issues related to PowerPoint or find it difficult to complete your PowerPoint homework, use our PowerPoint PPT Homework Help by Experts .
9. Inserting section breaks, page breaks, and page numbers
The document has two sections
Section 1 Contains
- The title page
- Table of contents
Section 2 Contains
- The remainder of the assignment.
There are then page breaks within each section i.e
(e.g. between ‘Abstract’ and ‘Table of contents’; ‘Conclusion’ and ‘References’).
To insert the Section break (i.e. make two sections)
- Position your cursor at the end of the Table of contents. (Just have this as a heading; the actual table will be added at the end.)
- From the toolbar at the top of your document, open the Page Layout tab and select Breaks>Section Breaks>Next Page. Under Section break types, select ‘Next page’. This has now divided the assignment into two sections.
Now to insert the page breaks
- Place your cursor at the foot of the title (cover) page.
- Select the Page Layout tab>Breaks>Page Breaks>Page. This has now created a page break between the title page and Abstract.
- Place the cursor at the foot of the Abstract page and repeat to make the break between the Abstract and Table of contents.
- Place a page break between the Conclusion in the next section.
10. Now to add the page numbers
For section 1:.
- Place your cursor within the title page. Click on the Insert tab and then select Page Number in the Header & Footer set of options.
- Select Top of Page>Plain Number 3 (‘right’ alignment). Do not close the Header and Footer just yet.
- Check the box for Different First Page. (This will remove the page number from the title page.)
- In the Header & Footer group of options to the left of the toolbar, select Page Number>Format Page Numbers. Select i, ii, iii .. from the Number format
- Drop-down list. Under Page numbering, click the Start at the radio button (if not already activated) and select i. Click OK.
- Close the Header and Footer. [This will paginate slightly differently from the example, with Abstract on page ii. ]
For section 2:
- Go to the start of section 2 (i.e. beginning at the ‘Introduction’) and double click on the existing page number. This will open the Header settings options.
- In the Header & Footer options section on the toolbar, select Page Number>Format Page Numbers.
- Make sure the ‘Show number on the first page is selected (i.e. the box is ticked).
- Select 1, 2, 3 from the Number format drop-down list. Under Page numbering, Click on the Start at the radio button and set the start on page 1.
11. Inserting the Table of contents
- Move the cursor under the ‘Table of contents’ heading.
- Check the checkboxes for ‘Show page numbers’ and ‘Right align page numbers’.In the (last) Show levels box, set it to either just ‘1’ (i.e. list only the heading 1 level headings) or ‘2’ (to show both H1, and H2 headings).
- To update the table anytime, right-click on the table and it’s almost done.
12. The title page
Follow these steps as the model for your work:
- Assignment title: Arial 28 pt, italics, centered
- (Assignment number): Arial 18 pt, italics, centered
- Other details: Times New Roman 14 pt, left-justified; single tab spacing for items on the one line.
13. Word count
Show the word count properly for the body of your assignment, because it’s’ important.
- Place your cursor on the Introduction title, hold the Shift key down, and got to the end of the Conclusion.
- And then Tools>Word Count and record the number of words.
14. Spelling and Grammar Check
Always keep an eye on spelling and sentence structure and Before you get a printed copy of your task,
What you have to do is
- Run the word spell and sentence structure, and carefully look at your Work. (Tools>Spelling and Grammar.)
- Ensure the Dictionary Language is set to English (Australia, UK, Canada).
Get the Best Excel Assignment Help Now
6 Tips On How To Make an Assignment First Page Best
8 Best Steps On How to Write An Assignment Report
4 Tips on How to Write an Assignment Introduction
6 Tips on How to Make An Assignment For High School
To this end, now you know the 14 best steps on how to make an assignment on MS Word in detail. Many times students are worried about their assignments but we are here to assist you with all your problems. You can contact our experts anytime if you have an issue with MS Office assignment help.
As a result, Our computer science assignment help experts are available for you to provide help 24/7.
Related Posts

How to Hire someone to do my Statistics Homework for Me?
Students ask to do my statistics homework for me. Although there are many online tutors or statistics homework service providing websites available to help you…

How to Get Good Grades in Exams Tips by Experts
Here in this blog, Codeavail professional experts will help you to understand how to get good grades in Exams. Notice that not all the material…
9 Microsoft Word Tips to Edit Your College Assignment Faster
Struggling to edit your college assignments efficiently? Here are some useful Microsoft Word tips to accelerate your editing process and save time.
Assignments at the college and university levels are research-heavy, and you’re often expected to produce write-ups with a significant number of pages. Just when you think you’re done with producing the required word count, the next step is equally challenging and time-consuming: editing.
From keyboard shortcuts to simple, built-in features such as Find and Replace and the automatic table of contents, here are several tips you can use to edit and format your college assignment more efficiently in Microsoft Word.
1. Leave Paragraph Spacing as Your Last Step
Let’s first start on the right track. When you have a 3,000-word essay or report ahead, it’s tempting to set double-spacing when you only write a few sentences or a paragraph at most. It gives the comforting illusion that you have done more work than you actually have.
But to be more efficient at the final editing stage, it’s best to leave paragraph spacing as your last step. This way, you save time because you don’t have to scroll up and down much more than you need to while navigating through different sections and pages of your text.
2. Learn to Utilize Keyboard Shortcut Keys
Keyboard shortcuts make editing and formatting much faster compared to using a mouse. For example, when you use your mouse to select some words, you’ll probably miss a letter or two and have to re-highlight, or overshoot and include a period when you don’t need to.
In this case, you can select text accurately by using Ctrl + Shift , and the left and right arrow keys in Windows. There are many more Microsoft Word keyboard shortcuts that will enable you to get most editing done on the keyboard, without having to switch to your mouse or trackpad. Don’t underestimate the amount of time you save with this method!
3. Hide the Headers and Footers
When you’re reading through a continuous body of text, the blank headers and footers may feel disruptive. To have a smoother reading and editing experience, hide the headers and footers to join all the pages together.
Hover your cursor over the gray space between your current page and the next, then double-click. When you need to use the headers and footers in Microsoft Word again, unhide them by hovering your cursor over the page separator line and double-click.
4. Collapse the Headings and Subheadings
For long report-style assignments, you’ll likely split your content into headings and subheadings. As you move from one section to the next, or jump between sections to rewrite and edit, make it easier to scroll through your text by collapsing the headings.
Hover over the heading title, then click the triangle icon that appears next to it to hide the content. If you want to hide all headings at once, right-click on any heading, and select Expand/Collapse > Collapse All Headings .
5. Automatically Sort References by Alphabetical Order
The works cited list is an essential section in any higher education assignment and is usually sorted by alphabetical order. You’ve likely added references to the list as you cite them in your essay, but when it comes to sorting at the end, it’s unfeasible and time-consuming to sort them manually. You can simply sort them automatically in Microsoft Word.
Select all your references and go to the Home tab. Under the Paragraph section, click the Sort icon (A and Z, with a downward arrow). In the Sort by field, choose Paragraphs . In the Type field, select Text . Then, select Ascending and click OK . The list will now be sorted by alphabetical order.
However, you might notice a couple of outliers. For example, when some references start with symbols instead of a letter, they will all likely be pushed to the very top. These are the few ones you’ll then need to manually reinsert into your list correctly.
6. Use Find and Replace to Avoid Spelling Mistakes
Whether they’re textbooks or journal articles, every student has probably encountered authors with surnames that are a little tricky to spell. Typing the name over and over for each in-text citation is prone to human error. To avoid misspellings, you can use Find and Replace.
First, use a unique abbreviation as a placeholder when you write your assignment. I recommend including a number in this abbreviation. This is because if your abbreviation only consists of letters, there’s a chance that this short combination of letters may have appeared elsewhere, as a part of a word, in your essay.
Once you’re done with the body content, it’s time to replace the abbreviation with the actual surname. In the Home tab, click Replace in the Editing tab. In the Find what field, type your abbreviation. In the Replace with field, type the actual author's name. Then, click Replace All . All your abbreviations will now be replaced with the correct author surname.
7. Insert Your Picture Into an Invisible Table
If you haven’t quite got the hang of formatting pictures in Microsoft Word, here’s a simple alternative that helps guarantee your image won’t cause your text to break up at weird places: insert your picture into an invisible table.
Go to the part of the text where you want your picture to appear. Press Enter to go to a new paragraph. Head to the Insert tab, click Table , and select one box to create a 1x1 table. With the cursor inside your table, click Pictures > Insert Picture > This Device to upload your picture into the document.
You can resize your picture within the table. Once you’re satisfied, highlight the table, go to the Table Design tab, click Borders > No Border . The black table border will then disappear. Your picture now appears to be perfectly fitted between two paragraphs of text.
8. Have an Overview of Multiple Page at Once
When you’re almost done editing, it’s best to scroll through all the pages to make sure there are no odd blank pages, separate sections, or incorrect image displays. But if you have more than 20 pages worth of content, scrolling through that much content quickly is just dizzying.
Instead, go to the View tab. In the Zoom section, click Multiple Pages . This zooms out your Microsoft Word document , so you can view two or three pages at once. You can also click the Zoom slider at the bottom right to zoom out even more and view more pages at once.
9. Automatically Create a Table of Contents
One of the final assignment components is the table of contents. If you’ve been manually keying in each heading, typing a line of periods that end with the heading’s corresponding page number, and double-checking the said page number yourself, it’s time to let Microsoft Word handle the task.
First, make sure you have applied the correct style to your headings. You can check this by clicking on each heading and see which style is selected in the Home tab. Then, number the pages of your Microsoft Word document .
Finally, go to the blank page where you want to insert your Table of Contents. Head to the References tab, click on Table of Contents , and select one of the Automatic Tables . Microsoft Word instantly generates a table of contents for you.
Improve Your Editing Process in Microsoft Word
By applying the above tips, you can revise your assignment more quickly and effectively without burdening yourself with eye fatigue. Cut down on the excessive scrolling and other manual tasks that can be done automatically by Microsoft Word.
Plus, saving time on editing means you have even more time to proofread and review your essays thoroughly, enabling you to produce higher-quality essays and reports.

- Get started with computers
- Learn Microsoft Office
- Apply for a job
- Improve my work skills
- Design nice-looking docs
- Getting Started
- Smartphones & Tablets
- Typing Tutorial
- Online Learning
- Basic Internet Skills
- Online Safety
- Social Media
- Zoom Basics
- Google Docs
- Google Sheets
- Career Planning
- Resume Writing
- Cover Letters
- Job Search and Networking
- Business Communication
- Entrepreneurship 101
- Careers without College
- Job Hunt for Today
- 3D Printing
- Freelancing 101
- Personal Finance
- Sharing Economy
- Decision-Making
- Graphic Design
- Photography
- Image Editing
- Learning WordPress
- Language Learning
- Critical Thinking
- For Educators
- Translations
- Staff Picks
- English expand_more expand_less
Word - Getting Started with Word
Word -, getting started with word, word getting started with word.

Word: Getting Started with Word
Lesson 1: getting started with word, introduction.
Microsoft Word is a word processing application that allows you to create a variety of documents , including letters, resumes, and more. In this lesson, you'll learn how to navigate the Word interface and become familiar with some of its most important features, such as the Ribbon , Quick Access Toolbar , and Backstage view .
Watch the video below to become more familiar with Word.
About this tutorial
The procedures in this tutorial will work for all recent versions of Microsoft Word , including Word 2019 , Word 2016 , and Office 365 . There may be some slight differences, but for the most part these versions are similar. However, if you're using an earlier version , you may want to refer to one of our other Word tutorials instead.
The Word interface
When you open Word for the first time, the Start Screen will appear. From here, you'll be able to create a new document , choose a template , and access your recently edited documents . From the Start Screen , locate and select Blank document to access the Word interface.

Click the buttons in the interactive below to learn more about the Word interface.

Microsoft Account
From here, you can access your Microsoft account information, view your profile, and switch accounts.
The Tell me bar allows you to search for commands, which is especially helpful if you don't remember where to find a specific command.
Command Group
Each group contains a series of different commands . Simply click any command to apply it. Some groups also have an arrow in the bottom-right corner, which you can click to see even more commands.
Quick Access Toolbar
The Quick Access Toolbar lets you access common commands no matter which tab is selected. By default, it includes the Save , Undo , and Redo commands.
The Ruler is located at the top and to the left of your document. It makes it easier to make alignment and spacing adjustments .
Click and drag the vertical scroll bar to move up and down through the pages of your document.
Zoom Control
Click and drag the slider to use the zoom control. The number to the right of the slider bar reflects the zoom percentage .
Document Views
There are three ways to view a document: Read Mode displays your document in full-screen mode. Print Layout is selected by default. It shows the document as it would appear on the printed page. Web Layout shows how your document would look as a webpage.
The Ribbon contains all of the commands you will need to perform common tasks in Word. It has multiple tabs , each with several groups of commands.
Document Pane
This is where you'll type and edit text in the document.
Page and Word Count
From here, you can quickly see the number of words and pages in your document.
Working with the Word environment
All recent versions of Word include the Ribbon and the Quick Access Toolbar , where you'll find commands to perform common tasks in Word, as well as Backstage view .
Word uses a tabbed Ribbon system instead of traditional menus. The Ribbon contains multiple tabs , which you can find near the top of the Word window.

Each tab contains several groups of related commands . For example, the Font group on the Home tab contains commands for formatting text in your document.

Some groups also have a small arrow in the bottom-right corner that you can click for even more options.
Showing and hiding the Ribbon
If you find that the Ribbon takes up too much screen space, you can hide it. To do this, click the Ribbon Display Options arrow in the upper-right corner of the Ribbon, then select the desired option from the drop-down menu:

- Auto-hide Ribbon : Auto-hide displays your document in full-screen mode and completely hides the Ribbon from view. To show the Ribbon, click the Expand Ribbon command at the top of screen.
- Show Tabs : This option hides all command groups when they're not in use, but tabs will remain visible. To show the Ribbon, simply click a tab.
- Show Tabs and Commands : This option maximizes the Ribbon. All of the tabs and commands will be visible. This option is selected by default when you open Word for the first time.
To learn how to add custom tabs and commands to the Ribbon, review our Extra on Customizing the Ribbon .
Using the Tell me feature
If you're having trouble finding a command you want, the Tell Me feature can help. It works just like a regular search bar. Type what you're looking for, and a list of options will appear. You can then use the command directly from the menu without having to find it on the Ribbon.

The Quick Access Toolbar
Located just above the Ribbon, the Quick Access Toolbar lets you access common commands no matter which tab is selected. By default, it shows the Save , Undo , and Redo commands, but you can add other commands depending on your needs.
To add commands to the Quick Access Toolbar:

The R uler is located at the top and to the left of your document. It makes it easier to adjust your document with precision. If you want, you can hide the Ruler to create more screen space.
To show or hide the Ruler:

Backstage view
Backstage view gives you various options for saving, opening a file, printing, and sharing your document. To access Backstage view, click the File tab on the Ribbon .

Click the buttons in the interactive below to learn more about using Backstage view.

From here, you can open documents saved to your computer or to your OneDrive.
Save and Save As
You'll use Save and Save As to save documents to your computer or to OneDrive.
From the Print pane, you can change the print settings and print your document. You can also see a preview of your document.
From here, you can export your document in another file format, such as PDF/XPS .
Click here to close the current document.
From here, you can invite people to view and collaborate on your document.
Return to Word
You can use the arrow to close Backstage view and return to Word.
From the Account pane, you can access your Microsoft account information, modify your theme and background, and sign out of your account.
Here, you can change various Word options . For example, you can control the spelling and grammar check settings, AutoRecover settings, and language preferences.
The information pane will appear whenever you access Backstage view. It contains information on the current document. You can also inspect the document to remove personal info and protect it to keep others from making further changes.
From here, you can create a new blank document , or you can choose from a large selection of templates .
Document views and zooming
Word has a variety of viewing options that change how your document is displayed. You can choose to view your document in Read Mode , Print Layout , or Web Layout . These views can be useful for various tasks, especially if you're planning to print the document. You can also zoom in and out to make your document easier to read.
Switching document views
Switching between different document views is easy. Just locate and select the desired document view command in the bottom-right corner of the Word window.

Zooming in and out
To zoom in or out, click and drag the zoom control slider in the bottom-right corner of the Word window. You can also select the + or - commands to zoom in or out by smaller increments. The number next to the slider displays the current zoom percentage , also called the zoom level .

- Open Word , and create a blank document .
- Change the Ribbon Display Options to Show Tabs .
- Using Customize Quick Access Toolbar , add New , Quick Print , and Spelling & Grammar.
- In the Tell me bar , type Shape and press Enter .
- Choose a shape from the menu, and double-click somewhere on your document.
- Show the Ruler if it is not already visible.
- Zoom the document to 120%.
- Change the Document view to Web Layout .

Change the Ribbon Display Options back to Show Tabs and Commands , and change the Document View back to Print Layout .
/en/word/understanding-onedrive/content/
Search for: Search Button
How to Assign Tasks in Microsoft Word
People working on a shared Word document can now assign tasks ‘To Do’ within the document, then mark a task as resolved or even reassign it. Here’s how Assign Tasks works and who gets it.
Assigning Tasks is an extension of the existing Comments feature for shared documents. When you use an @mention for someone else in your team or group, a new ‘Assign to:’ option appears like this.
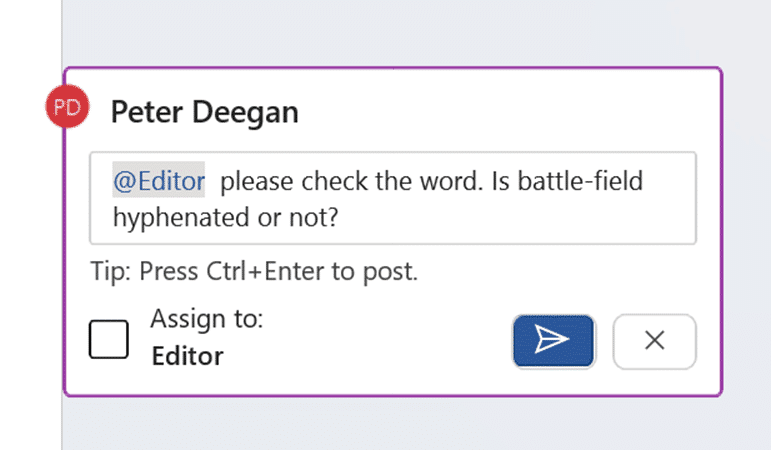
Check that box and the comment becomes a task as well, listed above the comment.
The person assigned the task gets an automatic email to notify:

Assign a task to yourself by @mentioning your own name then assigning the task.
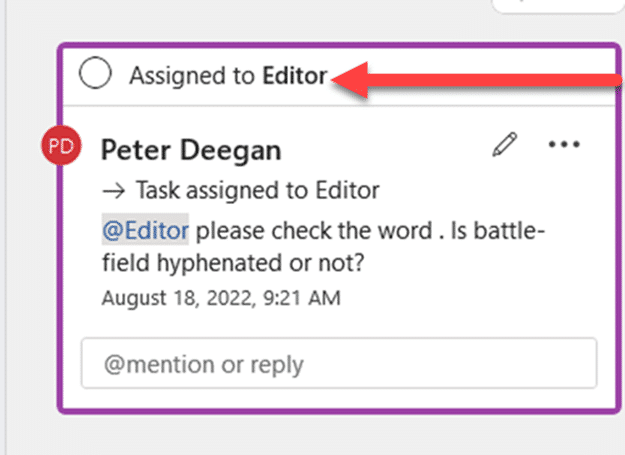
Task is separate from the comment thread
Keep in mind that the task is separate from the comment thread, even though it doesn’t seem that way.
A Task can be marked as ‘Resolved’ while the comment messages continues.
Resolve or Complete a Task
Each Task can be marked as ‘resolved’ separately from the thread itself by clicking on the circle “Assigned to”.
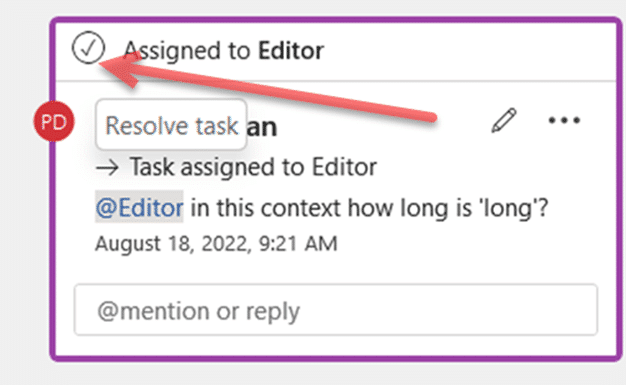
The task then shows as completed with a comment added showing who tagged ‘completed’.
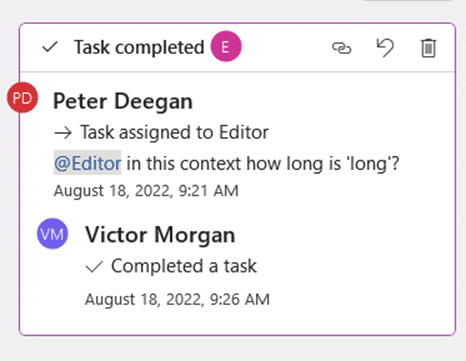
Reopen or resume a Task
If the task still needs work, click the Undo button to Reopen the task.
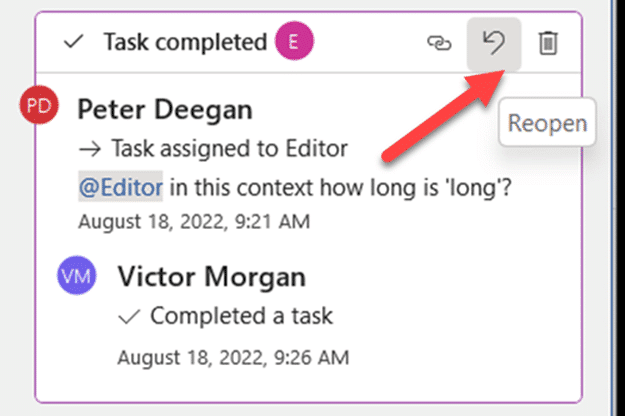
Or click the Trash Can icon to delete the task entirely.
Reassign a Task
A task can be reassigned to someone else. Add another comment with a new @mention, that will create an optional ‘Reassign to’ prompt.

More to come?
Tasks in Word docs seems like just the start of another extension of Microsoft 365 integrations.
There are already plans for Assign Tasks in upcoming Excel. PowerPoint can’t be far behind.
We were surprised that assigned tasks aren’t added to the person’s Microsoft To Do app. Or even just a link in the email to add the task to To Do. Surely that’s on Microsoft’s own development To Do list?
A summary list of assigned tasks should appear in the document. Perhaps a list of comments that can be filtered to show tasks, completed or not.
With better ‘in document’ task displays, there should be room for solo users to make their own ‘To Do’ list within a document. A great way to manage content in a long or complex doc.
Who gets it?
The Word document has to be saved on OneDrive or Sharepoint, according to Microsoft. We could only get Assign Tasks working on SharePoint, at the time of testing.
Assign Tasks is currently in Word on the web plus two beta releases
- Word 365 for Windows v2206 build 15321.10000 and later
- Word 365 for Mac, v16.66 build 22090700 and later
As usual, it’ll spread to preview and public releases in coming months.
The same feature is also in development for Excel 365 on the web plus for Windows and Mac.
One person Comments in Word Dictate your comments into a Word document Like👍button now in Word Comments
About this author

Office-Watch.com
Office 2021 - all you need to know . Facts & prices for the new Microsoft Office. Do you need it? Office LTSC is the enterprise licence version of Office 2021.
Office 2024 what's known so far plus educated guesses. Microsoft Office upcoming support end date checklist.
Latest from Office Watch
- Share a link to a specific PowerPoint slide
- Translate automatic or manual in Outlook
- Microsoft Mesh makes “magical” online meetings
- Why are Teams and Office divorcing?
- Pivotby – Excel’s new faster PivotTables
- More Excel on the web improvements
- All about editing an incoming Outlook message
- What “Update License” means on Microsoft 365 menus
- Excel’s warning about dates and centuries
- Write Excel formulas fast with free Copilot
- Easter images and icons in Microsoft Office
- Credit Card 💳 symbol in Word, Excel, PowerPoint and Outlook
- Yes, there will be a new version of Microsoft Office
- All about Office 2024 for Windows and Mac (so far)
- In person vs virtual event option coming to Outlook
- Checklists now in Microsoft Word
- Start Grouping in Excel for better looking sheets
- Three more Word features reach the web version
- Web link previews in Word for web
- Turn Excel into an AI / LLM wonder
We use cookies to ensure we give you the best experience of our website. By browsing this site you accept we use cookies to improve and personalise our services and marketing. Read our privacy statement for more about what we do with your data, as well as your rights and choices.
- Studying by distance learning
- Get prepared for study
- How much time will you need?
- International and studying from overseas
- About our qualifications
- How to decide what to study
- Full-time or part-time study?
- How we'll support your studies
- Online tools and resources
- Te tautoko i te angitū o ngā ākonga Māori - Supporting Māori learner success
- Pasifika learner support
- Disability and Access Services
- Access to local campus services
- Fees free study
- What fees you need to pay
- Paying your fees
- Student loans
- Scholarships, awards and financial assistance
- Learner stories
- Choose courses
- How to apply to enrol
- Enrolment dates
- Recognising previous study and experience
- English language entry requirements
- Providing proof of your identity
- Terms and conditions of enrolment
- Fees and funding
- Changes to your enrolment
- Changes to benefit Open Polytechnic learners
- Student Advisory Group
- Disclaimer and copyright statement
- Notice of meetings
- Jobs at Open Polytechnic
- Who are our learners?
- Our Māori learners
- Our Pasifika learners
- Media Contact
- Publications
- First Impressions Survey
- Academic research
- Supporting new blended delivery models
- Access to Open Polytechnic digital courseware
- iQualify for business divisions
- Hei whaiwhakaaro i mua i tō ako - Some things to think about before you study
- Te whakatau he aha hei ako māu - Deciding what to study
- Whakawhiwhinga ākonga Māori - Scholarships and awards for ākonga Māori
- Message from Pule Ma’ata - Pasifika
- Meet our kaimahi Pasifika
- Pasifika success
- Scholarships for Pasifika
- Getting started with online learning
- Course and study support
- Supporting Māori learner success
- Dyslexia and the Dyslexia-Friendly Quality Mark
- Meet some of our learners
- Get help with academic writing and research skills
- Mental health support
- Using iQualify
- MyOP learner portal and app download
- Accessing your learner email and free Microsoft software
- Our library
- Assistive technology tools
- Helperbird free assistive technology tool
- How to re-enrol
- Withdrawals and course transfers
- Learner forms
- Get your student ID card
- How your work will be assessed
- How to submit your assessment for marking
- Submitting your work in te reo Māori
- How to request an assessment extension
- Special Consideration for in-course assessments
- Grading scales
- Academic Integrity
- Assessment writing
- Referencing
- Word limits and word count guidelines
- Using AI - Artificial Intelligence services
- Exam dates and venue information
- Exam admittance information and permitted materials
- Information for exam day
- Sitting exams from overseas
- Getting assistance with exams
- Reconsiderations, resits and the return of exam papers
- Aegrotat consideration
- Getting your final results
- Get started
- Make a plan
- Set study goals
- Reading skills
- Active learning
- Taking notes
- Mind mapping
- Researching
- Evaluating information
- Critical thinking for reading and research
- Step-by-step guide to tackling assessments
- Assessment types
- Plan your assessment
- Understand your assessment task
- Writing skills
Formatting and presenting assessments
- Assessments information
- Referencing and plagiarism
- How to reference
- Preparing for exams
- Types of exam questions
- Planning your time for an exam
- Information for sitting exams
- Research ethics for doing research projects
- Te whare tapa whā
- The Fonofale model of health
- Taha tinana – physical wellbeing
- Taha hinengaro – mental wellbeing
- Taha whānau – family, community and social wellbeing
- Taha wairua – spiritual wellbeing
- Free mental health support
- Rainbow learner support
- Applying to graduate
- Attending a graduation ceremony
- Academic transcripts
- Graduation Live Stream
- Tertiary and International Learners Code of Practice
- Complaints and concerns
- iQualify LMS
- Learning Engine LMS
- CPD and training services
- Digital design, video, animation and software development
- Instructional design
- Content licensing
- Digital design, video and animation
Formatting and presenting your assessments correctly is important because many include marks for presentation.
This may include marks for things such as:
- formatting and layout
- APA referencing
- writing style
- grammar and spelling.
Before you start on your assessment:
- check your assessment question, emails from your course leader, and learning materials for how it should be presented
- read the instructions carefully. Make sure you understand them and follow them exactly
- if you're not sure about what’s required contact your course leader.
General guidelines for electronic submissions
- Most assessments should be produced using Microsoft Word.
- You can also submit assessments using: .doc, .docx, .xls, .xlsx or .rtf.
- if you don’t have Microsoft Word go to My Open Polytechnic to download and access your free version
- if you're not sure about the file type required, contact your course leader.
- Use a clear, readable font, such as Verdana, Calibri, Tahoma or Arial and use the same font throughout.
- Use black text on a white background.
- Avoid coloured backgrounds or text in a colour other than black, unless you have special permission to use them.
- Use 11 or 12 point font for the body of your assessment.
- Use 1.5 spacing and 2.53 cm (1”) wide margins.
- Leave a blank line between paragraphs.
- If the questions are short, leave a blank line between each question. If they are long, start each question on a new page.
- Left-justify your work (also known as left-aligned).
- Use bold for headings.
- Essays don’t usually need subheadings; reports usually do.
Most assessments need a title page, which should include:
- the title and number of the assessment
- the course number and name
- the due date
- your full name and student number.
Centre this information on the page, starting approximately one-third of the way down the page.
- Number and clearly label figures and tables.
- Add numbers as follows: Figure 1, Figure 2, Table 1, Table 2, and so on.
- Put table and figure captions above the table.
- Don't number the items in a reference list.
For more help with figures and tables, check:
Get more help with tables and figures – APA Style website
Headers and footers
Insert a header or footer on each page (except the title page). It should contain:
- your name (last name, first name/s)
- your student number
- the course code
- the assessment number
- page numbers.
Reference list
The reference list comes at the end of the assessment and should start on a new page labelled 'References'.
Need more help with reference lists? Check out the guides below:
Quick referencing APA guidelines (PDF 47 KB; opens in a new window)
Guide to APA referencing (PDF 395.11 KB; opens in a new window)
Appendices are used for information that:
- is too long to include in the body of your assessment
- supplements or complements the information you are providing.
Start each appendix (if applicable) on a new page. If there's just one appendix label it ‘Appendix’ without a number. If there is more than one, label them Appendix A, Appendix B, and so on.
In the main text of your assessment, refer to the Appendix by the label – for example, Appendix A.
Tops and bottoms of pages
Check the top and bottom of your pages to ensure they avoid:
- widows – single lines of text at the top of a page
- orphans – first lines of paragraphs at the bottom of a page
- tombstones – headings or subheadings alone at the bottom of a page
- split lists – lists that are divided between two pages (if possible).
General guidelines for hard copies
Most of the guidelines above also apply to hard copies (printed or handwritten documents).
If your course requires or allows handwritten assessments, be sure to follow the course instructions on presenting handwritten assessments.
Word limits and word count guidelines
Word limits support the development of concise writing skills. Word count guidelines help you to understand the expectation of workload for an assessment.
For more detailed information about these go to:
Word limits and word count guidelines
Got a question?
If you want to talk with someone about formatting and presenting your assessments, contact The Library and Learning Centre | Te Whare Pukapuka Wāhanga Whakapakari Ako.
Contact the Library and Learning Centre
Subject Explorer
School Subjects
Math & Science
Business & Technology
Electives & Health
Board & Administration
Teaching & Learning
Audio/Video Lectures
Books & Documents
Classifieds
Jobs & Resources
Discussions
Language & Literature
Practice Projects for Microsoft Word

Word 9 Table
In this practice project for Word, students create a document with a title and table. The table has two columns that have different font alignment and incluces various fonts. …

Word 8 Formatting Text
In this practice project for Word, students create a document using a different size and color font for the title than the rest of the paragraph. …

Word 7 Bullets
In this practice project for Word, students create a document with two different types of bullets showing points and subpoints. …

Word 6 Letter
In this practice project for Word, students create a letter. Included in the letter is a heading on the right, indented paragraphs, and the closing and signiture near the middle of the document. …

Word 5 Text And Outline
In this practice project for Word, students create a document that contains several paragraphs of text and also includes an outline with key points and subpoints. …

Word 4 Modified Text
In this practice project for Word, students create a document with the heading on the right, a boldfaced, centered title, and indented paragraphs. The document is double-spaced. …
Word 3 Basic Text
In this practice project for Word, students create a document with the heading on the right, a boldfaced title that is centered, and several paragraphs that are indented. …

Word 22 Preset Headings
In this practice project for Word, students create a document using the preset headings to create a title bar. The document has different alignment and font, blanks, and a short outline. …

Word 21 Formatting Options
In this practice project for Word, students create a document that shows some different effects that can be used with the same font. …

Word 20 Numbered List
In this practice project for Word, students create a document that includes a centered title followed by a numbered list. …

Word 2 Heading 2
In this practice project for Word, students create a document that has a centered title, a heading in the upper right corner, and indented paragraphs. …

Word 19 Advanced Table
In this practice project for Word, students create a document with a table showing a school schedule. The blocks in the table are different sizes and will take individual work within the blocks to …

Word 18 Columns
In this practice project for Word, students create a document with a header and two colomns. The columns include boldfaced and italic font and different alignment. …

Word 17 Columns
In this practice project for Word, students create a document with two identical columns in landscape orientation. Included in each are indented lines and different alignment and font. …

Word 16 Lesson Notes Handout
In this practice project for Word, students create a document like a student handout. This includes an outline with several levels, blanks for students to write on, and different font. …

Word 15 Lesson Notes
In this practice project for Word, students create a document with a header and two outlines. Students are asked to use the automatic numbering and outlining features in Word. They must use different …

Word 14 Table
In this practice project for Word, students create a scoresheet using a table. Students must use different sizes, colors and styles of font, including different alignment. …

Word 13 Outline
In this practice project for Word, students create an outline using the automatic outline in Word, including many levels of subpoints. …

Word 12 Formatting
In this practice project for Word, students create a document with a centered title in all capitals, the first letter of each word slightly larger than the rest. Throughout the document the font is …

Word 11 Formatting
In this practice project for Word, students create a document similar to a test or quiz. They must include points and subpoints, blanks, boldfaced text, tabs, and spacing. …
Resource Type:
Pass it on:
Leave a Reply
Templates for college and university assignments
Include customizable templates in your college toolbox. stay focused on your studies and leave the assignment structuring to tried and true layout templates for all kinds of papers, reports, and more..

Keep your college toolbox stocked with easy-to-use templates
Work smarter with higher-ed helpers from our college tools collection. Presentations are on point from start to finish when you start your project using a designer-created template; you'll be sure to catch and keep your professor's attention. Staying on track semester after semester takes work, but that work gets a little easier when you take control of your scheduling, list making, and planning by using trackers and planners that bring you joy. Learning good habits in college will serve you well into your professional life after graduation, so don't reinvent the wheel—use what is known to work!

Sep 21, 2022
Facilitate collaboration by assigning tasks in Word
Rubba Ashwas
- Add our blog to your RSS feed reader" href="/rss/blog.xml" data-bi-name="RSS Subscription" data-bi-id="rss_feed" data-bi-bhvr="120" data-bi-socchn="RSSSubscription" title="Microsoft 365 Insider Blog RSS" target="blank" class="d-inline-block">
Hi, Office Insiders! My name is Rubba Ashwas and I’m a Product Manager on the Word team. I’m excited to share that you can now assign tasks with @mentions in documents in Word for Windows and Word for Mac!
Assign tasks
This feature allows you and your team to conveniently create and assign tasks directly from within your Word document using @mentions in comments. The people you assign the tasks to will receive email notifications, letting them know they need to take action.
Many of you have enjoyed using the feature in Word for the web. We’re thrilled to now be bringing it to Word for Windows and Word for Mac.
How it works
- Open an existing document saved to OneDrive or SharePoint.
- Highlight the text that contains the information you want to comment on and select the New Comment button,

- Write your comment and type @ followed by the name of the team member you want to tag.
- Select the Assign to check box to convert your comment into a task.
- Click the blue arrow or press Ctrl + Enter to post your comment.
Scenarios to try
- Reassign a task: Type @ followed by the name of the team member you want to reassign the task to in the response field, select the Reassign to check box, and then click the blue arrow or press Ctrl + Enter . The person to whom you reassigned the task will be notified via email that they’ve been assigned the task.

- Resolve a task: Hover over the circle at the top of the comment and click the Resolve task button.

- Reopen a resolved task: In the right-hand margin or in Comments pane, click the comment that was closed, and then click the Reopen button.

Availability
This feature is available in Word for the Web, and to Insiders running the following Beta Channel builds:
- Windows: Version 2206 (Build 15321.10000) or later
- Mac: Version 16.66 (Build 22090700) or later
Don’t have it yet? It’s probably us, not you.
Features are released over some time to ensure things are working smoothly. We highlight features that you may not have because they’re slowly releasing to larger numbers of Insiders. Sometimes we remove elements to further improve them based on your feedback. Though this is rare, we also reserve the option to pull a feature entirely out of the product, even if you, as an Insider, have had the opportunity to try it.
We are actively working on this feature, and your feedback is key to guiding future improvements. You can submit comments by clicking Help > Feedback. Please tag your feedback with #AssignTasks so that we can easily find input about the feature.
Learn what other information you should include in your feedback to ensure its actionable and reaches the right people. We are excited to hear from you!
Sorry, JavaScript must be enabled to use this app.
Module 5: Microsoft Word, part 3
Assignment: create document with tables and images.
For this assignment, you will format a document with a table and an image. Follow the directions, then submit your assignment. If you get stuck on a step, review this module or previous modules and ask your classmates for help in the discussion forum.
- Download the report document and open it in Microsoft Word.
- Save the document as BA132_LastName_Report.docx , replacing “LastName” with your own last name. (Example: BA132_Hywater_Newsletter). It is a good idea to save your work periodically.

- Insert the graph image into your document after “creating greater contact efficiency for consumers.”

- Save your document again and submit your work to Canvas.
- shopping-business-retail [used in report document]. Authored by : Alexas_Fotos. Located at : https://pixabay.com/en/shopping-business-retail-1165437/ . License : CC0: No Rights Reserved
- Reading: Types of Retailers. Authored by : Lumen Learning. Located at : https://courses.lumenlearning.com/marketing-spring2016/chapter/reading-types-of-retailers/ . License : CC BY: Attribution
- Assignment: Report. Authored by : Lumen Learning. License : CC BY: Attribution
- The Retail Industry [used in report document]. Authored by : Lumen Learning. Located at : https://courses.lumenlearning.com/marketing-spring2016/chapter/reading-define-retailing/ . License : CC BY: Attribution
- Outcome: Retailers As Channels of Distribution. Authored by : Lumen Learning. Located at : https://courses.lumenlearning.com/marketing-spring2016/chapter/outcome-retailers-as-channels-of-distribution/ . License : CC BY: Attribution


How do I create a booklet using Microsoft Word?
When you have to create a booklet for a course assignment, it is a good idea to use the templates that come with Word. The Booklet templates are easy to locate in Word by following the directions below.
You should also be creative and visual so that your booklet grabs the attention of the reader. You can do this by inserting images. If you have sources to cite, the references in a booklet could look different than what you see in a research paper but will still include reference citations and in-text citations in APA format. Insert the reference citations on the last page under "References" and include the in-text citations near the image or text being cited. Refer to the APA guide when you have questions about formatting.
Follow these steps to create a booklet using a template:
Go to File > New .
Type booklet in the search box and select the search icon.
When you find the template you want to use, select it and choose Create . Select the booklet template and not the poetry template for the best results.
Click File > Save a copy to save your booklet.
To print your booklet, go to File > Print . Booklet templates are designed to make sure the page sequence and orientation will be correct if you print them on both sides of the paper, flipped along the short edge.
If you have a double-sided printer, just print the document. If you have a single-sided printer:
- Go to File > Print .
- Change the setting to Manual Print on Both Sides .
- Print one side.
When prompted, remove the printed pages and put them back into the input tray.
For more information about creating booklets in Microsoft Word, visit the following page on the Microsoft Support site:
Create a booklet using a Word template
- Justice Studies and Paralegal Studies
- Last Updated May 24, 2021
- Answered By Kerry Louvier
FAQ Actions
- Share on Facebook
Comments (0)
Hello! We're here to help! Please log in to ask your question.
Need an answer now? Search our FAQs !
How can I find my course textbook?
You can expect a prompt response, Monday through Friday, 8:00 AM-4:00 PM Central Time (by the next business day on weekends and holidays).
Questions may be answered by a Librarian, Learning Services Coordinator, Instructor, or Tutor.

Manage assignments on a mobile device
Microsoft Teams for Education allows educators and students to post messages, check notifications, open files, and manage assignments from their iOS or Android mobile devices. On mobile devices, educators can create and review assignments, while students can view and turn in assigned work.
Navigate to assignments
View assignments by tapping Assignments from the app bar. When a new assignment is created, a post appears in the General channel and students are notified in their Activity section. They can follow these notifications to navigate to the assignment.
If you don't see Assignments in your app bar, select More … > Reorder to add it to your app bar.
Tap the search icon on your mobile app to search for assignments by keywords.

Sort your assignments
By default, the Assignments tab is organized by:
Upcoming , or ungraded, work.
Ready to grade , or turned in work.
Past Due , or work where the due date has passed.
Returned , or work that has been graded.
Drafts , or unassigned work.
Tap Teams in the app bar and tap a class.
Tap General > Assignments .
Tap between assignments that are Upcoming, Ready to grade, Past Due, Returned, and Drafts .
To sort a class's assignments by categories you've created :
Tap Assignments in the app bar and tap a class.

View Class Materials
View rubrics, resources, and other read-only documents you've added in Class Materials .
To access your Class Materials folder:
Tap Teams in the app bar.
Tap a class.
Tap General > Files > Class Materials .

Create an assignment
To create a new assignment:
Tap Assignments in the app bar.
Tap the + icon and tap +New assignment.
Tap a class , then tap Next .
Enter assignment details. A title is required. All other fields are optional .
By default, assignments are automatically assigned to All students . To assign to specific students or groups:
Tap the student dropdown under Assign to .
Select Individual students or Groups of students .
Tap Attach to include reference materials with the assignment.
Tap Assign to post the assignment. Your students will be notified that an assignment has been added.
To reuse an existing assignment,
Tap Add + .
Follow the prompts to choose and edit the assignment you'd like to reuse.
Tap Assign .

Edit an assignment
To make changes to an existing assignment:
Tap Assignments in the app bar and open the assignment you'd like to edit.

Tap Edit assignment.
Enter updates, then tap Update to save your changes when you're finished.
To delete the assignment, tap the trash icon > Yes .
Tip: To view the assignment from a student's perspective, tap Student view .
Grade and return assignments
To view assignments your students have turned in:
Tap Assignments in the app bar and select an assignment.
Select Ready to grade to review ungraded assignments and see which students have submitted their work.
Choose To return in order to review which students haven't had their assignments graded.
Tap Returned to review student submissions that have already been graded.
To grade and give feedback on submitted assignments:
Tap To return and select a student.
Enter feedback or points for that assignment.
Tap Return to send points and feedback back to your student.
Grading Categories
To set up weighted types of assignments to reflect importance.
1. Tap Grades.
3. Select Assignment settings .
4. Scroll to Grade settings and toggle Weighted grading categories to On .
5. Name your grading category and enter the percentage you'd like to assign as that category's weight.
6. Repeat for each desired grading category.
7. When you've finished adding your categories, tap Save .
Note: Percentages must add up to 100% to move on.
8. In grade settings, your grading categories and percentages are now visible. To edit, select Manage grading categories .
Now you can select a grading category each time you create an assignment.
Important: In classes using grading categories, any assignment with points must have a grading category.
Letter-based grading
Letter grading must be set up as a Grading Scheme in the Grade settings section to display these options.
4. Scroll to Grade settings and choose Add schemes or Manage schemes .
Note: If no other grading schemes or categories have been set, this link will read Add schemes . Once you have gone through the steps to add a new scheme, the link will change to Manage schemes .
5. Choose Add scheme.
6. Set the grading levels. Letter grades will be the normal A, B, C, D, F, scheme. Ensure that there are enough levels to cover the entire 0-100 percent range.
7. Select the Save button when complete.
Finish by choosing the Done button.
Create a new module
1. Navigate to the desired Class Team, then select Classwork .
2. Tap Add module .
3. Enter a title for this module.
4. Optionally enter a description.
5. Select Save to save the module as a draft.
Note: Draft modules are only visible to Team owners (teachers) until published. All new modules are created in draft state.
Publish a module
Publishing a module will make it (and all resources within) visible to all students in the Class Team.
1. Navigate to the desired Class Team, then select Classwork.
2. Find the desired module, then tap Publish .
Edit a module
Module titles and descriptions can be edited at any time.
1. Navigate to the desired Class Team, tap Classwork.
2. Find the desired module, then tap More > Edit module .
Delete a module
1. Navigate to the desired Class Team, then select Classwork .
2. Find the desired module, then tap More > Delete .

Turn in assignments
To turn in an assignment:
Open the assignment you'd like to turn in.
If your teacher specified a document for you to turn in, or you have other files to attach to this assignment, tap Attach and upload your file.
Tap Turn in . Your turn-in will be recorded with a time and date stamp.
To add new work to an assignment you've already turned in before the due date:
Open the assignment and select Undo turn in .
Attach new work and files.
To turn in after making revisions, select Turn in again .

Don't have the Microsoft Teams mobile app yet? You can get it here
Additional resources for educators
Ask the community

Need more help?
Want more options.
Explore subscription benefits, browse training courses, learn how to secure your device, and more.

Microsoft 365 subscription benefits

Microsoft 365 training

Microsoft security

Accessibility center
Communities help you ask and answer questions, give feedback, and hear from experts with rich knowledge.

Ask the Microsoft Community

Microsoft Tech Community

Windows Insiders
Microsoft 365 Insiders
Was this information helpful?
Thank you for your feedback.
Contribute to the Microsoft 365 and Office forum! Click here to learn more 💡
April 9, 2024
Contribute to the Microsoft 365 and Office forum!
Click here to learn more 💡
Word Top Forum Contributors: Stefan Blom - Charles Kenyon - Suzanne S. Barnhill - Doug Robbins - MVP Office Apps & Services (Word) - Jim_ Gordon 👍✅
April 17, 2024
Word Top Forum Contributors:
Stefan Blom - Charles Kenyon - Suzanne S. Barnhill - Doug Robbins - MVP Office Apps & Services (Word) - Jim_ Gordon 👍✅
- Search the community and support articles
- Microsoft 365 and Office
- Search Community member
Ask a new question
I need help please I want to type assignments with word now is not show in my phone
Eng1501 Assignment 1
1.Poetry is piece of writing which words are arranged in separate lines. It where by poet passing his/her feelings and thinking about something that we can see or not see.
Yes I like poem.THE SLAVE DEALER.by Thomas' Pringle.
- Subscribe to RSS feed
Report abuse
Replies (1) .
- Microsoft Agent |
Hello,MBELE M S
Welcome to the Microsoft community!
I have realized your issue about Word for Android.
I would like to confrim that whether you can't type words in Word?Or did you type it in but it doesn't show up?
At the moment, due to the limited information you provided, I can't tell what the exact problem is, if you can, could you please describe it in more detail or upload a screenshot of the error report?
Have you tried uninstalling and reinstalling Word?Is it currently possible to log in to Word properly with a Microsoft account?
Feel free to post back if you need further assistance.
Thank you for your understanding and patience and I look forward to hearing from you.
Ryan - MSFT | Microsoft Community Support Specialist
Was this reply helpful? Yes No
Sorry this didn't help.
Great! Thanks for your feedback.
How satisfied are you with this reply?
Thanks for your feedback, it helps us improve the site.
Thanks for your feedback.
Question Info
- Norsk Bokmål
- Ελληνικά
- Русский
- עברית
- العربية
- ไทย
- 한국어
- 中文(简体)
- 中文(繁體)
- 日本語
IMAGES
VIDEO
COMMENTS
Are you a student or a teacher struggling with creating assignments in MS Word? Look no further! In this video, we'll provide you with a comprehensive guide ...
How to make an assignment on MS Word on PC or Laptop easily.To make an assignment attractive, good & acceptable you must have to follow these simple steps.1....
13. Word count. Show the word count properly for the body of your assignment, because it's' important. Place your cursor on the Introduction title, hold the Shift key down, and got to the end of the Conclusion. And then Tools>Word Count and record the number of words. 14. Spelling and Grammar Check.
السلام عليكمIn this video I've completely tried to show that how can we use MS Word and how to make assignments in MS Word in very easy way. If you are a beg...
From keyboard shortcuts to simple, built-in features such as Find and Replace and the automatic table of contents, here are several tips you can use to edit and format your college assignment more efficiently in Microsoft Word. 1. Leave Paragraph Spacing as Your Last Step. Let's first start on the right track.
The Word interface. When you open Word for the first time, the Start Screen will appear. From here, you'll be able to create a new document, choose a template, and access your recently edited documents. From the Start Screen, locate and select Blank document to access the Word interface. Click the buttons in the interactive below to learn more ...
When you're working on a document with other people or editing a document yourself, turn on Track Changes to see every change. Word marks all additions, deletions, moves, and formatting changes. Open the document to be reviewed. Click Review and then on the Track Changes button, select Track Changes. Read Track changes to learn more.
To select a word, double-click it. Word will select to the left and right of the cursor, until it encounters a space character. Triple-click A triple-click selects the current paragraph. Margin+click To select an entire line, move the cursor into the left margin. When you see the insertion pointer turn into an arrow pointer, click.
View and navigate your assignments (educator) Manage assignments on a mobile device. Grade, return, and reassign assignments. Delete an assignment in Microsoft Teams. Learn how to create, edit, and turn in assignments using the Assignments app in Microsoft Teams for Education. Tips for due dates, grading rubrics, and adding files, too.
Who this book is for. Microsoft Word Step by Step (Microsoft 365 and Office 2021) is designed for use as a learning and reference resource by people who want to use Word to create and edit documents, and who want to make use of the many features that help users achieve an attractive and professional result.
When you use an @mention for someone else in your team or group, a new 'Assign to:' option appears like this. Check that box and the comment becomes a task as well, listed above the comment. The person assigned the task gets an automatic email to notify: Assign a task to yourself by @mentioning your own name then assigning the task.
Use a clear, readable font, such as Verdana, Calibri, Tahoma or Arial and use the same font throughout. Use black text on a white background. Avoid coloured backgrounds or text in a colour other than black, unless you have special permission to use them. Use 11 or 12 point font for the body of your assessment.
In this video we will learn about how we can use ms word for university assignments and how to make assignments in ms word in perfect and easy way to get exc...
Word 12 Formatting. ★★★☆☆. Kendall Myers November 15, 2017. In this practice project for Word, students create a document with a centered title in all capitals, the first letter of each word slightly larger than the rest. Throughout the document the font is ….
Templates for college and university assignments. Include customizable templates in your college toolbox. Stay focused on your studies and leave the assignment structuring to tried and true layout templates for all kinds of papers, reports, and more. Category. Color. Create from scratch. Show all.
How it works. Open an existing document saved to OneDrive or SharePoint. Write your comment and type @ followed by the name of the team member you want to tag. Select the Assign to check box to convert your comment into a task. Click the blue arrow or press Ctrl + Enter to post your comment.
You'll see that students appear in a column, with their assignments in a row next to their name. Assignments are listed in order by due date with the nearest date at the beginning. Learn more about the Grades tab. Learn more. Create a group assignment. Edit an assignment. Save an assignment as a draft. Grade, return, and reassign assignments
For this assignment, you will format a document with a table and an image. Follow the directions, then submit your assignment. If you get stuck on a step, review this module or previous modules and ask your classmates for help in the discussion forum. Download the report document and open it in Microsoft Word.
Learn how to set up your assignment formatting in Microsoft Word. Includes: margins, font style and size, line spacing, line indents, header, headings and r...
Go to File > New. Type booklet in the search box and select the search icon. When you find the template you want to use, select it and choose Create. Select the booklet template and not the poetry template for the best results. Click File > Save a copy to save your booklet. To print your booklet, go to File > Print.
Download Free Cover Page Templates. Explore our collection of 23 beautifully designed cover page templates in Microsoft Word format. These templates feature captivating colors and layouts that are sure to make a lasting impression. Simply click on the preview image of each template and download it for free.
Hope this helps, Doug Robbins - MVP Office Apps & Services (Word) [email protected] It's time to replace 'Diversity, Equity & Inclusion' with 'Excellence, Opportunity & Civility' - V Ramaswamy
Instructor: Ms. Fouzia Altaf (MPhil. Bioinformatics)Instagram: https://www.instagram.com/energysaverbyfouziaaltafFacebook: https://www.facebook.com/energysav...
Create an assignment. To create a new assignment: Tap Assignments in the app bar. Tap the + icon and tap +New assignment. Tap a class, then tap Next. Enter assignment details. A title is required. All other fields are optional. By default, assignments are automatically assigned to All students.
Eng1501 Assignment 1. Section A. 1.Poetry is piece of writing which words are arranged in separate lines. It where by poet passing his/her feelings and thinking about something that we can see or not see. Yes I like poem.THE SLAVE DEALER.by Thomas' Pringle.