
Seamlessly Embed Videos into PowerPoint: A Step-by-Step Guide for Impressive Presentations

PowerPoint presentations are a staple in the world of business, education, and public speaking. They allow you to visually communicate your ideas and keep your audience engaged. However, sometimes static images and text aren’t enough to convey your message effectively. This is where embedding videos into your PowerPoint presentation comes in handy. Videos can bring your slides to life, making your presentation more dynamic and memorable. But how do you go about embedding a video in PowerPoint? Don't worry! This guide will walk you through the process step by step.
Why Embed a Video in PowerPoint?
Embedding a video directly into your PowerPoint presentation has several advantages:
1. Enhanced Engagement: Videos can break up the monotony of text-heavy slides, keeping your audience engaged.
2. Clearer Communication: Complex ideas can often be explained more effectively through video.
3. Professional Appearance: A well-integrated video can make your presentation look more polished and professional.
What You’ll Need
Before diving into the steps, let’s make sure you have everything you need:
- Microsoft PowerPoint: Ensure you have the latest version of PowerPoint installed. The steps in this guide are based on Microsoft PowerPoint 2019 and Microsoft 365.
- Video File: You’ll need the video file you want to embed. Common formats include MP4, AVI, and WMV.
- Compatible Hardware: A computer with enough processing power to handle video playback smoothly during your presentation.
Step-by-Step Guide to Embedding a Video in PowerPoint
1. open your powerpoint presentation.
Start by opening the PowerPoint presentation where you want to embed the video. If you’re starting from scratch, open PowerPoint and create a new presentation.
2. Navigate to the Slide Where You Want the Video
Click on the slide where you want to add the video. It’s a good idea to have a clear idea of where the video fits into your presentation’s narrative. This will help you avoid disrupting the flow of your presentation.
3. Insert the Video
Here’s where the magic happens. To insert the video:
- Go to the "Insert" tab: This is located on the Ribbon at the top of your screen.
- Click on "Video": In the "Media" group, you’ll see an option labeled "Video." Click on it.
- Choose the video source: You’ll be presented with two main options:
- "This Device": Use this option to insert a video file saved on your computer.
- "Online Video": Use this if you want to embed a video from an online source like YouTube. You’ll need to copy and paste the video URL here.
For embedding a video from your computer, select "This Device."
- Locate your video file: A file explorer window will pop up. Navigate to where your video file is stored, select it, and click "Insert."
4. Resize and Position the Video
Once your video is embedded, you can move it around and resize it just like any other object in PowerPoint:
- Resize: Click and drag the corners of the video frame to make it larger or smaller. Be mindful of the aspect ratio to avoid distortion.
- Position: Click and drag the video to the desired location on the slide.
5. Adjust Video Playback Settings
PowerPoint offers several playback options to ensure your video plays exactly when and how you want:
- Playback Tab: After selecting the video, go to the "Playback" tab on the Ribbon. Here, you can adjust settings like:
- Start: Choose whether the video starts automatically when the slide opens or if it requires a click to play.
- Play Full Screen: Check this box if you want the video to take up the entire screen when played.
- Loop until Stopped: If you want the video to repeat, enable this option.
- Trim Video: You can trim the beginning or end of your video to remove unwanted parts.
6. Test Your Video
Before finalizing your presentation, it’s crucial to test the video to ensure it plays correctly. Go into "Slide Show" mode and navigate to the slide with the video. Make sure it starts and plays as expected without any hitches.
Common Issues and Troubleshooting
- Video Not Playing: If your video doesn’t play, it might be due to an incompatible file format. Consider converting your video to MP4, which is widely supported.
- Performance Issues: Large video files can cause performance issues. If your presentation lags, consider compressing the video file or using a lower resolution.
- Missing Video During Presentation: If you’ve moved the video file to another location after embedding it, PowerPoint might not be able to find it. To avoid this, always keep your video files in the same folder as your PowerPoint presentation or embed the video directly into the presentation file.
Final Thoughts
Embedding a video in PowerPoint is a straightforward process that can significantly enhance the impact of your presentations. Whether you’re explaining a complex concept, showcasing a product, or simply adding some visual variety, a well-placed video can make all the difference.
By following the steps outlined in this guide, you can seamlessly integrate videos into your PowerPoint presentations, impressing your audience and elevating your content to the next level.
Privacy Matters
Support.com is committed to your privacy We do not share or sell your data to third parties. We do use cookies and other third-party technologies to improve our site and services. The California Consumer Privacy Act (CCPA) gives you the ability to opt out of the use of cookies, third-party technologies and/or the future sale of your data. Do not sell my personal information .
Support.com is committed to your privacy Read our Privacy Policy for a clear explanation of how we collect, use, disclose and store your information
How to Send PowerPoint Presentations With an Embedded Video
Adding videos to your PowerPoint presentations can make them more engaging and memorable for your audience. However, there’s an important thing to keep in mind – if you share just the PowerPoint file itself, the embedded video may no longer play properly.
Step 1: Create a Folder to Store Your Files
Before embedding your video, you need to create a dedicated folder to store both the PowerPoint file and the video file. This keeps everything neatly organized in one place.
Step 2: Add Your Video to PowerPoint
With your folder created, it’s time to embed your video into the PowerPoint presentation.
Step 3: Move Your Video File to the Folder
Now this is a crucial step. You need to move the video file itself into the folder you created earlier.
Step 4: Zip the Folder
To send both the presentation and video together, you need to zip the folder into one compressed file.
On Mac, right-click the folder and select “Compress ‘[folder name]'”
This creates a .zip file containing both your PowerPoint presentation and the video, ready for sharing.
Step 5: Share the Zipped File
Tell the recipients to unzip the file first before viewing the presentation. This way, the embedded video will play properly since both the presentation and video file are extracted to the same local folder.
Video Format Recommendations
For best results, use common video formats that work seamlessly across different devices and operating systems:
Compress Videos to Optimize File Size
On Windows: File > Info > Compress Media > choose compression level
Remember Zipping Essentials
Following these best practices guarantees your recipients can play the video just as you intended every time.
About The Author
Vegaslide staff, related posts, how to turn off autofit automatic text resizing feature in powerpoint.

I’m Trying to Save My PowerPoint File and Getting Error Msg
How to make an infographic in microsoft powerpoint, how do i recover a corrupt powerpoint 2013 presentation.
You’re using an older browser version. Update to the latest version of Google Chrome , Safari , Mozilla Firefox or Microsoft Edge for the best site experience. You are using an outdated browser, so there may be issues with displaying the page. To make the website work correctly, use the latest version of one of these browsers: Google Chrome , Safari , Mozilla Firefox or Microsoft Edge .
- Corporate Training
- Course Selling
- Academic Learning
- Learning Basics
- Instructional Design
- Online Training Tools
- Manufacturing
- Products iSpring Suite iSpring Learn
- Use Cases Training organizations Onboarding Compliance Training Induction Training Product Training Channel Partner Training Sales Training Microlearning Mobile Learning
- Company About Us Case Studies Customers Partnership Course Development Contact Us
- Knowledge Hub Knowledge Hub Academy Webinars Articles Guides Experts on iSpring
- Language EN English Français Deutsch Español Italiano Nederlands Português Polski 中文 日本語 العربية Indonesia
- Shopping Cart
How to Email a PowerPoint Presentation: 5 Proven Ways

content creator
Helen Colman See full bio →

After you’ve finished creating a PowerPoint presentation – assembling the content, perfecting the design, and adding animations and other special effects – you may want to email it to your students, employees, or clients. There are several ways to email PowerPoint slides, and the one you choose may depend on a few things: the file’s size, security concerns, and whether you want users to be able to edit the presentation. Let’s look at each of the 5 methods in detail.
1. Send as an Email Attachment
Sending a file as an email attachment is perhaps the first thing that comes to mind when there’s a need to email a PowerPoint presentation.
To do this:
- Save your completed PowerPoint presentation on your hard drive.
- Open your email program.
- Add recipients’ email addresses.
- Click on the attach button (usually represented by a paperclip icon), and navigate to the file on your hard drive.
- Once you’ve found the file on your computer, double-click on the file name or icon and it will upload to your email server.
- All that’s left to do is write the subject and body of your email and click Send .

This method is quick and easy, but:
- It would make the sender vulnerable to plagiarism, as the receiver could copy the content at will.
- Most popular email services cannot attach files greater than 25MB.
- PowerPoint files won’t open on Macs without an additional tool.
- Files created using newer versions of PowerPoint won’t open in older versions of the software.
2. Convert and Share Files in PowerPoint
PowerPoint comes with a host of built-in features to help facilitate the sharing of presentation files. You can send your presentation as an attachment, a link, a PDF file, an XPS file, or as an Internet Fax. To access these features, click File > Share > Email .

Under Email , select between the following options:
- Send as Attachment , to attach your slides to your email.
- Send a Link , to create an email with a link to your slideshow. But to use this option, you need to have access to a shared location, such as a SharePoint or OneDrive, and save your presentation there. (We’ll address this method in greater detail later in the article.)
- Send as PDF , to save your slides as a .pdf file, and then attach it to an email.
- Send as XPS (Microsoft’s alternative to PDF), to save your presentation as an .xps file and then attach it to an email message.
- Send as Internet Fax , to send your presentation as an Internet fax. For this option, you first need to sign up with a fax service provider.
3. Make It an HTML5 File
You can also convert a presentation that you want to share into an HTML5 file. In this way, your users will be able to open the slides in a browser and view them online. There are numerous advantages to this method:
- In presentations converted into the HTML5 format, all images and videos look the same as they do in the original and all PPT effects and transitions are preserved.
- HTML5 presentations work flawlessly in all operating systems and on all devices, and don’t require any software to open them. Users can view HTML5 slides right in their browsers.
- HTML5 slides are easy to upload to websites or Learning Management Systems .
- Your slides will be safe behind a wall of protections – watermarks, passwords, and time and domain restrictions. Users will only see your presentation when you allow them to.
- Presentations cannot be corrected by outside sources after conversion, meaning that copyrights will be protected.
You can turn your presentations into HTML5 format by using iSpring Converter Pro , which is shipped as a PowerPoint add-in. After installation, the iSpring tab will appear on your PowerPoint ribbon, so you can perform a conversion in a few clicks. Here’s how to do this:
- Download and install iSpring Converter Pro.
- Open a PowerPoint presentation.

- Click on Publish .

Start your free iSpring Converter Pro trial now →
4. Make It Into a Video
Another way to share your email presentation easily is to convert it into an MP4 file. This is an especially useful method if you want to share your ideas via video by uploading it to a platform like YouTube.
And this is where iSpring Converter Pro will fit nicely again. As with the HTML5 file, after conversion, a video will preserve all animations, effects, formatting, and audio embedded in the source files. iSpring lets you manage presentation specifics like video quality and size, as well as publication to YouTube from within the software itself.
To turn presentation into a video , perform the same steps we covered above but, when publishing, choose Video instead of HTML5.

Then you can click the Email button to send the output via email.

If you want to upload your video presentation to YouTube, go to the YouTube tab in the iSpring publishing window.

Log in to your YouTube account by clicking Sign In in the Account field, enter information about the video – title, description, and category in the relevant fields – and configure the settings if needed. Then, click the Publish button. After that, you can watch the published video in your YouTube account. The only thing you need to do now is email the link to the video to your users.
See a comprehensive guide on how to publish a PPT to YouTube →
5. Share via a Link
If converting a PPT file to another format is not what you want, but the presentation is too big to email as an attachment, you can always compress it into a .zip file before sending it. Or, instead of emailing the file directly, you can upload it to a file hosting service, like Google Drive or Dropbox, and share it by sending the link to recipients.
To compress large presentations into zip files:
- Right-click on the file in your computer.
- Choose Send to .
- Select the compressed (zipped) folder.
- Log in to your file hosting service and follow the steps required to upload a file and share it via a link. When recipients receive your email, they can click on your link and view the file online or download it to their computers and watch it using the PowerPoint slide show viewer.

Choose the handiest method from among these five for your line of work and presentation needs. Plus, consider the security of the method you use and decide how much control you would like to maintain over the intellectual property in the presentation.
Do you have any other ideas for sharing PowerPoint presentations? Tell us in the comments below!
Useful Resources on PowerPoint
Are you a PowerPoint lover? If so, here are some other helpful articles for you:
- How to Share a PowerPoint Presentation Online
- How to Protect PowerPoint Presentations
- How to Add Narration to a PowerPoint Presentation
- How to Add Youtube Video Into PowerPoint Presentation
- How to Structure a PowerPoint Presentation
- How to Convert PowerPoint Presentation to an eLearning Module
- How to Remove the Background From a Picture in PowerPoint
Table of Contents
iSpring Converter
Create online courses and assessments in record time.

Content creator
Helen Colman
She enjoys combining in-depth research with expert knowledge of the industry. If you have eLearning insights that you’d like to share, please get in touch .
You Might Also Like This
How to Create a Video Presentation in PowerPoint

The Top 10 PowerPoint (PPT) to MP4 Video Converters
How to Create a Quiz in PowerPoint
The Best Interactive Presentation Software and Tools in 2024

We use cookies to collect info about site visits and personalize your experience. See our Cookie Policy for more details.
Manage your cookies
Essential cookies are always on. You can turn off other cookies if you wish.
Essential cookies
Analytics cookies
Social media cookies
Effortless Emailing: How to Send PowerPoint Presentations via Email
Do you need to send a powerpoint presentation to someone but not sure how to do it via email don’t worry, we’ve got you covered in this article, we will guide you through the process of sending powerpoint presentations effortlessly using email..

Why should you email PowerPoint presentations?
Emailing PowerPoint presentations is a convenient way to share information with colleagues, clients, or friends. It allows you to send visually appealing and interactive presentations without the need for physical copies or complex file-sharing methods.
How to send PowerPoint presentations via email:
Follow these simple steps to send your PowerPoint presentations smoothly via email:
- Step 1: Open your email client
- Step 2: Click on the “Compose” or “New Email” button to start a new email
- Step 3: Enter the recipient’s email address in the “To” field
- Step 4: Add a subject line that indicates the content of the email
- Step 5: Write a brief introduction or message to accompany your presentation
- Step 6: Click on the “Attach” or “Paperclip” icon to add an attachment
- Step 7: Locate and select your PowerPoint presentation file from your computer
- Step 8: Wait for the attachment to finish uploading
- Step 9: Double-check the recipient’s email address, subject line, and message before sending
- Step 10: Click on the “Send” button and voila! Your PowerPoint presentation is on its way.
Tips for sending PowerPoint presentations via email:
Here are some additional tips to ensure a smooth delivery of your PowerPoint presentations:
- 1. File Size: Consider compressing your PowerPoint presentation to reduce the file size before sending. This ensures faster upload and avoids any email size limits.
- 2. Compatibility: Save your PowerPoint presentation in a universal file format, such as .pptx, to ensure compatibility with different devices and software.
- 3. Check Links: If your presentation includes hyperlinks, make sure to check them before sending. Broken links can lead to a frustrating experience for the recipient.
- 4. PDF Conversion: Alternatively, you can convert your PowerPoint presentation to a PDF file before sending. PDFs maintain the formatting and layout, ensuring consistency across devices and operating systems.
- 5. Use Cloud Storage: Consider uploading your PowerPoint presentation to a cloud storage service (e.g., Google Drive or Dropbox) and simply share the download link via email. This method avoids any file size limitations and allows for easy collaboration.
By following these steps and tips, you’ll be able to effortlessly send your PowerPoint presentations via email. Enjoy the convenience of sharing your ideas and information with others, no matter where they are!
We hope you found this guide helpful. If you have any further questions or need assistance, feel free to leave a comment below. Happy emailing!
How helpful was this article?
How to Embed a Video In PowerPoint [2022 User Guide]
- Share on Facebook
- Share on Twitter
By Nikolay Kaloyanov
in How-To Tutorials
2 years ago
Viewed 772 times
Spread the word about this article:

Videos have become a pivotal part of presentations. And not only. All types of content rely on videos – regardless if they are informational, educational, or sales content. According to Invideo ,
The average person is about to watch around 100 minutes of video content PER DAY in 2022.
This piece of stats only adds to the fact that people around the world embrace video content more and more, and will prefer it over text. In this article, we will show you how to embed a video in PowerPoint, so you can grab your audience’s attention and make them rate your presentation.
Article overview: 1. Why insert a video in PowerPoint? 2. How to embed a video in PowerPoint? 3. How to edit a video in PowerPoint?
1. Why insert a video in PowerPoint?
Before we show you how to embed videos in PowerPoint, we need to start with the reasons why you should add videos to your PowerPoint presentation.
✔️Reason #1 – People hate boring presentations
79% of people say they find most presentations boring. If you insert video content in your PowerPoint presentations, there’s no guarantee your presentation will be more likable. But you’ll certainly increase your chances to stand out.
✔️Reason #2 – Short attention span
Distractions are one major problem for presenters. Over the years, the average attention span has shrunk to just 8 seconds. Apart from the best practices to start and end a presentation , you can also keep your audience hooked when you embed videos in PowerPoint.
✔️Reason #3 – People absorb video content better
Your end goal is to convey your message no matter what your presentation is about. According to stats, audiences only retain 10% of the information they’ve seen in a text, compared to 95% in videos . If Google’s CEO Sundar Pichai can give up on bulk texts and bullet points, what stops you from following his presenting style?
2. How to embed a video in PowerPoint?
In 2022, a PowerPoint presentation can be a powerful tool that can impress audiences and sell great ideas. That’s why Microsoft has ensured they are in line with the recent digital marketing trends .
There are not one but three ways to insert videos in PowerPoint ! We will cover all of them in our tutorial.
2.1. How to insert a video into PowerPoint from my computer?
When to use : If you have your own videos to share in the presentation.
The best thing about adding videos in PowerPoint is that there is a dedicated menu. And in case some steps seem familiar, don’t get surprised.
Our first option is computer imports. Let’s see how to add a video from a PC or Mac.

Step 2 : Pick Video , and then go to This computer – the first option.

Step 3 : Select a file of your choice and then click Insert .

2.2. How to embed a stock video in PowerPoint?
Stock videos are great options for corporate presentations. Paired with some great PowerPoint templates for download , you can capture the attention of your audience. You have over 20 categories to choose from and if you prefer, you can use the search bar to find what you need. While there isn’t much of a choice compared to YouTube and Vimeo (which we will discuss later), picking stock videos ensures you won’t have copyright issues with your presentations.
Let’s see how to insert a stock video in PowerPoint.
Step 1 : Select Insert from the menu ribbon (this step is the same).
Step 2 : Pick Video , and then go to Stock Videos – the second option.

Step 3 : Choose which video you want to select and then press Insert .

2.3. How to embed a third-party video in PowerPoint?
Without a doubt, most people ask how to embed a YouTube video in PowerPoint, as this is the best place to find video resources. But you can not only embed a video from YouTube in PowerPoint, you can also insert one from other platforms like Vimeo, Slideshare, Stream, and Flipgrid. All you need to do is just copy the address of the video URL and paste it into the search bar. Let’s see how to do so.
Step 2 : Pick Video , and then go to Online Videos – the third option.

Step 3 : Copy the video URL and paste it into the search bar.

Step 4 : When the video preview appears, click Insert .

N.B. Embedding a video from an online source – WARNING⚠️
We need to warn you that adding videos to PowerPoint from online sources may affect the Video Format and Playback options. Also, embedding through the Web will cause a delay in loading time. I’ve personally found out that on average, a YouTube video embedded in PowerPoint starts playing in 5-6 seconds at least.
I ran an experiment where I added one Graphic Mama’s video from my computer, and it loaded instantly. It also didn’t have any formatting and playback issues. In conclusion, it may be best if you find a way to download your desired videos and upload them directly from your PC/Mac.

3. How to edit a video in PowerPoint?
If you learned how to upload a video in PowerPoint using these three methods mentioned above, that’s great. You have already made a lot of progress to satisfy your audience and meet your presentation goals. But your task doesn’t end here (unfortunately). You need to plan how your video will look and sound. Positioning your video, trimming unnecessary parts of it, etc., are all important things to consider.
Let’s see how to modify your PowerPoint videos so that they look great and add that “extra touch of finesse” to your slides.
3.1. How to format a video in PowerPoint?
Without a doubt, you need to check all the boxes when you upload your videos into PowerPoint. And the first thing to do is check your video format. Microsoft has added a lot of functions so that you can further customize the video experience for your audience.
Video Format Menu

As you can see, you can adjust the video, apply some video style, test it for accessibility, arrange it in the slide, and select its size. Let’s start.
3.1.1. How to apply visual color corrections?
Visual Corrections Presets

If you want to modify your contrast and exposure, you can use 25 pre-made color combinations between +40% and -40% brightness and contrast.
Visual Corrections Extended Menu

In case none of the presets delights you, you can manually adjust the brightness and contrast with 1% stops and values beyond +/- 40%.
3.1.2. Video Recolor
Sometimes, the video isn’t in your brand colors or you wish to make it more playful. The video recolor tool gives you just that – it applies a dramatic change to your video colors, in order to fit the Powerpoint templates colors or simply add some color punch. You’re left with three options: to pick something from the default options (21), choose a custom recolor variation, or check the video color options which are also found in Format Video Menu on the right (check Visual Corrections Extended Menu image).

3.1.3. Choosing Video Styles
Of course, choosing the right video style is important. It will be a decisive factor in measuring how well your audience will respond to the video. Picking one of the templates is okay but if you put some effort into choosing a video shape , video border , and video effects , you will notice a big difference.

Video Shape
Video Shapes can make your videos a ton better. The standard square format can be tweaked and if you add some imagination, you can end up with superb interactive elements – like arrows, comment boxes, etc.

Video Border
Video borders are very useful. They can outline the video, putting the focus on it, and the most important thing – separate the video from the background, especially if they are in similar colors.

Video Effects
Video effects are your playground. But seriously – these effects can make your embedded video stand out by adding some shadows, soft edges, glow effect, or simply giving it a smooth 3D look that will grab the audience.

3.1.4. Video Accessibility, Arrangement, and Dimensions
We decided to combine all these three under one section, as these are some of the standard options that don’t need much explanation. Alt text is for people with visual impairment or if the resource doesn’t load due to a slow Internet connection. Typically, you need between 1-2 sentences to explain what is in the video. When you click on Alt text, a dialog box with instructions will appear on the right.

The Arrange and Size options are related to where the video is positioned and how much space it will occupy from the slide. With Arrange , you can place the video anywhere on the slide, as well as rotate it, bring it back and forwards, and align it.
The Size tools allow you to scale the video up and down, crop it, and by default – lock the aspect ratio. To manage the alignment and size at the same time (as these two settings go well together), there is a special dedicated menu that you can access by clicking on the small arrow (check the cursor).

3.2. How to manage Video Playback in PowerPoint?
Learning how to embed a video in PowerPoint is important but just as crucial is the way you play the video – which parts are you going to show, which effects you will add, and decide if you will add or skip adding captions. All these things can make a difference.
3.2.1. How to add bookmarks to your video in PowerPoint?
You have probably seen plenty of YouTube videos where you can find bookmarks when new important parts of the videos start. The same applies here. You can add and remove bookmarks, so as to separate the different parts of your video.
3.2.2. Editing options
In the Editing section of the Playback menu, you can choose if you want to trim your video or add Fade In/Fade Out effects, and the duration of the latter. Below, you can see how to trim a video in PowerPoint – you can select the start and the end of it, so your audience will see the most important details only.

3.2.3. Video Options
In the Video Options , you will find several tools that you can work with.
- Volume – starting with video volume, it’s pretty straightforward what this means. You have 3 modes /low, medium, high/ + mute.
- Start – you have three options: Automatically /by default/, In Click Sequence , and When Clicked On .
- Play Fullscreen – when the video is on, it will be displayed throughout the whole slide.
- Hide While Not Playing – if the video is not playing, it will not be accessible.
- Loop until Stopped – after the video ends, it will automatically start from the beginning if you don’t stop it manually.
- Rewind after Playing – once the video is played through the end, it will display the first frame and stop.

3.2.4 Insert Captions
If your video has a voiceover, you may need to add captions to make it more understandable for an audience with hearing impairment or people sitting too far from you. The captions have to be uploaded from your computer.
Learning how to embed videos in PowerPoint is crucial for your presentation success. You will get access to a whole new world. But don’t forget about formatting. Some basic video editing can make your videos even more engaging.
If you found this article helpful, why don’t you check some of our other PowerPoint-related tutorials:
- Adding Audio to PowerPoint: The Quick Step-by-Step Guide
- How to Insert GIFs into PowerPoint: The Quick Step-by-Step Guide
- How to Get Started with PowerPoint in 2022

Add some character to your visuals
Cartoon Characters, Design Bundles, Illustrations, Backgrounds and more...
Like us on Facebook
Subscribe to our newsletter
Be the first to know what’s new in the world of graphic design and illustrations.
- [email protected]
Browse High Quality Vector Graphics
E.g.: businessman, lion, girl…
Related Articles
How to draw on google slides and make a great impression, how to add fonts to google slides [quick guide], the 25 absolute best adobe xd tutorials in 2022, monster business card template in illustrator (tutorial + freebie), what is google slides and how to get started, enjoyed this article.
Don’t forget to share!
- Comments (0)
Nikolay Kaloyanov
Nikolay is a copywriter with vast experience in Technology, Marketing, and Design. When he isn't playing with words and crafting texts, he watches sports and asks questions. He is a funny person...until you put him on a diet.

Thousands of vector graphics for your projects.
Hey! You made it all the way to the bottom!
Here are some other articles we think you may like:
![What is a Storyboard [Theory, Examples and Mega Inspiration]](https://i.graphicmama.com/blog/wp-content/uploads/2020/11/26125451/what-is-a-storyboard.jpg "how to email a powerpoint presentation with video")
How-To Tutorials
What is a storyboard [theory, examples and mega inspiration].
by Al Boicheva

How to Create a Custom Business Card Like a Professional [Tutorials]
by Iveta Pavlova
Character Animator Tutorials Part 6: Behaviors 2
by Slavena Simeonova
Looking for Design Bundles or Cartoon Characters?
A source of high-quality vector graphics offering a huge variety of premade character designs, graphic design bundles, Adobe Character Animator puppets, and more.
How to embed videos into your PowerPoint presentations

If you had to hold a presentation at work or school, you probably know how important is to make your presentation attractive to keep your audience's attention until the very end. When you need to make a point about something, a video might just do the trick. PowerPoint allows you to add videos to your presentations. For example, you can embed a local video file from your computer, a YouTube clip or a video from another website. Here's how to embed any video in your Microsoft PowerPoint presentations:
Skip to chapter
How to embed videos from your pc in your powerpoint presentations, how to embed a youtube video into your powerpoint presentation, how to embed a video in your powerpoint presentation using an embed code.
NOTE: For the purpose of this article we used Microsoft Office PowerPoint 2016.
This method allows you to insert local video files from your computer or other computers you are connected to. You can embed almost any type of video format, from ".mp4", to ".avi", to ".mkv" or ".mov." First, you need to open the PowerPoint app and select the slide where you want to add the video.

Next, click or tap the Insert tab from the ribbon on the top.

Now, you need to go to the Media section, which is just at the right side of the ribbon.

Click or tap the Video button in the Media section and a small menu opens. Press the " Video on My PC" option to embed a video from your PC.

File Explorer will open. Search for the folder containing the video that you want to insert into your presentation. Once you've found the video file, you can click or tap Insert.

Now, the video is embedded into your PowerPoint presentation. You can play the video, using the buttons at the bottom of the video player that is shown on the slide. If you can't see the buttons make sure the video is selected. You can drag the corners to resize it, or click and drag to reposition it on your slide.

The video is packed into the PPT or PPTX file where you save your presentation, so you don't need to worry about sending it along with the presentation. Remember that as the size of the video increases, the size of the presentation will increase too. You should not embed very long videos if you want to keep the presentation file small and easily transferable.
PowerPoint 2016 allows you to search for videos on YouTube within the app and add them directly to your presentation. To do this, select the slide where you want the video and then go to the Insert tab on the ribbon. Look for the Media section and press the Video button. In the menu that is displayed, choose the Online Video option.

Now, another window opens with two options: YouTube and "From a Video Embed Code."
Next to the YouTube logo, there is a search bar where you can type the name of the video that you want to add. Click or tap the Search button to display the search results.

The next thing you need to do is to select the video from the list of results and press the Insert button on the bottom of the window.

Wait for the video to be added to your PowerPoint presentation.

You can preview the video, resize or reposition it just as you like.

IMPORTANT: Make sure that you are connected to the internet when you want to play the video from your presentation, during your presentation delivery.
This option allows you to insert online videos into your presentations using embed codes from all kinds of online platforms. To do this, first select the slide where you want the video and then go to the Insert tab on the ribbon. Look for the Media section, and press the Video button. In the menu that is displayed, choose the Online Video option.

Next, make sure that you have copied the video embed code from the online platform where you found the video that you want to use in your presentation. For example, under any video you watch on YouTube, you need to press the Share option. Then, click or tap Embed so that the video embed code will be displayed.

Paste the embed code in the " From a Video Embed Code" field and press the Insert button on the right side of the field or the Enter key on your keyboard.

Wait for the video to be inserted into your PowerPoint presentation, where you can play it, resize it or reposition it as you like.

The problem with this method is that it accept only very simple embed codes, like those on YouTube. However, it doesn't seem to work with videos from other famous online platforms like Vimeo or Dailymotion. We tried and failed each time.
As you can see, Microsoft PowerPoint allows you to embed videos in your presentation using several methods, all of them accessible to any user. You can add a video stored on your PC or online videos from YouTube or another platform, using embed codes. Try this feature and let us know how it works. Also, if you have questions regarding this topic don't hesitate to share them with us in the comments below.
- Subscribe to newsletter.
Receive our daily newsletter. You may unsubscribe at any time. For details read the Privacy policy.
Check this box if you agree to receive our emails.
You are subscribed to www.digitalcitizen.life .
Receive our weekly newsletter. You can unsubscribe at any time. For details, read our Privacy policy.
Related articles

How to change the PowerPoint Slide Size: All you need to know

How to make a video smaller in Windows (5 methods)
How to embed mp3 and other audio files into powerpoint presentations, 4 ways to download powerpoint straight from microsoft.
Embedding a PowerPoint Slide Into Outlook Email: A Step-by-Step Guide
Embedding a PowerPoint slide into an Outlook email is a breeze. Simply open your PowerPoint presentation, select the slide you wish to embed, copy it, and then paste it directly into the body of your email in Outlook. It’s that easy!
After completing this action, your PowerPoint slide will appear as an image within your email, allowing the recipient to view your slide without having to open an attachment or leave their inbox.
Introduction
In today’s fast-paced business world, efficiency is key. Communicating effectively and swiftly can often make the difference between a deal won or lost. This is where the ability to embed a PowerPoint slide into an Outlook email can be a game-changer. It’s not just about saving time; it’s about creating a seamless experience for your email recipients. Whether you’re a sales professional pitching a new product, a teacher sharing a lecture slide with students, or a manager disseminating information to your team, embedding a PowerPoint slide directly into an email can ensure your message is seen exactly as you intended.
This skill is particularly relevant for anyone who frequently uses email as a means of communication and needs to share visual content that is created in PowerPoint. With the right know-how, you can enhance your correspondence, making it more engaging, persuasive, and professional.
Step by Step Tutorial to Embed a PowerPoint Slide into Outlook Email
Before diving into the steps, remember that by following these instructions, you’ll be able to share your PowerPoint slides without forcing your recipients to download or open separate files, which can be a real time-saver for everyone involved.
Step 1: Open Your PowerPoint Presentation
Open the PowerPoint presentation and navigate to the slide you want to embed.
Selecting the right slide is crucial because it will be the first thing the recipient sees when they open your email.
Step 2: Copy the Slide
Right-click on the slide thumbnail and select ‘Copy’, or simply press Ctrl+C on your keyboard.
Make sure you’ve selected the entire slide to avoid missing any important content when you paste it into your email.
Step 3: Open Outlook and Create a New Email
Open Outlook and begin composing a new email as you normally would.
Ensure that you’re using the HTML format for your email, as plain text format will not support the embedded slide image.
Step 4: Paste the Slide into Your Email
Click into the body of your email and paste the copied slide by right-clicking and selecting ‘Paste’, or pressing Ctrl+V on your keyboard.
After pasting, you may need to adjust the size or placement of the slide image to fit the email’s layout and ensure it’s visually appealing.
| Benefit | Explanation |
|---|---|
| Enhanced Visual Communication | Embedding a slide directly into an email ensures your recipients see the visual content as intended, rather than risking formatting issues with attachments. |
| Time Efficiency | This method saves time for both the sender and the recipient, as there’s no need to download and open a separate PowerPoint file. |
| Professionalism | A well-embedded slide can make your email look more polished and professional, leaving a better impression on your recipients. |
| Drawback | Explanation |
|---|---|
| File Size Limitations | Embedded images can increase the size of your email, potentially causing issues for recipients with inbox size limits. |
| Display Variability | Different email clients might display the embedded image differently, which could affect the slide’s appearance. |
| Limited Interactivity | Unlike a full PowerPoint presentation, an embedded slide is static and does not allow for animation or interactivity. |
Additional Information
When embedding a PowerPoint slide into an Outlook email, it’s important to consider the format and size of your slide. Large, complex slides may not translate well when converted to an image within an email. Keep your slides simple, clear, and easily readable at smaller sizes. Additionally, be aware of your audience’s email client; what looks good in Outlook may appear differently in other email services.
Always test your email with an embedded slide by sending it to yourself or a colleague before distributing it widely. Also, keep accessibility in mind—alt text for images can be a valuable addition for recipients who use screen readers. Lastly, while this article focuses on Outlook, the same general process can apply to embedding slides into emails with other clients, though the specific steps may vary.
- Open your PowerPoint presentation and select the slide you wish to embed.
- Copy the selected slide.
- Open Outlook and create a new email.
- Paste the slide into the body of your email.
Frequently Asked Questions
Can i embed more than one slide into an email.
Yes, you can embed multiple slides by copying and pasting each one individually into the email.
Will the animations on my slide work in the email?
No, the embedded slide will be a static image and will not retain any animations.
Is it possible to edit the slide after embedding it into the email?
Once embedded, the slide becomes an image and cannot be edited. Any changes must be made in PowerPoint before copying the slide.
Can recipients of the email download the embedded slide?
Recipients can save the embedded image, but it will not be the same as downloading a PowerPoint file with editable slides.
Will embedding a PowerPoint slide make my email too large to send?
It can, depending on the size of the slide image and your email client’s limitations. Be mindful of file size when embedding slides.
Embedding a PowerPoint slide into an Outlook email is a straightforward process that can significantly enhance your communication efforts. By following the steps outlined above, you can seamlessly integrate visual content into your emails, making them more engaging and informative.
Remember, the goal is to convey your message effectively and professionally, and embedding slides into emails can help you achieve just that. Whether you’re looking to impress clients, instruct students, or inform colleagues, mastering this simple yet impactful skill will serve you well in the digital age of communication.

Matthew Burleigh has been writing tech tutorials since 2008. His writing has appeared on dozens of different websites and been read over 50 million times.
After receiving his Bachelor’s and Master’s degrees in Computer Science he spent several years working in IT management for small businesses. However, he now works full time writing content online and creating websites.
His main writing topics include iPhones, Microsoft Office, Google Apps, Android, and Photoshop, but he has also written about many other tech topics as well.
Read his full bio here.
Share this:
Join our free newsletter.
Featured guides and deals
You may opt out at any time. Read our Privacy Policy
Related posts:
- How to Embed a Word Document Into PowerPoint 2000: A Step-by-Step Guide
- How to Save Powerpoint as PDF with Notes
- How to Set Time for Slides in Powerpoint
- Can I Convert My Powerpoint to Google Slides?
- How to Unhide a Slide in Powerpoint 2013
- How to Copy a PDF File Into PowerPoint: A Step-by-Step Guide
- How to Drag Slides From One PowerPoint to Another: A Step-by-Step Guide
- How to Make a Powerpoint Slide Vertical in Powerpoint 2013
- How to Add Page Numbers in Powerpoint 2010
- How to Delete a Slide in Powerpoint 2010
- How to Change the Font on All Slides in Google Slides
- How to Loop a Slideshow on Powerpoint 2013
- How to Remove Outlook Account from iPhone 13
- How to Hide a Slide in Powerpoint 2010
- How to Put Embedded Youtube Video in Powerpoint 2010
- How to Delete Multiple Slides in Google Slides
- How to Set Out of Office in Outlook 2013
- How to Strikethrough Text in Microsoft Outlook
- How to Insert Slides from Another Presentation in Powerpoint 2010
- How to Rotate a Slide in PowerPoint: A Step-by-Step Guide
Unsupported browser
This site was designed for modern browsers and tested with Internet Explorer version 10 and later.
It may not look or work correctly on your browser.
- Email Newsletters
How to Quickly Email a PowerPoint Presentation

Note : Watch this short tutorial screencast or follow the quick steps below, that compliment this video.
1. Click Email in Your PowerPoint Share Menu
While you're working in a PowerPoint presentation, go to the File menu and click on Share . Now, click on Email on the left side. Let's click on Send As Attachment .

2. PowerPoint Will Open Your Email Client Automatically
PowerPoint will actually open up your default email client and attach the presentation to that email. You can add a recipient and your message to quickly send this as an email attachment. This saves you the clicks of saving it separately and then attaching it by browsing through your folders.

3. Or, Email Your PowerPoint Presentation as a PDF
Another great way to do this is to send a PDF file instead. If your view doesn't have PowerPoint on their computer this ensures that they can view the file. You can do this by going to the same menu but this time choose Send As PDF .

You'll see that the same dialog launches, but this time with a PDF attached to the email ready to send.
Finishing Up!
These two tips are both time savers when it comes to sharing your PowerPoint presentations and hard work through email.
More 60 Second PowerPoint Video Tutorials
Learn more in our PowerPoint tutorials and quick PPT video tutorials on Envato Tuts+. We have an assortment of PowerPoint material, such as these short video tutorials:

Make Great Presentations ( Free PDF eBook Download )
We also have the perfect compliment to this tutorial, which will walk you through the complete presentation process. Learn how to write your presentation, design it like a pro, and prepare it to present powerfully.

Download our new eBook: The Complete Guide to Making Great Presentations . It's available for free with a subscription to the Tuts+ Business Newsletter.

Free All-in-One Office Suite with PDF Editor
Edit Word, Excel, and PPT for FREE.
Read, edit, and convert PDFs with the powerful PDF toolkit.
Microsoft-like interface, easy to use.
Windows • MacOS • Linux • iOS • Android

- Articles of PPT
How to Send a PowerPoint Through Email(3 Common Methods)
PowerPoint is a cornerstone of productivity in corporate environments, serving to convey business proposals, project updates, and educational content. And when collaboration is needed, sharing presentations becomes essential. Among the various options, emailing the presentation stands out. In this article, we will guide you through the process of how to send a PowerPoint through email.
How to send a PowerPoint through email? (3 Easy Ways)
Method 1: send as an email attachment.
One of the easiest ways to send a PowerPoint presentation through email is to attach it as a file. This method allows you to share your presentation with others, without any changes or conversions. Here are the steps to send a PowerPoint presentation as an email attachment:
Step 1: Save your finished presentation on your computer.
Step 2: Open your email client, and choose “New Email” to compose a new email.
Step 3: Input recipient email addresses.
Step 4: Click the attachment button (often a paperclip icon) and locate the file.
Step 5: Double-click the file to upload it.
Step 6: Compose your email subject and message, then hit Send.
One of the simplest and fastest ways to send a presentation is to use your email client and attach it to your message. However, this method has a limitation on the file size. Most email clients only allow you to send attachments up to 25 MB.
Method 2: Convert and Share Files in PowerPoint
Another way to send a PowerPoint presentation through email is to convert it to a different file format, such as PDF or XPS, and then share it as an attachment or a link. This method can help you reduce the file size and avoid compatibility issues with different versions of PowerPoint or other software. Here are the steps to convert and share files in PowerPoint:
Step 1 : Open your PowerPoint presentation and click on the File tab in the top left corner.
Step 2: Select Export from the left sidebar and then choose Create PDF/XPS Document.
If you choose Create PDF/XPS Document, you can adjust the size of the output file by clicking on “Minimum Size(publishing online)”. Then click on Publish to save your presentation as a PDF or XPS file.
Step 4: After you have converted your presentation to a different file format, you can share it through email by attaching it as a file.
Converting your presentation to a PDF or XPS file before sending it via email can help you avoid the problems of file size and compatibility. However, you should be aware that some features or animations may not be preserved in the converted file.
Method 3: Send PowerPoint as a link
The third way to send a PowerPoint presentation through email is to send it as a link. This method allows you to share your presentation as a link without having to download or upload any files. Here are the steps to send PowerPoint as a link:
Step 1: In the top left corner of your PowerPoint presentation, click the File tab.
Step 2: Select “Save As” from the left sidebar and then click on “OneDrive” to save the file in the Cloud.
Step 3 : After the file has been saved in the cloud, click on Share in the left sidebar menu and then select “Get a sharing link”.
Step 4: This will generate a link to your presentation that you can paste into your email message or any other platform. You can also adjust the permission level of the link by clicking on Anyone with this link can edit or Anyone with this link can view under Copy Link.
Step 5: Enter the recipient's email address, subject line, and message body as you normally would and paste the link to your presentation.
Step 6: Click on “Send” to send your email with the link to your presentation.
This method lets you share your presentations with others easily and avoid file size issues. It also enables collaboration. However, you should be aware that this method requires you to have an internet connection and a Microsoft account.
Best Free Alternative to Microsoft Office - WPS Office
WPS Office is a standout option among all of the office suites, setting itself apart as a premium choice. Amidst the multitude of options available in the market, where many are catering to specific industries, WPS Office distinguishes itself as an all-encompassing solution. This comprehensive suite consolidates various tools seamlessly, streamlining the user experience. Beyond providing a comprehensive range of productivity tools, WPS Office takes it up a notch with the integration of AI, making tasks smoother and more efficient.
Some of the other notable advantages of using WPS Office also include:
Seamless Compatibility: WPS Office effortlessly handles Microsoft Office file formats, making it adaptable for diverse document processing needs.
Free Version with Value: WPS Office offers a free version that provides essential features, catering to both individual users and cost-conscious businesses.
PDF Powerhouse: With PDF conversion and editing tools, WPS Office empowers users to convert Word docs to PDF, add comments, compress files, and more.
Collaborative Cloud Sharing : The cloud-based file-sharing feature fosters real-time collaboration, enabling users to share and work on files together effectively.
On-the-Go Efficiency: Its user-friendly interface extends to Android smartphones, ensuring productivity even while you're mobile.
Intuitive Interface: WPS Office's interface boasts a well-organized toolbar and recognizable icons, facilitating ease of use and quick learning.
Advanced Functionality: Beyond the basics, WPS Office offers API customization, inventory management, an activity dashboard, and a comprehensive office suite.
Steps to edit Word/Excel/PowerPoint in WPS:
WPS Office makes it easy for you to edit your files. You can follow these simple steps to modify your Word documents, Excel sheets, and PowerPoint presentations:
Edit a Word File:
Step 1: Start by locating and opening the WPS Office application on your computer.
Step 2: Go to the Sidebar menu and click on "Docs". Find and open your Word Document using WPS Writer.
Step 3: Make use of the helpful editing tools found in different tabs of WPS Writer to enhance your document until it's just right.
Step 1 : Start by selecting "Sheets" from the Sidebar menu. Then, find and open your Excel Document using WPS Spreadsheet.

Step 2: Make the most of WPS Spreadsheet's editing tools across its tabs to enhance your spreadsheet with ease.

Edit a PowerPoint Presentation:
Step 1 : Go to the Sidebar menu and tap on "Slides." Find and open your PowerPoint Presentation using WPS Presentation.

Step 2: Utilize the useful editing tools available in WPS Presentation's various tabs to easily enhance your presentation.

Get ready to experience the seamless efficiency crafted by WPS Office in their suite of office tools. Download WPS Office now and streamline your tasks like never before.
Use Word, Excel, and PPT for FREE, No Ads.
Edit PDF files with the powerful PDF toolkit.
Microsoft-like interface. Easy to learn. 100% Compatibility.
Boost your productivity with WPS's abundant free Word, Excel, PPT, and CV templates.
Q1. Can I send multiple PowerPoint presentations in one email?
It is feasible to attach numerous PowerPoint presentations to a single email. However, there are a few considerations to pay heed to:
Attaching numerous PowerPoint presentations might bring about an enormous file size, which may be problematic for some email clients or receivers with constrained internet connections.
It may overburden readers, making it difficult for them to concentrate on the subject matter of each presentation.
Large attachments or several files can be detected as dubious by some email servers or spam filters, causing probable delivery difficulties.
Given the problems raised above, it is recommended to send different emails for each presentation.
Q2. What should I do if the recipient cannot open the PowerPoint presentation?
If a recipient faces issues while opening the PowerPoint presentation, advise him to update the software and encourage the receiver to look at other programs, such as WPS Presentation. This free-of-cost program is well-known for its compatibility with PowerPoint files and might be a convenient answer if they have trouble opening the file.
Effortless Presentation Sharing
As you become more adept at file sharing, you'll find yourself effortlessly sharing files of any size and to any destination. In this article, we explored the process of how to send a PowerPoint through email, a widely used and professional approach to file sharing. WPS Office simplifies the conversion of documents to PDF format and enhances the sharing process. Feel free to enhance your file-sharing experience by downloading WPS Office today.
- 1. How to Fix Persistent Unlicensed Product Issue in Microsoft Office? (5 Common Methods)
- 2. How to Send PDF to Email
- 3. How to Repair Windows 10 (5 Common Methods)
- 4. How to Transfer Word File from PC to Android Phone (6 Common Methods)
- 5. How to Share A PowerPoint With Others (4 Common Methods)
- 6. How to Boot into the Recovery Mode in Windows 10 (5 Common Methods)

15 years of office industry experience, tech lover and copywriter. Follow me for product reviews, comparisons, and recommendations for new apps and software.
How to Send a PowerPoint Through Email When It’s Too Big
Sending a PowerPoint presentation through email can be a headache when the file is too big. But fear not, there’s a simple workaround to sharing that hefty file without clogging up someone’s inbox. All you need to do is compress the file, use a cloud storage service, or send it as a link. After reading this paragraph, you should have a basic understanding of how to accomplish the task specified by the prompt.
Step by Step Tutorial on Sending a Large PowerPoint Through Email
Getting that oversized PowerPoint file to its destination doesn’t have to be a battle with your email’s file size limit. The following steps will guide you through the process smoothly.
Step 1: Compress the PowerPoint file
Right-click on the file, select ‘Send to’, and then choose ‘Compressed (zipped) folder’.
Compressing the PowerPoint file can significantly reduce its size, making it easier to send through email. This method works well for files that are just slightly over the limit, as compression can only reduce the size so much without affecting the quality of the content within the presentation.
Step 2: Upload the file to a cloud storage service
Services such as Google Drive, Dropbox, or OneDrive allow you to upload and share large files.
Cloud storage services are incredibly useful when dealing with large files. Once uploaded, you can share a link to the file or even set permissions for who can view or edit the document.
Step 3: Send the link through email
Instead of attaching the file, paste the link to the file in your email.
Sending a link is a quick and efficient way to share a large PowerPoint file. The recipient can simply click on the link to view or download the presentation, without it taking up space in their email.
After completing these steps, your recipient should receive an email with either a compressed file or a link to the PowerPoint presentation. They’ll then be able to download or view the file without any issues related to file size.
Tips for Sending a Large PowerPoint Through Email
- Always check the file size limit of your recipient’s email provider.
- Compress images and videos within the PowerPoint before trying to send it.
- Remove any unnecessary slides or content to reduce the file size.
- Consider breaking the presentation into smaller parts if it’s still too large.
- Always inform the recipient to expect a large file or link, so they know to look for it.
Frequently Asked Questions
What is the maximum file size that i can send through email.
Most email providers have a limit of 20-25MB for attachments.
Can I compress a PowerPoint with embedded videos?
Yes, but the video quality may be reduced, and it may not compress enough to meet email size limits.
How do I compress images in PowerPoint?
You can use the ‘Compress Pictures’ feature under the Picture Format tab to reduce the file size.
Is it safe to use cloud storage services to share presentations?
Yes, reputable services like Google Drive and Dropbox have security measures to protect your files.
What do I do if my PowerPoint is still too large after compression?
Consider using a cloud service or breaking the presentation into smaller parts.
- Compress the PowerPoint file.
- Upload the file to a cloud storage service.
- Send the link through email.
Sending a large PowerPoint through email doesn’t have to be a daunting task. With a few simple steps, you can ensure your comprehensive, visually stunning presentations reach their intended recipients hassle-free. Whether you choose to compress the file or opt for the convenience of cloud storage services, the key is to find the method that works best for you and your recipient. Always remember to double-check file sizes, compress content where possible, and communicate with your recipient about the impending large file. By following the steps outlined in this article, you’ll become a pro at circumventing those pesky file size limits and ensure your presentations are delivered effectively and efficiently every time.

Matt Jacobs has been working as an IT consultant for small businesses since receiving his Master’s degree in 2003. While he still does some consulting work, his primary focus now is on creating technology support content for SupportYourTech.com.
His work can be found on many websites and focuses on topics such as Microsoft Office, Apple devices, Android devices, Photoshop, and more.
Share this:
- Click to share on Twitter (Opens in new window)
- Click to share on Facebook (Opens in new window)
Related Posts
- How to Compress Audio and Video in Powerpoint 2010: A Step-by-Step Guide
- How to Compress Pictures in Powerpoint: A Step-by-Step Guide
- How to Download a Google Slides Presentation as a Powerpoint File
- How Do I Access My Google Cloud? A Step-by-Step Guide
- How to Send an Entire Folder of Files as an Attachment in Outlook
- Creating a Word Cloud in PowerPoint on Windows 11: A Step-by-Step Guide
- How to Create a Zip File in Windows 10: A Step-by-Step Guide
- Can You Save a Powerpoint as a Video in Powerpoint 2013? Find Out Here!
- Windows 7 Default ZIP Program: A Comprehensive Guide
- Troubleshooting Powerpoint Designer Not Working on Windows 11: Fixes and Tips
- How to Insert an Excel Spreadsheet Into Powerpoint: A Step-by-Step Guide
- How to Zip a Powerpoint File: A Step-by-Step Guide
- How to Do a Powerpoint Google Slides Presentation Conversion
- How to Send a Picture Through Email on an iPhone: Easy Steps
- How to Save Powerpoint as PDF with Notes: A Step-by-Step Guide
- How to Rotate a Powerpoint Slide Presentation
- How to Loop a Powerpoint Presentation: Step-by-Step Guide
- How to Cloud Game on iPhone: A Step-by-Step Guide
- Keeping Track of Word Counts in PowerPoint: Tips and Tricks
- How to Merge Files in Powerpoint: A Step-by-Step Guide
Get Our Free Newsletter
How-to guides and tech deals
You may opt out at any time. Read our Privacy Policy
How to Share a PowerPoint
Last updated on September 11th, 2024

Sharing PowerPoint presentations is essential for collaboration, education, and communication in business and academic settings. Microsoft PowerPoint offers a built-in Share feature that makes it easier than ever to distribute your slides to colleagues, clients, or students; before, during or after the presentation. This guide will walk you through using the built-in sharing options in PowerPoint, along with additional methods for sharing your PPT presentation effectively.
The Share Option in PowerPoint
PowerPoint’s Share feature is designed to simplify the process of sharing presentations from inside the Microsoft PowerPoint interface.
To access it, open your presentation in Microsoft PowerPoint. Go to File menu, and look for the Share option. In some versions of PowerPoint, the Share option is typically located in the upper-right corner of the screen.
Clicking on this button will open up several options for sharing your presentation, tailored to suit different needs and preferences.

Step-by-Step Guide to Sharing a Presentation
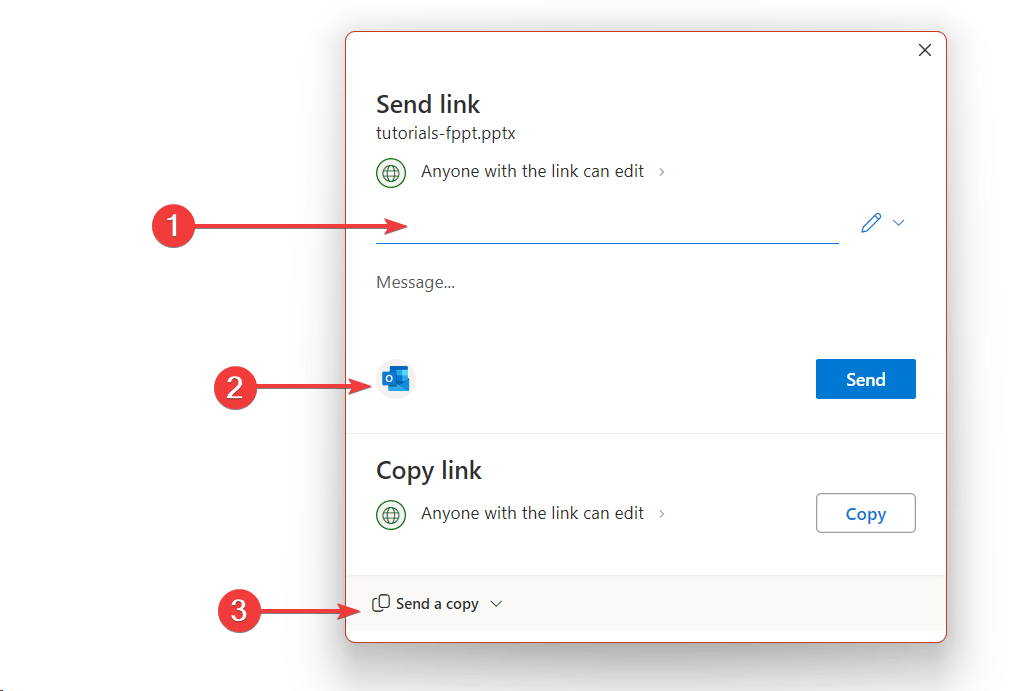
Once you click on the “Share” button, PowerPoint provides different ways to share your presentation, starting with email. How to send a PowerPoint presentation through email? Go to File -> Share and click the Outlook icon (that says “Share this link to new Outlook message”). This will open the following interface and automatically attach the presentation file to the new email.

Alternatively, if you don’t use Outlook, you can still share a presentation by email. Save the presentation file and from your Email client (Mail, emClient, etc.) click to attach a new file. Now, you can select the .pptx file from your computer.
If you use a cloud based email like Gmail or Outlook, you can compose a new email and then drag & drop the file into the browser UI.
If you prefer to send a copy directly, you can choose to “Send as Attachment,” which allows you to email your presentation as a PowerPoint file or a PDF. This is a great choice if you want to give the recipient an editable or view-only copy.
Alternatively, if the presentation is too large for an email attachment, you can select the option to Send a Link or explore one of the ways to share large PowerPoint files over the Internet .
By sending a link, the method will save your PowerPoint presentation to OneDrive (Microsoft’s cloud storage service) and then generate a shareable link that can be sent to your contacts.
This link can be configured with specific permissions, such as view-only or edit access, to ensure that your content is secure.
If your presentation is already saved on OneDrive, the process becomes even more straightforward. After saving, simply click the “Share” button, select “Copy Link,” and adjust the settings to control who can access the file. This method is particularly useful when collaborating in real-time, as it allows multiple people to view or edit the presentation simultaneously.
For those using Microsoft Teams, PowerPoint offers direct integration, making it easy to share your presentation within a Teams chat or meeting. By selecting the “Share in Teams” option, you can instantly distribute your slides to all participants. Additionally, if you’re hosting a meeting in Teams, you can choose to present directly from PowerPoint by clicking “Present in Teams.” This feature is designed for seamless sharing during virtual meetings, enabling smooth, real-time collaboration.
Customizing Sharing Options when Sending a PPT Presentation to Others
One of the key advantages of using PowerPoint’s built-in sharing feature is the ability to customize your sharing settings.
When you share via OneDrive or Teams, PowerPoint allows you to set specific permissions, such as who can view or edit the file. You can choose to make the presentation accessible to anyone with the link, restrict access to people within your organization, or limit it to specific individuals.

Furthermore, if you need to modify access settings after sharing, you can easily do so by navigating to OneDrive or Teams, locating the shared file, and adjusting the permissions. This control over your content helps prevent unauthorized access and protects your intellectual property.
Exploring Other Methods for Sharing PowerPoint Presentations
While PowerPoint’s built-in sharing feature is convenient, there are other methods you can use to distribute your presentations effectively.
How to Share a PowerPoint Presentation by Email
Sharing via email remains one of the most common approaches. You can attach your PowerPoint file directly to an email using your preferred email client.
However, keep in mind that email services often have size limits for attachments. For example, Gmail has a maximum attachment size limit of 25 MB for sending emails, Yahoo Mail allows attachments up to 25 MB per email, and Outlook has limit of 20 MB. Most of these limits are beyond the typical presentation size, unless you use too many images or big media inside the presentation. To mitigate this, consider compressing images and media files within PowerPoint or saving the presentation as a PDF to reduce the file size.
For large files, uploading them to a cloud storage service like OneDrive, Dropbox, or Google Drive and sending a shareable link is often a better solution.
How to Share a PowerPoint using Coud Storage
Cloud storage services offer an excellent alternative for sharing PowerPoint presentations, especially when dealing with large .pptx files.
Platforms like Dropbox, Google Drive, OneDrive, and iCloud allow you to upload your file, generate a sharing link, and control access permissions.
Each service comes with its own set of features and limitations, so it’s essential to choose the one that best fits your needs.
For instance, while OneDrive provides seamless integration with PowerPoint, Dropbox and Google Drive might offer better options for cross-platform compatibility.
Dropbox is a great option if you want others to see a preview of your presentation. By sharing a PDF or PPT presentation via Dropbox, the users will see a presentation preview. You can use Dropbox as a PDF Presenter Viewer in a browser.
How to Share Presentations via Microsoft Teams or Zoom
Collaboration tools like Microsoft Teams, Zoom, and Slack have also become popular for sharing PowerPoint presentations, especially in remote work environments.
These tools enable you to share and present your slides directly within their platforms, making real-time collaboration easier.
Presenting directly from PowerPoint during a virtual meeting allows for live interaction and feedback, which can be invaluable for brainstorming sessions, training presentations, or client presentations.
Sharing PowerPoint Presentations on Social Media
Social media and websites are another avenue for sharing presentations, particularly when targeting a broader audience. Uploading your presentation to platforms like LinkedIn, SlideShare, or your company’s website can increase its visibility and reach. However, it’s essential to consider privacy settings and the potential audience reach when sharing presentations publicly to protect sensitive information.
Alternative Methods for Sharing PowerPoint Presentations
If you prefer offline methods, sharing your presentation via USB drives, external hard drives, or direct device transfers can be effective.
Additionally, presentation-specific tools to host slides offer unique features tailored to hosting and sharing slides. These platforms can be an excellent alternative for those who want more control over their content’s distribution.
Troubleshooting Common Issues
When sharing presentations, you may encounter some common issues, such as links not working or permission errors.
To avoid these problems, ensure the link is correctly copied and that the recipient has the necessary permissions to access the file. If the recipient reports issues opening the presentation, double-check the sharing settings and adjust them as needed. In some cases, re-sharing the PPT again will solve it.
To prevent compatibility problems, consider saving your presentation in multiple formats, such as .pptx and PDF, to ensure it can be viewed on various devices and platforms. Remember to take special precaution with fonts used inside the presentation. Use safe-fonts whenever it is possible, so the other party does not necessarily need to have the custom fonts installed in the computer.
PowerPoint’s built-in Share feature provides a way for distributing presentations quickly and securely.
Whether you’re sharing via email, cloud storage, collaboration tools, or directly within a meeting, PowerPoint offers several options to suit your needs.
By exploring these tools, customizing your sharing settings, and understanding alternative methods, you can enhance your presentation-sharing experience and ensure that your message reaches its intended audience efficiently.
We will send you our curated collections to your email weekly. No spam, promise!
How-To Geek
How to make a microsoft powerpoint presentation into a video.

Your changes have been saved
Email is sent
Email has already been sent
Please verify your email address.
You’ve reached your account maximum for followed topics.
Quick Links
Why convert a powerpoint to video, convert a powerpoint presentation to a video.
Microsoft PowerPoint presentations are great, but they are not as easily accessible as videos. Luckily, you can convert your presentations to videos with a built-in option. We'll show you how.
There are many reasons to turn a presentation into a video. Maybe you want to send someone a presentation but they don't have PowerPoint installed. Or, maybe you want to upload your presentation to a site that only accepts videos.
PowerPoint has a built-in option to convert presentations to videos. When you perform this conversion, all your original animations, transitions, and media items are preserved. Your resulting video also includes all recorded timings , narrations , ink strokes, and laser pointer gestures (though you can choose not to include these if you want).
Related: How to Burn Your PowerPoint to DVD
To turn a PowerPoint presentation into a video, first, open your presentation with the PowerPoint app on your Windows or Mac computer.
In the top-left corner of PowerPoint, click the "File" option.

From the sidebar that opens after clicking the "File" option, select "Export."

In the "Export" menu, click "Create a Video."

To the right of the "Export" menu, you will now see a "Create a Video" section. In this section, you will define the options for your video file.
First, choose the quality for your video by clicking the "Full HD" option.

You will see multiple video quality options. Select the one that you think works the best for you. Know that the higher the quality you select, the larger the file size of your video will be.

To include the recorded timings and narrations in your video, then beneath the video quality menu, click the "Don't Use Recorded Timings and Narrations" option.

Select the "Use Recorded Timings and Narrations" option. If this option is grayed out, that's because you don't have any recorded timings or narrations in your presentation.

You will now specify how long each slide appears in the video. Click the "Seconds Spent on Each Slide" box and enter the duration in seconds. By default, this duration is set to 5 seconds.
Finally, at the bottom of the "Create a Video" section, click "Create Video" to start making your video.

Your computer's standard "save" window will open. Here, select the folder to save your video in, type a name for your video, and click "Save."

PowerPoint will take you back to the main interface. At the bottom of this interface, you will see the progress of the conversion.

When your video is made, you will find it in the specified folder on your computer.
And that's how you make your presentations available to a wider audience by converting them to a video format!
Need your video in another format? Use VLC to convert your video to other formats.
Related: How to Convert a Video or Audio File Using VLC
- Microsoft Office
- Microsoft PowerPoint

How to Make a PowerPoint into a Video in Under 5 Minutes
- how to make a powerpoint into a video

PowerPoint is, by far, the most popular tool people use to make presentations , whether for school projects or work-related activities, such as staff training or pitching a product idea to investors.
PowerPoint is genuinely a great tool. It’s simple and easy to use, offers hundreds of themes, and if you spend a bit of time playing around with all the different options inside the program, you can make professional presentations that will captivate your audience.
The only issue regarding PowerPoint—more specifically, presentations in general—is the limited usability of PPT files. You can’t upload a presentation on YouTube , for example. You could technically share it on your website or on social media, but a presentation without a presenter is just a random compilation of images.
Unless the person who created the presentation takes the time to weave the story, explain all the concepts, and expand on the bullet points the audience sees on the slides, the presentation won’t have the desired impact.
Does that mean that presentations are only viable in a face-to-face setting? Not exactly. There are a number of different ways to utilize presentations, but they all involve converting the PPT file into a video .
Now, the question begs itself— how do you make a video out of a presentation?
Turn PPTs into engaging videos
With InVideo’s online editor

Creating a Video from PowerPoint
The first thing that will go through most people’s minds is a webinar. When you stop to think about it, a webinar is nothing more than a glorified presentation. Someone takes the time to record themselves as they’re going through all the different slides and explaining everything in detail.
A webinar is a rather specific form of content, and it takes a lot of time and effort to put one together and to get enough people to watch it to make it worthwhile. Unless you’re an experienced salesperson who is adamant about selling a product and firmly believes that the best way to do so is to blabber about it for two hours, you’re probably looking for a faster, less painstaking way to turn a PowerPoint into a video.
Thankfully, there are a number of different ways to do so. In fact, PowerPoint itself gives you the option to convert the presentation into a video. In this article, we’ll walk you through the entire process step by step and show you how to make a video PPT using all the different versions of the program.
How to make a video from PowerPoint?(Office 365, PowerPoint 2019, PowerPoint 2016)
Although the option is there, keep in mind that it’s not as simple as clicking a Convert to video button. You do need to record narration and laser point gestures (mouse movement on-screen) beforehand.
The reason for that is simple and technical in nature—unless you record narration and timings beforehand, PowerPoint will default to five seconds per slide when creating a video.
You can change this by clicking the upward arrow next to the Timing under the Create a Video option, but keep in mind that you’ll be adjusting the time for all slides simultaneously. There is no option to adjust how long each individual slide will appear on the screen.
If you want to use different timings per slide, as well as record narration, select the Recording option inside PowerPoint and create a video.
Here’s how you’ll enable recording inside Office 365 PowerPoint, as well as PowerPoint 2019 and 2016:
1. Click on File and select Options on the left-hand side of the screen 2. Choose Customize Ribbon (A) from the drop-down menu 3. Check Recording (B) in the pop-up window and hit OK (C)

Image source: Microsoft
You’ll see a new option appear on your screen under the Recording tab, titled Record Slide Show. Clicking on the downward pointing arrow will allow you to choose whether you want to start recording the slideshow from the start or from the slide you’re currently on.
You can also choose to record the narration as audio or video, and you will be able to leverage a variety of different tools, such as pens and markers, to highlight certain elements on your slides.
As you’re recording, the red circle next to the Record Slide Show button will be blinking, indicating that the audio and/or video is being captured. Once you go through all the slides, you can either:
- Click on the square Stop button - Press S on your keyboard.
Exporting your video
The easiest way to export the video you just recorded is to navigate to the Recording tab and select Export to Video . This will open up a new menu, and PowerPoint will prompt you to choose the video quality.
|
| ||
|
| ||
| Standard (480p) | 852 x 480 | Portable devices like phones and tablets |
| HD (720p) | 1280 x 720 | The Internet |
| Full HD (1080p) | 1920 x 1080 | Computer monitors and HD screens |
| Ultra HD (4K) | 3840 x 2160 | Large TVs |
One thing to keep in mind is that the Ultra HD option is available only on Windows 10 .
Next up, you’ll need to either set the timings for the slides or select the Use Recorded Timings and Narration option.
Then, click on Create a Video , name your file, and choose where you want to save it.
Finally, select the Save as Type option and choose between two available formats:
- MPEG-4 Video - Windows Media Video
PowerPoint will start converting the slideshow into a video automatically. Depending on the video quality and length, this process might take a while, so we suggest timing it so that you don’t have to use the computer during that time. For larger, Full HD or Ultra HD videos, it’s best to keep the program running overnight.
PowerPoint 2013
One notable difference with the 2013 version of PowerPoint is that the video quality options are slightly different. Ultra HD (4K) was just entering the scene, and not a lot of people owned devices that supported the 3840 × 2160 video resolution, so it’s no surprise that the option doesn’t exist in this version.
|
| ||
|
| ||
| Presentation Quality | 1920 x 1080 | Computer and HD screens |
| Internet Quality | 1280 x 720 | The internet |
| Low Quality | 852 x 480 | Portable devices |
The interface didn’t change much over the years, so if you happen to be running PowerPoint 2013, you’ll go through the exact same process as with the newer versions of the program:
1. Navigate to File , click Export , and choose to Create a Video 2. Select the resolution 3. Set timing parameters or use recorded timings and narration 4. Click on Create Video 5. Choose Save as Type and select between MPEG-4 or Windows Media Video
PowerPoint 2010
If you are still using the 10-year-old version of PowerPoint, the options for creating a video out of your slideshow will be a bit different.
The first thing to keep in mind is that PowerPoint 2010 only supports .mp4 files and that the maximum resolution for the videos is 1290 x 720, which isn’t exactly ideal. If you want to create a professional-looking video from your PowerPoint presentation to share with business partners or your audience, you might want to consider a less restrictive alternative.
Here’s how you would turn your slideshow into a video in this outdated version of the program:
1. Select Save & Send under File 2. Choose the option Create a Video at the very bottom of the right-hand side of the screen 3. Find the Create a Video tab if you want to see the available video quality options 4. Click on the downward-pointing arrow next to the Computer & HD Displays option and choose from the three available options 5. Choose between Use and Don’t Use Recorded Timings and Narration depending on whether you want to use recorded timings and narration 6. Click on Create a Video , name it, choose the destination folder, and hit Save
|
| |
|
| |
| Computer & HD Displays | 1920 x 1080 |
| Internet & DVD | 1280 x 720 |
| Portable Devices | 852 x 480 |
PowerPoint Video Drawbacks
It’s always great when you can use the same tool for various different tasks. In the case of PowerPoint, you can both create the presentation within the program and convert it into a video on the spot.
That said, PowerPoint isn’t a video editing tool . What we mean by this is that you are severely limited in terms of what you can do with the video you create from your PPT. There are no transitions, you can’t leverage fade-ins and fade-outs, and there is no music, among other things.
No matter how you look at it, the videos created through PowerPoint will be bland. PowerPoint’s PPT to video conversion might get the job done if your only goal is to share a presentation internally with your team. Even then, it only makes sense in a remote work environment, where you can’t physically hold the presentation to your coworkers.
If you’re planning on using the presentation as a core part of your marketing strategy , then the video quality—and we don’t mean the resolution here—you’ll get from PowerPoint won’t suffice. No matter how professional you sound during the narration, the videos created through PowerPoint will still give off the impression that you didn’t try all that hard.
When you see the production value of the videos that businesses share on their websites, YouTube channels , and social media, it’s painfully obvious that PowerPoint videos can’t compete. This doesn’t mean you have to spend months learning video editing or spend a small fortune hiring a professional videographer to make and edit the videos for you.
With InVideo, a powerful yet easy-to-use online video editor , you can create stunning videos from your presentations in minutes! We’ll walk you through the whole process to show you how easy it is to create breathtaking videos from presentations with InVideo .
How to make a video from a PowerPoint Presentation using InVideo?
Videos are quickly becoming an integral part of every business’s marketing strategy. Whether you’re a startup, an enterprise, a medium-size business, or a solo entrepreneur, you will need to use videos if you want to attract as much traffic to your website as possible. The same goes for influencers and bloggers—videos beat any other type of content when it comes to user engagement.
InVideo makes video editing quick, easy, and fun. Thanks to our intuitive, drag-and-drop video editor , professionally designed video templates , and an extensive library of photos and audio tracks, you can create killer videos in no time, even if you have absolutely no video editing experience.
Our platform is cloud-based, meaning you can access it from any browser on your computer and laptop. This also means that your video editing capabilities won’t depend on how powerful your machine is, meaning you can create HD and Ultra HD videos even with a low-end PC or laptop.
The best part about InVideo is the fact that you can export up to 60 videos per month for free! With our free plan , you’ll have access to all of InVideo’s features so that you can play around with all the different options and learn video editing at your own pace. We also have dozens of video editing tutorials for different use-cases, so you can get started right away.
Creating videos from photos and PowerPoint presentations is one of many things you can do with InVideo.
Here’s are the simple steps you can follow to create a stunning video from your presentation with InVideo:
Step 1: Create an account
To get started, you’ll need to create an account.
Navigate to our website and click Sign Up in the top right corner. Input your email, set up your password, and you’re good to go. We’ll never ask you for your credit card information or phone number. We won’t bombard you with emails either—we hate spam as much as you do.
Step 2: Select a Template or start from scratch
Once you log in, you’ll see several different options on the homepage:

The Pre-made Templates option will be selected by default. While there are over 5000 stunning video templates in our library, we strongly suggest that you go with the Blank Template option for this purpose.
You will be starting from scratch, but it’s not as scary as it might sound. The blank template is the most convenient option since you’ll be treating each slide as a separate scene and editing them individually. Here’s how to do it:
- Choose how long each slide appears on the screen - Add the appropriate narration - Throw in effects , filters, transitions , etc.
Step 3: Upload your media
Assuming you are the one who created the presentation, you should have all the necessary media on your device—photos, slides, and the script . To add it to the video, you’ll first need to upload it through our video editor .
From the menu on the left, select the Uploads option and click on the Upload button at the bottom of the screen.

You can upload files up to 800MB at a time. If you have all the photos neatly sorted into a folder, you can upload the entire folder in one go. All the media you upload will be available immediately to the left of your video—for this and all future projects—and you can drag and drop images to the center of the screen to add them to the timeline.
Step 4: Add the photos
Let’s start with a single scene—the intro of your presentation. Drag and drop the desired image from the Uploads library onto the screen to add it to the scene.

The video editor will show you what the image will look like in the video. When you drop the photo, you’ll need to select one of the two options:
- Replace - Add as a layer

If the slide consists of a single image, choose Replace. Since we’re not using a pre-made template here, the image you chose will replace the black background.
If you would like to add additional images on top of it—such as graphs, screenshots, product photos, or lifestyle images—drag and drop them to the center of the screen once again, but this time select the Add as a Layer option. This will put the new image on top (in front) of the background one, making the first one act as a backdrop.
Step 5: Edit the Scenes and add text
By default, scenes will be about five to six seconds long, which probably isn’t sufficient for the narration. You can edit how long each slide—referred to as a scene in the video editor—will be on the screen for on the timeline.

The image above shows the basic timeline, which is great for having an overview of all your scenes. To edit a specific scene, click on it on the timeline and select the Advanced Timeline option in the top right corner.

On the left side, you’ll see all the different elements that make up the scene. Select each one you’d like to edit, whether it’s a logo, the text, or the image itself.
The middle of the timeline is reserved for the length of the scene. To adjust how long this scene will be in the video, move the sliders left or right. The duration of the scene will always be displayed in the center.
On the right side, you’ll be able to zoom in and out, so you can edit the timeline more easily.
As far as text editing is concerned, you can do so either from the timeline or by selecting the text box on the screen. You’ll be able to drag and drop the text box to adjust the positioning, rotate the text, change the colors and font, and more. To add multiple text boxes, select the Text option from the left-hand menu and drag and drop the new box onto the screen.

Step 6: Add narration
All that’s left to do is add narration. If you’ve recorded the audio already, you can add it through Uploads , the same way you did with photos. If not, you can add a voice-over to each individual scene. Select the Add VO option and import an existing voice-over or choose to record it on the spot.

Step 7: Export the Video
After you record or upload the VO, add the photos, and edit the length of each scene, you’re good to go. You can play around with filters, effects, and transitions if you’d like, but the base video is complete and ready to be shared with the world!
All that’s left to do is to click on Export in the top right corner and wait for the video to render. After a few minutes, depending on the video’s length, you’ll be able to download it, post it on YouTube and social media, or copy the shareable link and use the video in your marketing campaigns.
Turn your PPTs into epic videos
Without spending hours on editing

That’s how easy it is to create stunning videos with InVideo. Click here to get started today for free and turn your PowerPoint presentations into breathtaking videos in no time!
Let’s create superb videos
PDFelement: PDF Editor, Scanner
Edit, Convert, Annotate PDF
- PDFelement for Windows
- PDFelement for Mac
- PDFelement on Mac App Store
- PDF Reader for Windows
- PDFelement for iPhone/iPad
- Get from App Store
- PDFelement for Android
- Get from App Google Play
- PDF Scanner for iPhone
Cloud & SDK
- PDFelement Cloud
- PDFelement Pro DC
- PDFelement SDK
Online PDF Tools
- PDF to Word
- Compress PDF
- Word to PDF
Educational Users
- Annotate PDF
- Combine PDF
Personal Users
- Convert PDF
- Organize PDF
Professional Users
- eSign PDFs Legally
- Extract Data from PDF
- Password Protect PDF
PDF Solutions for
- Chat with PDF
- AI PDF Summarizer
- AI PDF Translator
- AI Grammar Checker
- AI Content Detector
- AI Rewrite PDF
- Explain PDF with AI
- Add Bookmarks to PDF
- Explain PDF
- Mac Software
- OCR PDF Tips
- Online PDF Tips
- Edit PDF like Word
- PDF Converter Tips
- PDF Compressor Tips
Why PDFelement
- Customer Stories
- PDF Software Comparison
- Contact Support
- PDFelement for iOS
- InstaScan for iPhone
Explore More
- Upgrade Get the best price to upgrade to the latest PDFelement 11.
- Reviews See what our users say.
- Free PDF Templates Edit, print, and customize free templates.
- PDF Knowledge PDF-related information you need.
- Download Center Download the most powerful and simple PDF tools.
- Download Download Pricing Pricing
- 6 Simple Ways to Send a PPT
Discover how to send a PPT with ease using various methods. Learn to streamline the process using Wondershare PDFelement’s innovative features.

- Send PDF to Kindle
- send photos as pdf
- Share a PDF as a Link
- Share a PDF on Facebook
- Share a PDF with Twitter
- Send PDF in Messenger
- Send PDF on Instagram
- How to Send PDF via Text
- Transfer PDFs to iPad
- Scan a Document Into an Email
- Beyond Compare
- Compare Two PDF Files
- Compare PDFs Adobe
- Foxit Compare PDF
- Compare PDF and Word Document
- 3 Methods of Using AI To Compare Two Documents: A Comprehensive Guide
- Top 12 Remote Work From Home Jobs
- Reasons You Should Go Paperless
- Digital Signature Vs. Electronic Signature
- Show the Power of Teamwork with these 6 Collaboration Tools
- Team collaboration and how to incorporate it in workplace
- Why is Self-management Important to Achieve Success?
- 5 Tips to Improve Adaptability Skills for Workplace Success
- Personality Traits: The Big 5 Model and other examples
- Tips and Tricks for Self-Confidence and Self-Esteem Building
- Why Goal Setting Is So Important
Sharing a PowerPoint presentation (PPT) is essential in today’s digital landscape. Whether for business, education, or collaborative projects, you need reliable methods to send your presentations quickly and efficiently. Wondershare PDFelement offers innovative solutions to enhance your sharing experience, including QR code sharing and PDFelement Cloud. This guide covers various methods for sending PPTs, ensuring you have the necessary tools for every situation.
In this article
How to send a ppt via email, how to send a ppt via dropbox, how to send a ppt on google drive, how to send a ppt from your phone, how to send ppts in batch, how to convert ppt to pdf before sending.

Sending a PPT via email is straightforward but challenging if the file is too large. Here's how to do it seamlessly:
- Open Your Email Client: Launch your preferred email client, Gmail or Outlook.
- Compose a New Email: Click 'Compose' or 'New Email.'
- Attach the PPT File: Click the attachment icon, navigate to your PPT file, and select it.
- Add Recipient and Message: Enter the recipient’s email address, subject, and a brief message.
- Send the Email: Click 'Send.'
Handling Large Files:
- Compress the PPT: Reduce the file size by compressing images and removing unused slides. Go to 'File' > 'Compress Pictures' in PowerPoint and choose your compression options.
- Use File Compression Tools: Tools like WinRAR or 7-Zip can compress the file into a ZIP folder. Right-click your PPT file, select 'Add to Archive', and choose 'ZIP'.
- Upload to PDFelement Cloud: Upload your presentation to PDFelement Cloud. This cloud storage solution allows you to bypass size limitations by simply sharing a link to the file. Here’s how:
- Open PDFelement and upload your PPT file to PDFelement Cloud.
- Generate a shareable link or QR code and include it in your email.

Dropbox is an excellent tool for sharing large files. Here's how to leverage it for your PPT:
- Upload the PPT to Dropbox:
- Open Dropbox and sign in.
- Click on 'Upload Files' and select your PPT file.
- Wait for the upload to complete.
- Share the File:
- Once uploaded, hover over the file and click 'Share'.
- Enter the recipient’s email address and add a message if desired.
- Click 'Send' or 'Copy Link' and paste the link in an email.
Using PDFelement with Dropbox:
- Integration: PDFelement integrates seamlessly with Dropbox. You can save your PPT to Dropbox from PDFelement and generate a shareable link or QR code.
- Secure Sharing: PDFelement provides options to add passwords and expiration dates to your Dropbox links, enhancing security.

Google Drive is another popular cloud storage service for sharing files. Follow these steps:
- Upload the PPT to Google Drive:
- Open Google Drive and sign in.
- Click 'New' > 'File Upload' and select your PPT file.
- Right-click the uploaded file and select 'Get Link'.
- Choose the sharing settings (e.g., view only, edit access).
- Copy the link and share it via email or other messaging platforms.
Using PDFelement with Google Drive:
- Integration: PDFelement integrates with Google Drive, allowing you to upload and share files directly. Open PDFelement, upload your PPT to Google Drive, and generate a shareable link or QR code.
- Enhanced Features: PDFelement allows you to annotate and add comments to your PPT before sharing, making it easier for recipients to understand your notes and revisions.
Sending a PPT from your phone is incredibly convenient when you’re on the move. Here’s how:
- Open your email app.
- Compose a new email and attach the PPT file from your phone’s storage.
- Send the email.
- Dropbox/Google Drive:
- Open the Dropbox or Google Drive app.
- Upload the PPT file.
- Share the link via email or messaging apps.
- Using PDFelement Mobile App:
- Open the PDFelement app on your phone.
- Upload your PPT to PDFelement Cloud.
- Generate a shareable link or QR code.
Advantages of Using PDFelement Mobile:
- Convenience: Access your PPTs anytime, anywhere.
- QR Code Sharing: Instantly generate a QR code for your file and share it with others for quick access.
- Secure Cloud Storage: Store your files in PDFelement Cloud and ensure they are safe and accessible.
When you need to send multiple PPTs, batch processing can save time. Here’s how:

- Compress all PPT files into a single ZIP folder. Right-click the selected files, choose 'Send to', and select “Compressed (zipped) folder.”
- Attach the ZIP folder to your email.
- Cloud Storage:

- Upload all PPT files to a single folder in Dropbox or Google Drive.
- Share the folder link with recipients.
- Using PDFelement:

- Open PDFelement and create a ZIP file containing all your PPTs.
- Upload the ZIP to PDFelement Cloud.
- Generate a shareable link or QR code and share it with your recipients for easy access.
Batch Processing with PDFelement:
- Efficiency: PDFelement allows you to batch convert PPTs to PDFs and upload them to PDFelement Cloud in one go.
- Organization: Keep all your presentations organized and easily accessible in one place.
- Security: Add password protection to your ZIP file or individual PDFs before sharing.
Converting PPT to PDF can make your presentation easier to share and view. Here’s how:
- Using PowerPoint:

- Open the PPT file.
- Go to 'File' > 'Save As'.
- Choose PDF from the file format options and save.
- Share the PDF via email or cloud storage.

- Open PDFelement and select 'Create PDF'.
- Choose the PPT file and convert it to PDF.
- Save and share the PDF via email or cloud storage.
Benefits of Using PDFelement:
- High-Quality Conversion: PDFelement ensures your PPT is converted to PDF without losing quality.
- Annotation Tools: Before sharing, add comments, highlights, and annotations to your PDF.
- Security Features: Add passwords and permissions to your PDF for secure sharing.
- Use QR Codes: PDFelement 11 allows you to share files using QR codes, making it easier for recipients to access the presentation. Simply generate a QR code for your file and share it.
- Utilize PDFelement Cloud: Store and share your presentations securely using PDFelement Cloud. Access your files from anywhere and share them with ease.
- Compress Before Sharing: Always compress your PPT files if they are too large. This helps in faster uploading and downloading.
- Annotate and Comment: Use PDFelement’s annotation tools to add comments and highlights to your presentations before sharing.
Thanks to the wide array of options available today, sharing a PowerPoint presentation has never been simpler. Whether emailing your presentation, storing it in the cloud, or converting it to PDF, Wondershare PDFelement elevates the process with innovative features. With QR code sharing, you can provide instant access to your presentation, allowing recipients to view it with a scan. Additionally, PDFelement Cloud ensures your presentation is always accessible and easily shareable from anywhere. These powerful tools not only make your presentation more accessible but also ensure it looks polished and professional, enhancing the overall impact of your work.
People Also Ask
How do i send a large powerpoint file via email, can i send a ppt directly from my phone, how do i convert a ppt to a pdf, what are the new features of pdfelement 11 for sharing ppts, how do i ensure my ppt is secure when sharing, can i batch process ppts using pdfelement, you may also like.
- How to Share a PDF as a Link
- How to Share a PDF on Facebook
- How to Share a PDF on Twitter

Record your presentation
You can record your PowerPoint presentation—or just a single slide—and capture voice, ink gestures, and your video presence. The completed recording is like any other presentation. You can play it for your audience in Slide Show or you can export it as a video file. So instead of just handing the deck to someone, people can see your presentation with all your passion and personality intact.
Record is an improved version of Record Slide Show for PowerPoint for Windows. The feature replaces the older experience and provides enhanced capabilities for capturing your presentations for later viewing.

What's new?
New access points for recording a video of the presentation .

New features added for recording video
The new Record window has two screens: Record and Export .
When you select Record , the Record screen opens by default.

If you select Export in the top right of the Record screen, the Export screen opens.

You can switch between the Record and Export screens using the Record and Export buttons in the top bar of the window.
New features added to the Record window
You'll see the following new features in the Record window:

You can also use the seek bar to skip to any point while you're previewing the video on the current slide.
New Export window
The Export window is another change with the Record feature. After recording, you’ll be lead through instructions to create a shareable video file of your presentation. By default, the video is in Full HD 1080p resolution in an mp4 format and will be saved to the same location where the presentation is stored.

The exported video includes all recorded timings, narration, animations, transitions, media, ink, and laser pointer gestures. If there's no recorded timings for a slide in the presentation, the slide will be displayed for 5 seconds in the exported video by default.
By default, the exported video has the same filename as the presentation, but you can create a unique filename for the exported video, if you want.
Depending on the size of your presentation, it may take a few minutes to export. After the export starts, you can track its progress in the Export window. You can also exit the Record window and track the progress in the status bar in PowerPoint.
The Customize Export button takes you to the backstage export menu to change resolution and time spent on each slide in the exported video.
Recording tips
Recordings are added to the presentation on a per-slide basis. If you want to change a recording, you can re-record one or more slides. You can rearrange the order of slides in a recorded presentation without having to re-record anything. This also means it's easy to pause for a break while recording a presentation.
PowerPoint doesn't record audio or video during transitions between slides, so be sure not to narrate while advancing the slide. There's also a brief buffer of silence at the beginning and the end of each slide.
Use video preview to make sure everything is set up correctly before recording.
Presentation recording works best with touch-screen PCs that have a web camera but you can use an external webcam and/or microphone.
If you're using PowerPoint on a tablet or laptop and you're inking with a stylus, you can use an external camera and microphone to minimize stylus noise.
After you finish your first slide recording, play it back to make sure your audio and video are set up the way you expect.
You can adjust and edit the size of video and ink in edit view.

Need more help?
Want more options.
Explore subscription benefits, browse training courses, learn how to secure your device, and more.

Microsoft 365 subscription benefits

Microsoft 365 training

Microsoft security

Accessibility center
Communities help you ask and answer questions, give feedback, and hear from experts with rich knowledge.

Ask the Microsoft Community

Microsoft Tech Community

Windows Insiders
Microsoft 365 Insiders
Was this information helpful?
Thank you for your feedback.
IMAGES
VIDEO
COMMENTS
Need to send out a PowerPoint that has an embedded video? Here's how to send a presentation without breaking it.
Use email to send your PowerPoint presentation as an attachment, a link, a PDF file, or an XPS file to others.
Learn how to easily email a PowerPoint slideshow with our step-by-step guide. Follow these simple steps to share your presentation with anyone.
1. Open Your PowerPoint Presentation. Start by opening the PowerPoint presentation where you want to embed the video. If you're starting from scratch, open PowerPoint and create a new presentation. 2. Navigate to the Slide Where You Want the Video. Click on the slide where you want to add the video. It's a good idea to have a clear idea of ...
Here's a step-by-step guide to sending a PowerPoint presentation with an embedded video so that it continues to play seamlessly when viewed by others.
After you've finished creating a PowerPoint presentation - assembling the content, perfecting the design, and adding animations and other special effects - you may want to email it to your students, employees, or clients. There are several ways to email PowerPoint slides, and the one you choose may depend on a few things: the file's size, security concerns, and whether you want users ...
Learn how to embed a video from YouTube or another online site in PowerPoint with easy steps and tips.
Why should you email PowerPoint presentations? Emailing PowerPoint presentations is a convenient way to share information with colleagues, clients, or friends. It allows you to send visually appealing and interactive presentations without the need for physical copies or complex file-sharing methods.
In PowerPoint for the web, you can send a file as an attachment in Outlook.com or Outlook Web App in Microsoft 365. The recipient will get a copy of the file, and if they want to edit it, they'll have to save it with a new name. You can also send a link to your presentation that lives in the cloud.
Using videos has become a very influential part of interaction. Let's see how to embed a video in PowerPoint and grab audiences' attention.
Embedding Videos Versus Linking to Videos In PowerPoint, you can either embed a video or link to a video from your presentation. If you embed a video, your video becomes part of the presentation, which increases the overall size of the presentation file.
How to embed a video in your PowerPoint presentation using an embed code This option allows you to insert online videos into your presentations using embed codes from all kinds of online platforms.
Embedding a PowerPoint slide into an Outlook email is a breeze. Simply open your PowerPoint presentation, select the slide you wish to embed, copy it, and then paste it directly into the body of your email in Outlook. It's that easy!
Click Email in Your PowerPoint Share Menu. While you're working in a PowerPoint presentation, go to the File menu and click on Share. Now, click on Email on the left side. Let's click on Send As Attachment. How to Email your PowerPoint presentation as an attachment. 2.
PowerPoint is a cornerstone of productivity in corporate environments, serving to convey business proposals, project updates, and educational content. And when collaboration is needed, sharing presentations becomes essential. Among the various options, emailing the presentation stands out. In this article, we will guide you through the process of how to send a PowerPoint through email. Send ...
Learn how to publish your own video using Microsoft PowerPoint with narration, annotations, animations, and timings. As full disclosure, I work at Microsoft ...
From OneDrive, share a PDF or copy of your presentation by email PowerPoint will open the email application and attach the file to a new message. Enter the recipients details and a short message, and click You can share or co-author a presentation in PowerPoint for macOS.
Struggling to send large PowerPoint files via email? Learn how to compress, convert, or use cloud storage to share your presentation with ease.
Example showing how to share a PowerPoint through email. Alternatively, if you don't use Outlook, you can still share a presentation by email. Save the presentation file and from your Email client (Mail, emClient, etc.) click to attach a new file. Now, you can select the .pptx file from your computer.
Join 400,000+ professionals in our courses here 👉 https://link.xelplus.com/yt-d-all-coursesLearn how to create a video using PowerPoint. I'll first show you...
To turn a PowerPoint presentation into a video, first, open your presentation with the PowerPoint app on your Windows or Mac computer. In the top-left corner of PowerPoint, click the "File" option.
When you make a recording of a presentation, all its elements (narration, animation, pointer movements, timings, and so on) are saved in the presentation itself. In essence, the presentation becomes a video that your audience can watch in PowerPoint.
Learn how to make a PowerPoint into a video fast and easy. Create breathtaking videos from presentations, attract 3x more traffic, and engage your audience.
Open Your Email Client: Launch your preferred email client, Gmail or Outlook. Compose a New Email: Click 'Compose' or 'New Email.' Attach the PPT File: Click the attachment icon, navigate to your PPT file, and select it. Add Recipient and Message: Enter the recipient's email address, subject, and a brief message. Send the Email: Click 'Send.'
You can record your PowerPoint presentation—or just a single slide—and capture voice, ink gestures, and your video presence. The completed recording is like any other presentation. You can play it for your audience in Slide Show or you can export it as a video file. So instead of just handing the deck to someone, people can see your ...