- PRO Courses Guides New Tech Help Pro Expert Videos About wikiHow Pro Upgrade Sign In
- EDIT Edit this Article
- EXPLORE Tech Help Pro About Us Random Article Quizzes Request a New Article Community Dashboard This Or That Game Happiness Hub Popular Categories Arts and Entertainment Artwork Books Movies Computers and Electronics Computers Phone Skills Technology Hacks Health Men's Health Mental Health Women's Health Relationships Dating Love Relationship Issues Hobbies and Crafts Crafts Drawing Games Education & Communication Communication Skills Personal Development Studying Personal Care and Style Fashion Hair Care Personal Hygiene Youth Personal Care School Stuff Dating All Categories Arts and Entertainment Finance and Business Home and Garden Relationship Quizzes Cars & Other Vehicles Food and Entertaining Personal Care and Style Sports and Fitness Computers and Electronics Health Pets and Animals Travel Education & Communication Hobbies and Crafts Philosophy and Religion Work World Family Life Holidays and Traditions Relationships Youth
- Browse Articles
- Learn Something New
- Quizzes Hot
- Happiness Hub
- This Or That Game
- Train Your Brain
- Explore More
- Support wikiHow
- About wikiHow
- Log in / Sign up
- Computers and Electronics
- Presentation Software
- PowerPoint Presentations

Simple Steps to Make a PowerPoint Presentation
Last Updated: July 23, 2024 Fact Checked
Creating a New PowerPoint
Creating the title slide, adding a new slide, adding content to slides, adding transitions, testing and saving your presentation.
This article was co-authored by wikiHow staff writer, Darlene Antonelli, MA . Darlene Antonelli is a Technology Writer and Editor for wikiHow. Darlene has experience teaching college courses, writing technology-related articles, and working hands-on in the technology field. She earned an MA in Writing from Rowan University in 2012 and wrote her thesis on online communities and the personalities curated in such communities. This article has been fact-checked, ensuring the accuracy of any cited facts and confirming the authority of its sources. This article has been viewed 4,336,024 times. Learn more...
Do you want to have your data in a slide show? If you have Microsoft 365, you can use PowerPoint! PowerPoint is a program that's part of the Microsoft Office suite (which you have to pay for) and is available for both Windows and Mac computers. This wikiHow teaches you how to create your own Microsoft PowerPoint presentation on a computer.
How to Make a PowerPoint Presentation
- Open the PowerPoint app, select a template and theme, then like “Create.”
- Click the text box to add your title and subtitle to create your title slide.
- Click the “Insert” tab, then “New Slide” to add another slide.
- Choose the type of slide you want to add, then add text and pictures.
- Rearrange slides by dragging them up or down in the preview box.
Things You Should Know
- Templates make it easy to create vibrant presentations no matter your skill level.
- When adding photos, you can adjust their sizes by clicking and dragging in or out from their corners.
- You can add animated transitions between slides or to individual elements like bullet points and blocks of text.

- If you don't have a Microsoft Office 365 subscription, you can use the website instead of the desktop app. Go to https://powerpoint.office.com/ to use the website version.
- You can also use the mobile app to make presentations, though it's easier to do this on a computer, which has a larger screen, a mouse, and a keyboard.

- If you don't want to use a template, just click the Blank option in the upper-left side of the page and skip to the next part.

- Skip this step if your selected template has no themes available.

- If you're creating a PowerPoint presentation for which an elaborate title slide has been requested, ignore this step.

- You can change the font and size of text used from the Home tab that's in the orange ribbon at the top of the window.

- You can also just leave this box blank if you like.

- You can also click and drag in or out one of a text box's corners to shrink or enlarge the text box.

- On a Mac, you'll click the Home tab instead. [1] X Research source

- Clicking the white slide-shaped box above this option will result in a new text slide being inserted.

- Title Slide
- Title and Content
- Section Header
- Two Content
- Content with Caption
- Picture with Caption

- Naturally, the title slide should be the first slide in your presentation, meaning that it should be the top slide in the left-hand column.

- Skip this step and the next two steps if your selected slide uses a template that doesn't have text boxes in it.

- Text boxes in PowerPoint will automatically format the bulk of your text for you (e.g., adding bullet points) based on the context of the content itself.
- You can add notes that the Presentation will not include (but you'll still be able to see them on your screen) by clicking Notes at the bottom of the slide.

- You can change the font of the selected text by clicking the current font's name and then clicking your preferred font.
- If you want to change the size of the text, click the numbered drop-down box and then click a larger or smaller number based on whether you want to enlarge or shrink the text.
- You can also change the color, bolding, italicization, underlining, and so on from here.

- Photos in particular can be enlarged or shrunk by clicking and dragging out or in one of their corners.

- Remember to keep slides uncluttered and relatively free of distractions. It's best to keep the amount of text per slide to around 33 words or less. [2] X Research source

- Slide content will animate in the order in which you assign transitions. For example, if you animate a photo on the slide and then animate the title, the photo will appear before the title.
- Make your slideshow progress automatically by setting the speed of every transition to align with your speech as well as setting each slide to Advance . [3] X Trustworthy Source Microsoft Support Technical support and product information from Microsoft. Go to source

- If you need to exit the presentation, press Esc .

- Windows - Click File , click Save , double-click This PC , select a save location, enter a name for your presentation, and click Save .
- Mac - Click File , click Save As... , enter the presentation's name in the "Save As" field, select a save location by clicking the "Where" box and clicking a folder, and click Save .
Community Q&A
- If you save your PowerPoint presentation in .pps format instead of the default .ppt format, double-clicking your PowerPoint presentation file will prompt the presentation to open directly into the slideshow view. Thanks Helpful 6 Not Helpful 0
- If you don't have Microsoft Office, you can still use Apple's Keynote program or Google Slides to create a PowerPoint presentation. Thanks Helpful 0 Not Helpful 0

- Your PowerPoint presentation (or some features in it) may not open in significantly older versions of PowerPoint. Thanks Helpful 1 Not Helpful 2
- Great PowerPoint presentations avoid placing too much text on one slide. Thanks Helpful 0 Not Helpful 0
You Might Also Like

- ↑ https://onedrive.live.com/view.aspx?resid=DBDCE00C929AA5D8!252&ithint=file%2cpptx&app=PowerPoint&authkey=!AH4O9NxcbehqzIg
- ↑ https://www.virtualsalt.com/powerpoint.htm
- ↑ https://support.microsoft.com/en-us/office/set-the-timing-and-speed-of-a-transition-c3c3c66f-4cca-4821-b8b9-7de0f3f6ead1#:~:text=To%20make%20the%20slide%20advance,effect%20on%20the%20slide%20finishes .
About This Article

- Send fan mail to authors
Reader Success Stories
Artis Holland
Sep 22, 2016
Is this article up to date?

Oct 18, 2016
Jul 23, 2016
Margery Niyi
Sep 25, 2017
Jul 21, 2016

Featured Articles

Trending Articles

Watch Articles

- Terms of Use
- Privacy Policy
- Do Not Sell or Share My Info
- Not Selling Info
wikiHow Tech Help Pro:
Level up your tech skills and stay ahead of the curve
A step-by-step guide to captivating PowerPoint presentation design
november 20, 2023
by Corporate PowerPoint Girl
Do you often find yourself stuck with a lackluster PowerPoint presentation, desperately seeking ways to make it more engaging and visually appealing? If your boss has ever told you to "please fix" a presentation and you didn't know where to start, you're not alone. In this article, we'll walk you through a straightforward method to transform your PowerPoint slides into a visually captivating masterpiece.
Let's dive right in!
Clean up your slides
The first step in this journey to presentation excellence is all about decluttering your slides and elevating their impact. Say goodbye to those uninspiring bullet points that often dominate presentations. Instead, focus on what truly matters – the key call-out numbers. By increasing the font size of these numbers, you ensure they take center stage, immediately drawing your audience's attention.
To make those numbers pop, consider breaking the text after the numbers into the next line and adding a touch of color. The contrast created by pairing a dark color with a lighter shade, like dark teal and light teal or burnt orange with peach, can work wonders. This simple adjustment makes your data more engaging , enhancing the overall impact of your presentation.
Add dimension with boxes
Now, let's introduce an element of depth and organization to your slides. By adding boxes, you'll create a visually pleasing structure that guides your audience through the content. In the "Insert" menu, select "Table" and opt for a one-by-one table. Change the table color to a light gray shade, elongate it, and position it neatly to the left of your text.
To improve readability and aesthetics, increase the spacing between text phrases. A small adjustment in the before spacing setting (setting it to 48) significantly enhances the visual appeal of your slides.
Insert circles
To further enhance the visual appeal and engagement of your slides, let's introduce circles. In the Insert menu, navigate to Shapes and choose the circle. Adjust the circle's height and width to 1.2, ensuring it complements your content seamlessly. Match the circle's shape fill color with the corresponding text color for a harmonious look.
Avoid using colored outlines for the circles, as they may distract from the overall aesthetic. This simple addition of circles adds an element of visual interest to your presentation, making it more captivating.
Choose icons
Now, it's time for a touch of creativity. Selecting icons to complement your text can elevate the clarity and appeal of your slides. In the "Insert" menu, you can search for relevant keywords to find the perfect icon from PowerPoint's extensive library .
For instance, if your text discusses investment portfolio yield, search for "growth" and choose an upward arrow growth icon. These icons add an extra layer of visual appeal and clarity to your content, making it more engaging and informative.
Final touches
To wrap up the transformation process, we come to the final touches that give your presentation a polished, professional finish. Align your icons with their corresponding circles and change the shape fill color to white. This simple adjustment creates a crisp, cohesive look that ties everything together seamlessly.
In conclusion, by following these steps, you've embarked on a journey to enhance your PowerPoint presentation . These initial steps are just the beginning of your exploration into the world of design elements and styles that can cater to your specific presentation needs. The key to a stunning PowerPoint presentation lies in the details. By following these steps, you can turn a lackluster set of slides into a visually engaging and dynamic presentation that will captivate your audience. So, the next time your boss says, "Please fix," you'll know exactly where to start. Happy presenting!
Related topics
Critical PowerPoint Shortcuts – Claim Your FREE Training Module and Get Your Time Back!
How to Present a PowerPoint Slideshow (w/ Shortcuts)
- PowerPoint Tutorials
- Shortcuts & Hacks
- May 11, 2019
There are a variety of ways to start a PowerPoint presention, depending on:
- Where you start your presentation (from beginning or from current)
- Which PowerPoint view you prefer to present in (Slide Show view or Presenter view)
- How comfortable you are with keyboard shortcuts
Why would Microsoft include so many ways to present a presentation? My guess is that everyone learns PowerPoint differently, and has personal presentation styles. The more options you have, the easier your life will be as there will always be a way to start your presentation the way you want to (or jump back into it when you need to).
See all the options below and find the method that works best for you and let the slide show begin !
NOTE: If you are running two presentations side-by-side, each presentation needs to be started as it’s own slide show. To see how to set up two PowerPoint presentations to run side-by-side like this before you start your slide show, read my guide here .
Table of Contents
Start slide show from beginning.

To start a slideshow from the beginning of your presentation using the ribbon, simply.
- Navigate to the Slide Show tab
- Select From Beginning
Selecting From Beginning starts your presentation from the very first non-hidden slide in your presentation, regardless of which slide you are currently inside of your deck.

You can also start your slide from the beginning of your presentation by hitting the Slideshow From Beginning keyboard shortcut, F5 .
Regardless of which method you use, this is the classic way to start your presentation in full screen from your first title slide (regardless of where you are in your slide deck).
Let the slide show begin!
NOTE: To expand your knowledge and learn how to use PowerPoint’s FREE and HIDDEN built-in laser pointer to point things out during your presentation, read my guide here .
Take your PPT skills to the next level
Start slide show from current.

To begin your slide show from the slide you are currently on using the ribbon, simply
- Navigate to the Slide Show tab
- Select From Current Slide
Selecting From Current Slide starts your slide show from whatever slide you are currently on, even if the slide is hidden.

You can also start your slide from the current slide you are on by hitting the Shift+F5 keyboard shortcut.
Because it’s often easiest to catch errors when building your slides in this full screen mode, I highly recommend learning the Shift+F5 shortcut and using it frequently as you build your slides to spot them for errors.

If you don’t want to bother learning the From Current Slide shortcut, you can also start your slideshow by clicking the Slide Show icon at the bottom of your screen.
This is a fantastic way to spot check your slides as you are building them. On top of that, it’s a fast and uncomplicated way to re-start your presentation from where you left off after demoing something on screen.
Start a mini-slide show in PowerPoint
You can also use the following hidden PowerPoint shortcut to run a mini slide show over the top of your current deck.

To run a mini slide show, simply:
- Hold down the Alt key on your keyboard
- With your mouse, click the Slide Show icon
Doing so starts a small slide show of your presentation that you can see below, from the current slide you are on.

Presenter View
The Presenter View is an alternate way to run your presentation in PowerPoint. In this view, your slides are projected on screen, and the details of your presentation are displayed on your computer as pictured below.

The presenter view includes your next (non-hidden) slides that is coming up, your current slide projected on screen, how long you’ve been talking and your speaker notes.

To launch the Presenter View from the beginning of your presentation using your Ribbon, simply:
- Navigate to the Slide Show tab
- Hold down the Alt key on your keyboard
- Click From Beginning
Holding down the Alt key and clicking From Beginning , the Presenter View will launch from the very first (non-hidden) slide in your presentation.

You can also launch the presenter view from the beginning of your presentation at any time by clicking Alt + F5 on your keyboard.
Start Presenter View in PowerPoint From Current Slide

Did you know that you can access different views in PowerPoint by adding keys as you click commands in the PowerPoint ribbon?
To start the Presenter view from your current slide using your Ribbon, simply:
- Hold down the Alt key on your keyboard
- Click From Current Slide
Holding the Alt key and clicking From Current Slide launches the Presenter View from your current slide. So, this is another way you can quickly practice your presentation, see your speaker notes and see what’s coming up next.
You can also launch the Presenter View from the beginning of your presentation at any time by hitting Alt+F5 on your keyboard.
Showing and Hiding Presenter View
Regardless of which view you start your PowerPoint slide show; you can switch between the two different slide show views without exiting presentation.

To switch between the two slideshow views (while giving your presentation), simply:
- Right-click your slide in whichever presentation view you are currently in
- Select either Show Presenter View or Hide Presenter View
When would you use a feature like this during a presentation? One example is if you want to view your notes without leaving the slide show mode.
NOTE: The letter r for both Show Presenter View and Hide Presenter View is underlined. This means that it is a keyboard shortcut. So, if you want to quickly flip between these two presentation views, you can simply right-click your slide and hit the letter r on your keyboard. Doing so automatically switches the view you are in.
Controlling how your presentation runs
Another way to control how your presentation runs (including the default laser pointer and pen color), is the Set Up Slide Show dialog box.

To open the Set Up Slide Show dialog box, simply:
- Select the Set Up Slide Show command
Doing so, opens all your PowerPoint slide show settings and options as pictured below.
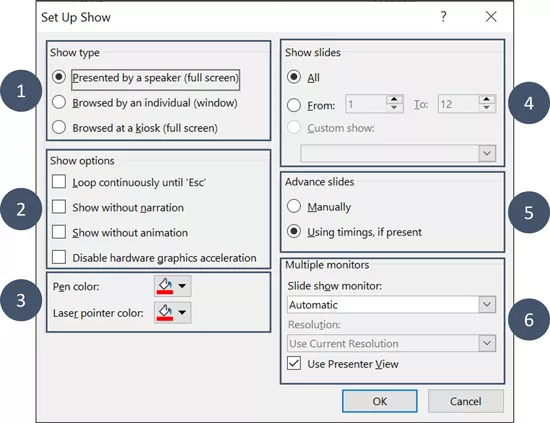
Inside the slide show settings dialog box, you can select:
- How your presentation runs (full screen, window or in kiosk mode).
- Your default pen and laser pointer color options ( see our laser pointer article here ).
- Which slide you want start from, or which slides you want to show. You can also setup a custom show here.
- How your slides progress (manually or using slide timings).
- Which of your computer monitors (or screens) your slide show runs on.
The Set Up Slide Show dialog box is also the secret to running multiple presentations at the same time in PowerPoint. To expand your knowledge and learn how to set this up, read our guide here .
Setup Slide Show SECRET Shortcut

To use the SECRET shortcut to open the Set Up Slide Show dialog box, simply:
- Hold down the Shift key on your keyboard
- With your mouse, click the Reading View icon at the bottom of your screen
This is useful when you need to quickly cycle through lots of PowerPoint presentations and change how those presentations run. Instead of wasting time clicking through the Ribbon, simply hold the Shift key and click the Reading View icon. This is also a friendly conversation starter with a fellow PowerPoint enthusiast at Happy Hour.
NOTE: The color of your Reading View icon might be different than in the picture above, as it is dependent on the Office Theme you selected for PowerPoint.
How to exit a PowerPoint presentation early?

Regardless of how you start your full screen presentation, you can end your presentation at any time by hitting the Esc key on your keyboard.
Hitting Esc immediately takes you out of the PowerPoint presentation mode and back to the normal editing view of your slides, on whatever slide you were last presenting.
Here is how you can use a combination of all the different keyboard shortcuts to spot check and practice your presentation in full screen before you finalize your presentation.
- Hit F5 on your keyboard to start your presentation in full screen from the very first slide in your presentation. You can then use your arrow keys to advance, spot checking your slides for errors.
- When you find an error, simply hit Esc key to return to the normal PowerPoint editing view to fix your slide.
- When you are done, hit Shift + F5 to return the full screen presentation mode from the slide you just updated. You can then continue spot checking your presentation (without having to start over from the beginning).
In this way you can quickly work your way through your slides and practice your presentation, fixing and adjusting your content as you go.
Understanding how to run your presentations is CRITICAL to the success of your presentation. Not only in presenting them live, but also in knowing how to spot check your slides as you build them.
I personally find it easiest to spot check your slides and quickly fix errors by running your presentation in slide show mode (or full screen). The last place you want to discover an error is during your presentation.
Using the commands and shortcuts above, you can quickly start, exit and step back into your slide show. Once you have these commands and features down, you will also look like a whiz during your presentations.
If you enjoyed the depth of this article, you will love our other PowerPoint training courses and free resources. To learn more, visit us here .
🔒 Unlock the PowerPoint Shortcuts Trusted by Industry Leaders KKR, American Express, HSBC, and More!
Join over 114,880 professionals from diverse fields including consulting, investment banking, advertising, marketing, sales, and business development who have supercharged their PowerPoint game with our proven methods.
✅ Customize compelling presentations effortlessly.
✅ Master time-saving techniques for faster deck creation.
✅ Boost your career prospects with top-notch PowerPoint skills.
Get FREE access to the Critical PowerPoint Shortcuts module of our premium training course by entering your name and email below.
DISCLAIMER: PC Users Only!
We respect your privacy and will keep your info safe and confidential.
Related Articles
About the author.

Popular Tutorials
- How to Strikethrough Text (l̶i̶k̶e̶ ̶t̶h̶i̶s̶) in Word, Excel & PowerPoint
- How to Make Animated Fireworks in PowerPoint (Step-by-Step)
- Strikethrough Shortcut (l̶i̶k̶e̶ ̶t̶h̶i̶s̶) for Word, Excel & PowerPoint
- How to Create a Flash Card Memory Game in PowerPoint (Like Jeopardy)
- Keyboard Shortcuts Not Working: Solved
PowerPoint Tutorial Categories
- Strategies & Opinions
- Presentation Design
- Pictures, Icons, Videos, Etc.
- New Features
- Miscellaneous
- Charts & Data Viz
We help busy professionals save hours and gain peace of mind, with corporate workshops, self-paced courses and tutorials for PowerPoint and Word.
Work With Us
- Corporate Training
- Presentation & Template Design
- Courses & Downloads
- PowerPoint Articles
- Word Articles
- Productivity Resources
Find a Tutorial
- Free Training
- For Businesses
We help busy office workers save hours and gain peace of mind, with tips, training and tutorials for Microsoft PowerPoint and Word.
Master Critical PowerPoint Shortcuts – Secure Your FREE Training Module and Save Valuable Time!
⌛ Master time-saving expert techniques.
🔥 Create powerful presentations.
🚀 Propel your career to new heights.
We value your privacy – we keep your info safe.
Discover PowerPoint Hacks Loved by Industry Giants - KKR, AmEx, HSBC!
Over 114,880 professionals in finance, marketing and sales have revolutionized their PPT skills with our proven methods.
Gain FREE access to a full module of our premium PowerPoint training program – Get started today!
We hate spam too and promise to keep your information safe.
You are currently viewing a placeholder content from Facebook . To access the actual content, click the button below. Please note that doing so will share data with third-party providers.
How to Start PowerPoint: A Step-by-Step Guide for Beginners
Starting PowerPoint is as easy as opening the program and selecting a template or a blank presentation. Once you’ve got the program open, you’ll be greeted with various options to create your perfect presentation, whether it’s for a business meeting, a school project, or just for fun. Just be sure you have PowerPoint installed on your computer or you have access to it online through Microsoft 365.
After you’ve opened PowerPoint and selected your template, you’ll be able to add text, images, videos, and other elements to your slides to make your presentation unique and engaging.
Introduction
PowerPoint is a versatile tool used by millions to create engaging and dynamic presentations. Whether you’re a student, a professional, or someone who just wants to make a fun slideshow for friends and family, knowing how to start PowerPoint is a must-have skill in today’s digital world. This program has been around for decades, evolving with technology to offer a wide range of features that can make any presentation go from bland to brilliant.
But why is it so important to know how to start PowerPoint? Well, think about it. Presentations are a key part of communication in various settings. They can make or break a business pitch, help or hinder a teacher’s lesson, and add a lot of fun to personal projects. PowerPoint is relevant to just about anyone who needs to convey information in a visual and organized way. So let’s dive in and get started on mastering the basics of opening and using PowerPoint.
Step by Step Tutorial: Starting PowerPoint
Before we begin, make sure you have PowerPoint installed on your computer. If you do, fantastic! If not, you can download it from the Microsoft website or access it online through Microsoft 365. Ready? Let’s go!
Step 1: Open PowerPoint
Launch PowerPoint by clicking on the program icon on your computer.
Once you’ve found the PowerPoint icon, either on your desktop, start menu, or taskbar, give it a click, and the program will open. You may see a loading screen briefly before the main window appears.
Step 2: Choose a Template
Select a template or a blank presentation to start creating your slides.
PowerPoint offers a variety of templates to fit every need and occasion. Whether you want something simple and professional or colorful and creative, there’s a template for you. If you prefer to start from scratch, you can choose a blank presentation.
Step 3: Customize Your Slides
Add text, images, videos, and other elements to your slides.
Once you’ve picked your template or opened a blank slide, it’s time to make it your own. You can add title text, bullet points, images, and even videos. PowerPoint has a range of tools for customizing each slide to fit your content perfectly.
| Benefit | Explanation |
|---|---|
| Easy to Use | PowerPoint is user-friendly, making it accessible for beginners and experts alike. |
| Customizable | With a wide range of templates and design tools, PowerPoint allows for high levels of customization. |
| Multimedia Integration | PowerPoint supports various media types, letting you create rich, engaging presentations. |
| Drawback | Explanation |
|---|---|
| Can Be Overwhelming | The vast array of features can be daunting for new users to navigate. |
| Template Limitations | While there are many templates, finding the perfect one can sometimes be challenging. |
| Potential for Technical Issues | Like any software, PowerPoint can experience glitches or crashes, which may cause inconvenience. |
Additional Information
When starting PowerPoint, it’s essential to keep your audience in mind. Who will be viewing your presentation? What is the main message you want to convey? Answering these questions can help you choose the right template and design elements. Don’t be afraid to experiment with different fonts, colors, and layouts to find what works best for your content.
Remember, a well-organized and visually appealing presentation can significantly impact your audience’s engagement and retention of information. Also, consider using PowerPoint’s various features like transitions and animations sparingly – while they can add a dynamic touch, overuse can be distracting. And always save your work regularly!
- Open PowerPoint by clicking on the program icon.
- Select a template or a blank presentation.
- Customize your slides by adding text, images, videos, and other elements.
Frequently Asked Questions
Do i need a microsoft account to use powerpoint.
Yes, to download and use PowerPoint, you’ll need a Microsoft account.
Can I access PowerPoint online?
Absolutely, PowerPoint is available online through Microsoft 365, which allows you to work on presentations from any browser.
Is PowerPoint free?
PowerPoint is not free, but it is included in the Microsoft Office Suite, which is available for purchase. However, you can use the online version with a Microsoft 365 subscription.
Can I collaborate with others on a PowerPoint presentation?
Yes, PowerPoint supports collaboration, allowing multiple users to work on the same presentation simultaneously.
Can I convert a PowerPoint presentation to a video?
Indeed, PowerPoint has a feature that lets you save your presentation as a video file.
Starting PowerPoint is just the beginning of creating compelling and memorable presentations. Whether you use a template or start from a blank canvas, the key to a great PowerPoint presentation is creativity, clarity, and audience engagement. Remember, practice makes perfect!
So go ahead and play around with all the tools and features PowerPoint offers. The more you use it, the more proficient you’ll become. And if you ever get stuck, there’s a vast community of PowerPoint users and an array of online resources to help you out. Now that you know how to start PowerPoint, where will your presentations take you?

Matthew Burleigh has been writing tech tutorials since 2008. His writing has appeared on dozens of different websites and been read over 50 million times.
After receiving his Bachelor’s and Master’s degrees in Computer Science he spent several years working in IT management for small businesses. However, he now works full time writing content online and creating websites.
His main writing topics include iPhones, Microsoft Office, Google Apps, Android, and Photoshop, but he has also written about many other tech topics as well.
Read his full bio here.
Share this:
Join our free newsletter.
Featured guides and deals
You may opt out at any time. Read our Privacy Policy
Related posts:
- Can I Convert My Powerpoint to Google Slides?
- How to Save Powerpoint as PDF with Notes
- How to Make a Powerpoint Slide Vertical in Powerpoint 2013
- How to Set Time for Slides in Powerpoint
- How to Insert Slides from Another Presentation in Powerpoint 2010
- How to Check Word Count on Powerpoint 2010
- How to Unhide a Slide in Powerpoint 2013
- How to Loop a Slideshow on Powerpoint 2013
- How to Change Hyperlink Color in Powerpoint 2010 (An Easy 5 Step Guide)
- How to Change the Font on All Slides in Google Slides
- How to Convert a PowerPoint to Word and Edit with Ease
- How to Insert Check Mark in Powerpoint for Office 365
- How to Change Line Spacing in Powerpoint for Every Slide at Once
- How to Download a Google Slides Presentation as a Powerpoint File
- Can I Create a Timeline in Powerpoint?
- How to Delete Multiple Slides in Google Slides
- How to Add Page Numbers in Powerpoint 2010
- How to Show Speaker Notes in Google Slides
- How to End Powerpoint on Last Slide in Powerpoint 2010
- How to Hide a Slide in Powerpoint 2010
July 23, 2024
How to create a PowerPoint presentation step by step
New to Microsoft PowerPoint? Our guide walks you through how to create a presentation in PowerPoint so you can get the ball rolling on your slideshow.
Have you been tasked with presenting a slideshow? If you have Microsoft PowerPoint and are ready to get started, we’ll walk you through how to create a PowerPoint presentation.
With two different methods, one for using Plus AI with PowerPoint and another for using PowerPoint alone, you have terrific options for building the slideshow.
Build a presentation with Plus AI for PowerPoint
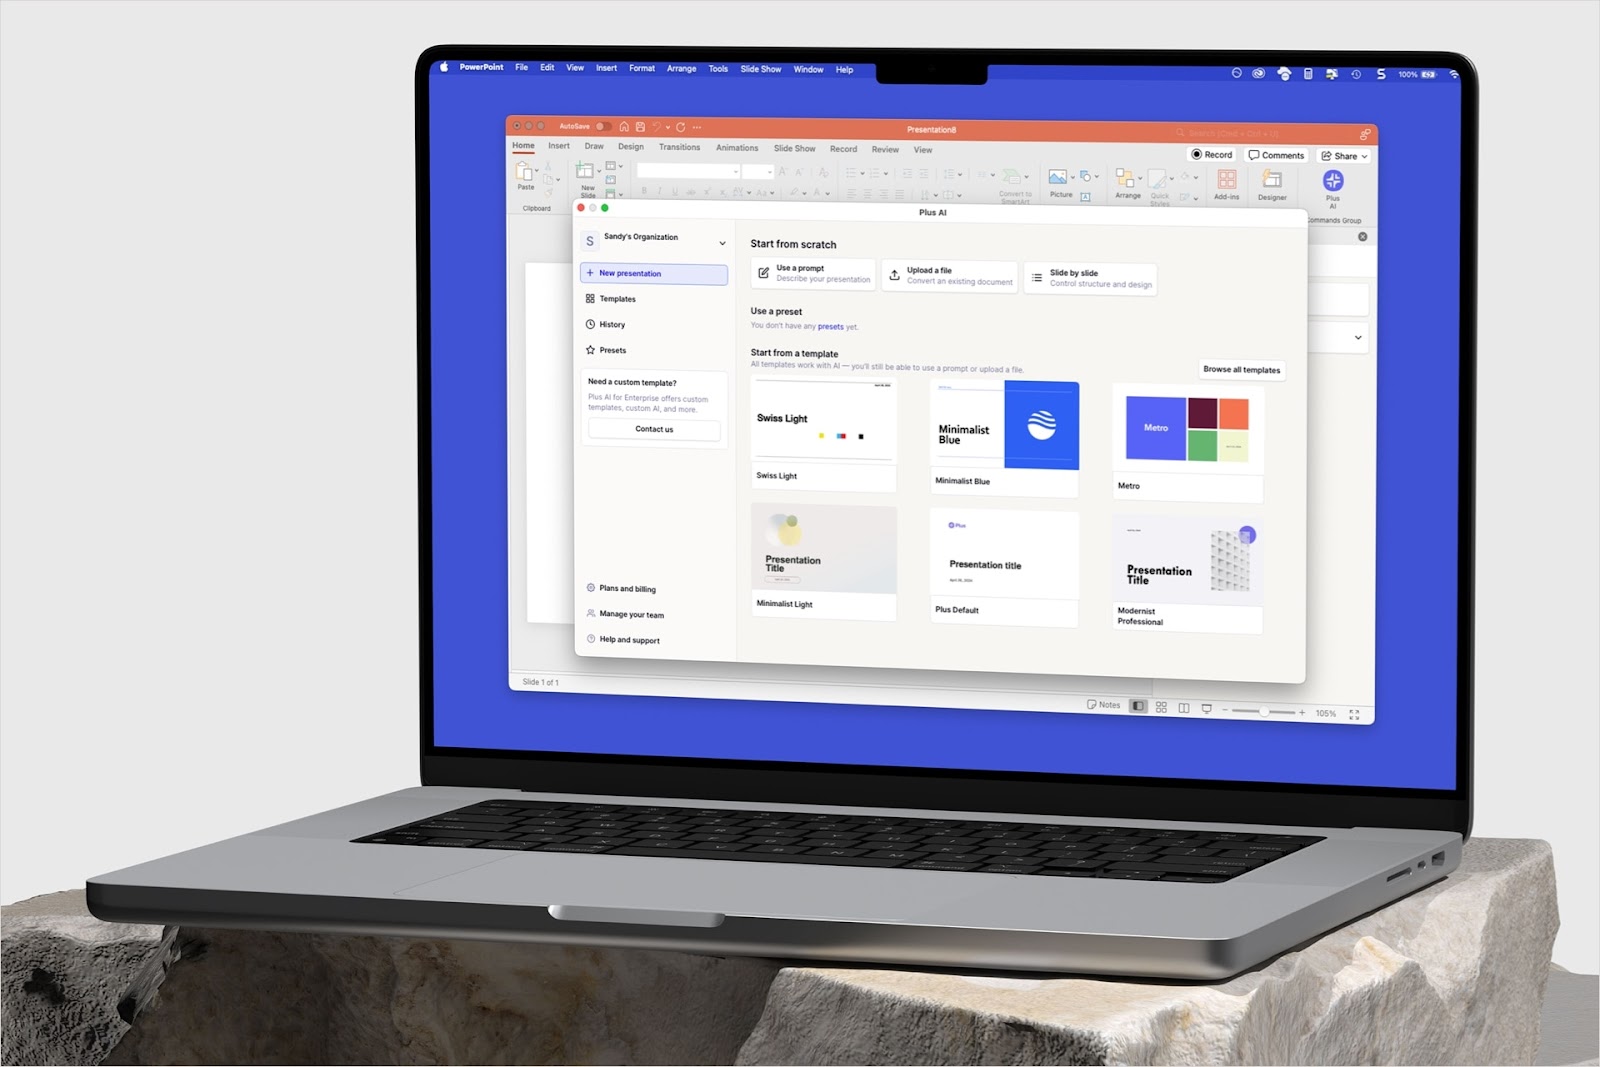
If you’re looking for the simplest and quickest way to create a PowerPoint presentation, look no further than Plus AI. Using Plus AI for PowerPoint , you just pick a template, provide a description, and receive your slideshow in a snap.
- Open PowerPoint , select New on the left, and pick Blank Presentation on the right.

- Go to the Home tab, select Plus AI in the ribbon, and choose New presentation in the sidebar.

- You can then start with a template or the content per your preference.
Because Plus AI offers an attractive collection of templates , so we’ll choose the Metro design to get started.

- To add the content, pick Use a prompt , Upload a file , or Slide by slide . For our example, we choose Use a prompt to show you the power of Plus AI’s content generation.

- With the prompt option , you then simply pick the presentation type, enter a description, and let artificial intelligence create an outline for you. Optionally, pick the language, number of slides, and include Plus tips.
- Click Generate Outline to review the slides.

- When the outline displays, you can edit, rearrange, or remove slides or use the Regenerate Outline option for a fresh outline. Click Generate Slides when you’re ready.

You’ll see your new PowerPoint presentation pop right up, complete with text, images, colors, and formatting!

From there, you can change anything you like and take advantage of Plus AI’s edit features. Insert a slide, rewrite content, or remix to get a new slide layout.

Don’t forget to save your new slideshow! Go to File > Save As , pick a location, enter a filename, and hit Save .

Creating a PowerPoint presentation with Plus AI is not just a huge time-saver but can perform research to obtain the content you need, offer suggestions for expanding the slides, and add useful items like timelines and charts. Plus, you get a visually pleasing slideshow with slides that look good !
Check out Plus AI on the web for a complete list of features, to view the template gallery, and to start your free trial!
Build a presentation in the PowerPoint application
Maybe you’re new to PowerPoint and would like instructions for creating a presentation from scratch in the application instead. While it can take much longer than using Plus AI, it does give you an opportunity to learn about PowerPoint’s basic setup steps.
Open PowerPoint and move through the following sections to create your slideshow. Keep in mind that verbiage and features may vary slightly depending on your platform and PowerPoint version.
1. Create a presentation
To start a new slideshow in PowerPoint, you can begin with a blank presentation or choose a built-in Microsoft template.
Select New on the left side and pick the option you want to the right:
- Blank presentation : With a blank presentation, you start with a completely empty canvas. This allows you to pick the designs, formatting, colors, and other elements from yourself.
- Microsoft template : Using a template, you’ll receive a theme that includes slides, styles, formatting, colors, and other design elements that can give you a jumpstart on your slideshow. However, you can edit or change anything you like.

Once you have your presentation in view, it’s time to start adding the slides. For the purposes of this tutorial, we’ll use the Blank Presentation .
2. Add a slide
Regardless of the presentation type you select; you’ll receive a title slide. Add your slideshow title and optionally a subtitle. Next, you’ll add more slides.

- Go to either the Home or Insert tab and open the New Slide menu in the ribbon.
- Choose the layout you want to use for the slide. You’ll see many options that include titles, headers, content, and more. You can also pick a Blank layout to add the content yourself.
- When the slide displays, you can start inserting or adding your slide elements.

Note : When you add a new slide, it’s placed after the currently selected slide by default. But you can rearrange the slide order per your preference at any time.
3. Insert and format text
Even though a slideshow is a visual tool, you’ll almost certainly want to include text. Whether a title or subtitle, bullet or number list, or paragraphs, you can add it easily using a text box.
- To add a text box to your slide, go to the Insert tab and select Text Box in the ribbon.
- Use your cursor to draw the text box, but keep in mind that you can resize and move the box as you like.

- Enter your text inside the text box. You can use the Font section of the ribbon on the Home tab to change the font style, size, color, and format.
Tip : Check out how to apply superscript or subscript in PowerPoint !

- Shape Styles : Choose a design, pick the fill or outline color, or add an effect like a shadow or reflection.
- Arrange : Send the text box forward or back in relation to other elements, align or distribute the box, or rotate it.
- Size : Change the size of the box. Alternatively, you can drag a corner or edge of the box in or out to resize it.
You can also use the WordArt Styles section of the ribbon to spruce up the font as an alternative to the tools on the Home tab.

4. Include and format image
Another slide element you’ll likely include is an image. Whether a photo, illustration, or logo, you can add and format an image easily in PowerPoint.
- To add an image to your slide, go to the Insert tab and open the Pictures menu.
- Choose This Device , Stock Images , or Online Pictures and then follow the prompts to locate, select, and insert the image.

- Adjust : Remove the background, add an artistic effect, apply transparency , or use a correction tool.
- Picture Styles : Choose a design, pick a border, add an effect, or select a layout.
- Arrange : Send the image forward or back in relation to other elements, align or distribute the image, or rotate it.
- Size : Change the size of the image. Alternatively, you can drag a corner or edge of the image in or out to resize it.

5. Add other types of slide elements
If you want to insert other types of media or slide elements, you have many options in PowerPoint. You can add things like shapes, charts, spreadsheets, tables, videos , screen clippings, and audio .
One way to add an item is to insert a New Slide and pick a layout containing a Content box. Then, click the type of content inside that box that you want to add.

The other way to add a slide element is to use the Insert tab. You’ll see all sorts of items you can insert including those mentioned above. Simply open the corresponding menu for the item and follow the prompts.

Again, remember to save your new presentation by going to File > Save As , picking a location, entering a filename, and selecting Save .
Setting up a PowerPoint presentation isn’t necessarily difficult but does take time. So, be sure to check out the extensive and robust feature set that Plus AI has to offer for creating your presentation.
And, review some of our additional articles on giving a great presentation along with how to end a presentation so that you’re prepared when your slideshow is ready to go.
How do I begin a PowerPoint presentation?
You can start your slideshow by heading to the Slide Show tab. Pick From Beginning to start at Slide 1 or From Current Slide to start with the current active slide.
Look at our tips for how to start a presentation when the time comes!
What should be the first slide of a presentation?
Normally, the first slide is a title or cover slide. It should include the presentation topic or title and optionally a subtitle. But, you can also include an image, the company name, a brief description, or a welcome message.
How do you create a PowerPoint presentation from a Word document?
While there are common ways to transform a Word document into a PowerPoint slideshow , you can take advantage of Plus AI’s file upload tool for a quick start. On the Home tab, select Plus AI and pick New presentation in the sidebar. Pick Upload a file > Choose file and select your Word document.
Alternatively, you can use Plus AI’s free converter. Open the Convert Word to PPT page in your browser and follow the simple steps to transform your Word document.
Latest posts
Latest post.

How to use ChatGPT to create a PowerPoint
Looking for ChatGPT for PowerPoint? Here's a step-by-step guide to using AI in PowerPoint and Google Slides

AI glossary: 130+ AI terms that you should know
Here are 130+ understandable definitions of the most important AI terms

How to embed a YouTube video in PowerPoint
A video in your slideshow can invoke emotion, provide information, or demonstrate a product or task. Here’s how to embed a YouTube video in PowerPoint.

Plus AI vs. Copilot for PowerPoint: In-depth comparison, pricing, and recommendations
Plus AI and Copilot, which is the best AI for PowerPoint? Read our in-depth review and find the best tool for you!
More resources

250+ Ideas for persuasive speech topics
How to choose a great persuasive speech topic, inspiration and ideas, and example presentations for you to get started
The most overused ChatGPT words
The most overused ChatGPT words and phrases. Check out these 18 terms that indicate something was written by ChatGPT

Best AI Presentation Makers of 2024 (with example outputs)
The best AI presentation software for PowerPoint, Google Slides and other popular presentation apps. Read our in-depth reviews with real examples and user reviews
How to Play PowerPoint Slides Automatically

The PowerPoint autoplay feature is an amazing tool for creating slideshows that advance automatically . Self-running PowerPoint presentations are great for leaving in kiosks or publicity booths. You can even show them with recordings or voiceovers to make sure your audience gets the most out of it.
Forget worrying about clicking from slide to slide, today we will teach you how to play PowerPoint slides automatically!

We’ll cover the following topics:
Why should you use the automatic slideshow PowerPoint feature?
- How to Play PowerPoint Slides Automatically without Clicking - Option 1
- How to play slideshow in PowerPoint automatically - Option 2
How to make PowerPoint slides advance automatically with audio
- How to loop slides in PowerPoint
- Check out some experts’ best practices for Automatic slideshows in PowerPoint
How to automatically play PowerPoint presentations across devices
How to play powerpoint slides automatically without clicking on mac, elevate your presentation with professional designs: try 24slides today.
Using the automatic slideshow feature has many benefits . The main one is its practicality; it is a tool you can set up in advance so that you eliminate the need for ongoing attention and your presentation flow is better.
And that’s not all, you can even add voiceovers, recordings, and even laser pointer gestures to make sure your audience gets the most out of your presentation.
It becomes particularly beneficial in the following scenarios:
- Business presentations: An automatically progressing presentation can help you focus on your content without worrying about going slide by slide, which can often be distracting and disrupt your rhythm.
- Publicity: Self-running presentations can be great if you use them for publicity. For example, if you have a kiosk or booth, a self-running PowerPoint slideshow can help you reach more people without them having to speak one-on-one with a salesperson.
- E-Learning: In e-learning modules or training presentations, autoplay can help learners progress through the material while listening to your lecture. However, they can also pause and rewind to go to the specific section they wish to revisit.
- Photo or Video Slideshows: Autoplay is commonly used in photo or video slideshows for events such as weddings or birthdays. It can serve as a background loop, or you can present it at a special moment along with music or narration to enhance the experience.
How to Play PowerPoint Slides Automatically without Clicking: Option 1
There are a couple of different ways to make your slides run automatically, and we'll go over both options. This first option is for when you need a really customized presentation: personalized timing for each slide, voiceovers, or laser pointer gestures .
If this is your case, go ahead with this section, but if you’d like something a bit simpler, proceed to Option 2.
- The first step is to go to the Slide Show Tab. On the Set Up group, you’ll find the Set Up Slide Show option to start customizing your self-running presentation.

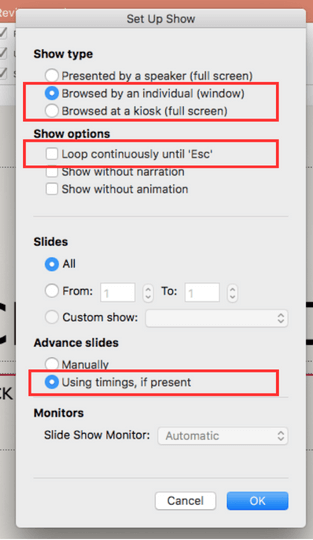
- Once the Set Up Show Window opens, deselect the Presented by a speaker option, as it refers to manually advancing your slides, either by clicking or using keys. Next, consider several options for the automatic slideshow:
- Browsed by an individual is one choice for creating a self-running PowerPoint presentation. This option permits you to deliver your slides within a window, as opposed to the typical full-screen mode. Ensure that the Use timings, if present option is enabled for this feature to function correctly.
- Another option is the Browsed at a kiosk , which allows you to run a full-screen, continuous slideshow automatically. This option locks in both the looping and timing settings, ensuring that your slideshow will continue until you press the ESC key.
If you’re not sure what option is the best for you, remember you can always select manually the loop and timings option . Try different options with these and try out how your presentation will look like with the different settings.
- The next step is to set your timings. This means defining how much time you want your PowerPoint slideshow to spend on each slide before automatically advancing to the next one.
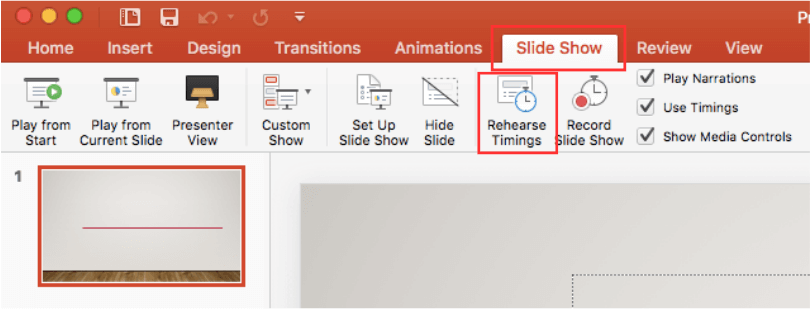
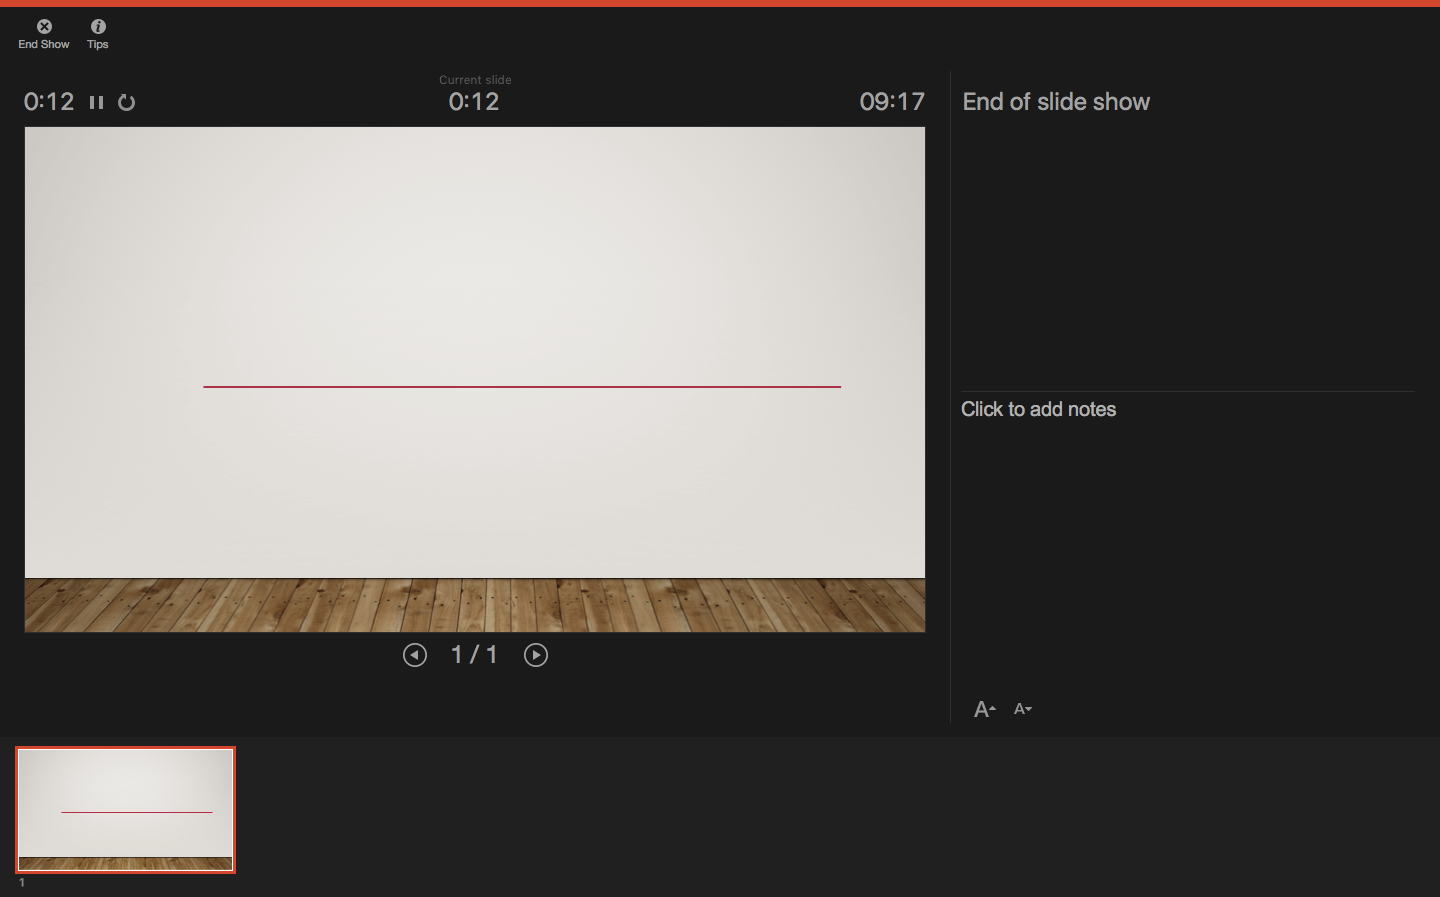
To set your timings, click on Rehearse Timings , which will allow you to go through your presentation slide by slide, and it’ll record how much time you spend on each one.

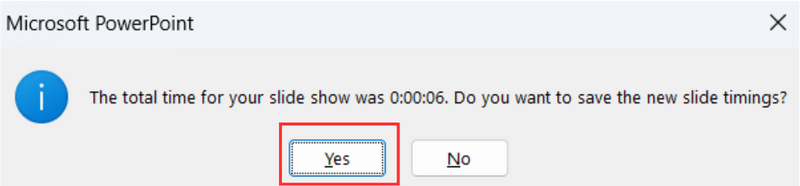
After you finish going through all your slides, a message will pop up to save your timings. Click yes so you can save the time spent on each slide.
How to play slideshow in PowerPoint automatically: Option 2
Let’s take a look at a different way of using the PowerPoint autoplay feature. This option is great if you’re looking for something simple and just want your slides to advance automatically at regular intervals.
- First, open the Transitions Tab and locate the Timing Group.

- Go to the After option and manually add how much time you want to spend on each of your slides.

Select the Apply To All option so all your slides have the same timing.
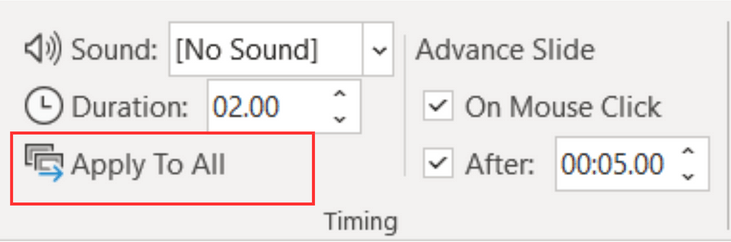
You can also deselect the On Mouse Click option, depending on whether you want to be able to advance your slides by clicking or not.
Adding audio to your automatic PowerPoint is a fantastic feature to enhance your professional image and communicate your content without needing to be present. Let’s take a look at how to do it:
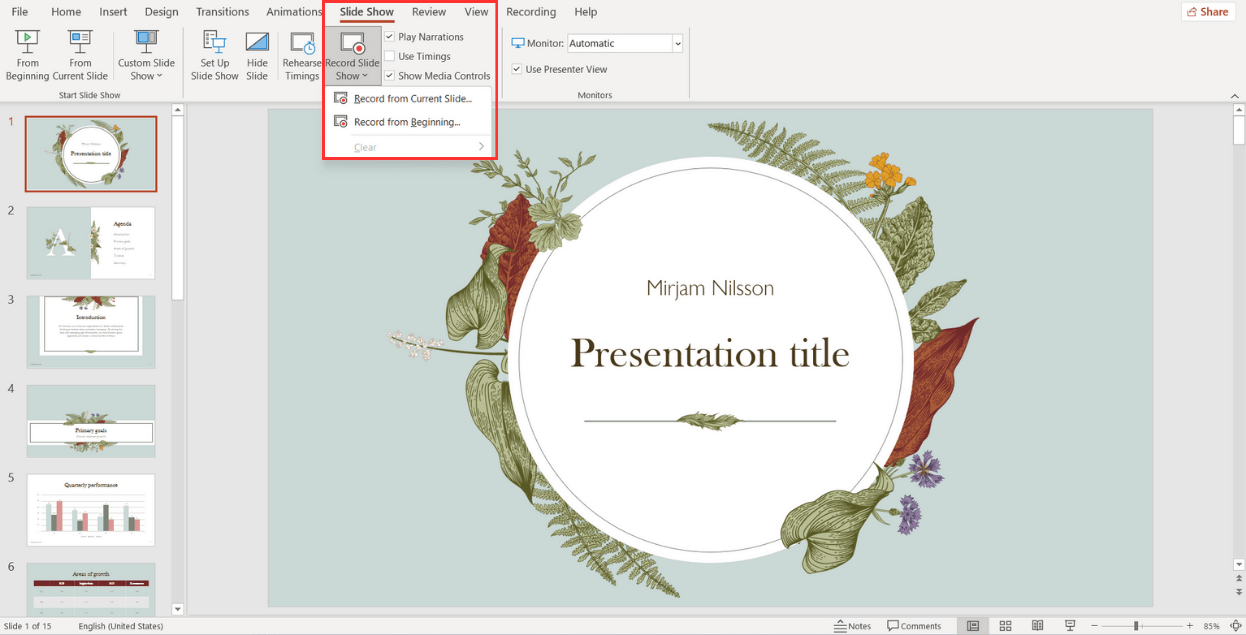
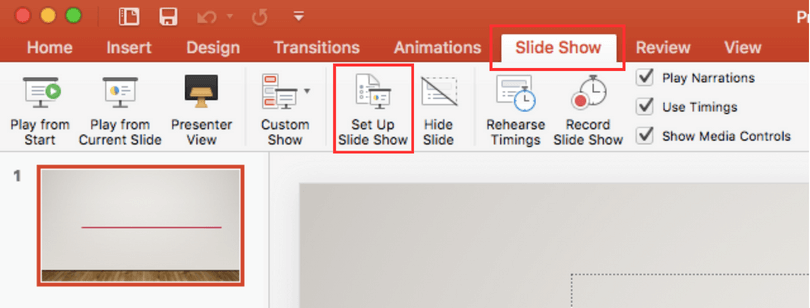
- Go to the Slide Show Tab and select Record Slide Show . Choose Record From Beginning to start with the first slide.
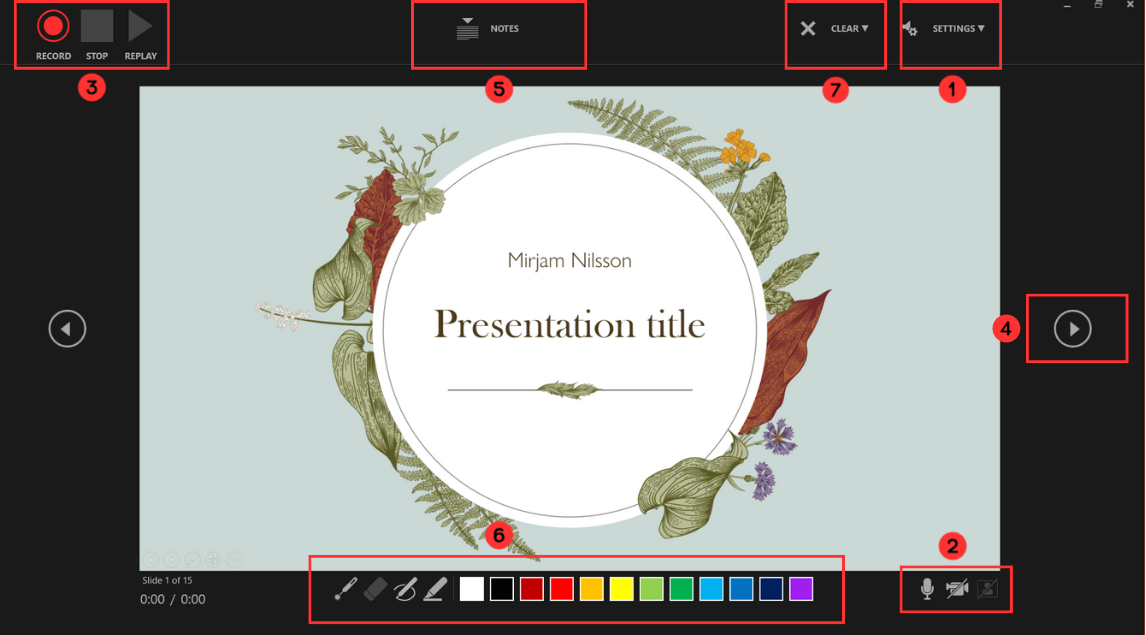
When the fullscreen opens, you will be able to see your first slide along with several options:
- Start in Settings (1) and select the tools you will be using. You have the option to use a microphone, or you can record yourself talking on camera. Choose your microphone and/or camera for recording.
- Next (2) , decide whether you want to have the microphone or camera you selected turned on. You can also choose to have a video preview.
- When you're ready to start recording, go to the top left corner (3) and click Record to start, Stop to pause, and Replay to review how it went.
- Once you finish with a slide, click on the right arrow (4) to move to the next slide.
- If you have Speaker notes in your slides, you can view them in (5) while you record.
- In the Pens and Markers section (6) , you can draw on the screen and make any annotations you want.
- Finally, the Clear option (7) allows you to clear existing recordings on the current slide or on all slides if you are unsatisfied and want to redo your recording.
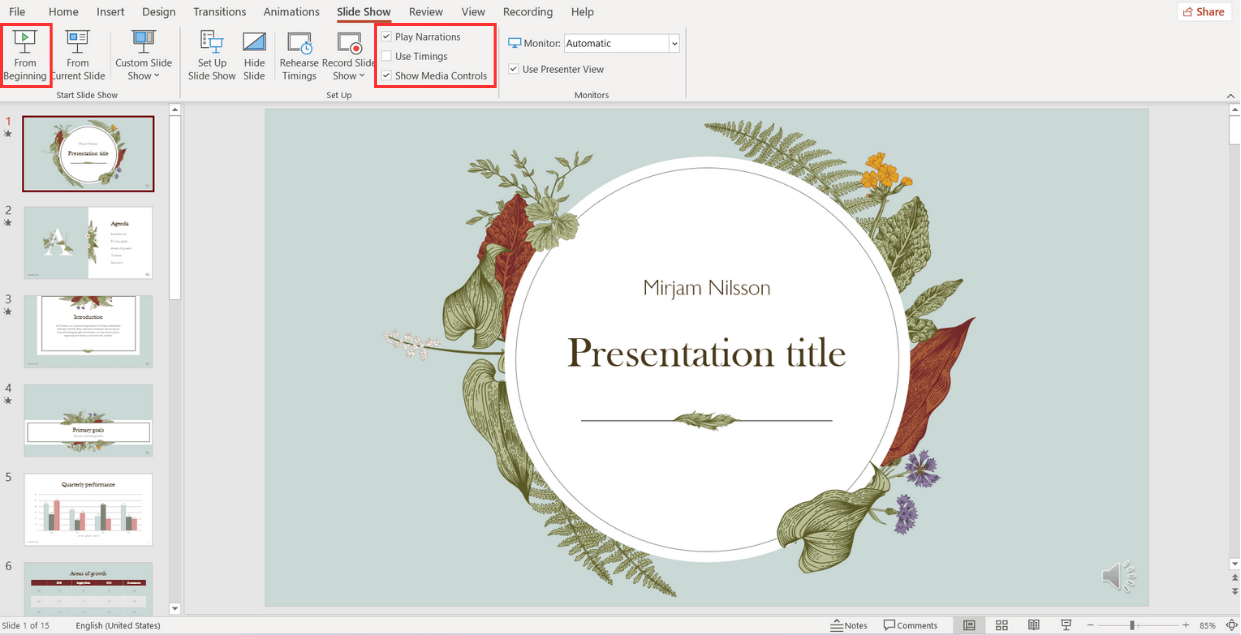
- Now, to review what you've recorded, go to Set Up and make sure Play Narrations and Use Timings are checked. Then, click on From Beginning to start the presentation.
How to loop slides in PowerPoint
If you want to learn how to loop your slides in PowerPoint, follow these steps:
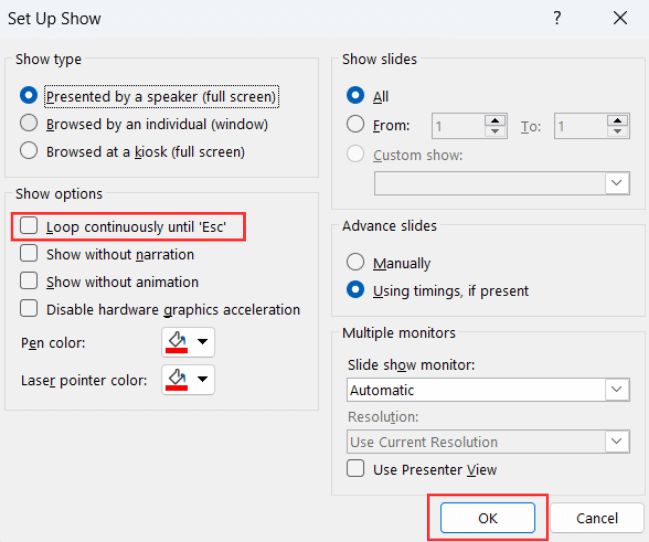
- Go to the Slide Show tab and select Set Up Slide Show .

- When the Set Up Show window appears, go to the Show options group and tick the Loop continuously until ‘Esc’ option. Don’t forget to click OK to apply the new setup!
And all done! Now, your presentation will loop until you select ‘Esc’.
Check out some expert best practices for Automatic slideshows in PowerPoint
Now that you've learned how to make a PowerPoint slideshow run automatically, we'll give you the secrets to make your presentation stand out . Let's take a look at some insights from our expert designers .
Avoid too much text
Remember that your time per slide is limited , so it is important not to put too much text since your audience will not have time to read it. Try to express your message in the shortest possible text, and if necessary, revise and rewrite it as many times as necessary to synthesize it.
Limit interactive elements
Limit or avoid interactive elements such as hyperlinks that rely on user interaction since they may not function in PowerPoint autoplay mode.
However, if you want your audience or potential clients to take a specific action, consider using a QR code. Only make sure to leave the slide displayed for enough time for them to use it.
Practice, practice, practice
Keep in mind that your speech needs to fit perfectly with your timings for each slide. So, practicing your presentation multiple times is crucial to ensure a seamless and synchronized delivery.
First, go to the Slide Show Tab and select Set Up Slide Show .
- When the Set Up Show Window opens, deselect the Presented by a speaker option and consider the following options to set up your automatic slideshow:
- Browsed by an individual : With this option, you can show your slides within a window instead of the typical full-screen mode. Make sure that the Use timings, if present option is selected.
- Another option is the Browsed at a kiosk : This option locks in both the looping and timing settings, ensuring that your slideshow will continue until you press the ESC key.
- Next, you need to set your timings. This involves determining the duration for each slide so that it advances automatically to the next one when you have finished presenting it.
To set your timings, go to the Slide Show Tab and click on Rehearse Timings.
A window will open, allowing you to go through your presentation slide by slide, and it will record how much time you spend on each one . As you progress through each slide, it will confirm the time spent, and you can either agree or choose to re-record.
After you finish going through all your slides, a message will pop up to save your timings . Click yes so you can save the time spent on each slide.
If you’re looking to create a presentation that truly wows your audience, you might want to consider professional design assistance for your PowerPoint. Lucky for you, we’re here to help. Check out the fantastic designs 24Slides can help you create today!

You might also like
- How to Add a Timer to Your Powerpoint Presentations
- 11 Time-Saving PowerPoint Hacks For Creating Quick Presentations
- How To Loop a PowerPoint Presentation
- Add a PowerPoint Real-Time Clock to Your Presentations
Create professional presentations online
Other people also read

Tutorial: Save your PowerPoint as a Video
How To Convert Google Slides To PowerPoint and Vice Versa

How To Add Animations To PowerPoint
How-To Geek
How to loop a powerpoint presentation.

Your changes have been saved
Email Is sent
Please verify your email address.
You’ve reached your account maximum for followed topics.
The Humble Notepad Is My Most-Used Windows App
Every gpu should be mounted vertically. change my mind., how i made a minimalist dumb phone with free software, quick links, set up your slideshow to be looped, apply automatic slide transitions.
Slideshows are sometimes used to display images at events, such as weddings or trade shows. Whatever the occasion might be, you’ll want to loop your PowerPoint presentation so your guests aren’t staring at a blank screen. Here’s how it’s done.
First, open your PowerPoint presentation in which you would like to loop. Once open, navigate to the “Set Up” group of the “Slide Show” tab and then select the “Set Up Slide Show” button.

The “Set Up Show” window will appear. In the “Show options” group, check the box next to “Loop Continuously until Esc.” Once selected, click “OK” in the bottom-right corner of the window.

Now, when you play your slideshow, it will end only when you press the “Esc” key instead of when you've finished the last slide.
Related: How to Make YouTube Videos Loop Continuously
One caveat: With the way we currently have it set up, the slideshow will proceed only when someone clicks the mouse button. That’s fine if there will be a speaker present at all times. Otherwise, you’ll need to set up automatic slide transitions.
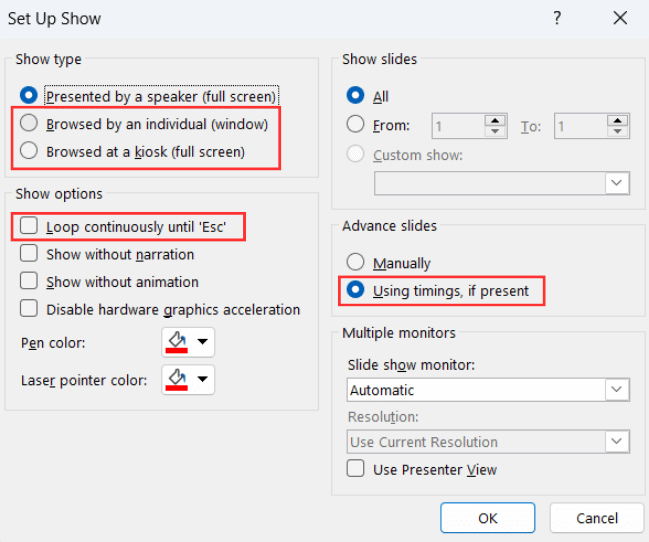
Head back to the “Set Up Show” window by selecting “Set Up Slide Show” in the “Set Up” group of the “Slide Show” tab.
There are a couple of options you need to select, but one important note is that you must first select “Using Timings, If Present” under the “Advance Slides” group.

The next option we select will lock a few things in place (which is why you need to select “Using Timings, If Present” first).
Under the “Show Type” group, select “Browsed at a Kiosk (Full Screen)." The “Loop Continuously until Esc” option will be enabled automatically if you haven’t already turned it on, and the option you’ve selected under “Advance Slides” will remain unchanged.
Select “OK” when ready to proceed.

Without the “Browsed at a Kiosk” option enabled, the automatic slide progressions would be disabled if someone were to press the Back key. With it enabled, the Forward and Back keys are locked, allowing the slideshow to automatically progress unattended without fear of someone breaking it.
Now it’s time to set the timings of the slides. Head over to the “Transitions” tab. In the “Timing” group, check the box next to “After” and set the timing at which you’d like each slide to progress. Note that it doesn’t matter if the box next to “On Mouse Click” is checked or not---it won’t work.
After that, select the “Apply to All” option in the same group.

Now, when you play your slideshow, it will continuously loop without interruption. To exit the slideshow, press the “Esc” button.
- Microsoft Office
- Office 2016
How to Make Slides Automatically Transition in PowerPoint: A Comprehensive Guide

Creating an impactful PowerPoint presentation involves not only compelling content but also the seamless transition between slides. Automatic slide transitions play a crucial role in maintaining your audience's focus and engagement. In this comprehensive guide, we'll provide you with a step-by-step approach on how to make slides automatically transition in PowerPoint while ensuring a professional and dynamic presentation.
Understanding Automatic Transitions
Automatic transitions enable your slides to change smoothly from one to another, enhancing the overall flow and impact of your presentation. By mastering this feature, you can elevate your slideshows and deliver a compelling narrative.
Step 1: Open Your PowerPoint Presentation
Begin by launching PowerPoint and opening your presentation. Ensure your slides are properly arranged in the desired order for your presentation.
Step 2: Select the Slide You Want to Modify
Click on the slide where you want to apply the automatic transition. To apply the same transition to multiple slides, hold down the Ctrl key while selecting the slides.
Step 3: Access the Transition Tab
Navigate to the "Transition" tab in the PowerPoint ribbon. Here, you'll find a variety of transition effects to choose from.

Step 4: Choose a Transition Effect
Click on the desired transition effect to see a live preview on the selected slide. Choose an effect that complements the tone and content of your presentation. PowerPoint offers various options, from subtle fades to dynamic flips and spins.
Step 5: Set Transition Options
Customize the transition according to your preference. You can adjust the speed, modify direction, and apply other specific options based on the effect you've chosen.
Step 6: Apply to All Slides (Optional)
To maintain consistency, you can apply the same automatic transition to all slides in your presentation. Click on the "Apply to All" button to ensure a professional look throughout your slideshow.
Step 7: Preview Your Presentation
Before your actual presentation, preview your slides. Click on the "Slide Show" tab and select "From Beginning" to view your presentation as your audience would. This allows you to ensure the transitions are smooth and enhances the overall narrative flow.
Mastering automatic slide transitions in PowerPoint is essential for creating captivating presentations. By following these steps, you can ensure a seamless flow of information, keeping your audience engaged and focused. Practice different transition effects to find the one that best suits your presentation style and message.
1. Can I customize the duration of each slide's automatic transition?
Yes, you can customize the duration of each slide's automatic transition. In the Transition tab, you'll find options to set specific durations, allowing you to control the pace of your presentation.
2. Are automatic slide transitions supported in PowerPoint Online?
Yes, automatic slide transitions are supported in PowerPoint Online. The process is similar to the desktop version. Open your presentation, access the Transition tab, and follow the steps to apply automatic transitions to your slides.
3. Can I add sound effects to automatic slide transitions?
Certainly. PowerPoint allows you to add sound effects to your slide transitions. In the Transition tab, you'll find an option to add sound. Choose from available sound effects or upload your own audio file to enhance the impact of your transitions.
4. Is it possible to disable automatic transitions for specific slides?
Yes, you can disable automatic transitions for specific slides. Select the slide, go to the Transition tab, and choose the "None" option from the transition effects to disable automatic transitions for that particular slide.
5. What is the ideal duration for automatic slide transitions?
The ideal duration for automatic slide transitions depends on the content and pace of your presentation. Generally, transitions lasting between 1 to 2 seconds work well for most slides. Adjust the timing based on the complexity of the information being presented and your audience's preferences.


Microsoft 365 Life Hacks > Organization > What is a poster presentation?
What is a poster presentation?
When preparing to present noteworthy research at an academic conference, its important to articulate your findings effectively, so it leaves a lasting impression on your peers. A common method for presenting research is through poster presentations. Learn what a poster presentation is, how to craft one for your next conference, and its benefits.

A poster presentation, or a poster session, is a type of research format presented on a poster by an individual or a group at a conference. These posters organize and display the thesis or hypothesis, methods, and outcomes of a research study in a way that’s visually pleasing for audience members. Attendees will listen to participants’ presentations and ask questions to engage in discussion. Typically, these sessions last between 1-2 hours. So, participants should be thoroughly prepared to effectively present throughout its duration.

Tell your story with captivating presentations
Powerpoint empowers you to develop well-designed content across all your devices
How do you create a poster presentation?
Poster presentations, unlike PowerPoint presentations , require physical design and production. Professional poster creation involves graphic artists, production, and team meetings. So, it’s important to outline a poster presentation timeline for your team to follow, keeping your presentation in mind to ensure ample time for completion.
To start outlining the poster design, identify its components. First, your title, authors, and institution should be placed at the top center of the poster. Organize the poster vertically and include the relevant sections – “Introduction”, “Methods”, “Results”, “Conclusions”, and “Recommendations”. Each section must include relevant and accurate content that summarizes your work, while being visually appealing to captivate its viewers.
Data visualization can be organized with pie charts, for survey or demographic results, infographics for complex information, and bar graphs for quantitative data. From a design perspective, prioritize readability and simplicity for your audience. Use a balanced color scheme, lines, frames, and other visual cues to highlight information.
What are the benefits of poster presentations?
Poster presentations communicate complex research in an effective manner, that offers benefits for the presenter and audience alike. These benefits include:
Visually engagement
As mentioned earlier, poster presentations should be visually engaging. Graphics, images, data visualizations and colors convey complex information, in a simpler format, so viewers can understand it.
Concise communication
Poster presentations are in a concise format. Its relevant sections – introductions, methods, results, conclusions, and recommendations – are outlined in a digestible format, so readers can follow along. The concise format encourages presenters to communicate their findings clearly and briefly within the limited space available. Concise communication ensures viewers can follow their research topic, with comprehensible verbiage.
Networking opportunity
Poster presentations are delivered at conferences, a great platform for networking and collaboration. Presenters can connect with colleagues, researchers, and other peers who share similar research interests and expertise. Consequently, presenters can hope to develop their research with their peers or pursue additional opportunities.
Interactive discussion
Poster presentations facilitate interactive discussions between presenters and conference attendees. Viewers can interface directly with the presenter, ask questions and request clarification on aspects of their research. Presenters can improve their research spiel from insights they gained from their discussion.
Poster presentations offer researchers a platform to share their findings, network with peers in their field, and engage with others interested in their research. If you are preparing to present at a conference, follow these tips to effectively create and deliver your poster presentation. For more help with presenting research, learn more presentation tips .
Get started with Microsoft 365
It’s the Office you know, plus the tools to help you work better together, so you can get more done—anytime, anywhere.
Topics in this article
More articles like this one.

Dive into summer by planning the perfect pool party
Planning a pool party is a cinch with these tips on how to plan one, create a playlist, and decide on a memorable theme for your guests.

What is workload management?
Learn how workload management can organize your work in a way that keeps your staff motivated and your projects moving forward.

What are stretch goals?
Set ambitious and challenging targets for your organization. Understand what stretch goals are and how they can help your team.

Six tips to read more books
Tired of getting eye strain from staring at screens all day? Re-discover your love of reading with this practical guide to reading more books.
Everything you need to achieve more in less time
Get powerful productivity and security apps with Microsoft 365

Explore Other Categories
- Use Presenter view Video
- Set up your presentation Video
- Deliver your presentation Video
Set up your presentation

Before you give your presentation in front of an audience, you can rehearse it with your slides. Watch this video to find out how.
First, go to the SLIDE SHOW tab and make sure Use Presenter View is selected.
For rehearsal, you can press ALT+F5 to display the Presenter view on a single screen.
Rehearsing this way will help you get comfortable with your slides, and give you practice using the Presenter view.
View your speaker notes as you deliver your slide show
Draw on or highlight slides during a presentation
Turn your mouse into a laser pointer
Add speaker notes to each slide in a presentation
Before you give your presentation in front of an audience, you can rehearse it with your slides using the Presenter view.
During the show, you'll use dual monitors, but for rehearsal, you can press ALT+F5 to display the Presenter view on a single screen.
Keep in mind that when you are using the Presenter view, you are in Slide Show mode, so you can’t edit your slides or notes.
This is good, because it prevents you from unintentionally altering your slides during a show.
Laptops are used by many presenters for both creating and running their shows.
Most laptops available today have dual monitor capabilities built in.
So when you arrive at the presentation room, all you have to do is plug the presentation projector or monitor into the connector on your laptop and you are ready to go.
Start the show to make sure everything is working.
If you want to change which monitor shows the Presenter view, click DISPLAY SETTINGS , and then, click Swap Presenter View and Slide Show .
Before the audience arrives, run through some your slides to make sure everything works and you can see your laptop.
Also, make sure any non-essential programs, like email and browsers, are closed and your desktop is clean.
These other programs slow down your computer, and can cause a distraction if the audience sees them.
The last thing to do is start the Slide Show .
Plan your PowerPoint presentation, so the audience sees a welcome slide as they enter.
This way, the audience will know immediately that you are ready to begin.
Up next, we'll give the presentation using the Presenter view.

Need more help?
Want more options.
Explore subscription benefits, browse training courses, learn how to secure your device, and more.

Microsoft 365 subscription benefits

Microsoft 365 training

Microsoft security

Accessibility center
Communities help you ask and answer questions, give feedback, and hear from experts with rich knowledge.

Ask the Microsoft Community

Microsoft Tech Community

Windows Insiders
Microsoft 365 Insiders
Was this information helpful?
Thank you for your feedback.
We need you: Help us implement a Product Wishlist for Slido
- Help Center
- Integrations With Slido
- Slido for PowerPoint
Troubleshooting Slido for PowerPoint on macOS
- 7 months ago 13 December 2023
- Joel from Slido
Slido for PowerPoint is available for both macOS and Windows. This guide is to help macOS users troubleshoot any issues that may arise when accessing or using the integration. If you’re a Windows user, please reference our Slido for Windows troubleshooting guide .
To learn more about Slido for PowerPoint , check out our overview to see how everything works
In this article:
Essential requirements
Reporting an issue to our support team, set up issues, app updates, how to uninstall slido for powerpoint on macos.
- *.slido.com
- *.sentry.io
- log-api.newrelic.com
- log-api.eu.newrelic.com
- Microsoft PowerPoint 2021 or later with October 2023 update (16.78) applied
- macOS 12.0 (Monterey) or later
We recommend keeping your macOS version up to date. This helps ensure that your Microsoft 365 or Office for Mac apps (including Slido) stay updated .
If you’re having any trouble with our Slido for PowerPoint on macOS app, we want to help. To speed up the process, please include the following three elements in an email to [email protected].
- Screenshot(s) of your issue
- Any company network or device settings in place (e.g. VPN, authentication proxy, admin permissions, firewall, antivirus, etc.)
- Slido application logs – details below
Slido application logs
These application logs are the most essential piece of information for any investigation. They tell us how the app is behaving and often indicate the root cause of the problem.
To find and send the application logs:
- Open Finder
- Go to Applications
- Find Slido and open it
- Click Get logs > Save
You can also find the logs under the Help section in your Slido menu.

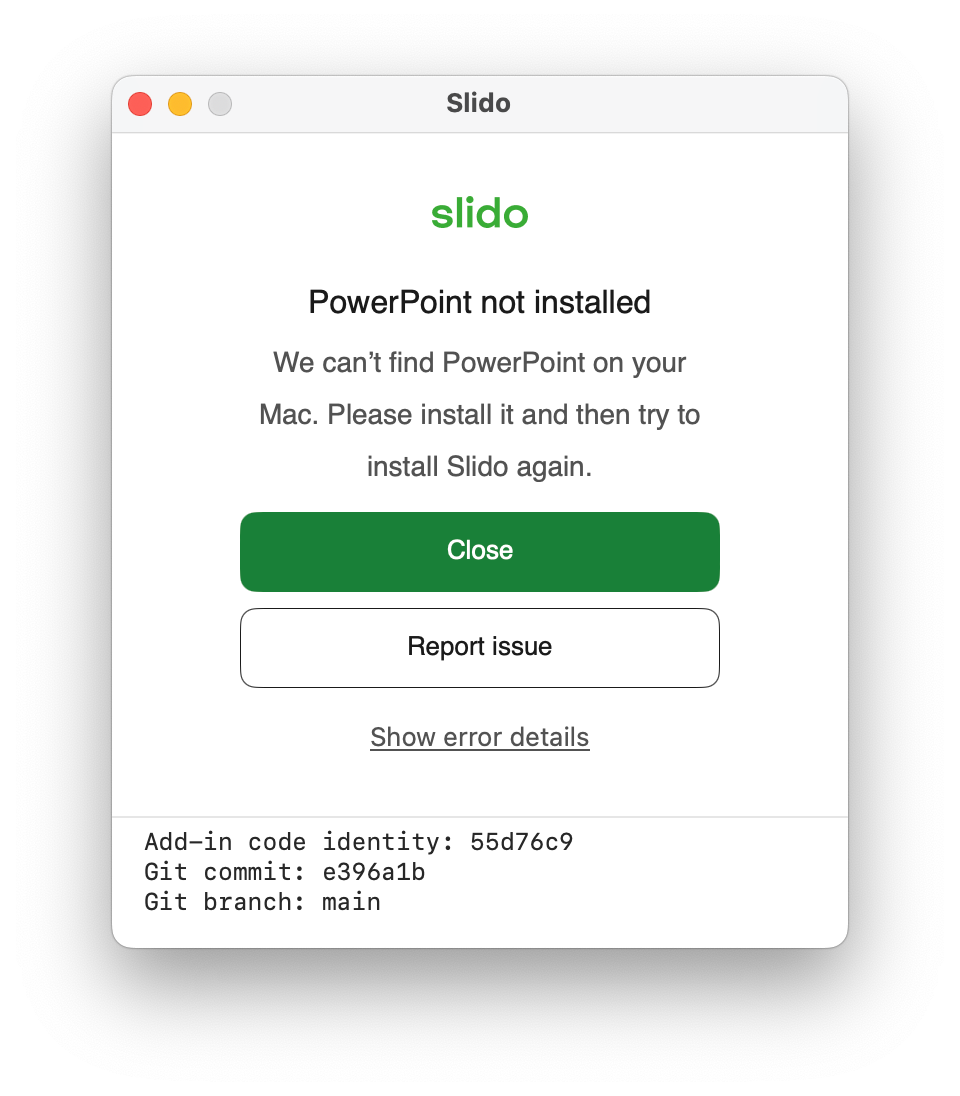
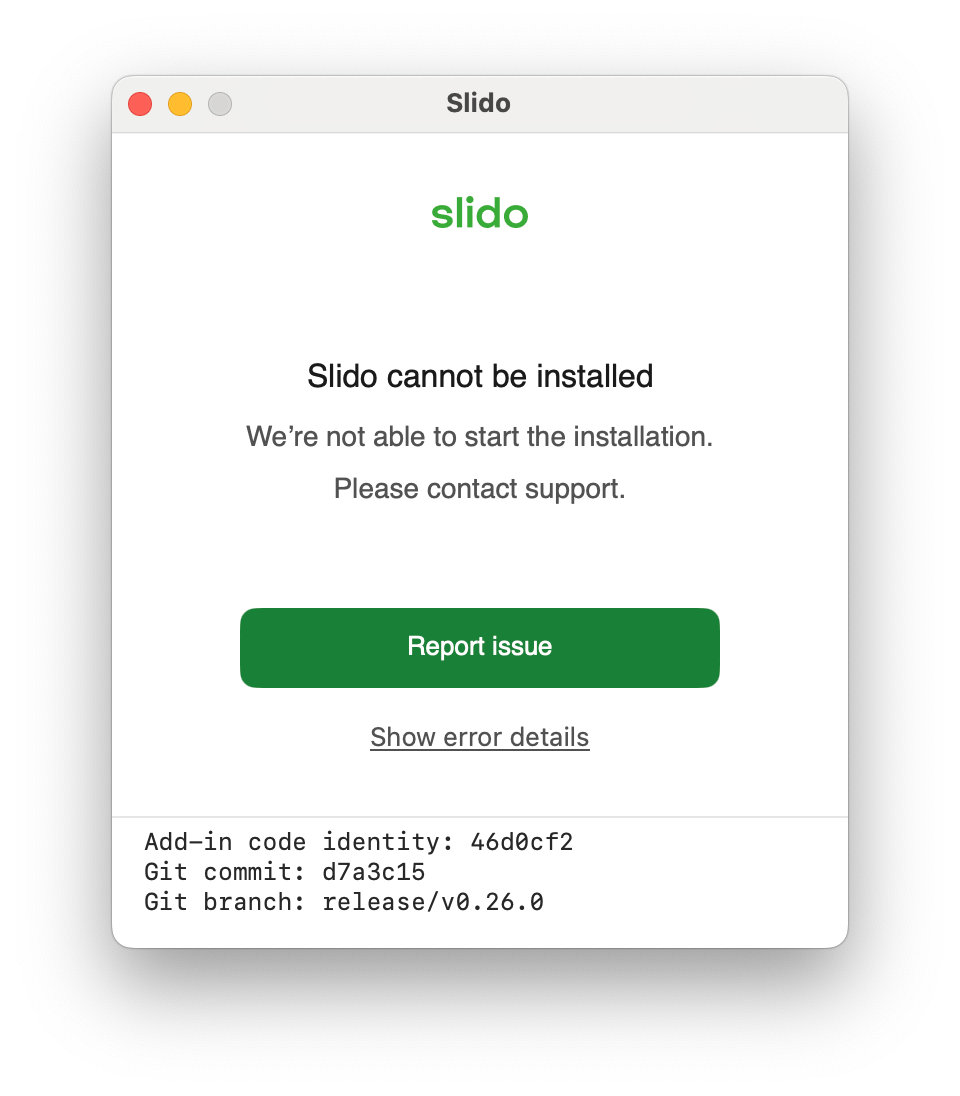
We are aware of rare errors that could occasionally arise during the app’s installation or registration process. In these instances, we include user-friendly messaging to guide you in basic troubleshooting.
For example, see below where PowerPoint itself has not been properly installed.
Administration rights
Depending on your setup, it’s possible that you may not have proper administration rights to install the application. If this is the case, you’ll see the below messaging.
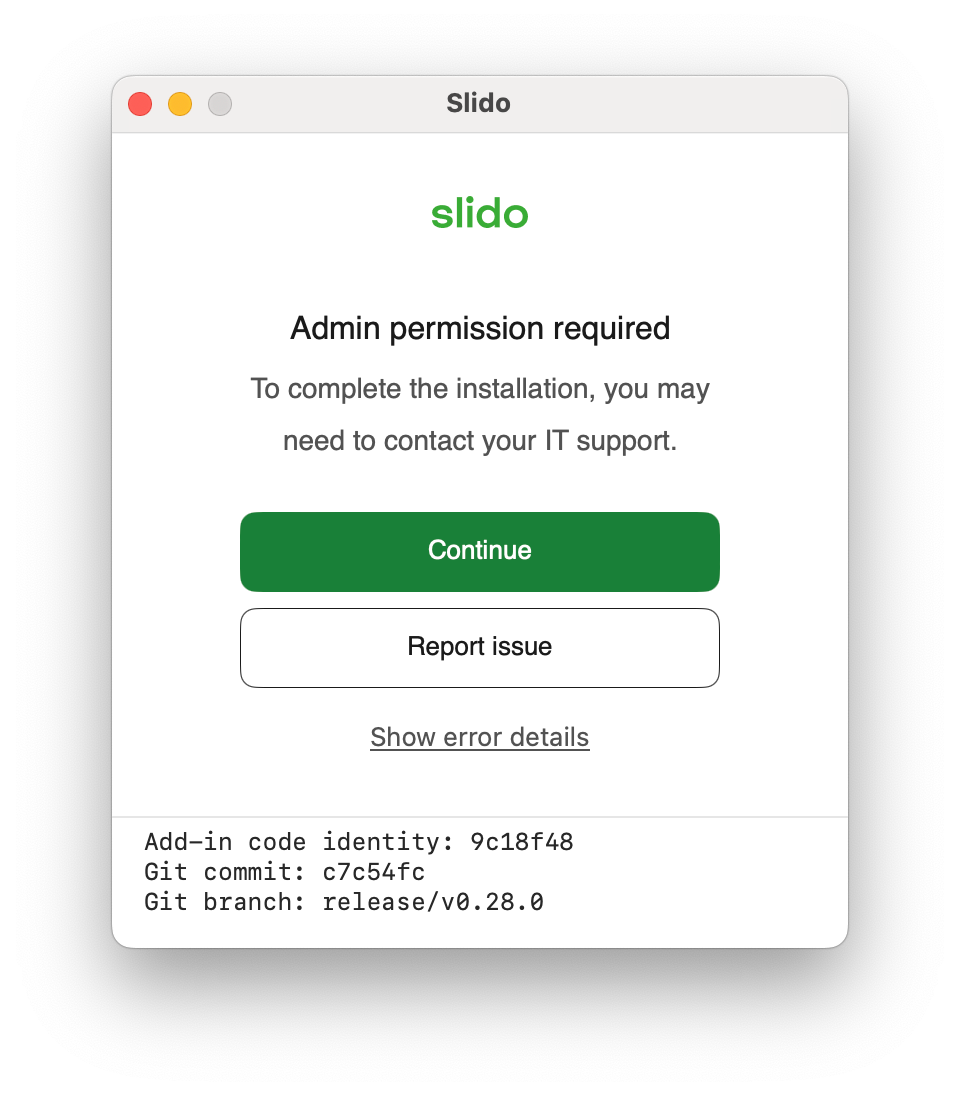
Click Continue and you’ll be prompted to enter admin credentials.
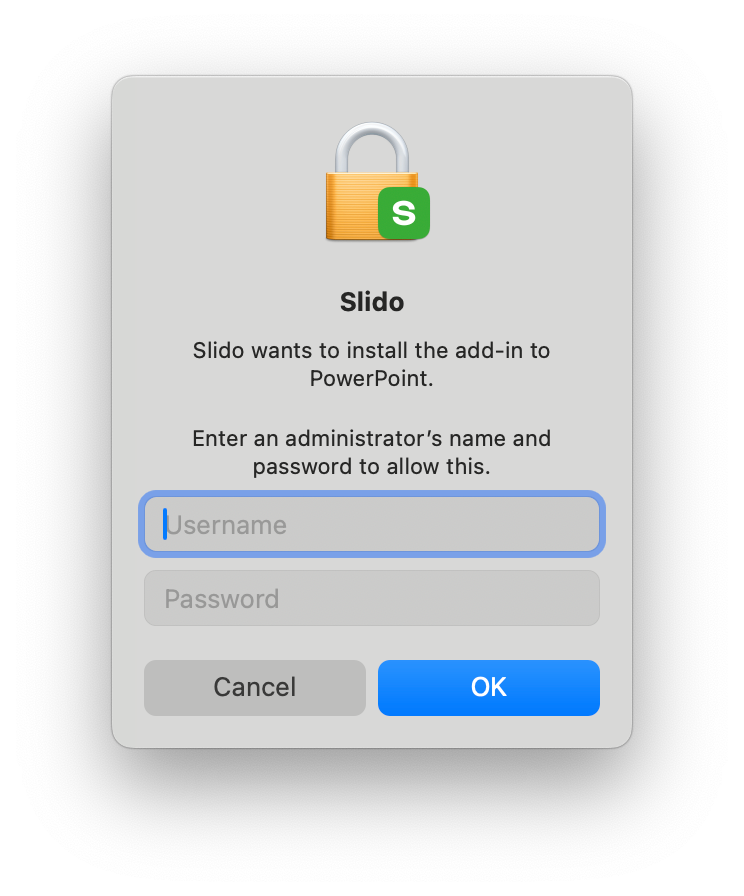
If you don’t have admin credentials to enter here, please reach out to your IT department for assistance in installing Slido for PowerPoint on macOS.
Unable to download apps outside of the App Store
It’s possible that your security settings only allow you to download apps from the Apple App Store. If this is the case, you’ll run into the below error when trying to access the Slido app.
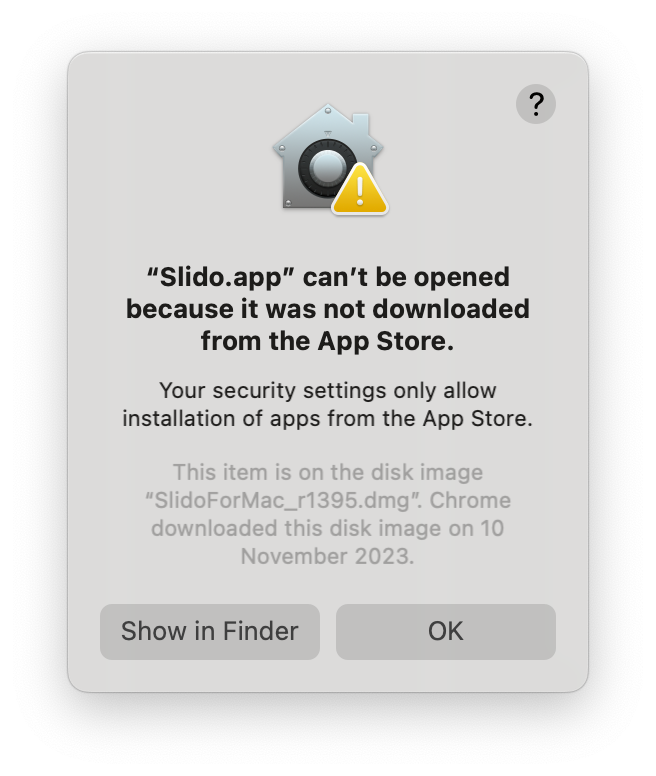
To change this setting, open up System Settings > Privacy & Security . Then scroll down to the Security section where you should be able to change your application download preferences.

Other issues
If you encounter an error message that you’re unable to resolve independently, please select the Report issue option. You’ll then be redirected to our Contact us page where you can add a summary of your issue and click Send .
For more efficient support, please include the information requested in the previous section . Note that your logs will already be attached to your message.
Updating the Slido for PowerPoint on macOS application is seamless and easy. You can always check for any updates by simply opening up the app:
- Go to Applications
- If there is an update available, you’ll be prompted to install a new version of Slido
If you encounter any issues during the updating process, please contact us by following the steps above .
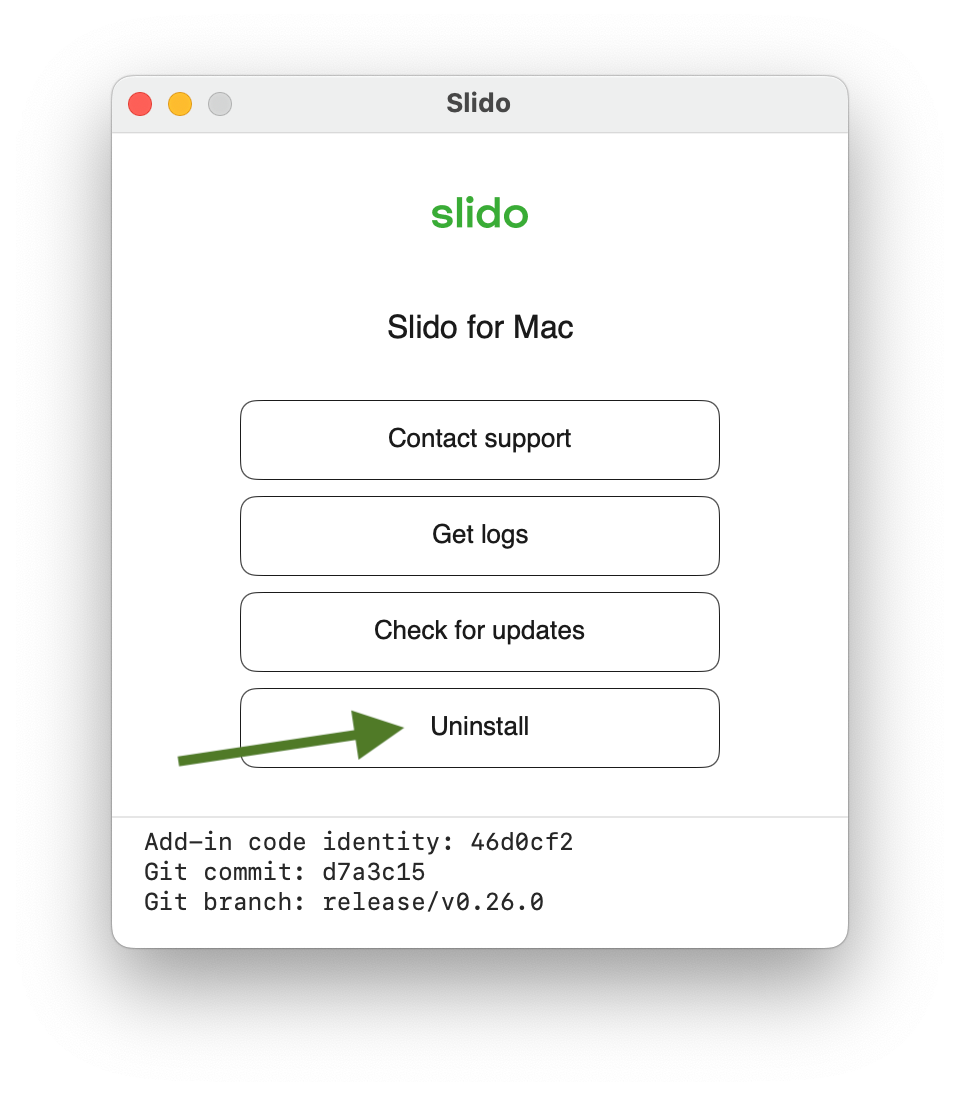
If you ever decide you no longer need the Slido for PowerPoint on macOS application, simply open up the app and select the Uninstall option.
Curious about more?
- Troubleshooting
- powerpoint troubleshooting
Create a community account
Already have an account? Login
Social Login
Log in to your community account.
Enter your E-mail address. We'll send you an e-mail with instructions to reset your password.
Scanning file for viruses.
Sorry, we're still checking this file's contents to make sure it's safe to download. Please try again in a few minutes.
This file cannot be downloaded
Sorry, our virus scanner detected that this file isn't safe to download.
IMAGES
VIDEO
COMMENTS
Select the text. Under Drawing Tools, choose Format. Do one of the following: To change the color of your text, choose Text Fill, and then choose a color. To change the outline color of your text, choose Text Outline, and then choose a color. To apply a shadow, reflection, glow, bevel, 3-D rotation, a transform, choose Text Effects, and then ...
In PowerPoint, you can create a presentation from scratch, or from a theme with built-in graphics, fonts, and placeholders for your text, images, and content...
Create a presentation. Open PowerPoint. In the left pane, select New. Select an option: To create a presentation from scratch, select Blank Presentation. To use a prepared design, select one of the templates. To see tips for using PowerPoint, select Take a Tour, and then select Create, . Add a slide.
To do that, simply go up to the Home tab and click on New Slide. This inserts a new slide in your presentation right after the one you were on. You can alternatively hit Ctrl+M on your keyboard to insert a new blank slide in PowerPoint. To learn more about this shortcut, see my guide on using Ctrl+M in PowerPoint.
Get started with PowerPoint for Beginners. Follow this 20-Minute step by step PowerPoint tutorial to start creating presentations smoothly.Contents of this v...
Open the PowerPoint app, select a template and theme, then like "Create.". Click the text box to add your title and subtitle to create your title slide. Click the "Insert" tab, then "New Slide" to add another slide. Choose the type of slide you want to add, then add text and pictures. Rearrange slides by dragging them up or down in ...
Microsoft PowerPoint is a presentation design software that is part of Microsoft 365. This software allows you to design presentations by combining text, images, graphics, video, and animation on slides in a simple and intuitive way. Over time, PowerPoint has evolved and improved its accessibility to users.
Create a presentation from a theme. Select File > New. Double-click a theme in the gallery to create a presentation in that theme. Or search for more templates.
Learn everything you need to know to get started using Microsoft PowerPoint! You'll learn all the basics plus more, including: how to choose a design theme...
In the "Insert" menu, select "Table" and opt for a one-by-one table. Change the table color to a light gray shade, elongate it, and position it neatly to the left of your text. To improve readability and aesthetics, increase the spacing between text phrases. A small adjustment in the before spacing setting (setting it to 48) significantly ...
Navigate to the Slide Show tab. Hold down the Alt key on your keyboard. Click From Beginning. Holding down the Alt key and clicking From Beginning, the Presenter View will launch from the very first (non-hidden) slide in your presentation.
Six steps for creating a slide show. 1. Plan your slide show. Before getting too deep into your slide show project, it's a good idea to select and save the photos and videos you want to use. This helps you create a slide show more efficiently and purposefully, ensuring a better outcome. 4.
Make Bullet Points Count. Limit the Use of Transitions. Skip Text Where Possible. Think in Color. Take a Look From the Top Down. Bonus: Start With Templates. Slideshows are an intuitive way to share complex ideas with an audience, although they're dull and frustrating when poorly executed.
A great PowerPoint presentation is: Prepared to Win. Research, plan, and prepare your presentation professionally. It helps you deliver an effective message to your target audience. Designed Correctly. Your visual points should stand out without overwhelming your audience. A good PowerPoint visual shouldn't complicate your message.
On the Design tab, select the theme you want. To see more themes, expand the Theme gallery . On the Home tab, click New Slide. To choose a different slide layout, click the arrow next to New Slide and then click the slide layout you want. On the Transitions tab, click the transition you want. To see more transitions, expand the Transition gallery .
Step 2: Choose a Template. Select a template or a blank presentation to start creating your slides. PowerPoint offers a variety of templates to fit every need and occasion. Whether you want something simple and professional or colorful and creative, there's a template for you. If you prefer to start from scratch, you can choose a blank ...
How to Create a Presentation in PowerPoint - Office 365. This video explains how to create a basic PowerPoint presentation. How to select a theme and how you...
Just like for creating a master template, the first thing is to access the master view. Go to View tab > Slide Master to see exactly all the design guidelines your presentation has at the moment. #2. Edit the Master Slide. If there's a common element that you want to change, the Master Slide is the place to do it!
Again, remember to save your new presentation by going to File > Save As, picking a location, entering a filename, and selecting Save. Conclusion. Setting up a PowerPoint presentation isn't necessarily difficult but does take time. So, be sure to check out the extensive and robust feature set that Plus AI has to offer for creating your ...
Go to the Slide Show tab and select Set Up Slide Show. When the Set Up Show window appears, go to the Show options group and tick the Loop continuously until 'Esc' option. Don't forget to click OK to apply the new setup! And all done! Now, your presentation will loop until you select 'Esc'.
Alternatively, you can use the following keyboard shortcuts while viewing your slideshow: Spacebar or Right Arrow Button: Go to the next slide in the presentation.; Left Arrow Button: Go to the previous slide in the presentation. Esc: End the show. W: Hide your current slide and display a white screen. Press the same key again to bring back the slide's content.
On the Slide Show tab, in the Set Up group, click the arrow on the Record Slide Show button. In the Record Slide Show dialog box, select the Narrations and laser pointer check box, and if appropriate, select or deselect the Slide and animation timings check box. Click Start Recording.
First, open your PowerPoint presentation in which you would like to loop. Once open, navigate to the "Set Up" group of the "Slide Show" tab and then select the "Set Up Slide Show" button. The "Set Up Show" window will appear. In the "Show options" group, check the box next to "Loop Continuously until Esc.".
Step 1: Open Your PowerPoint Presentation. Begin by launching PowerPoint and opening your presentation. Ensure your slides are properly arranged in the desired order for your presentation. Step 2: Select the Slide You Want to Modify. Click on the slide where you want to apply the automatic transition.
Poster presentations, unlike PowerPoint presentations, require physical design and production. Professional poster creation involves graphic artists, production, and team meetings. So, it's important to outline a poster presentation timeline for your team to follow, keeping your presentation in mind to ensure ample time for completion.
Watch this video to find out how. Set up your presentation. First, go to the SLIDE SHOW tab and make sure Use Presenter View is selected. For rehearsal, you can press ALT+F5 to display the Presenter view on a single screen. Rehearsing this way will help you get comfortable with your slides, and give you practice using the Presenter view.
If you're having any trouble with our Slido for PowerPoint on macOS app, we want to help. To speed up the process, please include the following three elements in an email to [email protected]. Screenshot(s) of your issue; Any company network or device settings in place (e.g. VPN, authentication proxy, admin permissions, firewall, antivirus, etc.)