- Open access
- Published: 19 July 2015

The role of visual representations in scientific practices: from conceptual understanding and knowledge generation to ‘seeing’ how science works
- Maria Evagorou 1 ,
- Sibel Erduran 2 &
- Terhi Mäntylä 3
International Journal of STEM Education volume 2 , Article number: 11 ( 2015 ) Cite this article
73k Accesses
78 Citations
13 Altmetric
Metrics details
The use of visual representations (i.e., photographs, diagrams, models) has been part of science, and their use makes it possible for scientists to interact with and represent complex phenomena, not observable in other ways. Despite a wealth of research in science education on visual representations, the emphasis of such research has mainly been on the conceptual understanding when using visual representations and less on visual representations as epistemic objects. In this paper, we argue that by positioning visual representations as epistemic objects of scientific practices, science education can bring a renewed focus on how visualization contributes to knowledge formation in science from the learners’ perspective.
This is a theoretical paper, and in order to argue about the role of visualization, we first present a case study, that of the discovery of the structure of DNA that highlights the epistemic components of visual information in science. The second case study focuses on Faraday’s use of the lines of magnetic force. Faraday is known of his exploratory, creative, and yet systemic way of experimenting, and the visual reasoning leading to theoretical development was an inherent part of the experimentation. Third, we trace a contemporary account from science focusing on the experimental practices and how reproducibility of experimental procedures can be reinforced through video data.
Conclusions
Our conclusions suggest that in teaching science, the emphasis in visualization should shift from cognitive understanding—using the products of science to understand the content—to engaging in the processes of visualization. Furthermore, we suggest that is it essential to design curriculum materials and learning environments that create a social and epistemic context and invite students to engage in the practice of visualization as evidence, reasoning, experimental procedure, or a means of communication and reflect on these practices. Implications for teacher education include the need for teacher professional development programs to problematize the use of visual representations as epistemic objects that are part of scientific practices.
During the last decades, research and reform documents in science education across the world have been calling for an emphasis not only on the content but also on the processes of science (Bybee 2014 ; Eurydice 2012 ; Duschl and Bybee 2014 ; Osborne 2014 ; Schwartz et al. 2012 ), in order to make science accessible to the students and enable them to understand the epistemic foundation of science. Scientific practices, part of the process of science, are the cognitive and discursive activities that are targeted in science education to develop epistemic understanding and appreciation of the nature of science (Duschl et al. 2008 ) and have been the emphasis of recent reform documents in science education across the world (Achieve 2013 ; Eurydice 2012 ). With the term scientific practices, we refer to the processes that take place during scientific discoveries and include among others: asking questions, developing and using models, engaging in arguments, and constructing and communicating explanations (National Research Council 2012 ). The emphasis on scientific practices aims to move the teaching of science from knowledge to the understanding of the processes and the epistemic aspects of science. Additionally, by placing an emphasis on engaging students in scientific practices, we aim to help students acquire scientific knowledge in meaningful contexts that resemble the reality of scientific discoveries.
Despite a wealth of research in science education on visual representations, the emphasis of such research has mainly been on the conceptual understanding when using visual representations and less on visual representations as epistemic objects. In this paper, we argue that by positioning visual representations as epistemic objects, science education can bring a renewed focus on how visualization contributes to knowledge formation in science from the learners’ perspective. Specifically, the use of visual representations (i.e., photographs, diagrams, tables, charts) has been part of science and over the years has evolved with the new technologies (i.e., from drawings to advanced digital images and three dimensional models). Visualization makes it possible for scientists to interact with complex phenomena (Richards 2003 ), and they might convey important evidence not observable in other ways. Visual representations as a tool to support cognitive understanding in science have been studied extensively (i.e., Gilbert 2010 ; Wu and Shah 2004 ). Studies in science education have explored the use of images in science textbooks (i.e., Dimopoulos et al. 2003 ; Bungum 2008 ), students’ representations or models when doing science (i.e., Gilbert et al. 2008 ; Dori et al. 2003 ; Lehrer and Schauble 2012 ; Schwarz et al. 2009 ), and students’ images of science and scientists (i.e., Chambers 1983 ). Therefore, studies in the field of science education have been using the term visualization as “the formation of an internal representation from an external representation” (Gilbert et al. 2008 , p. 4) or as a tool for conceptual understanding for students.
In this paper, we do not refer to visualization as mental image, model, or presentation only (Gilbert et al. 2008 ; Philips et al. 2010 ) but instead focus on visual representations or visualization as epistemic objects. Specifically, we refer to visualization as a process for knowledge production and growth in science. In this respect, modeling is an aspect of visualization, but what we are focusing on with visualization is not on the use of model as a tool for cognitive understanding (Gilbert 2010 ; Wu and Shah 2004 ) but the on the process of modeling as a scientific practice which includes the construction and use of models, the use of other representations, the communication in the groups with the use of the visual representation, and the appreciation of the difficulties that the science phase in this process. Therefore, the purpose of this paper is to present through the history of science how visualization can be considered not only as a cognitive tool in science education but also as an epistemic object that can potentially support students to understand aspects of the nature of science.
Scientific practices and science education
According to the New Generation Science Standards (Achieve 2013 ), scientific practices refer to: asking questions and defining problems; developing and using models; planning and carrying out investigations; analyzing and interpreting data; using mathematical and computational thinking; constructing explanations and designing solutions; engaging in argument from evidence; and obtaining, evaluating, and communicating information. A significant aspect of scientific practices is that science learning is more than just about learning facts, concepts, theories, and laws. A fuller appreciation of science necessitates the understanding of the science relative to its epistemological grounding and the process that are involved in the production of knowledge (Hogan and Maglienti 2001 ; Wickman 2004 ).
The New Generation Science Standards is, among other changes, shifting away from science inquiry and towards the inclusion of scientific practices (Duschl and Bybee 2014 ; Osborne 2014 ). By comparing the abilities to do scientific inquiry (National Research Council 2000 ) with the set of scientific practices, it is evident that the latter is about engaging in the processes of doing science and experiencing in that way science in a more authentic way. Engaging in scientific practices according to Osborne ( 2014 ) “presents a more authentic picture of the endeavor that is science” (p.183) and also helps the students to develop a deeper understanding of the epistemic aspects of science. Furthermore, as Bybee ( 2014 ) argues, by engaging students in scientific practices, we involve them in an understanding of the nature of science and an understanding on the nature of scientific knowledge.
Science as a practice and scientific practices as a term emerged by the philosopher of science, Kuhn (Osborne 2014 ), refers to the processes in which the scientists engage during knowledge production and communication. The work that is followed by historians, philosophers, and sociologists of science (Latour 2011 ; Longino 2002 ; Nersessian 2008 ) revealed the scientific practices in which the scientists engage in and include among others theory development and specific ways of talking, modeling, and communicating the outcomes of science.
Visualization as an epistemic object
Schematic, pictorial symbols in the design of scientific instruments and analysis of the perceptual and functional information that is being stored in those images have been areas of investigation in philosophy of scientific experimentation (Gooding et al. 1993 ). The nature of visual perception, the relationship between thought and vision, and the role of reproducibility as a norm for experimental research form a central aspect of this domain of research in philosophy of science. For instance, Rothbart ( 1997 ) has argued that visualizations are commonplace in the theoretical sciences even if every scientific theory may not be defined by visualized models.
Visual representations (i.e., photographs, diagrams, tables, charts, models) have been used in science over the years to enable scientists to interact with complex phenomena (Richards 2003 ) and might convey important evidence not observable in other ways (Barber et al. 2006 ). Some authors (e.g., Ruivenkamp and Rip 2010 ) have argued that visualization is as a core activity of some scientific communities of practice (e.g., nanotechnology) while others (e.g., Lynch and Edgerton 1988 ) have differentiated the role of particular visualization techniques (e.g., of digital image processing in astronomy). Visualization in science includes the complex process through which scientists develop or produce imagery, schemes, and graphical representation, and therefore, what is of importance in this process is not only the result but also the methodology employed by the scientists, namely, how this result was produced. Visual representations in science may refer to objects that are believed to have some kind of material or physical existence but equally might refer to purely mental, conceptual, and abstract constructs (Pauwels 2006 ). More specifically, visual representations can be found for: (a) phenomena that are not observable with the eye (i.e., microscopic or macroscopic); (b) phenomena that do not exist as visual representations but can be translated as such (i.e., sound); and (c) in experimental settings to provide visual data representations (i.e., graphs presenting velocity of moving objects). Additionally, since science is not only about replicating reality but also about making it more understandable to people (either to the public or other scientists), visual representations are not only about reproducing the nature but also about: (a) functioning in helping solving a problem, (b) filling gaps in our knowledge, and (c) facilitating knowledge building or transfer (Lynch 2006 ).
Using or developing visual representations in the scientific practice can range from a straightforward to a complicated situation. More specifically, scientists can observe a phenomenon (i.e., mitosis) and represent it visually using a picture or diagram, which is quite straightforward. But they can also use a variety of complicated techniques (i.e., crystallography in the case of DNA studies) that are either available or need to be developed or refined in order to acquire the visual information that can be used in the process of theory development (i.e., Latour and Woolgar 1979 ). Furthermore, some visual representations need decoding, and the scientists need to learn how to read these images (i.e., radiologists); therefore, using visual representations in the process of science requires learning a new language that is specific to the medium/methods that is used (i.e., understanding an X-ray picture is different from understanding an MRI scan) and then communicating that language to other scientists and the public.
There are much intent and purposes of visual representations in scientific practices, as for example to make a diagnosis, compare, describe, and preserve for future study, verify and explore new territory, generate new data (Pauwels 2006 ), or present new methodologies. According to Latour and Woolgar ( 1979 ) and Knorr Cetina ( 1999 ), visual representations can be used either as primary data (i.e., image from a microscope). or can be used to help in concept development (i.e., models of DNA used by Watson and Crick), to uncover relationships and to make the abstract more concrete (graphs of sound waves). Therefore, visual representations and visual practices, in all forms, are an important aspect of the scientific practices in developing, clarifying, and transmitting scientific knowledge (Pauwels 2006 ).
Methods and Results: Merging Visualization and scientific practices in science
In this paper, we present three case studies that embody the working practices of scientists in an effort to present visualization as a scientific practice and present our argument about how visualization is a complex process that could include among others modeling and use of representation but is not only limited to that. The first case study explores the role of visualization in the construction of knowledge about the structure of DNA, using visuals as evidence. The second case study focuses on Faraday’s use of the lines of magnetic force and the visual reasoning leading to the theoretical development that was an inherent part of the experimentation. The third case study focuses on the current practices of scientists in the context of a peer-reviewed journal called the Journal of Visualized Experiments where the methodology is communicated through videotaped procedures. The three case studies represent the research interests of the three authors of this paper and were chosen to present how visualization as a practice can be involved in all stages of doing science, from hypothesizing and evaluating evidence (case study 1) to experimenting and reasoning (case study 2) to communicating the findings and methodology with the research community (case study 3), and represent in this way the three functions of visualization as presented by Lynch ( 2006 ). Furthermore, the last case study showcases how the development of visualization technologies has contributed to the communication of findings and methodologies in science and present in that way an aspect of current scientific practices. In all three cases, our approach is guided by the observation that the visual information is an integral part of scientific practices at the least and furthermore that they are particularly central in the scientific practices of science.
Case study 1: use visual representations as evidence in the discovery of DNA
The focus of the first case study is the discovery of the structure of DNA. The DNA was first isolated in 1869 by Friedrich Miescher, and by the late 1940s, it was known that it contained phosphate, sugar, and four nitrogen-containing chemical bases. However, no one had figured the structure of the DNA until Watson and Crick presented their model of DNA in 1953. Other than the social aspects of the discovery of the DNA, another important aspect was the role of visual evidence that led to knowledge development in the area. More specifically, by studying the personal accounts of Watson ( 1968 ) and Crick ( 1988 ) about the discovery of the structure of the DNA, the following main ideas regarding the role of visual representations in the production of knowledge can be identified: (a) The use of visual representations was an important part of knowledge growth and was often dependent upon the discovery of new technologies (i.e., better microscopes or better techniques in crystallography that would provide better visual representations as evidence of the helical structure of the DNA); and (b) Models (three-dimensional) were used as a way to represent the visual images (X-ray images) and connect them to the evidence provided by other sources to see whether the theory can be supported. Therefore, the model of DNA was built based on the combination of visual evidence and experimental data.
An example showcasing the importance of visual representations in the process of knowledge production in this case is provided by Watson, in his book The Double Helix (1968):
…since the middle of the summer Rosy [Rosalind Franklin] had had evidence for a new three-dimensional form of DNA. It occurred when the DNA 2molecules were surrounded by a large amount of water. When I asked what the pattern was like, Maurice went into the adjacent room to pick up a print of the new form they called the “B” structure. The instant I saw the picture, my mouth fell open and my pulse began to race. The pattern was unbelievably simpler than those previously obtained (A form). Moreover, the black cross of reflections which dominated the picture could arise only from a helical structure. With the A form the argument for the helix was never straightforward, and considerable ambiguity existed as to exactly which type of helical symmetry was present. With the B form however, mere inspection of its X-ray picture gave several of the vital helical parameters. (p. 167-169)
As suggested by Watson’s personal account of the discovery of the DNA, the photo taken by Rosalind Franklin (Fig. 1 ) convinced him that the DNA molecule must consist of two chains arranged in a paired helix, which resembles a spiral staircase or ladder, and on March 7, 1953, Watson and Crick finished and presented their model of the structure of DNA (Watson and Berry 2004 ; Watson 1968 ) which was based on the visual information provided by the X-ray image and their knowledge of chemistry.
X-ray chrystallography of DNA
In analyzing the visualization practice in this case study, we observe the following instances that highlight how the visual information played a role:
Asking questions and defining problems: The real world in the model of science can at some points only be observed through visual representations or representations, i.e., if we are using DNA as an example, the structure of DNA was only observable through the crystallography images produced by Rosalind Franklin in the laboratory. There was no other way to observe the structure of DNA, therefore the real world.
Analyzing and interpreting data: The images that resulted from crystallography as well as their interpretations served as the data for the scientists studying the structure of DNA.
Experimenting: The data in the form of visual information were used to predict the possible structure of the DNA.
Modeling: Based on the prediction, an actual three-dimensional model was prepared by Watson and Crick. The first model did not fit with the real world (refuted by Rosalind Franklin and her research group from King’s College) and Watson and Crick had to go through the same process again to find better visual evidence (better crystallography images) and create an improved visual model.
Example excerpts from Watson’s biography provide further evidence for how visualization practices were applied in the context of the discovery of DNA (Table 1 ).
In summary, by examining the history of the discovery of DNA, we showcased how visual data is used as scientific evidence in science, identifying in that way an aspect of the nature of science that is still unexplored in the history of science and an aspect that has been ignored in the teaching of science. Visual representations are used in many ways: as images, as models, as evidence to support or rebut a model, and as interpretations of reality.
Case study 2: applying visual reasoning in knowledge production, the example of the lines of magnetic force
The focus of this case study is on Faraday’s use of the lines of magnetic force. Faraday is known of his exploratory, creative, and yet systemic way of experimenting, and the visual reasoning leading to theoretical development was an inherent part of this experimentation (Gooding 2006 ). Faraday’s articles or notebooks do not include mathematical formulations; instead, they include images and illustrations from experimental devices and setups to the recapping of his theoretical ideas (Nersessian 2008 ). According to Gooding ( 2006 ), “Faraday’s visual method was designed not to copy apparent features of the world, but to analyse and replicate them” (2006, p. 46).
The lines of force played a central role in Faraday’s research on electricity and magnetism and in the development of his “field theory” (Faraday 1852a ; Nersessian 1984 ). Before Faraday, the experiments with iron filings around magnets were known and the term “magnetic curves” was used for the iron filing patterns and also for the geometrical constructs derived from the mathematical theory of magnetism (Gooding et al. 1993 ). However, Faraday used the lines of force for explaining his experimental observations and in constructing the theory of forces in magnetism and electricity. Examples of Faraday’s different illustrations of lines of magnetic force are given in Fig. 2 . Faraday gave the following experiment-based definition for the lines of magnetic forces:
a Iron filing pattern in case of bar magnet drawn by Faraday (Faraday 1852b , Plate IX, p. 158, Fig. 1), b Faraday’s drawing of lines of magnetic force in case of cylinder magnet, where the experimental procedure, knife blade showing the direction of lines, is combined into drawing (Faraday, 1855, vol. 1, plate 1)
A line of magnetic force may be defined as that line which is described by a very small magnetic needle, when it is so moved in either direction correspondent to its length, that the needle is constantly a tangent to the line of motion; or it is that line along which, if a transverse wire be moved in either direction, there is no tendency to the formation of any current in the wire, whilst if moved in any other direction there is such a tendency; or it is that line which coincides with the direction of the magnecrystallic axis of a crystal of bismuth, which is carried in either direction along it. The direction of these lines about and amongst magnets and electric currents, is easily represented and understood, in a general manner, by the ordinary use of iron filings. (Faraday 1852a , p. 25 (3071))
The definition describes the connection between the experiments and the visual representation of the results. Initially, the lines of force were just geometric representations, but later, Faraday treated them as physical objects (Nersessian 1984 ; Pocovi and Finlay 2002 ):
I have sometimes used the term lines of force so vaguely, as to leave the reader doubtful whether I intended it as a merely representative idea of the forces, or as the description of the path along which the power was continuously exerted. … wherever the expression line of force is taken simply to represent the disposition of forces, it shall have the fullness of that meaning; but that wherever it may seem to represent the idea of the physical mode of transmission of the force, it expresses in that respect the opinion to which I incline at present. The opinion may be erroneous, and yet all that relates or refers to the disposition of the force will remain the same. (Faraday, 1852a , p. 55-56 (3075))
He also felt that the lines of force had greater explanatory power than the dominant theory of action-at-a-distance:
Now it appears to me that these lines may be employed with great advantage to represent nature, condition, direction and comparative amount of the magnetic forces; and that in many cases they have, to the physical reasoned at least, a superiority over that method which represents the forces as concentrated in centres of action… (Faraday, 1852a , p. 26 (3074))
For giving some insight to Faraday’s visual reasoning as an epistemic practice, the following examples of Faraday’s studies of the lines of magnetic force (Faraday 1852a , 1852b ) are presented:
(a) Asking questions and defining problems: The iron filing patterns formed the empirical basis for the visual model: 2D visualization of lines of magnetic force as presented in Fig. 2 . According to Faraday, these iron filing patterns were suitable for illustrating the direction and form of the magnetic lines of force (emphasis added):
It must be well understood that these forms give no indication by their appearance of the relative strength of the magnetic force at different places, inasmuch as the appearance of the lines depends greatly upon the quantity of filings and the amount of tapping; but the direction and forms of these lines are well given, and these indicate, in a considerable degree, the direction in which the forces increase and diminish . (Faraday 1852b , p.158 (3237))
Despite being static and two dimensional on paper, the lines of magnetic force were dynamical (Nersessian 1992 , 2008 ) and three dimensional for Faraday (see Fig. 2 b). For instance, Faraday described the lines of force “expanding”, “bending,” and “being cut” (Nersessian 1992 ). In Fig. 2 b, Faraday has summarized his experiment (bar magnet and knife blade) and its results (lines of force) in one picture.
(b) Analyzing and interpreting data: The model was so powerful for Faraday that he ended up thinking them as physical objects (e.g., Nersessian 1984 ), i.e., making interpretations of the way forces act. Of course, he made a lot of experiments for showing the physical existence of the lines of force, but he did not succeed in it (Nersessian 1984 ). The following quote illuminates Faraday’s use of the lines of force in different situations:
The study of these lines has, at different times, been greatly influential in leading me to various results, which I think prove their utility as well as fertility. Thus, the law of magneto-electric induction; the earth’s inductive action; the relation of magnetism and light; diamagnetic action and its law, and magnetocrystallic action, are the cases of this kind… (Faraday 1852a , p. 55 (3174))
(c) Experimenting: In Faraday's case, he used a lot of exploratory experiments; in case of lines of magnetic force, he used, e.g., iron filings, magnetic needles, or current carrying wires (see the quote above). The magnetic field is not directly observable and the representation of lines of force was a visual model, which includes the direction, form, and magnitude of field.
(d) Modeling: There is no denying that the lines of magnetic force are visual by nature. Faraday’s views of lines of force developed gradually during the years, and he applied and developed them in different contexts such as electromagnetic, electrostatic, and magnetic induction (Nersessian 1984 ). An example of Faraday’s explanation of the effect of the wire b’s position to experiment is given in Fig. 3 . In Fig. 3 , few magnetic lines of force are drawn, and in the quote below, Faraday is explaining the effect using these magnetic lines of force (emphasis added):
Picture of an experiment with different arrangements of wires ( a , b’ , b” ), magnet, and galvanometer. Note the lines of force drawn around the magnet. (Faraday 1852a , p. 34)
It will be evident by inspection of Fig. 3 , that, however the wires are carried away, the general result will, according to the assumed principles of action, be the same; for if a be the axial wire, and b’, b”, b”’ the equatorial wire, represented in three different positions, whatever magnetic lines of force pass across the latter wire in one position, will also pass it in the other, or in any other position which can be given to it. The distance of the wire at the place of intersection with the lines of force, has been shown, by the experiments (3093.), to be unimportant. (Faraday 1852a , p. 34 (3099))
In summary, by examining the history of Faraday’s use of lines of force, we showed how visual imagery and reasoning played an important part in Faraday’s construction and representation of his “field theory”. As Gooding has stated, “many of Faraday’s sketches are far more that depictions of observation, they are tools for reasoning with and about phenomena” (2006, p. 59).
Case study 3: visualizing scientific methods, the case of a journal
The focus of the third case study is the Journal of Visualized Experiments (JoVE) , a peer-reviewed publication indexed in PubMed. The journal devoted to the publication of biological, medical, chemical, and physical research in a video format. The journal describes its history as follows:
JoVE was established as a new tool in life science publication and communication, with participation of scientists from leading research institutions. JoVE takes advantage of video technology to capture and transmit the multiple facets and intricacies of life science research. Visualization greatly facilitates the understanding and efficient reproduction of both basic and complex experimental techniques, thereby addressing two of the biggest challenges faced by today's life science research community: i) low transparency and poor reproducibility of biological experiments and ii) time and labor-intensive nature of learning new experimental techniques. ( http://www.jove.com/ )
By examining the journal content, we generate a set of categories that can be considered as indicators of relevance and significance in terms of epistemic practices of science that have relevance for science education. For example, the quote above illustrates how scientists view some norms of scientific practice including the norms of “transparency” and “reproducibility” of experimental methods and results, and how the visual format of the journal facilitates the implementation of these norms. “Reproducibility” can be considered as an epistemic criterion that sits at the heart of what counts as an experimental procedure in science:
Investigating what should be reproducible and by whom leads to different types of experimental reproducibility, which can be observed to play different roles in experimental practice. A successful application of the strategy of reproducing an experiment is an achievement that may depend on certain isiosyncratic aspects of a local situation. Yet a purely local experiment that cannot be carried out by other experimenters and in other experimental contexts will, in the end be unproductive in science. (Sarkar and Pfeifer 2006 , p.270)
We now turn to an article on “Elevated Plus Maze for Mice” that is available for free on the journal website ( http://www.jove.com/video/1088/elevated-plus-maze-for-mice ). The purpose of this experiment was to investigate anxiety levels in mice through behavioral analysis. The journal article consists of a 9-min video accompanied by text. The video illustrates the handling of the mice in soundproof location with less light, worksheets with characteristics of mice, computer software, apparatus, resources, setting up the computer software, and the video recording of mouse behavior on the computer. The authors describe the apparatus that is used in the experiment and state how procedural differences exist between research groups that lead to difficulties in the interpretation of results:
The apparatus consists of open arms and closed arms, crossed in the middle perpendicularly to each other, and a center area. Mice are given access to all of the arms and are allowed to move freely between them. The number of entries into the open arms and the time spent in the open arms are used as indices of open space-induced anxiety in mice. Unfortunately, the procedural differences that exist between laboratories make it difficult to duplicate and compare results among laboratories.
The authors’ emphasis on the particularity of procedural context echoes in the observations of some philosophers of science:
It is not just the knowledge of experimental objects and phenomena but also their actual existence and occurrence that prove to be dependent on specific, productive interventions by the experimenters” (Sarkar and Pfeifer 2006 , pp. 270-271)
The inclusion of a video of the experimental procedure specifies what the apparatus looks like (Fig. 4 ) and how the behavior of the mice is captured through video recording that feeds into a computer (Fig. 5 ). Subsequently, a computer software which captures different variables such as the distance traveled, the number of entries, and the time spent on each arm of the apparatus. Here, there is visual information at different levels of representation ranging from reconfiguration of raw video data to representations that analyze the data around the variables in question (Fig. 6 ). The practice of levels of visual representations is not particular to the biological sciences. For instance, they are commonplace in nanotechnological practices:
Visual illustration of apparatus
Video processing of experimental set-up
Computer software for video input and variable recording
In the visualization processes, instruments are needed that can register the nanoscale and provide raw data, which needs to be transformed into images. Some Imaging Techniques have software incorporated already where this transformation automatically takes place, providing raw images. Raw data must be translated through the use of Graphic Software and software is also used for the further manipulation of images to highlight what is of interest to capture the (inferred) phenomena -- and to capture the reader. There are two levels of choice: Scientists have to choose which imaging technique and embedded software to use for the job at hand, and they will then have to follow the structure of the software. Within such software, there are explicit choices for the scientists, e.g. about colour coding, and ways of sharpening images. (Ruivenkamp and Rip 2010 , pp.14–15)
On the text that accompanies the video, the authors highlight the role of visualization in their experiment:
Visualization of the protocol will promote better understanding of the details of the entire experimental procedure, allowing for standardization of the protocols used in different laboratories and comparisons of the behavioral phenotypes of various strains of mutant mice assessed using this test.
The software that takes the video data and transforms it into various representations allows the researchers to collect data on mouse behavior more reliably. For instance, the distance traveled across the arms of the apparatus or the time spent on each arm would have been difficult to observe and record precisely. A further aspect to note is how the visualization of the experiment facilitates control of bias. The authors illustrate how the olfactory bias between experimental procedures carried on mice in sequence is avoided by cleaning the equipment.
Our discussion highlights the role of visualization in science, particularly with respect to presenting visualization as part of the scientific practices. We have used case studies from the history of science highlighting a scientist’s account of how visualization played a role in the discovery of DNA and the magnetic field and from a contemporary illustration of a science journal’s practices in incorporating visualization as a way to communicate new findings and methodologies. Our implicit aim in drawing from these case studies was the need to align science education with scientific practices, particularly in terms of how visual representations, stable or dynamic, can engage students in the processes of science and not only to be used as tools for cognitive development in science. Our approach was guided by the notion of “knowledge-as-practice” as advanced by Knorr Cetina ( 1999 ) who studied scientists and characterized their knowledge as practice, a characterization which shifts focus away from ideas inside scientists’ minds to practices that are cultural and deeply contextualized within fields of science. She suggests that people working together can be examined as epistemic cultures whose collective knowledge exists as practice.
It is important to stress, however, that visual representations are not used in isolation, but are supported by other types of evidence as well, or other theories (i.e., in order to understand the helical form of DNA, or the structure, chemistry knowledge was needed). More importantly, this finding can also have implications when teaching science as argument (e.g., Erduran and Jimenez-Aleixandre 2008 ), since the verbal evidence used in the science classroom to maintain an argument could be supported by visual evidence (either a model, representation, image, graph, etc.). For example, in a group of students discussing the outcomes of an introduced species in an ecosystem, pictures of the species and the ecosystem over time, and videos showing the changes in the ecosystem, and the special characteristics of the different species could serve as visual evidence to help the students support their arguments (Evagorou et al. 2012 ). Therefore, an important implication for the teaching of science is the use of visual representations as evidence in the science curriculum as part of knowledge production. Even though studies in the area of science education have focused on the use of models and modeling as a way to support students in the learning of science (Dori et al. 2003 ; Lehrer and Schauble 2012 ; Mendonça and Justi 2013 ; Papaevripidou et al. 2007 ) or on the use of images (i.e., Korfiatis et al. 2003 ), with the term using visuals as evidence, we refer to the collection of all forms of visuals and the processes involved.
Another aspect that was identified through the case studies is that of the visual reasoning (an integral part of Faraday’s investigations). Both the verbalization and visualization were part of the process of generating new knowledge (Gooding 2006 ). Even today, most of the textbooks use the lines of force (or just field lines) as a geometrical representation of field, and the number of field lines is connected to the quantity of flux. Often, the textbooks use the same kind of visual imagery than in what is used by scientists. However, when using images, only certain aspects or features of the phenomena or data are captured or highlighted, and often in tacit ways. Especially in textbooks, the process of producing the image is not presented and instead only the product—image—is left. This could easily lead to an idea of images (i.e., photos, graphs, visual model) being just representations of knowledge and, in the worse case, misinterpreted representations of knowledge as the results of Pocovi and Finlay ( 2002 ) in case of electric field lines show. In order to avoid this, the teachers should be able to explain how the images are produced (what features of phenomena or data the images captures, on what ground the features are chosen to that image, and what features are omitted); in this way, the role of visualization in knowledge production can be made “visible” to students by engaging them in the process of visualization.
The implication of these norms for science teaching and learning is numerous. The classroom contexts can model the generation, sharing and evaluation of evidence, and experimental procedures carried out by students, thereby promoting not only some contemporary cultural norms in scientific practice but also enabling the learning of criteria, standards, and heuristics that scientists use in making decisions on scientific methods. As we have demonstrated with the three case studies, visual representations are part of the process of knowledge growth and communication in science, as demonstrated with two examples from the history of science and an example from current scientific practices. Additionally, visual information, especially with the use of technology is a part of students’ everyday lives. Therefore, we suggest making use of students’ knowledge and technological skills (i.e., how to produce their own videos showing their experimental method or how to identify or provide appropriate visual evidence for a given topic), in order to teach them the aspects of the nature of science that are often neglected both in the history of science and the design of curriculum. Specifically, what we suggest in this paper is that students should actively engage in visualization processes in order to appreciate the diverse nature of doing science and engage in authentic scientific practices.
However, as a word of caution, we need to distinguish the products and processes involved in visualization practices in science:
If one considers scientific representations and the ways in which they can foster or thwart our understanding, it is clear that a mere object approach, which would devote all attention to the representation as a free-standing product of scientific labor, is inadequate. What is needed is a process approach: each visual representation should be linked with its context of production (Pauwels 2006 , p.21).
The aforementioned suggests that the emphasis in visualization should shift from cognitive understanding—using the products of science to understand the content—to engaging in the processes of visualization. Therefore, an implication for the teaching of science includes designing curriculum materials and learning environments that create a social and epistemic context and invite students to engage in the practice of visualization as evidence, reasoning, experimental procedure, or a means of communication (as presented in the three case studies) and reflect on these practices (Ryu et al. 2015 ).
Finally, a question that arises from including visualization in science education, as well as from including scientific practices in science education is whether teachers themselves are prepared to include them as part of their teaching (Bybee 2014 ). Teacher preparation programs and teacher education have been critiqued, studied, and rethought since the time they emerged (Cochran-Smith 2004 ). Despite the years of history in teacher training and teacher education, the debate about initial teacher training and its content still pertains in our community and in policy circles (Cochran-Smith 2004 ; Conway et al. 2009 ). In the last decades, the debate has shifted from a behavioral view of learning and teaching to a learning problem—focusing on that way not only on teachers’ knowledge, skills, and beliefs but also on making the connection of the aforementioned with how and if pupils learn (Cochran-Smith 2004 ). The Science Education in Europe report recommended that “Good quality teachers, with up-to-date knowledge and skills, are the foundation of any system of formal science education” (Osborne and Dillon 2008 , p.9).
However, questions such as what should be the emphasis on pre-service and in-service science teacher training, especially with the new emphasis on scientific practices, still remain unanswered. As Bybee ( 2014 ) argues, starting from the new emphasis on scientific practices in the NGSS, we should consider teacher preparation programs “that would provide undergraduates opportunities to learn the science content and practices in contexts that would be aligned with their future work as teachers” (p.218). Therefore, engaging pre- and in-service teachers in visualization as a scientific practice should be one of the purposes of teacher preparation programs.
Achieve. (2013). The next generation science standards (pp. 1–3). Retrieved from http://www.nextgenscience.org/ .
Google Scholar
Barber, J, Pearson, D, & Cervetti, G. (2006). Seeds of science/roots of reading . California: The Regents of the University of California.
Bungum, B. (2008). Images of physics: an explorative study of the changing character of visual images in Norwegian physics textbooks. NorDiNa, 4 (2), 132–141.
Bybee, RW. (2014). NGSS and the next generation of science teachers. Journal of Science Teacher Education, 25 (2), 211–221. doi: 10.1007/s10972-014-9381-4 .
Article Google Scholar
Chambers, D. (1983). Stereotypic images of the scientist: the draw-a-scientist test. Science Education, 67 (2), 255–265.
Cochran-Smith, M. (2004). The problem of teacher education. Journal of Teacher Education, 55 (4), 295–299. doi: 10.1177/0022487104268057 .
Conway, PF, Murphy, R, & Rath, A. (2009). Learning to teach and its implications for the continuum of teacher education: a nine-country cross-national study .
Crick, F. (1988). What a mad pursuit . USA: Basic Books.
Dimopoulos, K, Koulaidis, V, & Sklaveniti, S. (2003). Towards an analysis of visual images in school science textbooks and press articles about science and technology. Research in Science Education, 33 , 189–216.
Dori, YJ, Tal, RT, & Tsaushu, M. (2003). Teaching biotechnology through case studies—can we improve higher order thinking skills of nonscience majors? Science Education, 87 (6), 767–793. doi: 10.1002/sce.10081 .
Duschl, RA, & Bybee, RW. (2014). Planning and carrying out investigations: an entry to learning and to teacher professional development around NGSS science and engineering practices. International Journal of STEM Education, 1 (1), 12. doi: 10.1186/s40594-014-0012-6 .
Duschl, R., Schweingruber, H. A., & Shouse, A. (2008). Taking science to school . Washington DC: National Academies Press.
Erduran, S, & Jimenez-Aleixandre, MP (Eds.). (2008). Argumentation in science education: perspectives from classroom-based research . Dordrecht: Springer.
Eurydice. (2012). Developing key competencies at school in Europe: challenges and opportunities for policy – 2011/12 (pp. 1–72).
Evagorou, M, Jimenez-Aleixandre, MP, & Osborne, J. (2012). “Should we kill the grey squirrels?” A study exploring students’ justifications and decision-making. International Journal of Science Education, 34 (3), 401–428. doi: 10.1080/09500693.2011.619211 .
Faraday, M. (1852a). Experimental researches in electricity. – Twenty-eighth series. Philosophical Transactions of the Royal Society of London, 142 , 25–56.
Faraday, M. (1852b). Experimental researches in electricity. – Twenty-ninth series. Philosophical Transactions of the Royal Society of London, 142 , 137–159.
Gilbert, JK. (2010). The role of visual representations in the learning and teaching of science: an introduction (pp. 1–19).
Gilbert, J., Reiner, M. & Nakhleh, M. (2008). Visualization: theory and practice in science education . Dordrecht, The Netherlands: Springer.
Gooding, D. (2006). From phenomenology to field theory: Faraday’s visual reasoning. Perspectives on Science, 14 (1), 40–65.
Gooding, D, Pinch, T, & Schaffer, S (Eds.). (1993). The uses of experiment: studies in the natural sciences . Cambridge: Cambridge University Press.
Hogan, K, & Maglienti, M. (2001). Comparing the epistemological underpinnings of students’ and scientists’ reasoning about conclusions. Journal of Research in Science Teaching, 38 (6), 663–687.
Knorr Cetina, K. (1999). Epistemic cultures: how the sciences make knowledge . Cambridge: Harvard University Press.
Korfiatis, KJ, Stamou, AG, & Paraskevopoulos, S. (2003). Images of nature in Greek primary school textbooks. Science Education, 88 (1), 72–89. doi: 10.1002/sce.10133 .
Latour, B. (2011). Visualisation and cognition: drawing things together (pp. 1–32).
Latour, B, & Woolgar, S. (1979). Laboratory life: the construction of scientific facts . Princeton: Princeton University Press.
Lehrer, R, & Schauble, L. (2012). Seeding evolutionary thinking by engaging children in modeling its foundations. Science Education, 96 (4), 701–724. doi: 10.1002/sce.20475 .
Longino, H. E. (2002). The fate of knowledge . Princeton: Princeton University Press.
Lynch, M. (2006). The production of scientific images: vision and re-vision in the history, philosophy, and sociology of science. In L Pauwels (Ed.), Visual cultures of science: rethinking representational practices in knowledge building and science communication (pp. 26–40). Lebanon, NH: Darthmouth College Press.
Lynch, M. & S. Y. Edgerton Jr. (1988). ‘Aesthetic and digital image processing representational craft in contemporary astronomy’, in G. Fyfe & J. Law (eds), Picturing Power; Visual Depictions and Social Relations (London, Routledge): 184 – 220.
Mendonça, PCC, & Justi, R. (2013). An instrument for analyzing arguments produced in modeling-based chemistry lessons. Journal of Research in Science Teaching, 51 (2), 192–218. doi: 10.1002/tea.21133 .
National Research Council (2000). Inquiry and the national science education standards . Washington DC: National Academies Press.
National Research Council (2012). A framework for K-12 science education . Washington DC: National Academies Press.
Nersessian, NJ. (1984). Faraday to Einstein: constructing meaning in scientific theories . Dordrecht: Martinus Nijhoff Publishers.
Book Google Scholar
Nersessian, NJ. (1992). How do scientists think? Capturing the dynamics of conceptual change in science. In RN Giere (Ed.), Cognitive Models of Science (pp. 3–45). Minneapolis: University of Minnesota Press.
Nersessian, NJ. (2008). Creating scientific concepts . Cambridge: The MIT Press.
Osborne, J. (2014). Teaching scientific practices: meeting the challenge of change. Journal of Science Teacher Education, 25 (2), 177–196. doi: 10.1007/s10972-014-9384-1 .
Osborne, J. & Dillon, J. (2008). Science education in Europe: critical reflections . London: Nuffield Foundation.
Papaevripidou, M, Constantinou, CP, & Zacharia, ZC. (2007). Modeling complex marine ecosystems: an investigation of two teaching approaches with fifth graders. Journal of Computer Assisted Learning, 23 (2), 145–157. doi: 10.1111/j.1365-2729.2006.00217.x .
Pauwels, L. (2006). A theoretical framework for assessing visual representational practices in knowledge building and science communications. In L Pauwels (Ed.), Visual cultures of science: rethinking representational practices in knowledge building and science communication (pp. 1–25). Lebanon, NH: Darthmouth College Press.
Philips, L., Norris, S. & McNab, J. (2010). Visualization in mathematics, reading and science education . Dordrecht, The Netherlands: Springer.
Pocovi, MC, & Finlay, F. (2002). Lines of force: Faraday’s and students’ views. Science & Education, 11 , 459–474.
Richards, A. (2003). Argument and authority in the visual representations of science. Technical Communication Quarterly, 12 (2), 183–206. doi: 10.1207/s15427625tcq1202_3 .
Rothbart, D. (1997). Explaining the growth of scientific knowledge: metaphors, models and meaning . Lewiston, NY: Mellen Press.
Ruivenkamp, M, & Rip, A. (2010). Visualizing the invisible nanoscale study: visualization practices in nanotechnology community of practice. Science Studies, 23 (1), 3–36.
Ryu, S, Han, Y, & Paik, S-H. (2015). Understanding co-development of conceptual and epistemic understanding through modeling practices with mobile internet. Journal of Science Education and Technology, 24 (2-3), 330–355. doi: 10.1007/s10956-014-9545-1 .
Sarkar, S, & Pfeifer, J. (2006). The philosophy of science, chapter on experimentation (Vol. 1, A-M). New York: Taylor & Francis.
Schwartz, RS, Lederman, NG, & Abd-el-Khalick, F. (2012). A series of misrepresentations: a response to Allchin’s whole approach to assessing nature of science understandings. Science Education, 96 (4), 685–692. doi: 10.1002/sce.21013 .
Schwarz, CV, Reiser, BJ, Davis, EA, Kenyon, L, Achér, A, Fortus, D, et al. (2009). Developing a learning progression for scientific modeling: making scientific modeling accessible and meaningful for learners. Journal of Research in Science Teaching, 46 (6), 632–654. doi: 10.1002/tea.20311 .
Watson, J. (1968). The Double Helix: a personal account of the discovery of the structure of DNA . New York: Scribner.
Watson, J, & Berry, A. (2004). DNA: the secret of life . New York: Alfred A. Knopf.
Wickman, PO. (2004). The practical epistemologies of the classroom: a study of laboratory work. Science Education, 88 , 325–344.
Wu, HK, & Shah, P. (2004). Exploring visuospatial thinking in chemistry learning. Science Education, 88 (3), 465–492. doi: 10.1002/sce.10126 .
Download references
Acknowledgements
The authors would like to acknowledge all reviewers for their valuable comments that have helped us improve the manuscript.
Author information
Authors and affiliations.
University of Nicosia, 46, Makedonitissa Avenue, Egkomi, 1700, Nicosia, Cyprus
Maria Evagorou
University of Limerick, Limerick, Ireland
Sibel Erduran
University of Tampere, Tampere, Finland
Terhi Mäntylä
You can also search for this author in PubMed Google Scholar
Corresponding author
Correspondence to Maria Evagorou .
Additional information
Competing interests.
The authors declare that they have no competing interests.
Authors’ contributions
ME carried out the introductory literature review, the analysis of the first case study, and drafted the manuscript. SE carried out the analysis of the third case study and contributed towards the “Conclusions” section of the manuscript. TM carried out the second case study. All authors read and approved the final manuscript.
Rights and permissions
Open Access This article is distributed under the terms of the Creative Commons Attribution 4.0 International License ( https://creativecommons.org/licenses/by/4.0 ), which permits use, duplication, adaptation, distribution, and reproduction in any medium or format, as long as you give appropriate credit to the original author(s) and the source, provide a link to the Creative Commons license, and indicate if changes were made.
Reprints and permissions
About this article
Cite this article.
Evagorou, M., Erduran, S. & Mäntylä, T. The role of visual representations in scientific practices: from conceptual understanding and knowledge generation to ‘seeing’ how science works. IJ STEM Ed 2 , 11 (2015). https://doi.org/10.1186/s40594-015-0024-x
Download citation
Received : 29 September 2014
Accepted : 16 May 2015
Published : 19 July 2015
DOI : https://doi.org/10.1186/s40594-015-0024-x
Share this article
Anyone you share the following link with will be able to read this content:
Sorry, a shareable link is not currently available for this article.
Provided by the Springer Nature SharedIt content-sharing initiative
- Visual representations
- Epistemic practices
- Science learning

An official website of the United States government
The .gov means it’s official. Federal government websites often end in .gov or .mil. Before sharing sensitive information, make sure you’re on a federal government site.
The site is secure. The https:// ensures that you are connecting to the official website and that any information you provide is encrypted and transmitted securely.
- Publications
- Account settings
Preview improvements coming to the PMC website in October 2024. Learn More or Try it out now .
- Advanced Search
- Journal List
- Korean J Anesthesiol
- v.75(2); 2022 Apr
The principles of presenting statistical results using figures
Jae hong park.
1 Department of Anesthesiology and Pain Medicine, Haeundae Paik Hospital, Inje University College of Medicine, Busan, Korea
Dong Kyu Lee
2 Department of Anesthesiology and Pain Medicine, Dongguk University Ilsan Hospital, Goyang, Korea
3 Department of Anesthesiology and Pain Medicine, Chung-Ang University College of Medicine, Seoul, Korea
Jong Hae Kim
4 Department of Anesthesiology and Pain Medicine, Daegu Catholic University School of Medicine, Daegu, Korea
Francis Sahngun Nahm
5 Department of Anesthesiology and Pain Medicine, Seoul National University Bundang Hospital, Seongnam, Korea
Sang Gyu Kwak
6 Department of Medical Statistics, Daegu Catholic University School of Medicine, Daegu, Korea
Chi-Yeon Lim
7 Department of Biostatistics, Dongguk University College of Medicine, Goyang, Korea
Associated Data
Tables and figures are commonly adopted methods for presenting specific data or statistical analysis results. Figures can be used to display characteristics and distributions of data, allowing for intuitive understanding through visualization and thus making it easier to interpret the statistical results. To maximize the positive aspects of figure presentation and increase the accuracy of the content, in this article, the authors will describe how to choose an appropriate figure type and the necessary components to include. Additionally, this article includes examples of figures that are commonly used in research and their essential components using virtual data.
Introduction
All studies based on scientific approaches in anesthesia and pain medicine must involve an analysis of data to support a theory. After establishing a hypothesis and determining the research subjects, the researcher organizes the data obtained into specific categories. In most cases, data are composed of numbers or letters, but can also be stored as photos or figures, depending on the type of research. After researchers classify and index the data, they must decide which statistical analysis method to use. In general, data composed of numbers or letters are stored in tables with rows and columns. This can easily be accomplished using spreadsheet-based computer programs. The simple functions provided by spreadsheet programs, such as classification and sorting, facilitate the interpretation of the essential characteristics of the data, such as structure and frequency. In addition, some spreadsheet programs can show the results of these simple functions as graphs (such as dots, straight lines, or bars) such that the structure and characteristics of the data can be grasped quickly through visualization.
Graphs can be used to present the statistical analysis results in such a way as to make them intuitively easy to understand. For many research papers, the statistical results are illustrated using graphs to support their theory and to enable visual comparisons with other study results. Even though presenting data and statistical results using visual graphs have many advantages, representative values of variables are not presented as exact numbers. Therefore, it is essential to follow some basic principles that allow for graphical representations to be both transparent and precise so information is not misinterpreted. A previous Statistical Round article has covered the general principles of presenting statistical results as text, tables, and figures [ 1 ]. The current article provides further examples of how to present basic statistical results as graphs and essential aspects to consider to prevent distorted interpretations.
Common considerations
In this section, general considerations for presenting graphs are described. Although not all aspects are essential, we have summarized the key points to improve accuracy and minimize errors when using graphs for information transfer and interpretation.
When data are expressed using dots, lines, diagrams, etc., the axes of the graph should have ticks on a scale sufficient to identify the value corresponding to the position of each mark. Both major ticks and minor ticks can be used to indicate the scale on an axis; however, a corresponding value should at least be presented as a major tick. The axis title should include the name of the measurement variable or result and the unit of measurement. If the scale of the axis is an arithmetic distribution, the interval between the marks should be displayed uniformly. When the value of a variable is transformed during analysis or if the measured value has already been transformed, the interval between the marks should be adjusted according to the characteristics of the data. In this case, the type of transformation or measurement scale used should be included in the graph legend ( Fig. 1 ).

Histogram and accompanying density plot of baseline BNP. The baseline BNP shows a right-skewed distribution. The X-axis scale is logarithmic, and an explanation regarding the x-axis scale should be included in the footnote. Note the difference between the most frequently observed value and the representative value (dashed line). BNP: B-type natriuretic peptide, hsTnI: high-sensitivity troponin I, POD: postoperative day. From the previously-published article: "Moon YJ, Kwon HM, Jung KW, et al. Preoperative high-sensitivity troponin I and B-type natriuretic peptide, alone and in combination, for risk stratification of mortality after liver transplantation. Korean J Anesthesiol 2021; 74: 242-53."
If a part of the axis is removed, it is recommended that a break be inserted into the axis and the scales before and after the break be the same ( Fig. 2 ). If the numbering of an axis has to start from a non-zero value, or if the scales before and after the break must be different, an explanation should be included.

An example of a line and dot plot. Note that there is a break on the y-axis, which is inserted to reduce the white space. The measured value at each time point is on those at the adjacent time points. The interpolated line between dots (markers) indicates their changing trend. The statistical method used was the two-way mixed ANOVA with one within- and one between-factor, and post-hoc Bonferroni adjusted pairwise comparisons. There was statistical intergroup difference (F[1,112] = 6.542, P = 0.012) and a significant interaction between group and time (F[3, 336.4] = 3.535, P = 0.015). * P < 0.05 between groups, † P < 0.05 between groups at each time point.
Each axis should have an appropriate range to distinguish between the data presented in the graph. In the case that the range is too large or too small for the displayed data values, the visual comparison of the data may appear exaggerated or the difference may not be recognizable.
Two-dimensional graphs with orthogonally oriented horizontal and vertical axes (x-axis and y-axis, respectively) that cross at a reference point of zero are most commonly used. However, an additional vertical axis can be included on the opposite side of the existing vertical axis if necessary to represent two variables with different measurement units in a single diagram. 1)
Representative values
The preferred type of graph should be chosen based on the representative value of the data (absolute value, fraction, average, median, etc.). Choosing the most-commonly used graph type for a specific representative value helps the reader to interpret the data or statistical results accurately. However, in the case that the use of an uncommon type of graph is unavoidable, an explanation of the representative value and error term must be provided to prevent misunderstanding.
Symbols, lines, and diagrams for representative values
When a symbol, line, or diagram is used to indicate the representative value of the data, the size or thickness of the line should be adjusted appropriately. Additionally, the degree of adjustment should be uniform so that different sizes or thicknesses are not misunderstood as large or small values. In addition, the size and thickness should be adjusted to indicate real values. When symbols or lines are expressed in overlapping or very close proximity, they must have an appropriate size and thickness to allow for an accurate comparison of the values ( Fig. 2 ). A statistical program or other types of program that draws a professional graph rather than a picture-editing tool should be used to accurately represent the positions of symbols, lines, and diagrams with the corresponding values. The graph tools provided by most statistical programs offer user-selected symbols and lines that can be accurately marked according to the corresponding values.
It is recommended that the same symbols be used every time a representative value is represented. However, to distinguish between different groups, different symbols can be used to improve discrimination. The use of different symbols to present the representative values of the same group is not recommended.
A line can be used either when every point represents a specific value or when it visually indicates a change between two symbols ( Fig. 3 ). In the latter case, adding lines between symbols can make the interpretation difficult if the change is not meaningful. Different lines should be used for different groups or situations ( Fig. 2 ). Sometimes, it may be difficult to distinguish between different dashes owing to the line thickness, the size of the graph, or overlapping lines. Therefore, different line types should be adjusted to allow for easy discernability. One option may be to use a color graph; however, this is recommended only when it is impossible to express the information accurately in black and white. Because some readers may have difficulty distinguishing colors, care must be taken regarding color selection.

An example of a dot-line graph. Dots and error bars indicate the means and SDs. The interpolated line allows for enhanced estimation of the changing trend. Bar plots could also be used to represent this kind of statistical result.
The representative value can also be presented using a shape. If the area or form of the shape is proportional to the value, an explanation of this fact should be included. For a diagram expressed at regular intervals where the height or length corresponds to the value (such as a histogram), precautions similar to those regarding symbols or lines should be applied.
Various colors or specific patterns can be used inside the diagram to facilitate interpretation. It is good practice to set different colors or patterns for each group or to use them differently to allow for data before and after an event to be distinguishable. However, such a graph may become complicated as a result of too many colors and patterns or a lack of unified notation.
A description of the variable or situation, represented by lines, symbols, or shapes, should be included in the graph legend. The legend can be located inside or outside the graph, as long as it does not interfere with interpretation. Explanations of values that the symbols, lines, and/or diagrams represent should be included. If abbreviations are used, their definitions should be included in the figure legend. Borders of the legend box can be added as needed around the legend to make it easier to read, and it may be helpful to match the order of data as it appears in both the legend and the graph.
Statistically inferred representative values and their corresponding errors can be indicated on the graph in various ways. Most commonly, whisker-shaped symbols are used to express errors. Depending on the type of graph, it is typically expressed by the length of a line or an area. When there are many representative values or considerable overlap, the symbols used to express the error will also overlap, making it difficult to distinguish between them. If the spread of data is equal on both sides, such as with a normal distribution, it can be presented in only one direction; however, both errors should be presented when the data are skewed to one side. Alternatively, to avoid overlap, the positions of the corresponding values may be moved forward or backward slightly; however, an explanation of this should be included in the figure legend. For example, if it is difficult to distinguish between the means and standard deviations of blood pressure measured at 5 sec after medication in two groups, the representative values of each group can be displayed at 4.9, and 5.1 sec. It is recommended to describe an explanation that the blood pressure values of the two groups measured at specific time point are displayed separately in the figure legend ( Fig. 2 ). For representative examples, refer to the previous Statistical Round article [ 1 ].
Annotations can be added to the graph to explain specific values or statistically significant differences. Annotations are also used to highlight visible differences in the graphs (in which case, instead of an annotation, an explanation should be included in the figure legend). Symbols can be used for annotations that explain statistical differences and should be consistent in type and order throughout the paper. As specified in the instructions to the authors for the Korean Journal of Anesthesiology, it usually follows the order: * (asterisk), † (dagger), ‡ (double dagger, diesis), § (silcrow), and ¶ (pilcrow) [ 2 , 3 ].
Figure legend
In order for readers to know what is contained in a figure and the results of any statistical analysis conducted, a figure legend should be included. A figure legend usually consists of a graph title, a brief description of the graph content, statistical methods, and results. Definitions of any abbreviations and/or symbols used should also be included to facilitate interpretation.
Commonly used graphs
Scatter plots.
A scatter plot shows the associations between two numerical variables measured from one subject ( Fig. 4 ). By adding another variable, three-dimensional expression is also possible. Scatter plots can also be used for ordered categorical variables, at the expense of reduced readability. A scatter plot displays the coordinates of the measured values on an orthogonal plane with two variables as axes using specific symbols, such as dots. The two variables may be independent of each other or may have a cause-effect relationship. Scatter plots are primarily used in the data exploration stage to examine the relationship between two variables, and a trend line 2) can be added to indicate a statistically significant relationship between the two variables. Scatter plots help the reader to understand the relationship between two variables and contribute considerably to the visual expression and understanding of correlation or regression analyses.

An example of a scatter plot. This plot presents the cardiac output value for the same patients using two different measurement methods: EDCO (esophageal doppler cardiac output) and TDCO (continuous thermodilution method). From the previously-published article: “Shim YH, Oh YJ, Nam SB, et. al. Cardiac output estimations by esophageal Doppler cannot replace estimations by the thermodilution method in off-pump coronary artery bypass surgery patients. Korean J Anesthesiol 2003; 45: 456–61.”
As described above, a scatter plot usually demonstrates the relationship between the actual values between two variables. In addition, however, a scatter plot is used for interpretation in some statistical methods. One example is the Bland-Altman scatter plot, which is a method used to analyze the agreement between two measurements ( Fig. 5 ). In addition, scatter plots are often used to evaluate residuals in regression analyses or visually check the fit of a statistically estimated model.

Bland-Altman scatter plot comparing the standard frontal position with an alternative mandibular position. The dotted horizontal line represents the mean difference between the two measures. The dashed horizontal lines represent the 95% limit of agreement between the two measures. The 95% limit of agreement is drawn at the mean difference +/- 1.96 times the standard deviation of the difference. The solid line is the line of equality which indicates the exact same value between two measures.
A line plot is a graph that connects a series of repeatedly measured data points using a straight or curved line, based on a scatter plot. This type of graph is used in several fields to represent various statistical results. A commonly used example is any case in which the data are measured at a set time interval. A run chart (run-sequential plot) is a line plot that displays the data in chronological order. When applying a continuous variable on one axis, such as time, caution must be taken regarding the scale interval. Ordered categorical variables are also candidates for line plots. With scatter plots, measured values are mainly used to examine the data distribution; however, line plots are used primarily for averages, which are representative values of the measured data under specific conditions in the relevant group. As previously mentioned, the errors (such as the standard deviation) must be displayed on a line plot with the representative values.
For bar charts, the height or length of each bar represents the value of the variables, and the ratio between them makes it easy to visualize the differences between categorical variables. On either the horizontal or vertical axis, the values are presented as scale values, whereas on the other axis, the values are presented by other measurement parameters. This type of graph can also be used to express continuous variables, and it is possible to express multiple measured values as cumulative or grouped values using different bar appearances.
A histogram is a graph used to represent the frequency distribution of the data ( Fig. 1 ). Each column’s height indicates the number of samples corresponding to each bin, divided by a fixed interval. Because the variable corresponding to the bin has the characteristics of a continuous variable, the bins are adjacent to each other but do not overlap. Bar plots differ from histograms. In a bar plot, the bars are separated from each other because they represent the values of categorical variables. Each column’s height in a histogram can also be normalized in the form of the frequency of the samples for the total sample size. In this case, mathematical methods, such as kernel density estimation, can be used to smooth the overall shape (smoothing) and estimate a density plot that can be used to represent the distribution of the data.
Boxplots and box-and-whisker plots
A boxplot is a graph that is used to express the median and quartiles of data using a box shape. It is often used to represent nonparametric statistics ( Fig. 6 , Supplementary R code ). A whisker, which is represented by a line extending from each box, can be used to indicate the range of the data (box-and-whisker plot). The range of data defined using whiskers can be set according to the researchers’ needs. For example, the ends of both whiskers can be the maximum and minimum values or values corresponding to 10% and 90% of the entire data range. If both ends of the whiskers are set to values that correspond to the first quartile minus 1.5 times the interquartile range (IQR) and the third quartile plus 1.5 times the IQR, data outside this range can be defined as outliers. The box-and-whisker plot enables recognition of the distribution of data without a specific distribution assumption and displays data dispersion and kurtosis. Depending on the data spread, one of the quartiles and the median may overlap. In this case, the location of the median should be clearly expressed. Violin and bee-swarm plots are improved versions of the box-and-whisker plot and can be used to represent the frequency of data at specific values along with the spread of data.

An example of a box-whisker plot. Estimated median (Q1, Q3) [min:max] from the sample data is 1.1 (0.8, 1.3) [0.1:2.1]. This graph includes explanations of the components of the box-whisker plot. These are not necessary for the general purpose of publication. A significance marker can be added, though it was not used in this graph. If a significance maker is added, it should be located on the shoulder or alongside the whisker. If markers are located over the mid-top of the whiskers, these could be interpreted as outliers if no detailed explanation is provided. The limits of the whiskers can be varied depending on the purpose.
Other commonly used graphs
In addition to the basic graphs previously introduced, various graphs have also been used to present the results or evaluate the analysis process for a specific statistical method. Some examples include receiver operating characteristic (ROC) curves [ 4 ], survival curves, regression curves by linear regression analysis, and dose-response curves. These graphs deliver information on a specific relationship between interpreted statistical results or indicate the trend of independent and dependent variables expressed as functions. These graphs have predetermined components that reflect the characteristics of the data and analysis, and these components must be included in the graph. Additional information must also be included with these graphs to facilitate interpretation, such as corresponding statistics, tables, trend lines, and guidelines. The graph output from a statistics program includes most of the basic requirements, but some parts may need to be added or removed in some cases. In addition, the graph should be composed according to the guidelines of the target journal because the requirements may vary.
Graphs for specific statistical analysis methods
In general, statistical analyses begin with the selection of a specific statistical method according to the characteristics of the collected variables and the expected relationship between them. Most statistical methods require particular features and relationships between variables, and the estimated results are formalized. The following sections include graphs that express specific statistical results. The following graphs are only examples, and other graph types may be appropriate, depending on the characteristics of the data collected.
All of the example graphs were created using R software 4.1.0 for Windows (R Development Core Team, Austria, 2021). The ggplot2 package used in the R software provides various options for creating graphs in the medical field and a user-centered graph editing function. All examples are fictitious data assuming clinical or experimental conditions and should not be interpreted as actual data. All virtual data and R codes are provided in the Supplementary Materials ( Supplementary material 1; R code ).
Independent t-tests
For the first example, data on the time from administration of a neuromuscular blocking agent antagonist to the patients’ first movement after general anesthesia between two different agents are compared ( Supplementary material 2; reverse.csv ). In total, 218 patients were included in this study. Both groups satisfied the assumption of normal distribution but violated the equality of variance; therefore, an unequal variance t -test was performed ( Table 1 ). Fig. 7 shows a graph of the results in the form of a vertical bar graph ( Supplementary material 1; R code ). 3)

An example of a horizontal bar plot with an error bar. Positive-sided error bars are marked because the SDs are located at the same distance from the mean. The recommended legend for this figure is: “The elapsed time from administration to first movement for two different reversal agents: an anticholinergic (n = 109) and a new drug (n = 109); *two-sided P value < 0.05 with the unequal variances t -test”.
Time to Movement After Two Neuromuscular Reversal Agents
Data are presented as mean ± SD.
Paired t-tests
The next example includes virtual data on the required air volume to ensure endotracheal cuff sealing during general anesthesia ( Supplementary material 3; cuff_pressure.csv ). After tracheal intubation with an adequately sized tube, cuff sealing was achieved through either an arbitrary volume that prevented end-inspiratory leak or by a volume resulting in a cuff pressure of 25 mmHg. The two alternative volumes necessary for the two cuff sealing methods were measured for each patient, and a total of 100 patients were included. A paired t -test was performed because the two methods were conducted on each patient. The results are presented in Table 2 . Fig. 3 shows a graphical representation of the results ( Supplementary material 1; R code ).
Cuff Inflation Volume to Prevent End-inspiratory Gas Leakage
Values are presented as mean ± SD.
Comparisons between more than three independent groups
For the following example, information on the amount of opioids administered for pain control after three types of surgery were obtained ( Supplementary material 4; opioid_surgery.csv ). The total number of patients was 171 (57 in each group).
One-way analysis of variance (ANOVA) was performed, and there was a statistically significant difference in the opioid dose administered according to the surgery type. Tukey’s test was performed for post-hoc testing. The results showed that the opioid dose administered after operation C was significantly higher than that administered after operations A or B ( Table 3 ).
Postoperative Opioid Requirements according to Three Different Types of Surgery
A graph of the statistical results is shown in Fig. 8 . As the three groups were not related to each other, they are expressed as bar graphs. The results of the statistical tests are presented in the Supplementary material 1; R code .

An example of a vertical bar plot. The asterisk (*) is used to represent a comparative statistically significant result.
Comparisons for repeatedly measured data
In the following example, virtual data on the effect of an antihypertensive drug on diastolic blood pressure were used ( Supplementary material 5; dbpmedication.csv ). A total of 114 patients were included, and the control and treatment groups were equally allocated. Data were measured six times at 5-second intervals, including the time of drug administration. For statistical analysis, two-way mixed ANOVA with one within-factor and one between-factor was used. There was a statistically significant difference between the treatment and control groups (F[1,112] = 6.542, P = 0.012), and there was a statistically significant interaction between the treatment and the time (F[3, 336.4] = 3.535, P = 0.015). The treatment group showed significant differences at 15, 20, and 25 s after administration (adjusted P = 0.004, P = 0.003, and P = 0.006, respectively; Table 4 ). The detailed statistical analysis process was omitted, but a graph of the results is shown in Fig. 2 . The graphs are slightly shifted to the left and right so that they can be distinguished from each other, and a gap is set on the y-axis. These methods make the results easier to visualize by preventing the graphs from overlapping and reducing the whitespace ( Supplementary material 1; R code ).
Changes in Diastolic Blood Pressure after Antihypertensive Treatment
Values are presented as mean ± SD. Two-way mixed analysis of variance with one within factor and one between factor. A statistically significant intergroup difference (F[1,112] = 6.542, P = 0.012) and a significant interaction between group and time (F[3, 336.4] = 3.535, P = 0.015) are seen.
Categorical data comparisons
For the following example, two categorical variables (endotracheal intubation success and sore throat occurrence) were assessed in relation to two different intubation techniques ( Supplementary material 6; sorethr.csv ). The data included two observations from 106 patients (53 patients in each group). The chi-square test with Yate’s correction showed that the success rate of the new tracheal intubation technique was significantly higher than that of the conventional technique (P = 0.018), whereas there was no statistical difference in sore throat occurrence ( Table 5 ). The results are represented using a bar graph classified by observation ( Fig. 9 ). Because the 95% CIs are not symmetrically distributed with respect to the representative values, both error bars are presented and statistical significance is indicated using symbols. To better represent the data, the sample size may also be displayed ( Supplementary material 1; R code ).

An example of a grouped bar plot. The height of each bar indicates the observed rate. If the CIs of the rate are not distributed symmetrically from the observed rate, both sides of the error bar should be presented. The asterisk indicates statistical significance.
Observed Intubation Success and Presence of Sore Throat after the Conventional and New Intubation Technique
Values are presented as numbers (percentiles).
Other commonly used statistical graphs
Correlation analyses, linear regression.
As an example of correlation analysis, the blood concentrations of three intravenous anesthetic adjuvants were measured during propofol general anesthesia ( Supplementary material 7; pretxlevel.csv ). All three adjuvants (A, B, and C) showed a positive correlation with exposure time (correlation coefficient r = 0.71, r = 0.65, and r = 0.42, respectively), but only the coefficient of adjuvant A was statistically significant (P = 0.014, P = 0.117, and P = 0.132, respectively; Fig. 10 ). Various diagrams can be used to show these correlations. However, in this article, a scatter plot with a trend line for the group, and the statistical analysis results are presented ( Supplementary material 1; R code ).

An example of a scatter plot with a linear trend line for the correlation analysis. The asterisk indicates statistical significance.
A scatter plot with a trend line clearly represents the data and is used more often in linear regression analyses than in correlation analyses. For the linear regression example graph, blood glucose concentrations and the degree of glucose deposition in the mitral valve node were used in patients with type 2 diabetes with rheumatic mitral valve insufficiency ( Supplementary material 8; dmmvi.csv ). Linear regression analysis was performed with blood glucose concentration as the independent variable and the degree of glucose deposition in the mitral valve as the dependent variable. The regression equation was estimated to be “Glucose in nodule = 0.048 × Blood glucose concentration + 32.98 (P < 0.001)”. The graph in Fig. 11 shows the observed values with a regression line and other necessary information ( Supplementary R code ).

An example of a scatter plot with a trend line for the linear regression. Around the regression line, the shadowed area indicates the range of the 95% CI of the estimated coefficient. The estimated regression line formula is also presented in the graph with statistics.
Logistic regression
For the following example, virtual data showed the influence of five factors on specific test results ( Supplementary material 9; five_factors.csv ). The test result is a yes/no dichotomous variable, whereas all five factors (F1 to F5) are continuous variables. Although logistic regression analyses involve various assumptions that must be verified before statistical analysis to obtain accurate results, the contents of such verification processes have been omitted. The model estimated by logistic regression provides the odds ratio (OR) for each independent variable ( Table 6 ). A graphic representation of ORs allows for a clearer interpretation than a table in the case of multiple independent variables or ORs with many numbers ( Fig. 12 , Supplementary material 1; R code ).

An example of a dot plot with an error bar. For each level of factors (y-axis), corresponding odds ratio (OR) and 95% CIs are presented using dots and accompanying horizontal error bar. The dotted line indicates the reference value of 1. The estimated OR would not be different from 1.0 statistically if its error bar crossed this reference line.
Estimated OR and 95% CI of Logistic Regression Model
OR: odds ratio.
Survival analysis
Survival analysis is a statistical method that can be applied to mortality data and various types of longitudinal data. There are various methods, from the nonparametric Kaplan-Meier method to more complex methods involving different parametric models. Kaplan-Meier survival analysis and Cox regression models are widely used in the medical field. Survival analysis results usually accompany the survival curve, which can increase the reader’s understanding of the results through visualization. For details on the survival curve, refer to the previous Statistical Round article [ 5 , 6 ]. An example of a survival curve is shown in Fig. 13 . In addition to several important pieces of information that should be included, the survival table must be attached to the survival curve because the number at risk is reduced at the end of the observation. This can minimize the likelihood of misinterpretation.

An example of a survival curve. Two survival curves with 95% CIs are presented. The median survival time is also indicated for each curve. Because the number at risk decreases at the end of observation, the survival table should be incorporated with curves to clarify the statistical inference process. From the previously-published article: "In J, Lee DK. Survival analysis: part II - applied clinical data analysis. Korean J Anesthesiol 2019; 72: 441-57."
Dose-response curve
For this example, various concentrations of two antibiotics were assessed by measuring the absorbance of a specific light known to be proportional to the normal bacterial flora amount in a culture medium ( Supplementary material 10; antiobsorp.csv ). The data were fitted using a 4-parameter log-logistic model; the estimated parameters are summarized in Table 7 . A graph of the fitted model is presented in Fig. 14 ( Supplementary material 1; R code ). The absorbance values for the doses of the two antibiotics are expressed using symbols, and a dose-response curve was drawn. Compared to a table that includes only numbers, using a graph is more intuitive and easier to interpret.

An example of multiple dose-response curves. Observed values are plotted using dot symbols: filled circles and triangles. The straight solid and dashed lines indicate the ED50 value of each curve. Be aware that the x-axis is log scaled.
Dose-response Curve Model Fit Result
Dose-response curve fit using a 4-parameter log-logistic model. Values are presented as estimates (95% CI). ED: effective dose at a certain response level indicated by the following number as the percentile.
Conclusions
There are many types of graphs for various statistical methods that can be used to represent data and results, depending on their characteristics. Trying out a few types of graphs that show the characteristics well and then choosing the best one among them is recommended. Presenting results with a table and a figure simultaneously takes up space and can distract readers. Therefore, it is recommended to use graphs and discuss significant results in the body of the manuscript, and tables of granular information can be moved to the supplementary material or vice versa.
1) In addition to a two-dimensional graph consisting of a horizontal (x-axis) and a vertical axis (y-axis), a three-dimensional graph using a third axis (z-axis) perpendicular to both axes is also widely used in specific fields. In this article, we will focus on two-dimensional graphs.
2) The trend line is a type of regression graph that provides useful information regarding the relationship between two variables and can be fitted as linear, quadratic, or cubic formulas.
3) When the range of error has both positive and negative values, like a continuous variable, the histogram contains the possibility of error in a strict sense. This is because, when expressed as a bar graph, the error range on one side does not appear on the graph (as shown in Fig. 7). While there is a way to express both sides when the range of error is different, it is not commonly used. In most medical papers, they are used without distinction given the general perception that the error range expressed in the bar graph is naturally distributed equally on both sides.
Conflicts of Interest
No potential conflict of interest relevant to this article was reported.
Author Contributions
Jae Hong Park (Conceptualization; Methodology; Validation; Writing – review & editing)
Dong Kyu Lee (Data curation; Formal analysis; Methodology; Supervision; Validation; Writing – original draft; Writing – review & editing)
Hyun Kang (Conceptualization; Data curation; Writing – review & editing)
Jong Hae Kim (Conceptualization; Data curation; Writing – review & editing)
Francis Sahngun Nahm (Conceptualization; Data curation; Writing – review & editing)
EunJin Ahn (Conceptualization; Data curation; Writing – review & editing)
Junyong In (Conceptualization; Data curation; Validation; Writing – review & editing)
Sang Gyu Kwak (Conceptualization; Data curation; Writing – review & editing)
Chi-Yeon Lim (Conceptualization; Data curation; Writing – review & editing)
Supplementary Materials
Supplementary material 1., supplementary material 2., supplementary material 3..
cuff pressure
Supplementary Material 4.
opioid_surgery
Supplementary Material 5.
dbpmedication
Supplementary Material 6.
Supplementary material 7., supplementary material 8., supplementary material 9..
five factors
Supplementary Material 10.
Get science-backed answers as you write with Paperpal's Research feature
Presenting Research Data Effectively Through Tables and Figures

Presenting research data and key findings in an organized, visually attractive, and meaningful manner is a key part of a good research paper. This is particularly important in instances where complex data and information, which cannot be easily communicated through text alone, need to be presented engagingly. The best way to do this is through the use of tables and figures. They help to organize and summarize large amounts of data and present it in an easy-to-understand way.
Tables are used to present numerical data, while figures are used to display non-numerical data, such as graphs, charts, and diagrams. There are different types of tables and figures, and choosing the appropriate format is essential to present the data effectively. This article provides some insights on how to present research data and findings using tables and figures.
How to present research data in tables?
When complex data and statistical findings are too unwieldy or difficult to present either in text form or as figures, they can be presented through tables. Tables are best used where exact numerical values need to be analyzed and shared. It also aids in the comparison and contrast of various features or values among the different units. This allows swift and easy identification of patterns in the datasets. While presenting tables in a research paper, it is essential to incorporate certain core elements to ensure that readers are able to draw inferences and conclusions easily and quickly.
- Title of the table : The title should be concise and clear and communicate the purpose of the table. Tables must be referenced in the text through table numbers. Both the table number and the title are ideally mentioned just above the table.
- Body of the table: A crucial element in preparing the body of a table is to ensure uniformity in terms of units of measurement and the accurate use of decimal places. It is also important to format the table and ensure equal spacing between rows and columns.
- Keep it simple and accurate: It is important to ensure that only relevant information is presented in the table. One needs to be cautious not to populate tables with unnecessary information or design elements. Using plain fonts, in italics or bold, and the use of color or border styles help make the table visually appealing. Rows and columns must be labeled clearly and accurately to ensure that there is no ambiguity in analyzing the data presented.
How to present research data in figures?
Figures are a powerful tool for visually presenting research data and key study findings. Figures are usually used to communicate trends or relationships and general patterns emerging from datasets. They are also used to present research data and complex information in a simpler form. Figures can take various forms like graphs, pie charts, scatter plots, line diagrams, drawings, maps, and photos. Early career researchers need to know how best to present figures in their research papers. The following are some core elements that should be incorporated.
- Title: Every figure must have a title that is clear and concise and must summarize the main point of the data being presented. It should be placed just below the figure. The numbering of the figures should be sequential and must correspond to the reference provided in the text.
- Type of figure: The type of figure to be used is usually dictated by the kind of information to be conveyed. Researchers need to decide which type of figure will enable readers to understand the information being shared easily. For example, scatter plots can be used to show relationships between two variables, pie charts can be used to illustrate relative proportions, and graphs can be used for the quantitative relationship between variables.
- Use of Images: When using figures, care should be taken to ensure that images are of a high resolution – sharp and clear.
- Labeling: Ensuring that all parts of the figures and the axes are labeled accurately is crucial if readers are to glean important details quickly. Use standard font sizes and styles. Experts also suggest the inclusion of scale bars in maps.
Tips for Effectively Presenting Research Data through Tables and Figures
When presenting research data through tables or figures, it’s important to ensure that it is adding value to the text and not merely repeating values. This means taking care of certain vital aspects to ensure that the presentation is uniform, clear, and easy to read. Here are some tips to help you achieve that:
- Make sure that tables or figures add value to the text
- Ensure uniformity in numbering of tables, figures, and values both in the text and in the visual presentation
- Cite the source if tables and figures are used from a different source
- Use appropriate scales when creating tables and figures
- Use logarithmic scales if the data covers a wide range
- Use linear scales if the data is relatively small
- Check publication or style guide instructions of the target journal regarding the presentation of research data and findings, image resolution, presentation style, formatting, and so on
- Remember, tables and figures are only tools to convey information – using too many of them can overwhelm readers
In summary, presenting research data through tables and figures can be an effective way to convey information. However, it’s important to follow these tips to ensure that the presentation is clear and easy to read. By taking care of these vital aspects, researchers can effectively communicate their findings to their intended audience.
Paperpal is an AI writing assistant that help academics write better, faster with real-time suggestions for in-depth language and grammar correction. Trained on millions of research manuscripts enhanced by professional academic editors, Paperpal delivers human precision at machine speed.
Try it for free or upgrade to Paperpal Prime , which unlocks unlimited access to premium features like academic translation, paraphrasing, contextual synonyms, consistency checks and more. It’s like always having a professional academic editor by your side! Go beyond limitations and experience the future of academic writing. Get Paperpal Prime now at just US$19 a month!
Related Reads:
- 6 Tips for Post-Doc Researchers to Take Their Career to the Next Level
- 5 Reasons for Rejection After Peer Review
- Ethical Research Practices For Research with Human Subjects
- Ethics in Science: Importance, Principles & Guidelines
Empirical Research: A Comprehensive Guide for Academics
How to write a scientific paper in 10 steps , you may also like, measuring academic success: definition & strategies for excellence, phd qualifying exam: tips for success , why traditional editorial process needs an upgrade, paperpal’s new ai research finder empowers authors to..., ai + human expertise – a paradigm shift..., how to use paperpal to generate emails &..., is it ethical to use ai-generated abstracts without..., how to avoid plagiarism when using generative ai..., what are journal guidelines on using generative ai..., types of plagiarism and 6 tips to avoid....
Thank you for visiting nature.com. You are using a browser version with limited support for CSS. To obtain the best experience, we recommend you use a more up to date browser (or turn off compatibility mode in Internet Explorer). In the meantime, to ensure continued support, we are displaying the site without styles and JavaScript.
- View all journals
- Explore content
- About the journal
- Publish with us
- Sign up for alerts
- TECHNOLOGY FEATURE
- 08 May 2020
The software that powers scientific illustration
- Jeffrey M. Perkel
You can also search for this author in PubMed Google Scholar
Illustration by The Project Twins
Like many researchers, Rita Sattler is trained to conduct science, not to draw it. But papers still need writing — and illustrating. So, when the time came to document what her team had done for a journal article, Sattler did what her colleagues frequently do: she fired up PowerPoint.
Access options
Access Nature and 54 other Nature Portfolio journals
Get Nature+, our best-value online-access subscription
24,99 € / 30 days
cancel any time
Subscribe to this journal
Receive 51 print issues and online access
185,98 € per year
only 3,65 € per issue
Rent or buy this article
Prices vary by article type
Prices may be subject to local taxes which are calculated during checkout
Nature 582 , 137-138 (2020)
doi: https://doi.org/10.1038/d41586-020-01404-7
Related Articles

- Biological techniques
- Communication

Whole-cortex in situ sequencing reveals input-dependent area identity
Article 24 APR 24

Spatiotemporally resolved colorectal oncogenesis in mini-colons ex vivo

Breaking ice, and helicopter drops: winning photos of working scientists
Career Feature 23 APR 24

‘Shrugging off failure is hard’: the $400-million grant setback that shaped the Smithsonian lead scientist’s career
Career Column 15 APR 24

How I harnessed media engagement to supercharge my research career
Career Column 09 APR 24

Tweeting your research paper boosts engagement but not citations
News 27 MAR 24

Cosmic rentals
Futures 24 APR 24

Londoners see what a scientist looks like up close in 50 photographs
Career News 18 APR 24
Berlin (DE)
Springer Nature Group
ECUST Seeking Global Talents
Join Us and Create a Bright Future Together!
Shanghai, China
East China University of Science and Technology (ECUST)
Position Recruitment of Guangzhou Medical University
Seeking talents around the world.
Guangzhou, Guangdong, China
Guangzhou Medical University
Junior Group Leader
The Imagine Institute is a leading European research centre dedicated to genetic diseases, with the primary objective to better understand and trea...
Paris, Ile-de-France (FR)
Imagine Institute
Director of the Czech Advanced Technology and Research Institute of Palacký University Olomouc
The Rector of Palacký University Olomouc announces a Call for the Position of Director of the Czech Advanced Technology and Research Institute of P...
Czech Republic (CZ)
Palacký University Olomouc
Sign up for the Nature Briefing newsletter — what matters in science, free to your inbox daily.
Quick links
- Explore articles by subject
- Guide to authors
- Editorial policies

- Manuscript Preparation
How to Use Tables and Figures effectively in Research Papers
- 3 minute read
- 42.9K views
Table of Contents
Data is the most important component of any research. It needs to be presented effectively in a paper to ensure that readers understand the key message in the paper. Figures and tables act as concise tools for clear presentation . Tables display information arranged in rows and columns in a grid-like format, while figures convey information visually, and take the form of a graph, diagram, chart, or image. Be it to compare the rise and fall of GDPs among countries over the years or to understand how COVID-19 has impacted incomes all over the world, tables and figures are imperative to convey vital findings accurately.
So, what are some of the best practices to follow when creating meaningful and attractive tables and figures? Here are some tips on how best to present tables and figures in a research paper.
Guidelines for including tables and figures meaningfully in a paper:
- Self-explanatory display items: Sometimes, readers, reviewers and journal editors directly go to the tables and figures before reading the entire text. So, the tables need to be well organized and self-explanatory.
- Avoidance of repetition: Tables and figures add clarity to the research. They complement the research text and draw attention to key points. They can be used to highlight the main points of the paper, but values should not be repeated as it defeats the very purpose of these elements.
- Consistency: There should be consistency in the values and figures in the tables and figures and the main text of the research paper.
- Informative titles: Titles should be concise and describe the purpose and content of the table. It should draw the reader’s attention towards the key findings of the research. Column heads, axis labels, figure labels, etc., should also be appropriately labelled.
- Adherence to journal guidelines: It is important to follow the instructions given in the target journal regarding the preparation and presentation of figures and tables, style of numbering, titles, image resolution, file formats, etc.
Now that we know how to go about including tables and figures in the manuscript, let’s take a look at what makes tables and figures stand out and create impact.
How to present data in a table?
For effective and concise presentation of data in a table, make sure to:
- Combine repetitive tables: If the tables have similar content, they should be organized into one.
- Divide the data: If there are large amounts of information, the data should be divided into categories for more clarity and better presentation. It is necessary to clearly demarcate the categories into well-structured columns and sub-columns.
- Keep only relevant data: The tables should not look cluttered. Ensure enough spacing.
Example of table presentation in a research paper

For comprehensible and engaging presentation of figures:
- Ensure clarity: All the parts of the figure should be clear. Ensure the use of a standard font, legible labels, and sharp images.
- Use appropriate legends: They make figures effective and draw attention towards the key message.
- Make it precise: There should be correct use of scale bars in images and maps, appropriate units wherever required, and adequate labels and legends.
It is important to get tables and figures correct and precise for your research paper to convey your findings accurately and clearly. If you are confused about how to suitably present your data through tables and figures, do not worry. Elsevier Author Services are well-equipped to guide you through every step to ensure that your manuscript is of top-notch quality.

- Research Process
What is a Problem Statement? [with examples]

What is the Background of a Study and How Should it be Written?
You may also like.

Make Hook, Line, and Sinker: The Art of Crafting Engaging Introductions

Can Describing Study Limitations Improve the Quality of Your Paper?

A Guide to Crafting Shorter, Impactful Sentences in Academic Writing

6 Steps to Write an Excellent Discussion in Your Manuscript

How to Write Clear and Crisp Civil Engineering Papers? Here are 5 Key Tips to Consider

The Clear Path to An Impactful Paper: ②

The Essentials of Writing to Communicate Research in Medicine

Changing Lines: Sentence Patterns in Academic Writing
Input your search keywords and press Enter.
From Paper to Presentation: Redesigning Existing Figures for Slides
By Matthew Goss
Scientific figures do not equally suit all contexts. A figure designed for a paper will often be information-dense; multiple panels illustrate multiple ideas, multiple axes and color bars show the impact of numerous variables, annotations highlight specific caveats, and an extensive caption explains the whole thing. This can work well where a figure demonstrates the conclusions of a full page of tightly edited text, and where a reader has plenty of time to read through the caption and think things through.
However, figures like this rarely work well for presentations. When you show an audience a highly detailed figure, they immediately jump to trying to understand it, and due to that change in focus, there’s a good chance they just stopped listening to you talk. Instead of copying a figure straight from a paper into my presentation, I try to rethink how I can show the data to most effectively tell an engaging story.
This post features several examples of ways you can make figures that are better suited to use in a presentation. This includes redesigning your own figures and modifying figures made by others. All figures taken from the literature are reproduced under Fair Use.
Example 1: Redesigning your own paper figures
Pictured here is a figure I made for a recent publication ( Barber et al., ES&T , 2023 ). This shows the modeled indoor air quality parameters under fifty-six different modeled scenarios. While this figure is quite information-dense, this format allows a reader to identify expected indoor concentrations for a specific ventilation rate and UV fluence rate that might be relevant to their own indoor space. It is, however, way too much to try to show on one slide during a presentation.
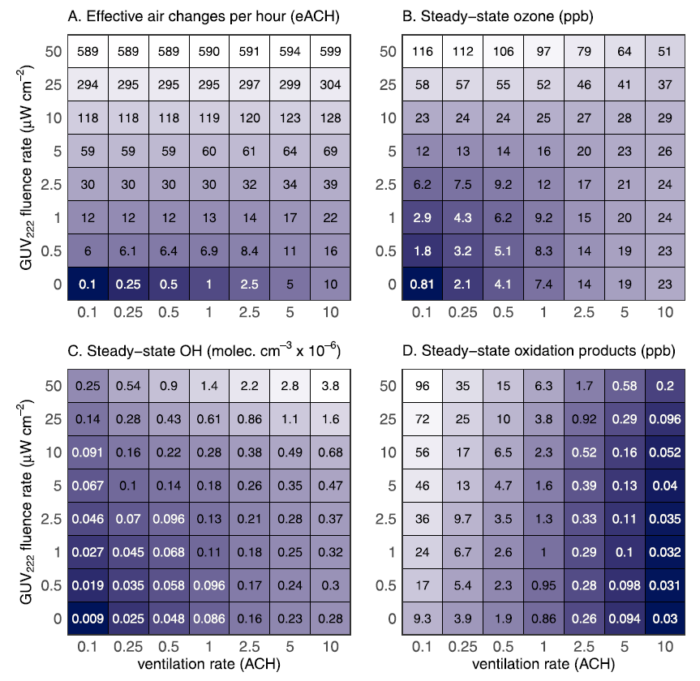
A useful way to restructure this is to decide exactly which information from the figure is important to your presentation’s story… and throw the rest away. Any excess information which you don’t talk about will only serve to distract your audience. In this example, the exact values of the numbers labeling each grid box are pretty irrelevant to the presentation audience. I also only want to talk about the ozone panel, and don’t feel that such a wide range of ventilation rates is necessary to show. Here, I’ve taken the same data and replotted it as a series of four lines.
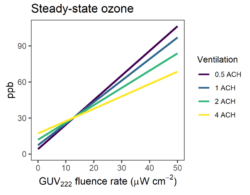
This shifts information that was previously conveyed using text to a graphical format while eliminating a lot of extraneous data. The fonts are also larger to make sure they can be read at the back of the room. By focusing on only one plot and rethinking how to format the key data, it’s a lot easier to explain the results to the audience.
Example 2: Modifying someone else’s figure
Figures from the literature can provide useful context in the introduction of a presentation or when comparing your own results to previous work. However, these figures may not always be up to snuff. Consider this figure from Krivanek and Fiedler, Nucl. Eng. Des. , 2017 . It’s a bit blurry and the font is very small and hard to read.
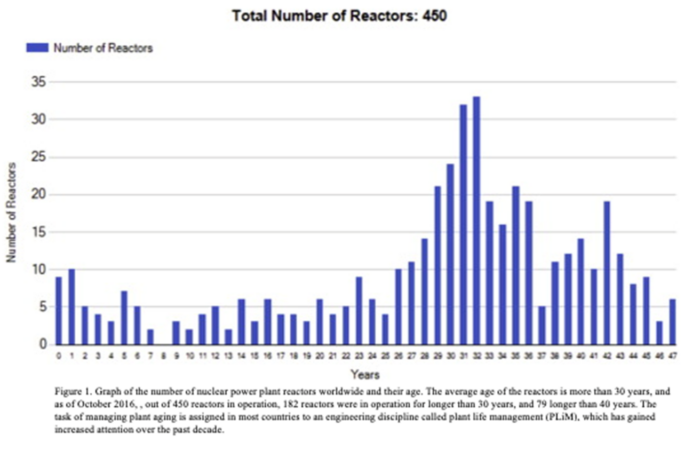
By covering parts of the figure with text boxes to rewrite the axes, this becomes more legible for those in the back of the room. I’ve also added an arrow to visually demonstrate that nearly half of the reactors are more than 30 years old, something that was previously only noted in the caption. Just make sure to cite the new figure appropriately (e.g. “modified from Krivanek and Fiedler, 2017”), so your audience knows that you adapted or modified an existing figure.
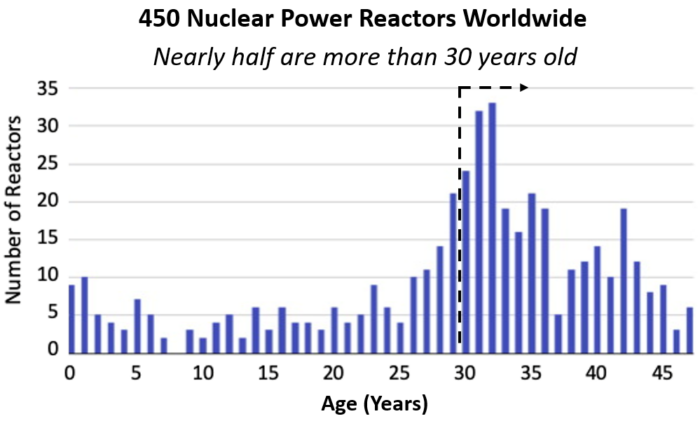
You can even take this to the next level by scraping figure data to reproduce the figure as you wish. By using a free software such as Ankit Rohatgi’s webplotdigitizer , it’s easy to extract data so that you can replot it as you wish. Here, I’ve remade the figure, grouping the data by decade to make it a little simpler, and recoloring it to fit my presentation’s color scheme.
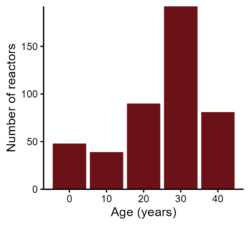
Just make sure to adjust your citation appropriately (e.g. “data from Krivanek & Fiedler, 2017, figure 1”) and consider citing the software tool .
Example 3: Selecting only the relevant part of a literature figure
Finally, let’s consider this figure from Veres et al., PNAS , 2020 . It contains a ton of information about hydroperoxymethyl thioformate (HPMTF) concentrations measured above the oceans.
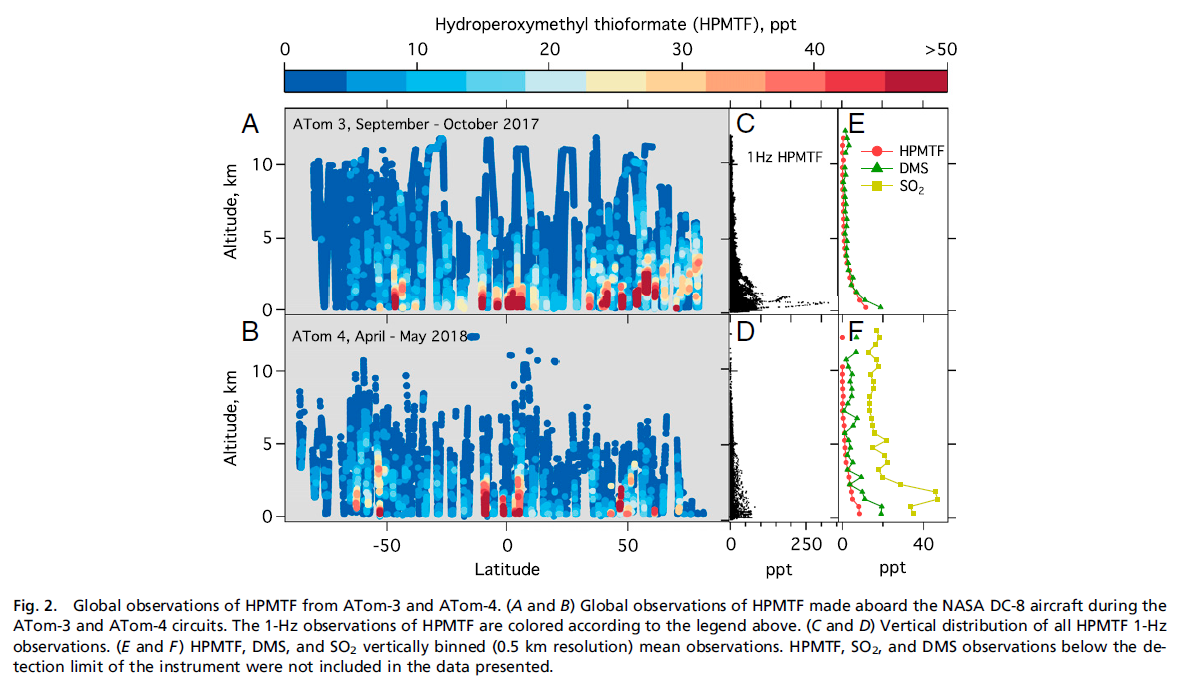
But perhaps I just want to use this figure in my hypothetical presentation to show that HPMTF and dimethyl sulfide (DMS) concentrations are highest near the surface. There’s a lot of information here that I don’t need. Luckily, panel E contains everything I want to talk about!
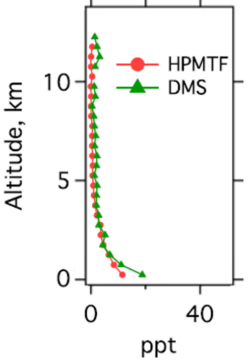
Here, I’ve simply cropped the original figure in powerpoint, lined up cropped axes labels, and covered up the panel label and the unused SO 2 legend entry with white rectangles. With only a couple minutes of work, I’ve created a much simpler figure that will be far more legible to a presentation audience. As always, make sure to cite the figure appropriately (e.g. “modified from Veres et al., 2020”).
Hopefully these examples demonstrate ways in which you can improve your presentation figures to highlight your specific message without distracting the audience with overwhelming details. Redesigning figures may take a bit of extra work, and it can be challenging to take a step back and reevaluate your own prior figure designs, but I hope you’ll agree that the results are worth it.
If you want some hands-on help with redesigning figures for presentations and you’re a member of the MIT community, you can always make a Comm Lab appointment , and we can go through it together!
Princeton Correspondents on Undergraduate Research
How to Make a Successful Research Presentation
Turning a research paper into a visual presentation is difficult; there are pitfalls, and navigating the path to a brief, informative presentation takes time and practice. As a TA for GEO/WRI 201: Methods in Data Analysis & Scientific Writing this past fall, I saw how this process works from an instructor’s standpoint. I’ve presented my own research before, but helping others present theirs taught me a bit more about the process. Here are some tips I learned that may help you with your next research presentation:
More is more
In general, your presentation will always benefit from more practice, more feedback, and more revision. By practicing in front of friends, you can get comfortable with presenting your work while receiving feedback. It is hard to know how to revise your presentation if you never practice. If you are presenting to a general audience, getting feedback from someone outside of your discipline is crucial. Terms and ideas that seem intuitive to you may be completely foreign to someone else, and your well-crafted presentation could fall flat.
Less is more
Limit the scope of your presentation, the number of slides, and the text on each slide. In my experience, text works well for organizing slides, orienting the audience to key terms, and annotating important figures–not for explaining complex ideas. Having fewer slides is usually better as well. In general, about one slide per minute of presentation is an appropriate budget. Too many slides is usually a sign that your topic is too broad.

Limit the scope of your presentation
Don’t present your paper. Presentations are usually around 10 min long. You will not have time to explain all of the research you did in a semester (or a year!) in such a short span of time. Instead, focus on the highlight(s). Identify a single compelling research question which your work addressed, and craft a succinct but complete narrative around it.
You will not have time to explain all of the research you did. Instead, focus on the highlights. Identify a single compelling research question which your work addressed, and craft a succinct but complete narrative around it.
Craft a compelling research narrative
After identifying the focused research question, walk your audience through your research as if it were a story. Presentations with strong narrative arcs are clear, captivating, and compelling.
- Introduction (exposition — rising action)
Orient the audience and draw them in by demonstrating the relevance and importance of your research story with strong global motive. Provide them with the necessary vocabulary and background knowledge to understand the plot of your story. Introduce the key studies (characters) relevant in your story and build tension and conflict with scholarly and data motive. By the end of your introduction, your audience should clearly understand your research question and be dying to know how you resolve the tension built through motive.
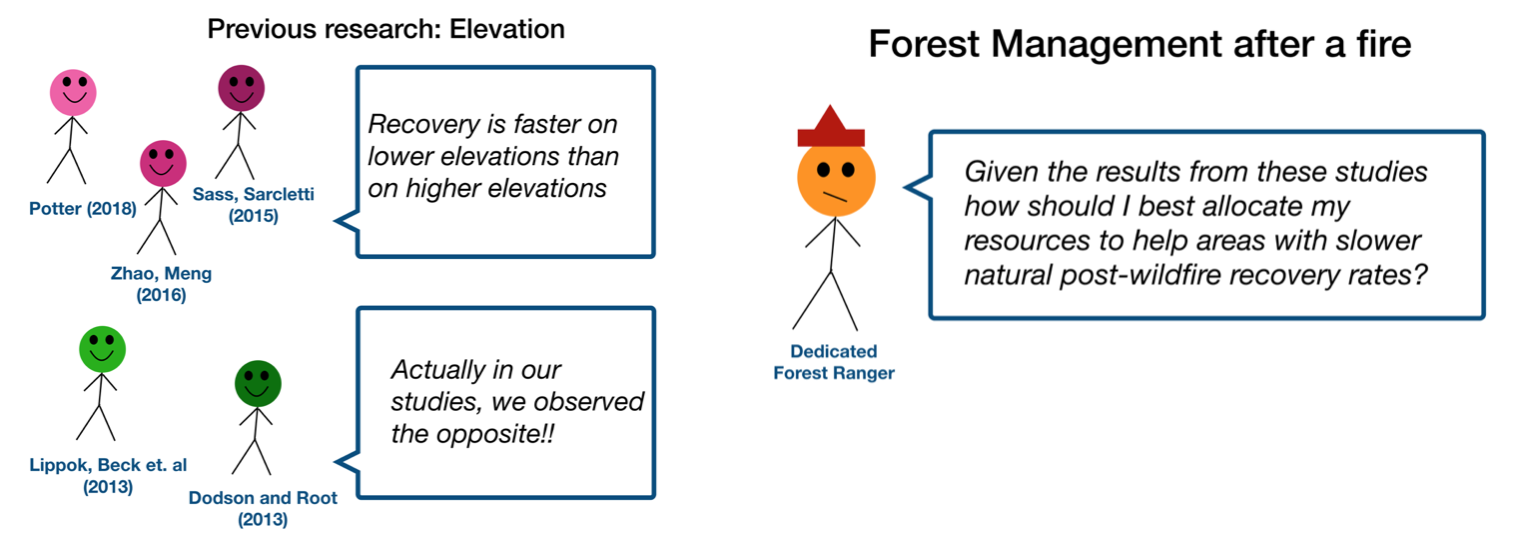
- Methods (rising action)
The methods section should transition smoothly and logically from the introduction. Beware of presenting your methods in a boring, arc-killing, ‘this is what I did.’ Focus on the details that set your story apart from the stories other people have already told. Keep the audience interested by clearly motivating your decisions based on your original research question or the tension built in your introduction.
- Results (climax)
Less is usually more here. Only present results which are clearly related to the focused research question you are presenting. Make sure you explain the results clearly so that your audience understands what your research found. This is the peak of tension in your narrative arc, so don’t undercut it by quickly clicking through to your discussion.
- Discussion (falling action)
By now your audience should be dying for a satisfying resolution. Here is where you contextualize your results and begin resolving the tension between past research. Be thorough. If you have too many conflicts left unresolved, or you don’t have enough time to present all of the resolutions, you probably need to further narrow the scope of your presentation.
- Conclusion (denouement)
Return back to your initial research question and motive, resolving any final conflicts and tying up loose ends. Leave the audience with a clear resolution of your focus research question, and use unresolved tension to set up potential sequels (i.e. further research).
Use your medium to enhance the narrative
Visual presentations should be dominated by clear, intentional graphics. Subtle animation in key moments (usually during the results or discussion) can add drama to the narrative arc and make conflict resolutions more satisfying. You are narrating a story written in images, videos, cartoons, and graphs. While your paper is mostly text, with graphics to highlight crucial points, your slides should be the opposite. Adapting to the new medium may require you to create or acquire far more graphics than you included in your paper, but it is necessary to create an engaging presentation.
The most important thing you can do for your presentation is to practice and revise. Bother your friends, your roommates, TAs–anybody who will sit down and listen to your work. Beyond that, think about presentations you have found compelling and try to incorporate some of those elements into your own. Remember you want your work to be comprehensible; you aren’t creating experts in 10 minutes. Above all, try to stay passionate about what you did and why. You put the time in, so show your audience that it’s worth it.
For more insight into research presentations, check out these past PCUR posts written by Emma and Ellie .
— Alec Getraer, Natural Sciences Correspondent
Share this:
- Share on Tumblr

- Jun 8, 2021
How to draw your research with simple scientific illustrations
Turn sketchbook ideas into scientific masterpieces: a student’s journey
You know the phrase. A picture speaks a 1000 words.
And often, a research paper speaks for much longer than it really needs to. SEVERAL thousand words more beyond what you may want to know. So why don’t we try and make your long story short with your very own scientific illustrations and infographics? And the good news is that you don’t need to be a fancy high-level artist to draw for YOUR science.
Not a Picasso? No problem! But you could be a Da Vinci - most people know him as a famous painter, but he was equally versed in the sciences.
Let us take you through the process of becoming a scientist just like him, one step at a time.

In this blog, Dr. Juan Miguel Balbin, Science Communicator at Animate Your Science, talks about his experiences and life lessons growing up with a sketchbook, and the fundamentals of making simple scientific illustrations to add visibility to your research.
The boy with a sketchbook, now a scientist with a lab book

As a scientist you’ve gone through school. Several levels of school more than what you originally intended. For now let’s cast our minds back to primary school (or elementary for our global readers!). We all had a pencil case with several coloured pencils, broken and blunt ones, and maybe some notes you’d sneakily pass around in class.
For me, I had a sketchbook in there that was just a little bigger than the size of my hand.

Artist lesson #1 : No piece of art in the world is completely original
I liked to draw, but I wasn’t the best at it. I had friends who could draw hyperrealistic animals or put together entire comic book strips. Me? I wasn’t super original. I’d draw characters from my favourite video games or TV shows growing up. But I always felt like I was “copying” from something that already existed. Was I a fraud because I couldn’t come up with my own unique ideas? Little did I know at the time that every artist “copies” and dare I say “steals” ideas as inspiration for their own style. It’s only human to be influenced.
So anyone can draw if your imagination is up for the task!
Artist lesson #2 : Start doodling with a simple medium that’s accessible to you
Eventually my sketchbook ran out of pages, so I wondered if I could go digital. I first tinkered a lot with Microsoft Paint (the classic one that needed Windows XP or older!) as well as Microsoft PowerPoint. These were great starting points for someone wanting to test out digital art and to learn about bitmap vs vector graphics .

Artist lesson #3 : Refine your way of drawing with new tools as you progress
In the end, doodles in Paint and PowerPoint could only go so far when it came to looking professional. So, in high school I picked up classes for Adobe Illustrator (AI) which was industry-standard stuff in graphic design. AI was a fantastic tool to equip myself with to really get that polished look in my work.
But one thing didn’t change. I still drew very simple things, just using new toys.
Artist lesson #4 : Thinking like a scientist makes art easier
I realised that I had a very methodological way of drawing where I would reverse-engineer an image in my mind and list the shapes it was made up of. Wait, was this how an artist thinks? I wasn’t sure. Perhaps this style of thinking paved the way for me on the path to becoming a scientist with a little bit of art and graphic design under my belt. Take the Twitter bird for example!

Artist lesson #5 : If you can draw, you fill a very special niche on a team
Fast forward to University, and I came across the concept of scientific posters. I had a group assignment where we needed to make a poster about insecticide resistance in moths. Nobody else wanted to be responsible for making the poster, so I put my hand up for the job. My group was thankful for someone with a graphic design skillset. I didn’t know what a poster was really meant to look like, except that it shouldn’t be an intimidating wall of text where you would have to squint to see the Size 8 No Spacing Times New Roman.

Instead, we filled it up half-way with pictures and catchy titles while giving a good oral commentary. No intimidating text, just a gigantic moth in the middle of the poster (apologies to those with a phobia!). We scored a very high mark, and it set the bar high for every science poster after.
Artist lesson #6 : Art is your ticket to a good first impression
Heading into my PhD, I was being trained to be a clear and concise scientist. Creativity was gauged on research novelty, not by how prettily I could label up some tubes. What was an artist doing here? Then came my first lab meeting where I presented my initial project proposal. I’ve seen everyone else do theirs, but I wanted to try something different - my own way.
My slides had colourful illustrations of genetically-modified malaria parasites that I would engineer to glow green and red - this was the moment I made my artwork known to my research group and they loved it! However for more formal seminars, the “traditional” slides were needed. Yes that meant reverting back to a bunch of statistics and references. Oh well.

Artist lesson #7 : A story is told better when you use art to show what’s happening
The next step was to present at scientific conferences and excite people with my research! But how could I possibly do this with a project that had mostly negative results? Why was hypothesis A wrong? Because of reasons B and C? How could I tell people this was really hard? With little data on me, I sought to fill up the gaps in my posters and PowerPoints with visual introductions to my topic, drawn schematics of my experiments and used these to tell my story.

And it worked well. Really well.
My storytelling worked well enough to be awarded two prizes at two separate events for the same seemingly basic research project. You don’t need to cure cancer or make a Da Vinci-level painting to make an impact, I certainly didn’t. There’s room for artists of all skill levels in science.

Hopefully at this point you’ve been inspired to give scientific illustrations a try! Let’s now talk about the process of making your graphics and why scientists might hesitate to give drawing a go. I guarantee your next grant or presentation will be GLOWING with these tips.
Identify what shapes make up your research object
“but i haven’t got any drawing skills”.
If you can draw basic shapes, you’re all set. Really, that’s it, plus a healthy dose of imagination. Basic shapes form the basis of any complicated (or simple) drawing.

Okay sure, maybe an owl’s a bit too much. But you can see it’s just made up of a million different shapes. And just like any science experiment there’s method to the madness, so hold on to your pencil and paper. What shapes make up your “owl”?
Let’s draw a cell for example, a red blood cell (my specialty!). A simple red circle is a good place to start. But then you go back into Google Images and find that these cells aren’t just red circles, they’ve got some dimension to them, with a little bit of a dip in the center. So, draw another red circle, but make it a little darker to make it fancy.

Voila! You now have a mostly medically-accurate red blood cell. Of course, you could always add more details, but the point is that beauty lies in simplicity, and science loves to keep things clear, concise and simple . But simple doesn’t need to mean boring and made in a rush. See our article on graphical abstracts to see why you don’t rush these things.
So no, we’re not drawing owls unless you specifically work on owls. Be relieved.
“My work is too complicated for me to turn into a picture.”
In that case, let’s make it less complicated by using symbols.
Symbols are easy to understand and will allow your audience to quickly get a hold on the topic you’re presenting. You can use symbols to illustrate your literature review, methodology, or even as icons for your dot points. Let’s try and make these, using shapes.
microscope (circles and rectangles)
chemical flask (triangles and rectangles)
viral particle (triangles in an icosahedron)
leaf (pointy oval)
atomic models (three ovals and circles)

For researchers who work on more abstract or non-tangible topics, we’ll have to be a little more creative. But this is the fun part! Allow me to introduce metaphorical symbols - your new best friend. These represent broader concepts and methods that could closely tie with your topic and methods. Take these for example.
magnifying glass (representing “investigation”, circles and rectangles)
gears (representing “mechanisms”, circles and squares)
keys (representing the keys to “unlocking the unknown”, circles and rectangles)
thought bubble (representing “hypotheses”, circles)
stopwatch (representing “time needed for a study”, circles and rectangles)
lightbulb (representing “novelty”, circles, rectangles and lines)
ladder (representing “progression”, rectangles)
stick figures (representing “participants”, you know how to make this!)
check boxes (representing “tasks” in your study, squares and rectangles)

Once you have your individual symbols together, you could display them as a scientific infographic like this.

Then give yourself a pat on the back, you’ve earned it for making your first set of scientific illustrations!
“I don’t know what software to use to make my drawings”
Worry not, you likely already have something you can use! Many researchers love to use Microsoft PowerPoint to arrange figures because they’ve already been trained in it. PowerPoint is a fantastic starting point for making illustrations using the Insert shape tool.

Levelling up past PowerPoint? Try out InkScape for free to gain that edge in your vector artwork. We also recommend Affinity Designer which you can access with a one-time payment! Affinity Designer allows you to tinker with both bitmap and vector graphics for that added flexibility.

The holy grail is definitely the Adobe Creative Suite of software products, including Adobe Photoshop, Adobe Illustrator and Adobe InDesign. For starters, try out Illustrator! A free trial is available, so give it a try before you commit to a subscription!

“I haven’t got the time to learn to make these myself”
Understandable, completely understandable. Though I would bet that if you’re reading this blog right now that you would be keen to give it a try with some trial and error.
There are also online resources, such as BioRende r , which provide you with base illustrations that you can move around and assemble into a figure yourself.
Alternatively, we’re at your beck and call. Have a look at our gallery to get an idea of the services we provide so we could draw your research for you!
Other tips for new venturing scientific illustrators
An illustration is only good if it can be easily understood! Pair it with an equally descriptive figure legend and/or very clear labels.
Visibility is everything - make sure it is suitably large for your purpose, and is coloured in a way that matches the palette for your poster/presentation etc.
Your pictures tell a story , but they need you to narrate them. Use your illustrations as a tool to better structure your oral narrative.
Once you’re confident with illustrating, why not breathe life into them in a video abstract or animation ?
Take-away points
Every artist starts out simple!
You can draw anything if you can pick out what shapes to use to make an image.
You can tell a story by drawing simple symbols and icons.
We’re only at the tip of the iceberg with what you could do to make scientific illustrations. If you found this blog useful, perhaps you'd consider subscribing to our newsletter ?
Until next time!
Dr Juan Miguel Balbin
Dr Tullio Rossi
#scientificillustration #Twitter

Related Posts
How to design an effective graphical abstract: the ultimate guide
How to Make Cool Animated Science Videos in PowerPoint
How to Select a Great Colour Scheme for Your Scientific Poster


- Master Your Homework
- Do My Homework
Including Pictures in Research Papers: A Guide
Including pictures in research papers has become an increasingly important part of academic writing. As the use of visuals to convey ideas and messages becomes more commonplace, there is a need for academics to understand how best to incorporate images into their work. This article provides guidance on when and how illustrations should be used in research papers as well as outlining considerations for authors who are including pictures in order to ensure that their contributions meet established standards for publication.
I. Introduction to Including Pictures in Research Papers
Ii. benefits of using visuals for academic writing, iii. types of visuals used in academic writing, iv. guidelines on embedding images into a paper, v. challenges associated with inclusion of images in research work, vi. best practices when incorporating images and other graphics materials into academics writings, vii. conclusion.
The Visual Power of Photos in a Research Paper Pictures have the unique ability to convey complex ideas with minimal effort. This makes them ideal for inclusion into any research paper, which can benefit from their impactful visuals and visual storytelling capabilities. By including pictures within your research paper, you not only enhance its aesthetic appeal but also give yourself more room to explore the topics at hand without overwhelming readers with text-heavy sections.
Including photos as part of your argument is an effective way to illustrate what’s being discussed while also providing valuable evidence that supports it – even if these images are merely used as decorations or breakpoints between passages! The question remains though: can a research paper have pictures? . Absolutely! As long as they provide concrete information related to the topic under discussion, photographs should be welcome additions that further support one’s claims and arguments. There’s no limit on how many can be included either; just make sure each image adds value and isn’t simply placed there out of vanity or personal preference (this will cost you points!).
In academic writing, visuals are often used to illustrate complex topics or provide context for data. They can help writers make their arguments more compelling and effective by using visual cues that readers are likely to remember long after they’ve read the paper. Visuals also serve an additional purpose: helping readers gain a deeper understanding of what the author is trying to convey.
- Enhancing Clarity :Visual elements like charts and diagrams offer clarity that words alone simply cannot accomplish – particularly when it comes to explaining quantitative information or illustrating relationships between concepts.
Table of Contents and Images Most academic papers contain at least one table of contents. This helps readers navigate through the paper, as well as giving an overview on what topics have been discussed. To further enhance their visibility, authors may also use images to illustrate a point or add clarity to complex information within their writing.
In addition to tables and pictures, research papers can also utilize other visuals such as diagrams, charts and graphs. These tools are especially useful when trying to analyze large data sets in order to make a compelling argument or reveal underlying trends that could otherwise be difficult for readers understand without visual aid.
- Charts: helpful for illustrating changes over time.
- Graphs: used best when tracking multiple variables against each other.
While it’s not necessarily expected for every paper include visuals throughout its entirety; where appropriate they can greatly benefit both the writer’s message but more importantly assist with making sense out of complicated concepts by providing tangible examples.
Including images within a paper can be an effective way to support your argument or provide further detail. However, there are some basic guidelines one should consider when embedding visuals into their paper.
- Cite the source: Make sure you cite any images used in your research paper, whether they are of personal origin or from another source such as websites and magazines.
- Presentational Value: Images add more than just visual interest to a paper; they have value by supplementing and enhancing points made throughout the text. Select only those that serve this purpose well.
Additionally, it is important to know if including pictures is allowed at all for certain papers. The answer here varies depending on which type of research article you are writing – while many articles allow visuals such as graphs, charts etc., other types may not permit them due to space constraints. In either case, using captions can make sure these images aren’t lost even without being directly included within the main text body itself.
When incorporating images into a research paper, there are several challenges associated with doing so. Firstly, authors must consider the legalities of using the image in their work and ensure that they have permission to use it from its original source. This can be difficult as images taken from websites such as Google Images may not always list an appropriate license or author attribution.
In addition to this, one must also carefully consider how an image will fit within the broader context of their research paper. Authors should assess what value adding an image will bring and whether it is relevant enough for inclusion in the first place; merely including pictures because ‘it looks nice’ does nothing to further support any arguments or points being made throughout one’s work.
Can a research paper have pictures? Yes! When used correctly and appropriately, visuals can enhance comprehension by providing readers with additional information beyond mere text-based explanations. However, authors need to approach visual materials strategically if they wish to make full use of them while avoiding potential legal issues at hand when borrowing content without explicit permission.
When incorporating images into academic writings, it is important to be mindful of the quality and reliability of sources. Images should always come from reliable and credible websites or databases that are peer-reviewed by experts in the field. When citing an image, one must provide a complete citation as part of their bibliography.
Best Practices:
- Check for copyright permissions (if necessary). Ensure any images used have been cleared for use with appropriate credit given to authors/creators.
- Make sure graphics materials support text (vice versa). Graphics should add value, understanding and insight not simply serve as decoration.
- Can research paper have pictures? . Yes! Appropriate visuals can help explain complex concepts better than words alone. Pictures also make research papers more visually appealing which helps readers engage with content more effectively.
It is clear from the evidence provided that there are multiple benefits associated with incorporating pictures into a research paper. Pictures can provide clarity and illustrate complex concepts in ways that words alone cannot. Additionally, they may serve to break up text-heavy material and make it easier for readers to digest information.
That said, all images used should still be carefully selected – not only to ensure accuracy but also to create an aesthetically pleasing visual experience for viewers. When utilized correctly, photos have the power to increase comprehension of topics and lead readers on more meaningful journeys through written works. Ultimately, this can result in better understanding and retention of ideas presented within a research paper.
In conclusion, the use of visuals in research papers is an effective tool for providing readers with a clearer understanding and insight into the points being discussed. It can also add visual appeal to any paper or report. Inclusion of pictures should be done carefully, however; ensuring that they are correctly sourced and properly referenced within text is essential. With proper selection and implementation techniques, researchers will find images to be invaluable additions to their work.

Effective Use of Tables and Figures in Research Papers
Research papers are often based on copious amounts of data that can be summarized and easily read through tables and graphs. When writing a research paper , it is important for data to be presented to the reader in a visually appealing way. The data in figures and tables, however, should not be a repetition of the data found in the text. There are many ways of presenting data in tables and figures, governed by a few simple rules. An APA research paper and MLA research paper both require tables and figures, but the rules around them are different. When writing a research paper, the importance of tables and figures cannot be underestimated. How do you know if you need a table or figure? The rule of thumb is that if you cannot present your data in one or two sentences, then you need a table .
Using Tables
Tables are easily created using programs such as Excel. Tables and figures in scientific papers are wonderful ways of presenting data. Effective data presentation in research papers requires understanding your reader and the elements that comprise a table. Tables have several elements, including the legend, column titles, and body. As with academic writing, it is also just as important to structure tables so that readers can easily understand them. Tables that are disorganized or otherwise confusing will make the reader lose interest in your work.
- Title: Tables should have a clear, descriptive title, which functions as the “topic sentence” of the table. The titles can be lengthy or short, depending on the discipline.
- Column Titles: The goal of these title headings is to simplify the table. The reader’s attention moves from the title to the column title sequentially. A good set of column titles will allow the reader to quickly grasp what the table is about.
- Table Body: This is the main area of the table where numerical or textual data is located. Construct your table so that elements read from up to down, and not across.
Related: Done organizing your research data effectively in tables? Check out this post on tips for citing tables in your manuscript now!
The placement of figures and tables should be at the center of the page. It should be properly referenced and ordered in the number that it appears in the text. In addition, tables should be set apart from the text. Text wrapping should not be used. Sometimes, tables and figures are presented after the references in selected journals.
Using Figures
Figures can take many forms, such as bar graphs, frequency histograms, scatterplots, drawings, maps, etc. When using figures in a research paper, always think of your reader. What is the easiest figure for your reader to understand? How can you present the data in the simplest and most effective way? For instance, a photograph may be the best choice if you want your reader to understand spatial relationships.
- Figure Captions: Figures should be numbered and have descriptive titles or captions. The captions should be succinct enough to understand at the first glance. Captions are placed under the figure and are left justified.
- Image: Choose an image that is simple and easily understandable. Consider the size, resolution, and the image’s overall visual attractiveness.
- Additional Information: Illustrations in manuscripts are numbered separately from tables. Include any information that the reader needs to understand your figure, such as legends.
Common Errors in Research Papers
Effective data presentation in research papers requires understanding the common errors that make data presentation ineffective. These common mistakes include using the wrong type of figure for the data. For instance, using a scatterplot instead of a bar graph for showing levels of hydration is a mistake. Another common mistake is that some authors tend to italicize the table number. Remember, only the table title should be italicized . Another common mistake is failing to attribute the table. If the table/figure is from another source, simply put “ Note. Adapted from…” underneath the table. This should help avoid any issues with plagiarism.
Using tables and figures in research papers is essential for the paper’s readability. The reader is given a chance to understand data through visual content. When writing a research paper, these elements should be considered as part of good research writing. APA research papers, MLA research papers, and other manuscripts require visual content if the data is too complex or voluminous. The importance of tables and graphs is underscored by the main purpose of writing, and that is to be understood.
Frequently Asked Questions
"Consider the following points when creating figures for research papers: Determine purpose: Clarify the message or information to be conveyed. Choose figure type: Select the appropriate type for data representation. Prepare and organize data: Collect and arrange accurate and relevant data. Select software: Use suitable software for figure creation and editing. Design figure: Focus on clarity, labeling, and visual elements. Create the figure: Plot data or generate the figure using the chosen software. Label and annotate: Clearly identify and explain all elements in the figure. Review and revise: Verify accuracy, coherence, and alignment with the paper. Format and export: Adjust format to meet publication guidelines and export as suitable file."
"To create tables for a research paper, follow these steps: 1) Determine the purpose and information to be conveyed. 2) Plan the layout, including rows, columns, and headings. 3) Use spreadsheet software like Excel to design and format the table. 4) Input accurate data into cells, aligning it logically. 5) Include column and row headers for context. 6) Format the table for readability using consistent styles. 7) Add a descriptive title and caption to summarize and provide context. 8) Number and reference the table in the paper. 9) Review and revise for accuracy and clarity before finalizing."
"Including figures in a research paper enhances clarity and visual appeal. Follow these steps: Determine the need for figures based on data trends or to explain complex processes. Choose the right type of figure, such as graphs, charts, or images, to convey your message effectively. Create or obtain the figure, properly citing the source if needed. Number and caption each figure, providing concise and informative descriptions. Place figures logically in the paper and reference them in the text. Format and label figures clearly for better understanding. Provide detailed figure captions to aid comprehension. Cite the source for non-original figures or images. Review and revise figures for accuracy and consistency."
"Research papers use various types of tables to present data: Descriptive tables: Summarize main data characteristics, often presenting demographic information. Frequency tables: Display distribution of categorical variables, showing counts or percentages in different categories. Cross-tabulation tables: Explore relationships between categorical variables by presenting joint frequencies or percentages. Summary statistics tables: Present key statistics (mean, standard deviation, etc.) for numerical variables. Comparative tables: Compare different groups or conditions, displaying key statistics side by side. Correlation or regression tables: Display results of statistical analyses, such as coefficients and p-values. Longitudinal or time-series tables: Show data collected over multiple time points with columns for periods and rows for variables/subjects. Data matrix tables: Present raw data or matrices, common in experimental psychology or biology. Label tables clearly, include titles, and use footnotes or captions for explanations."

Enago is a very useful site. It covers nearly all topics of research writing and publishing in a simple, clear, attractive way. Though I’m a journal editor having much knowledge and training in these issues, I always find something new in this site. Thank you
“Thank You, your contents really help me :)”
Rate this article Cancel Reply
Your email address will not be published.

Enago Academy's Most Popular Articles

- Reporting Research
Explanatory & Response Variable in Statistics — A quick guide for early career researchers!
Often researchers have a difficult time choosing the parameters and variables (like explanatory and response…

- Manuscript Preparation
- Publishing Research
How to Use Creative Data Visualization Techniques for Easy Comprehension of Qualitative Research
“A picture is worth a thousand words!”—an adage used so often stands true even whilst…

- Figures & Tables
Effective Use of Statistics in Research – Methods and Tools for Data Analysis
Remember that impending feeling you get when you are asked to analyze your data! Now…
- Old Webinars
- Webinar Mobile App
SCI中稿技巧: 提升研究数据的说服力
如何寻找原创研究课题 快速定位目标文献的有效搜索策略 如何根据期刊指南准备手稿的对应部分 论文手稿语言润色实用技巧分享,快速提高论文质量

Distill: A Journal With Interactive Images for Machine Learning Research
Research is a wide and extensive field of study. This field has welcomed a plethora…
Explanatory & Response Variable in Statistics — A quick guide for early career…
How to Create and Use Gantt Charts

Sign-up to read more
Subscribe for free to get unrestricted access to all our resources on research writing and academic publishing including:
- 2000+ blog articles
- 50+ Webinars
- 10+ Expert podcasts
- 50+ Infographics
- 10+ Checklists
- Research Guides
We hate spam too. We promise to protect your privacy and never spam you.
I am looking for Editing/ Proofreading services for my manuscript Tentative date of next journal submission:

What should universities' stance be on AI tools in research and academic writing?
IMAGES
VIDEO
COMMENTS
Scientific Illustrations are an important part of research papers in today's modern age of graphics and images. Researchers also need to know how to create and edit scientific figures using commonly available tools online. Enago Academy - Learn. Share. Discuss. Publish. ... make some preliminary sketches on paper. You can think of this step as ...
Rule 1: Include only one idea per slide. Each slide should have one central objective to deliver—the main idea or question [3-5].Often, this means breaking complex ideas down into manageable pieces (see Fig 1, where "background" information has been split into 2 key concepts).In another example, if you are presenting a complex computational approach in a large flow diagram, introduce ...
The use of visual representations (i.e., photographs, diagrams, models) has been part of science, and their use makes it possible for scientists to interact with and represent complex phenomena, not observable in other ways. Despite a wealth of research in science education on visual representations, the emphasis of such research has mainly been on the conceptual understanding when using ...
Abstract. Tables and figures are commonly adopted methods for presenting specific data or statistical analysis results. Figures can be used to display characteristics and distributions of data, allowing for intuitive understanding through visualization and thus making it easier to interpret the statistical results.
The best way to do this is through the use of tables and figures. They help to organize and summarize large amounts of data and present it in an easy-to-understand way. Tables are used to present numerical data, while figures are used to display non-numerical data, such as graphs, charts, and diagrams. There are different types of tables and ...
experiences of using various forms of visual represe ntation in their research, academic. practice and learning and teaching. 2. Visual representation in the process of learning and teaching ...
The software that powers scientific illustration. The web-based tool BioRender has become a staple of biomedical research drawings. By. Jeffrey M. Perkel. Illustration by The Project Twins. Like ...
Example of table presentation in a research paper. For comprehensible and engaging presentation of figures: Ensure clarity: All the parts of the figure should be clear. Ensure the use of a standard font, legible labels, and sharp images. Use appropriate legends: They make figures effective and draw attention towards the key message.
Combine ideas or results from many publications, sometimes with new analysis. Design language: Feature width and delivery rate are commonly reported in this field; this figure plots them against each other to invent a new figure of merit. Each number represents a result from one publication.
Presenting Figures and Their Importance in Research Papers. The old adage that a picture tells a thousand words can be very true in research articles. Used correctly, figures provide efficient visual presentations of your qualitative or quantitative findings. Used incorrectly, figures and tables can be confusing or even misleading for the reader.
Tables and figures in scientific papers are wonderful ways of presenting data. Effective data presentation in research papers requires understanding your reader and the elements that comprise a table. Tables have several elements, including the legend, column titles, and body. As with academic writing, it is also just as important to structure ...
More from the blog. From Paper to Presentation: Redesigning Existing Figures for Slides . January 15, 2024 Scientific figures do not equally suit all contexts. A figure designed for a paper will often be information-dense; multiple panels illustrate multiple ideas, multiple axes and color bars show the impact of numerous variables, annotations highlight specific caveats, and an extensive ...
Presentations with strong narrative arcs are clear, captivating, and compelling. Orient the audience and draw them in by demonstrating the relevance and importance of your research story with strong global motive. Provide them with the necessary vocabulary and background knowledge to understand the plot of your story.
The rules for the use of tables and graphs in abstracts (Table 1) are different from the rules for their insertion in a full report published in a journal, where space is less limited. In contrast to abstracts, in a full manuscript in a journal, multiple illustrations should be used and can be expanded. Tables, graphs, and figures can be used ...
Once you have selected the appropriate format for data presentation, the next step is to ensure that the tables and/or figures in your research paper are visually appealing and present your data in a clear, concise, and effective manner. ... Tables & Figures. Footnotes in tables (part 1): choice of footnote markers and their…
Figures and figure legends: Figures are submitted as individual files in nearly all cases, separate from the article. There should be a list of figure legends in the paper (on a separate page), but not the figures themselves. Use the appropriate format as specified by the journal (usually. jpg but can be other formats).
This paper positions "research findings" presentations as a distinctive genre, part of qualitative method, and an expression of scholarly discourse. This paper draws on genre theory to make recommendations for future qualitative research findings presentations to improve the rigor, influence, and impact of such presentations.
How to draw your research with simple scientific illustrations. Turn sketchbook ideas into scientific masterpieces: a student's journey. You know the phrase. A picture speaks a 1000 words. And often, a research paper speaks for much longer than it really needs to. SEVERAL thousand words more beyond what you may want to know.
Including pictures in research papers has become an increasingly important part of academic writing. As the use of visuals to convey ideas and messages becomes more commonplace, there is a need for academics to understand how best to incorporate images into their work. This article provides guidance on when and how illustrations should be used ...
Journal of The Association of Physicians of India V ol. 65 September 2017. 72. Presenting Research Paper: Learning the steps. Sandeep B Bavdekar 1, Varun Anand2, Shruti Vyas3. Professor and Head ...
Tables and figures in scientific papers are wonderful ways of presenting data. Effective data presentation in research papers requires understanding your reader and the elements that comprise a table. Tables have several elements, including the legend, column titles, and body. As with academic writing, it is also just as important to structure ...
Table of contents. Step 1: Introduce your topic. Step 2: Describe the background. Step 3: Establish your research problem. Step 4: Specify your objective (s) Step 5: Map out your paper. Research paper introduction examples. Frequently asked questions about the research paper introduction.
Research papers are often based on copious amounts of data that can be summarized and easily read through tables and graphs. When writing a research paper, it is important for data to be presented to the reader in a visually appealing way.The data in figures and tables, however, should not be a repetition of the data found in the text.