Generate accurate APA citations for free
- Knowledge Base
- APA Style 7th edition
- Creating an APA Style table of contents

How to Create an APA Table of Contents | Format & Examples
Published on November 5, 2020 by Jack Caulfield . Revised on January 17, 2024.
A table of contents is not required in an APA Style paper , but if you include one, follow these guidelines:
- Include all level 1 and level 2 headings (other levels are optional).
- Indicate different heading levels with indents. Adhere to general APA format in terms of font, spacing, etc.
You can automatically create the table of contents by applying APA heading styles in Word.
Instantly correct all language mistakes in your text
Upload your document to correct all your mistakes in minutes

Table of contents
Apa format guidelines for the table of contents, how to generate a table of contents in word.
In a thesis or dissertation , the table of contents comes between your abstract and your introduction . It should be written in the same font and size as the rest of your text (usually 12 pt Times New Roman). At the top of the page, write Contents , centered and in bold.
In APA Style, you can use up to five levels of heading , each with its own formatting style. In the table of contents, you should include all level 1 and 2 headings, left-aligned and formatted as plain text. Level 2 headings are indented.
Including lower-level headings in the table of contents is optional. Add an additional indent for each level. If you have a lot of headings in your text, you may not be able to include them all—your table of contents should not be more than two pages long in total.

Prevent plagiarism. Run a free check.
To automatically generate a table of contents in Word, you’ll first have to apply heading styles throughout your text. After that, you can generate the table of contents.
Applying heading styles
First, go through your text making sure that each level of heading is in keeping with APA Style rules.
Next, update the heading styles listed in the Home tab at the top:
- Highlight a level 1 heading
- Right-click the Heading 1 style and select Update Heading 1 to match selection
- Do the same for each level of heading
Once you’ve done this you can update any other headings quickly using the heading styles. Make sure all headings are in the appropriate style before proceeding.
Generating the table of contents
Now you can generate your table of contents. First write the title “Contents” (in the style of a level 1 heading). Then place your cursor two lines below this and go to the References tab.
Click on Table of Contents and select Custom Table of Contents… In the popup window, select how many levels of heading you wish to include (at least two) under Show levels , then click OK :
Updating your table of contents
Now you have a table of contents based on your current headings and page numbers. If you continue working on your text after this, be sure to go back and update your table of contents at the end, as headings and page numbers might change.
You can do this by right-clicking on the table of contents and selecting Update Field . Then you can choose whether to update all information or just the page numbers. It’s best to update everything, just to be sure.
Cite this Scribbr article
If you want to cite this source, you can copy and paste the citation or click the “Cite this Scribbr article” button to automatically add the citation to our free Citation Generator.
Caulfield, J. (2024, January 17). How to Create an APA Table of Contents | Format & Examples. Scribbr. Retrieved August 5, 2024, from https://www.scribbr.com/apa-style/apa-table-of-contents/
Is this article helpful?

Jack Caulfield
Other students also liked, apa headings and subheadings, apa format for academic papers and essays, apa 7th edition: the most notable changes, get unlimited documents corrected.
✔ Free APA citation check included ✔ Unlimited document corrections ✔ Specialized in correcting academic texts
- PRO Courses Guides New Tech Help Pro Expert Videos About wikiHow Pro Upgrade Sign In
- EDIT Edit this Article
- EXPLORE Tech Help Pro About Us Random Article Quizzes Request a New Article Community Dashboard This Or That Game Happiness Hub Popular Categories Arts and Entertainment Artwork Books Movies Computers and Electronics Computers Phone Skills Technology Hacks Health Men's Health Mental Health Women's Health Relationships Dating Love Relationship Issues Hobbies and Crafts Crafts Drawing Games Education & Communication Communication Skills Personal Development Studying Personal Care and Style Fashion Hair Care Personal Hygiene Youth Personal Care School Stuff Dating All Categories Arts and Entertainment Finance and Business Home and Garden Relationship Quizzes Cars & Other Vehicles Food and Entertaining Personal Care and Style Sports and Fitness Computers and Electronics Health Pets and Animals Travel Education & Communication Hobbies and Crafts Philosophy and Religion Work World Family Life Holidays and Traditions Relationships Youth
- Browse Articles
- Learn Something New
- Quizzes Hot
- Happiness Hub
- This Or That Game
- Train Your Brain
- Explore More
- Support wikiHow
- About wikiHow
- Log in / Sign up
- Education and Communications
- Technical Writing
How to Write a Table of Contents
Last Updated: June 16, 2024 Fact Checked
This article was co-authored by Stephanie Wong Ken, MFA . Stephanie Wong Ken is a writer based in Canada. Stephanie's writing has appeared in Joyland, Catapult, Pithead Chapel, Cosmonaut's Avenue, and other publications. She holds an MFA in Fiction and Creative Writing from Portland State University. This article has been fact-checked, ensuring the accuracy of any cited facts and confirming the authority of its sources. This article has been viewed 1,060,857 times.
The Table of Contents in a document acts as a map for the reader, making it easier for them to find information in the document based on title and page number. A good Table of Contents should be organized, easy to read and simple to use. You can write a Table of Contents manually on your computer or have a word processing tool create it for you. Make sure the Table of Contents is formatted properly in your final document so it is as accurate and accessible as possible.
Writing a Table of Contents
To write a simple table of contents, create a new page in your document and type the names of the chapters or sections of your piece of writing. Then, use your word processing program to insert the page number where each section starts. If you move things around, the page number in your table of contents will automatically update.
Sample Tables of Contents

Creating the Table of Contents on a Word Processor

- The Table of Contents should be on its own page. Do not include the introduction or a dedication on the same page as the Table of Contents.

- For example, you may write down main headings like, “Introduction,” “Case Study 1,” or “Conclusion.”

- For example, under the main heading “Introduction” you may write the subheading, “Themes and Concepts.” Or under the main heading “Conclusion” you may write, “Final Analysis.”
- You can also include sub-subheadings underneath the subheadings, if applicable. For example, under the subheading “Themes and Concepts” you may have the sub-subheading, “Identity.”
- Some papers do not have subheadings at all, only main headings. If this is the case, skip this step.

- For example, if the “Introduction” section begins on page 1, you will attach “page 1” to the Introduction heading. If the “Conclusion” section begins on page 45, attach “page 45” to the Conclusion heading.

- Check that the subheadings are located underneath the correct headings, indented to the right.
- Make sure there are page numbers for the subheadings listed as well.
- You can center the content in the table using the table options if you want the content to appear a few spaces away from the lines of the table. You can also leave the content indented to the left if you'd prefer.

- You can put the title above the table or in a separate row on the top of the rest of the content.
Using a Word Processing Tool

- You should also confirm the page numbers are correct in the document. Each page should be numbered in order. Having the correct page numbers will ensure the Table of Contents is created correctly when you use the word processing tool.

- If there are subheadings in your document, label them “Heading 2.” Highlight each subheading and click on “Heading 2” in the Styles tab.
- If there are sub-subheadings in your document, label them “Heading 3.” Highlight each subheading and click on “Heading 3” in the Styles tab.
- The text and font for each main heading may change based on the settings for “Heading 1,” “Heading 2,” and “Heading 3.” You can choose your preferred text and font for each main heading so they appear as you like in the Table of Contents.

- You can choose the built-in Table of Content options, where the tool will automatically choose a font size and style for you.
- You can also go for from a list of custom Table of Contents, where you choose the font color and size based on your preferences.
Polishing the Table of Contents

- You should also check the subheadings or sub-subheadings in the Table of Contents, if applicable, to ensure they match those in the document.

- If you created the Table of Contents manually, do this by going in and adjusting the headings and/or the page numbers when they change.
- If you created the Table of Contents with a word processing tool, update it by clicking the Update option by the Table of Contents option on the Reference tab. You can side clicking on the Table of Contents and choosing “update” that way.
Community Q&A
You Might Also Like

- ↑ https://edu.gcfglobal.org/en/word-tips/how-to-create-a-table-of-contents-in-word/1/#
- ↑ https://examples.yourdictionary.com/reference/examples/table-of-content-examples.html
- ↑ http://bitesizebio.com/21549/using-word-to-write-your-thesis-making-a-table-of-contents-inserting-captions-and-cross-referencing/
- ↑ https://guides.lib.umich.edu/c.php?g=283073&p=1886010
- ↑ https://nsufl.libguides.com/c.php?g=413851&p=2820026
About This Article

To write a table of contents, open a new document and list the major headings, titles, or chapters of the project in chronological order. Next, insert subheadings or subtopics if your project has those. Fill in the page number where each heading starts, then format the content in a table with 2 columns. Place the headings and subheadings in order in the first column, then put the page numbers in the second column. Don't forget to add a "Table of Contents" title at the top of the document! To learn more about polishing your Table of Contents, read on! Did this summary help you? Yes No
- Send fan mail to authors
Reader Success Stories
Mar 22, 2017
Did this article help you?
Mar 3, 2022
Feb 1, 2018

Featured Articles

Trending Articles

Watch Articles

- Terms of Use
- Privacy Policy
- Do Not Sell or Share My Info
- Not Selling Info
Get all the best how-tos!
Sign up for wikiHow's weekly email newsletter
Simon Sez IT
Online software training and video tutorials for Microsoft, Adobe & more
- Get Started
- Access 2021 Beginners
- Access 2021 Advanced
- Access 2019
- Access 2019 Advanced
- Access 2016
- Copilot in Microsoft 365 for Beginners
- Copilot Essentials in Microsoft Office
- Microsoft Excel 365 Essentials
- Microsoft Excel 365 Advanced
- Microsoft Excel 365 Intermediate
- Excel 365 for Beginners
- The Accountants Excel Toolkit
- Microsoft 365
- OneNote Desktop and Windows 10
- OneNote 2016
- Outlook 2021
- Outlook 2019
- Outlook 2016
- Outlook 2013
- Outlook 2010
- Introduction to Power Automate
- Power BI Essentials
- Power BI Training
- Power BI Intermediate
- PowerPoint 365 for Beginners
- PowerPoint 2021
- PowerPoint 2019
- PowerPoint 2016
- PowerPoint 2013
- Project 2021 Advanced
- Project 2021 Beginners
- Project for the Web
- Project 2019
- Project 2019 Advanced
- Microsoft Publisher 365
- Publisher 2013
- SharePoint Online: The Essential Guide (2023)
- SharePoint Online (2021)
- SharePoint Foundation 2013
- SharePoint Server 2013
- SharePoint Foundation 2010
- Microsoft Teams (2023 Update)
- Macros and VBA for Beginners
- VBA for Excel
- VBA Intermediate Training
- Microsoft Visio 2019
- Microsoft Visio 2010
- Windows 11 Advanced
- Windows 11 (2023 Update)
- Windows 10 (2020 Update)
- Microsoft Word 365
- Word 2019 Advanced
- Dreamweaver CC
- Dreamweaver CS6
- Dreamweaver CS5
- Dreamweaver CS4
- Adobe Illustrator CC for Beginners
- Adobe InDesign CC for Beginners
- InDesign CS6
- InDesign CS5
- Adobe Photoshop CC Advanced
- Adobe Photoshop CC Intermediate
- Adobe Photoshop CC for Beginners
- Photoshop CS6
- Photoshop CS5
- Photoshop Elements 2022
- Photoshop Elements 2019
- Photoshop Elements 2018
- Photoshop Elements 15
- Photoshop Elements 14
- QuickBooks Online 2024
- QuickBooks Desktop 2024
- QuickBooks Desktop 2023
- QuickBooks Desktop Pro 2022
- QuickBooks Pro 2021
- AngularJS Crash Course
- Bootstrap Framework
- HTML/CSS Crash Course
- HTML5 Essentials
- Java for Beginners
- JavaScript for Beginners
- jQuery Crash Course
- MySQL for Beginners
- PHP for Beginners
- Advanced PHP Programming
- Matplotlib, Seaborn, and Plotly Python Libraries for Beginners
- Python Object-Oriented Programming
- Pandas for Beginners
- Introduction to Python
- SQL for Beginners
- SQL Server Integration Services for Beginners
- XML Crash Course
- Alteryx Advanced
- Introduction to Alteryx
- Introduction to Data Visualization and Business Intelligence Principles
- Analytical Methods for Effective Data Analysis
- Introduction to Analytics and Artificial Intelligence
- Data Analytics in Excel
- Financial Risk Management
- Financial Forecasting and Modeling
- Qlik Sense Advanced
- R Programming
- Tableau Desktop Advanced
- Tableau Desktop
- Advanced Agile Scrum
- Agile Scrum Training
- Using ChatGPT to Increase Accounting Productivity
- AI In Action: Transforming Financial Operations
- Using Generative AI for Images and Videos
- Generative AI and Cybersecurity
- Introduction to ChatGPT
- Introduction to Asana for Project Management
- Asana for Employees and Managers
- Introduction to Asana
- Effective Communication Tactics for the Modern Workplace
- Introduction to Confluence
- Introduction to Pipedrive
- HubSpot CRM for Beginners
- Google Slides for Beginners
- Introduction to Google Chrome
- Introduction to Google Calendar
- Introduction to Google Drive
- Gmail for Beginners and Pros
- Getting Started in Jira
- Getting Started in Monday.com
- Cybersecurity Essentials: Stay Safe and Secure Online
- Cybersecurity Awareness Essentials
- Introduction to Wrike for Project Management
- Excel Efficiency and Data Management
- Excel Advanced Features and Customization
- Mastering PivotTables
- Microsoft Suite Productivity

How to Create a Contents Page in Word
This Contents Page in Word tutorial is s uitable for users of Word 2010, 2013, 2016, 2019, and Word for Microsoft 365.
Objective
Create a Table of Contents for a Word document and update it to add new entries.
Table of Contents Explained
A Table of Contents page makes it easier for your readers to navigate and work with long documents. It gives documents a professional look and feel and helps you jump to a specific section quickly and easily.
A Table of Contents is usually inserted at the beginning of a document or just after a cover page. It can be modified to fit the overall style of the document and be updated easily with one click when new headings and paragraphs are added to the document.
The golden rule, when creating a contents page, is good preparation.
A Table of Contents relies on the document being formatted with heading styles in order to work correctly. Word scans the document and looks for anything marked with a heading style and pulls it through into the contents page. You can choose how many heading levels you would like to include.
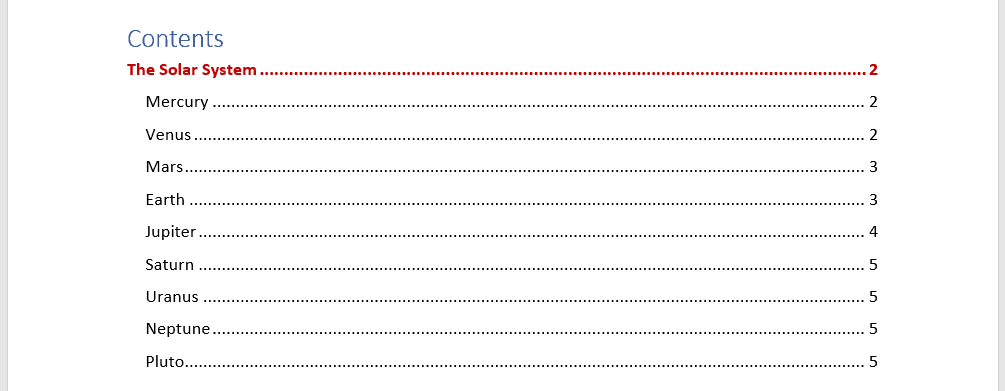
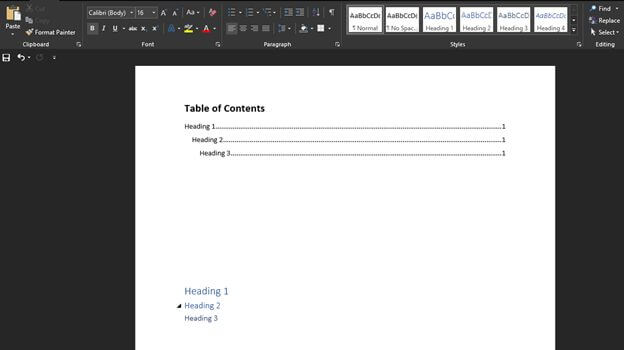
In this screenshot, I have pulled through 3 levels of heading.
Method
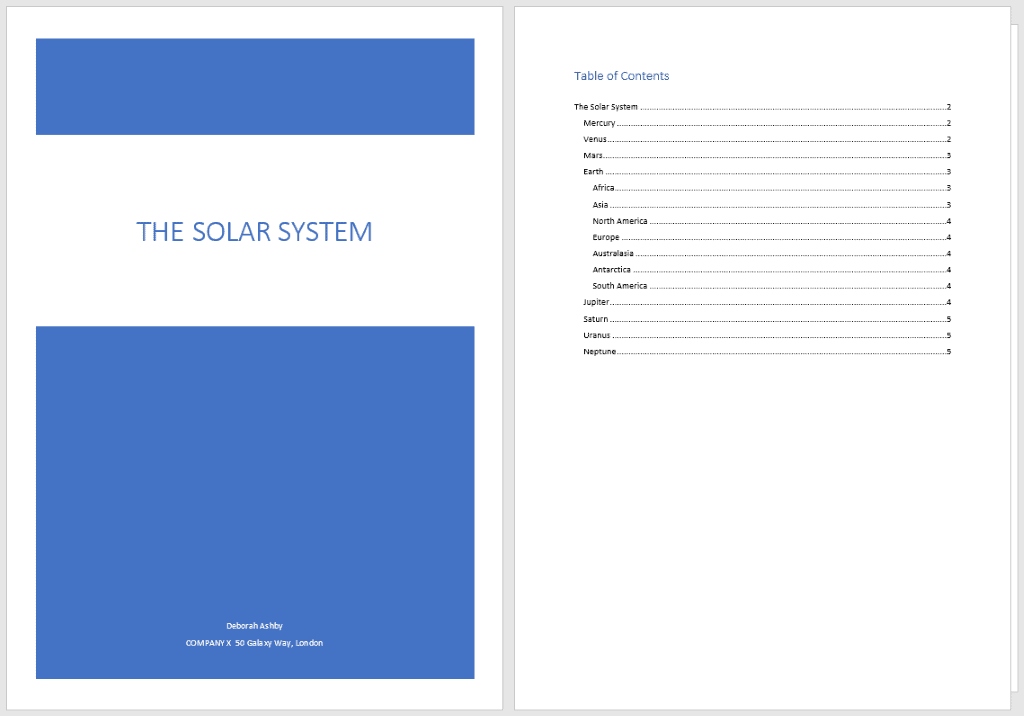
In this example, I am going to go through the process of creating, modifying, and updating a Table of Contents in Word for a document titled ‘ The Solar System’ .
Prepare the Word document
In order to successfully insert a Table of Contents page, you must first set-up the document correctly by using Word styles to denote headings.
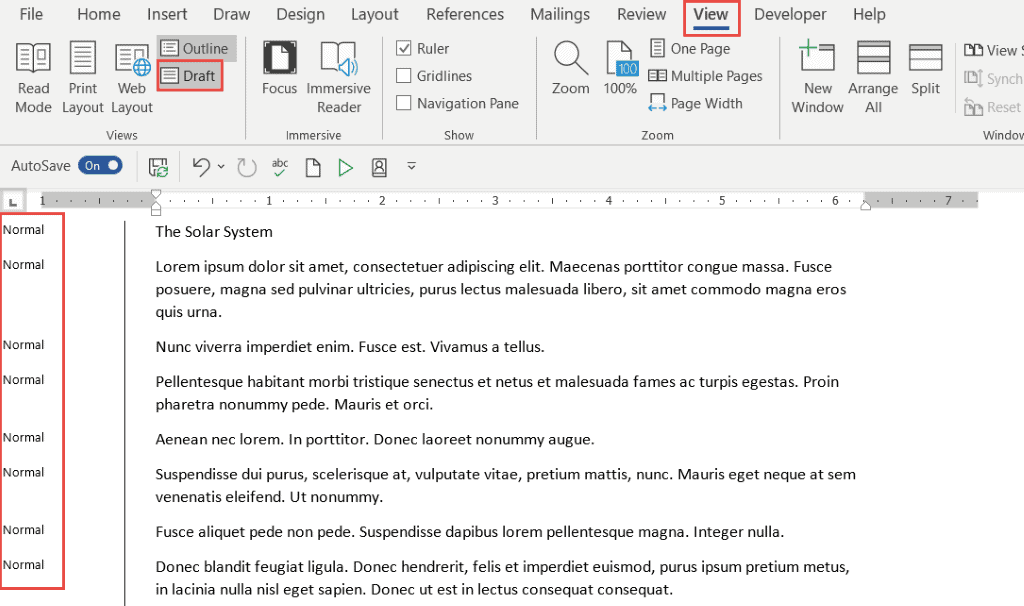
Switching to Draft View
You may find it easier to view your document in draft mode when working with styles, as it makes it easy to see which headings you’ve applied to which items.
- Click the View tab
- Click Draft
The style currently applied to each paragraph will display on the left-hand side of the document. Normal denotes no style has been applied.
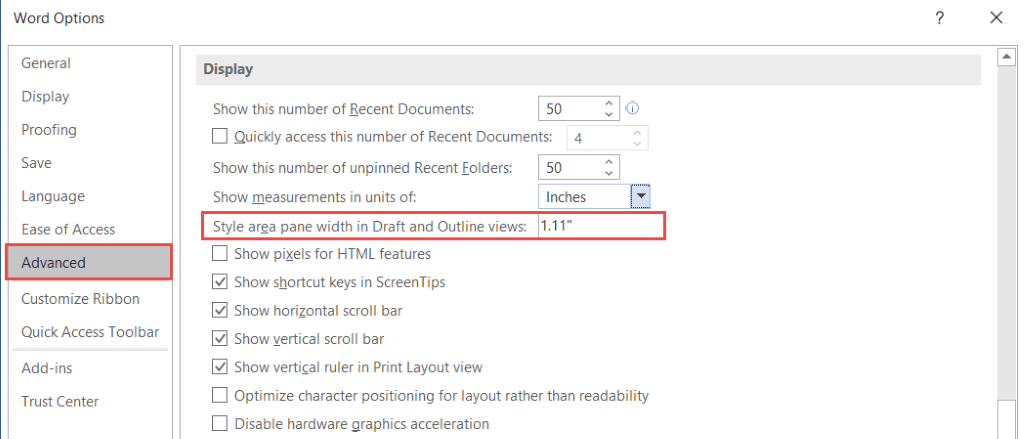
NOTE : When you switch to Draft view, if you do not see the style pane on the left-hand side, you will need to go into Word Options and turn it on.
- Click the File tab
- Click Options
- Click the Advanced tab
- Scroll down the Display section
If you cannot see the styles pane, it will say 0 inches. Set this to 1 – 2 inches and click OK .
Apply heading styles to the document
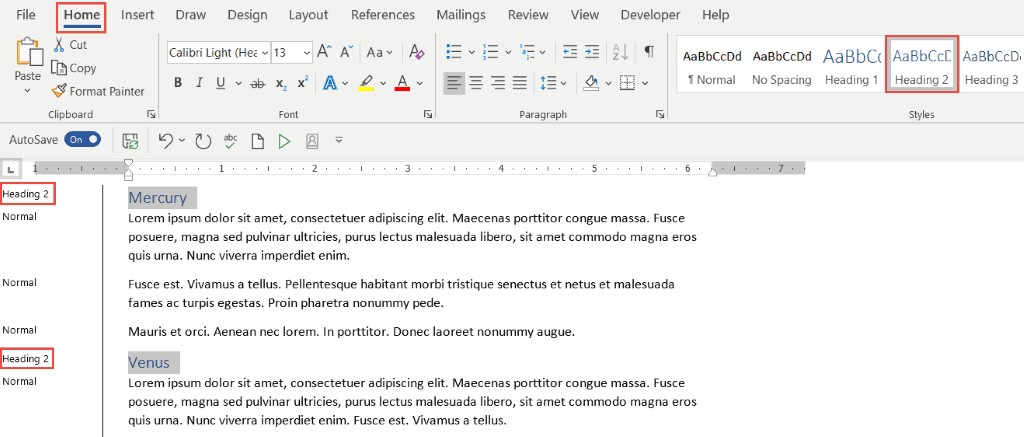
- Select the first main heading in your document
- Click the Home tab
- In the Styles group, click Heading 1
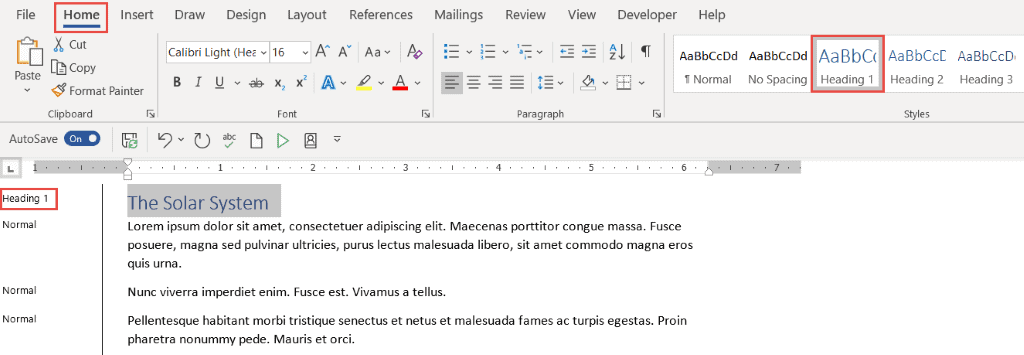
Scroll through the document and apply a Heading 1 style to all top-level headings
- Select the second-level headings in your document
- In the Styles group, click Heading 2
Apply a Heading 2 to all second-level headings in the document. You can hold down the CTRL key to select multiple headings at the same time.
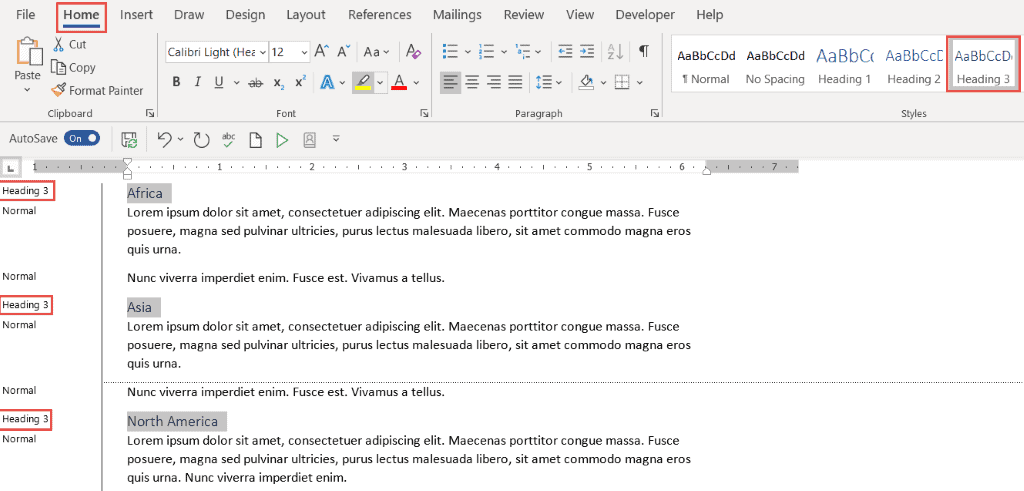
Repeat this process for any other headings in the document. In this example, I have three levels of heading in my document.
Once the document is styled and organized correctly, it becomes easy to insert a Table of Contents.
Insert the Contents Page
A contents page is normally inserted at the beginning of the document.
- Scroll to the top of the document and position the cursor before the first letter of the first word in the document
- Press CTRL+Enter to insert a page break
- Click the References tab
- Click Table of Contents
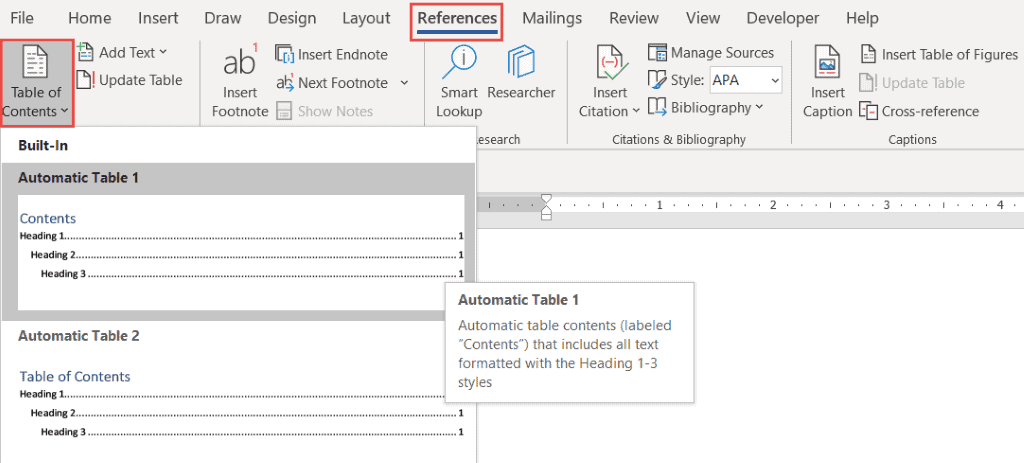
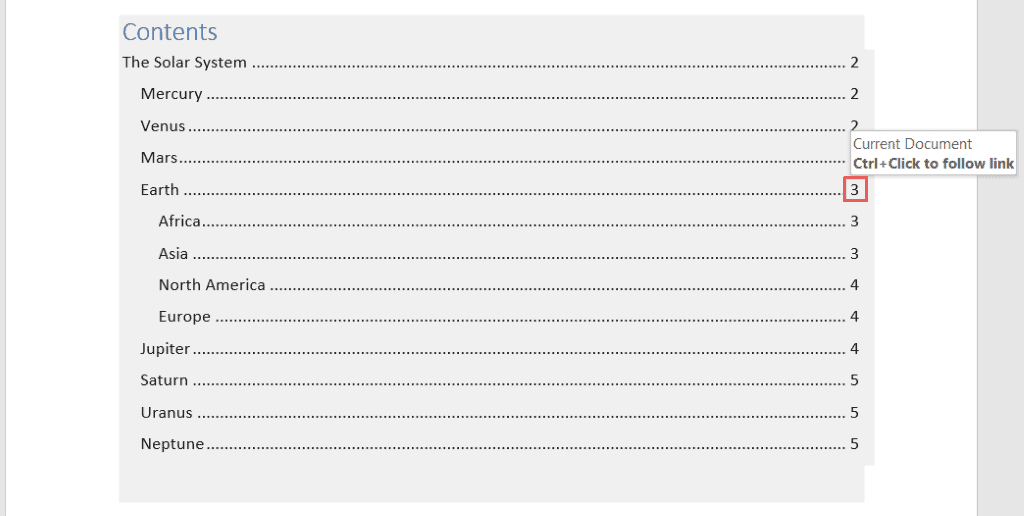
Word makes it simple to quickly add a Table of Contents by providing a small selection of in-built tables. In this example, I have selected Automatic Table 1 .
Hold down the CTRL key and click on a page number to jump to that page.
Modify a Table of Contents
You can make changes to the Table of Contents and format it as you please.
- Click on the Table of Contents to select it
- Click on the References tab
- Click Custom Table of Contents
Tab leaders and levels
Tab leaders
Tab leaders are the dots you see between the heading and the page number in the Table of Contents. You can change these to solid lines or dashes.
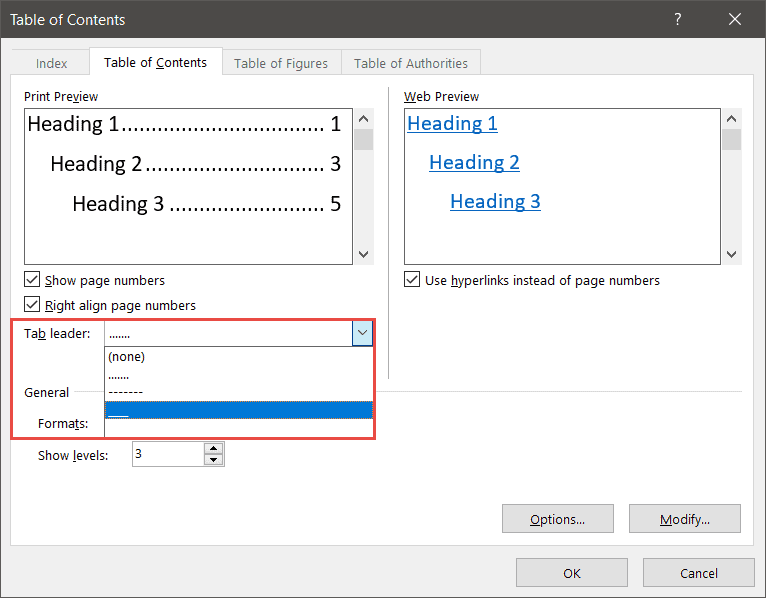
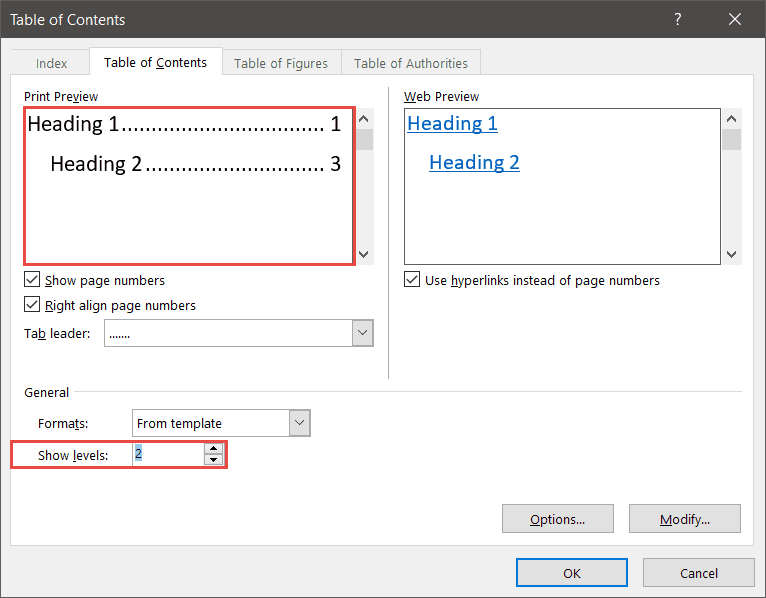
Show levels
You can also specify how many levels of heading you want to show in the Table of Contents. For example, you might have four levels of heading in the document, but you only want to show two levels in the Table of Contents.
- Click OK
If you make a change to the Table of Contents, Word will ask if you would like to replace the current Table of Contents.
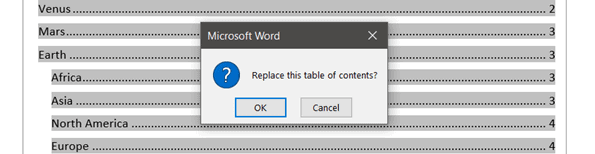
- Click OK to replace
Updating a Table of Contents
It’s rare for a document to stay the same forever. New paragraphs might be added either at the end of the document or somewhere within it. With each new addition, headings are pushed on to new pages, and the new items need to be added to the Table of Contents.
Fortunately, it’s very easy to update a Table of Contents in Word.
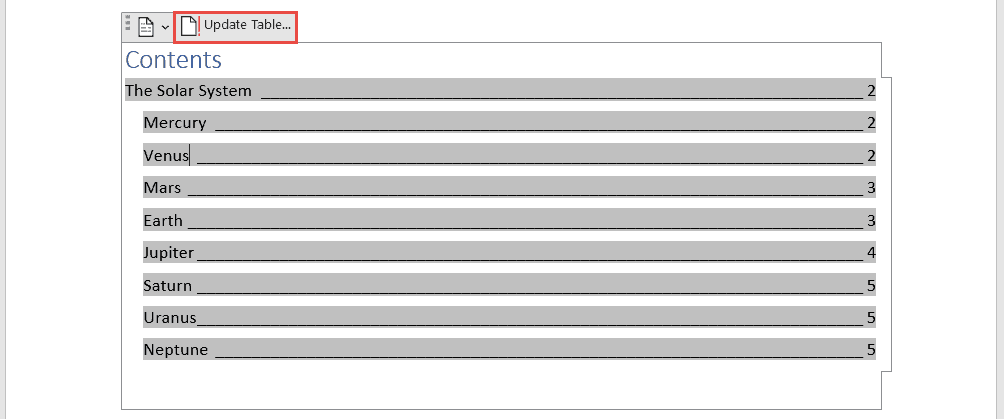
In this example, I’ve added a paragraph for ‘Pluto’ at the end of the document. I’ve formatted it with a heading 2 style.

I now need to update my Table of Contents to include the additional heading.
- Click the Update Table button
Word will ask if you want to update the pages numbers only or the entire table.
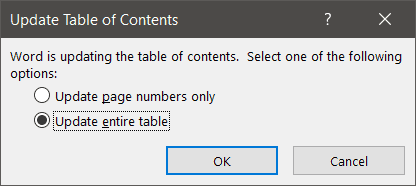
If you have reorganized your document and moved headings on to different pages but not added any new headings, you could select ‘ Update page numbers only.’ For everything else, select ‘Update entire table.’
Custom Table of Contents
You can customize the look and feel of your Table of Contents by modifying the formatting. For example, you might decide that you want all level 2 headings to display in a bold, red font.
- Click Modify
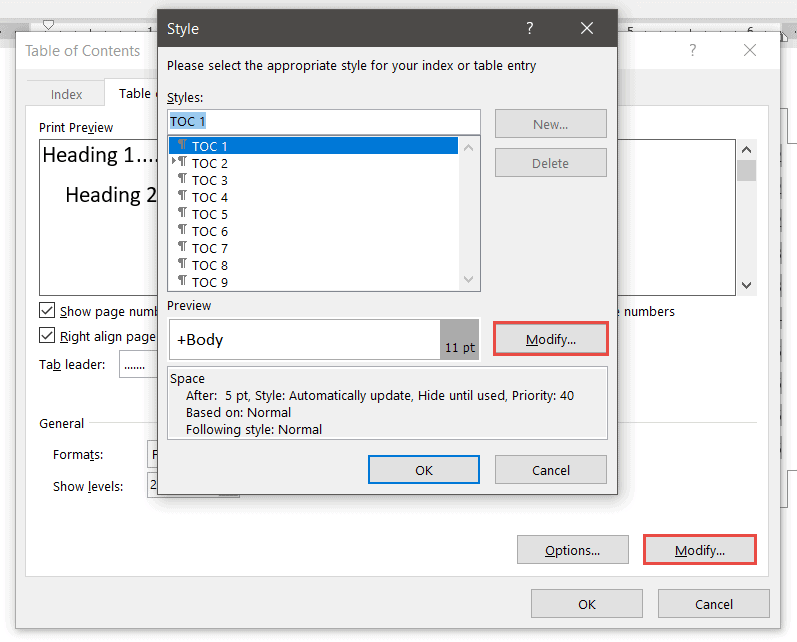
Modifying ‘TOC 1’ will affect all level 1 headings. Modifying ‘TOC 2’ will affect all level 2 headings and so on.
- Select TOC 1
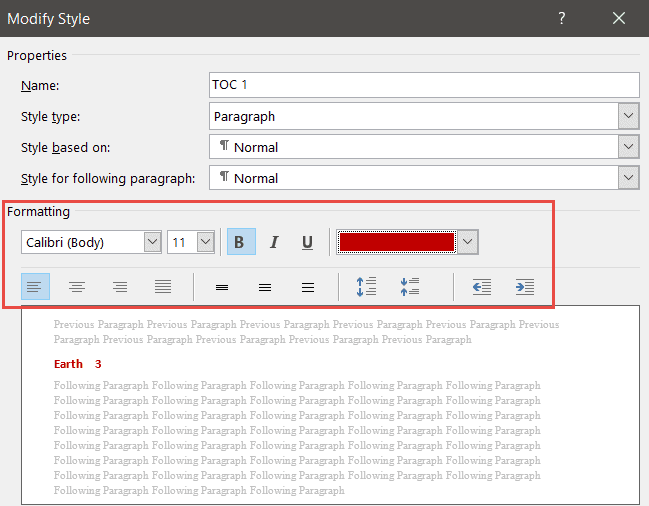
- Make the desired formatting changes
Video Tutorial
To see a demo of how to create a Contents Page in Word, please watch the following video tutorial.
How to create a Contents Page in Word Video (15:09)
For more Free Microsoft Office tutorials from Simon Sez IT. Take a look at our MS Office Resource Center .
To learn Word with Simon Sez IT. Take a look at the Word courses we have available.
Deborah Ashby

Deborah Ashby is a TAP Accredited IT Trainer, specializing in the design, delivery, and facilitation of Microsoft courses both online and in the classroom.She has over 11 years of IT Training Experience and 24 years in the IT Industry. To date, she's trained over 10,000 people in the UK and overseas at companies such as HMRC, the Metropolitan Police, Parliament, SKY, Microsoft, Kew Gardens, Norton Rose Fulbright LLP.She's a qualified MOS Master for 2010, 2013, and 2016 editions of Microsoft Office and is COLF and TAP Accredited and a member of The British Learning Institute.
Similar Posts
How to Apply Multiple Animations in PowerPoint
Using the Layout Tab for Excel 2010 Charts and Graphs – Part 2
Excel INDIRECT Function—The Best Guide with 5 Examples
How to Print Gridlines in Excel?
How to Customize QuickBooks 2019 Forms – Part 1
Scrum Project Management – What You Should Know in 2022
- Privacy Policy

ADVANCE YOUR CAREER
Gain instant access to 200+ courses. Earn a CERTIFICATE each time you complete a course.
- Change margins Article
- Create newsletter columns Article
- Change page orientation to landscape or portrait Article
- Add a border to a page Article
- Insert a header or footer Article
- Insert page numbers Article
- Insert a page break Article
- Insert a table of contents Article

Insert a table of contents
A table of contents in Word is based on the headings in your document.

Create the table of contents
Put your cursor where you want to add the table of contents.
Go to References > Table of Contents . and choose an automatic style.

If you make changes to your document that affect the table of contents, update the table of contents by right-clicking the table of contents and choosing Update Field .
To update your table of contents manually, see Update a table of contents .
If you have missing entries
Missing entries often happen because headings aren't formatted as headings.
For each heading that you want in the table of contents, select the heading text.
Go to Home > Styles , and then choose Heading 1 .

Update your table of contents.
Word uses the headings in your document to build an automatic table of contents that can be updated when you change the heading text, sequence, or level.
Click where you want to insert the table of contents – usually near the beginning of a document.
Click References > Table of Contents and then choose an Automatic Table of Contents style from the list.
Note: If you use a Manual Table of Contents style, Word won't use your headings to create a table of contents and won't be able to update it automatically. Instead, Word will use placeholder text to create the look of a table of contents so you can manually type each entry into the table of contents. To update your manual table of contents, see Update a table of contents .

If you want to Format or customize your table of contents , you can. For example, you can change the font, the number of heading levels, and whether to show dotted lines between entries and page numbers.
Click where you want to insert the table of contents—usually near the beginning of the document.
On the toolbar ribbon, select References .
Near the left end, select Insert Table of Contents . (Or select Table of Contents > Insert Table of Contents .
The table of contents is inserted, showing the headings and page numbering in your document.
If you make changes to your document that affect the table of contents, you can update it by right-clicking the table and selecting Update Table of Contents .
Get the learning guide
For a hands-on guide that steps you through the process of creating a table of contents, download our Table of Contents tutorial . Or, in desktop Word, go to File > New , and search for table of contents .
Update a table of contents

Need more help?
Want more options.
Explore subscription benefits, browse training courses, learn how to secure your device, and more.

Microsoft 365 subscription benefits

Microsoft 365 training

Microsoft security

Accessibility center
Communities help you ask and answer questions, give feedback, and hear from experts with rich knowledge.

Ask the Microsoft Community

Microsoft Tech Community

Windows Insiders
Microsoft 365 Insiders
Was this information helpful?
Thank you for your feedback.
We use cookies to ensure we give you the best experience of our website. By browsing this site you accept we use cookies to improve and personalise our services and marketing. Read our privacy statement for more about what we do with your data, as well as your rights and choices.
- Studying by distance learning
- Get prepared for study
- How much time will you need?
- About our qualifications
- How to decide what to study
- How we'll support your studies
- Online tools and resources
- Te tautoko i te angitū o ngā ākonga Māori - Supporting Māori learner success
- Pasifika learner support
- Disability and Access Services
- Access to local campus services
- Fees free study
- Paying your fees
- Student loans
- Scholarships, awards and financial assistance
- Learner stories
- Choose courses
- How to apply to enrol
- Course start, end and withdrawal dates
- Recognising previous study and experience
- English language entry requirements
- Providing proof of your identity
- Terms and conditions of enrolment
- Fees and funding
- Changes to your enrolment
- International and studying from overseas
- Changes to benefit Open Polytechnic learners
- Student Advisory Group
- Disclaimer and copyright statement
- Notice of meetings
- Jobs at Open Polytechnic
- Who are our learners?
- Our Māori learners
- Our Pasifika learners
- Media Contact
- Publications
- First Impressions Survey
- Academic research
- Hei whaiwhakaaro i mua i tō ako - Some things to think about before you study
- Te whakatau he aha hei ako māu - Deciding what to study
- Whakawhiwhinga ākonga Māori - Scholarships and awards for ākonga Māori
- Message from Pule Ma’ata - Pasifika
- Meet our kaimahi Pasifika
- Pasifika success
- Scholarships for Pasifika
- Getting started with online learning
- Course and study support
- Supporting Māori learner success
- Meet some of our learners
- Dyslexia and the Dyslexia-Friendly Quality Mark
- Library & Learning Centre
- Mental health support
- Using iQualify
- MyOP learner portal and app download
- Accessing your learner email and free online Microsoft software
- Assistive technology tools
- Helperbird free assistive technology tool
- eduroam free Wi-Fi
- How to re-enrol
- Withdrawing from your course
- Withdrawals and course transfers
- Learner forms
- Get your student ID card
- Get started
- Make a plan
- Set study goals
- Reading skills
- Active learning
- Taking notes
- Mind mapping
- Researching
- Evaluating information
- Critical thinking for reading and research
- Step-by-step guide to tackling assessments
- Assessment types
- Plan your assessment
- Understand your assessment task
- Writing skills
Formatting and presenting assessments
- Assessments information
- Get help with academic writing and research skills
- Referencing and plagiarism
- How to reference
- Preparing for exams
- Types of exam questions
- Planning your time for an exam
- Information for sitting exams
- Research ethics for doing research projects
- How your work will be assessed
- How to submit your assessment for marking
- Submitting your work in te reo Māori
- How to request an assessment extension
- Special Consideration for in-course assessments
- Grading scales
- Academic Integrity
- Assessment writing
- Referencing
- Word limits and word count guidelines
- Using AI - Artificial Intelligence services
- Exam dates and venue information
- Exam admittance information and permitted materials
- Information for exam day
- Sitting exams from overseas
- Getting assistance with exams
- Exam reconsiderations, resits and the return of exam papers
- Aegrotat consideration
- Getting your final results
- Te whare tapa whā
- The Fonofale model of health
- Taha tinana – physical wellbeing
- Taha hinengaro – mental wellbeing
- Taha whānau – family, community and social wellbeing
- Taha wairua – spiritual wellbeing
- Free mental health support
- Rainbow learner support
- Applying to graduate
- Attending a graduation ceremony
- Academic transcripts
- Graduation Live Stream
- Tertiary and International Learners Code of Practice
- Complaints and concerns
- Learning Engine LMS
- CPD and training services
- Digital design, video, animation and software development
- Instructional design
- Content licensing
- Digital design, video and animation
Formatting and presenting your assessments correctly is important because many include marks for presentation.
This may include marks for things such as:
- formatting and layout
- APA referencing
- writing style
- grammar and spelling.
Before you start on your assessment:
- check your assessment question, emails from your course leader, and learning materials for how it should be presented
- read the instructions carefully. Make sure you understand them and follow them exactly
- if you're not sure about what’s required contact your course leader.
Please note that assessments for psychology courses have specific requirements for formatting and presentation. Refer to the information and guidance provided on our Library and Learning Centre website:
APA Style for Psychology assessments
General guidelines for electronic submissions
- Most assessments should be produced using Microsoft Word.
- You can also submit assessments using: .doc, .docx, .xls, .xlsx or .rtf.
- if you don’t have Microsoft Word go to My Open Polytechnic to download and access your free version
- if you're not sure about the file type required, contact your course leader.
- Use a clear, readable font, such as Verdana, Calibri, Tahoma or Arial and use the same font throughout.
- Use black text on a white background.
- Avoid coloured backgrounds or text in a colour other than black, unless you have special permission to use them.
- Use 11 or 12 point font for the body of your assessment.
- Use 1.5 spacing and 2.53 cm (1”) wide margins.
- Leave a blank line between paragraphs.
- If the questions are short, leave a blank line between each question. If they are long, start each question on a new page.
- Left-justify your work (also known as left-aligned).
- Use bold for headings.
- Essays don’t usually need subheadings; reports usually do.
Most assessments need a title page, which should include:
- the title and number of the assessment
- the course number and name
- the due date
- your full name and student number.
Centre this information on the page, starting approximately one-third of the way down the page.
- Number and clearly label figures and tables.
- Add numbers as follows: Figure 1, Figure 2, Table 1, Table 2, and so on.
- Put table and figure captions above the table.
- Don't number the items in a reference list.
For more help with figures and tables, check:
Get more help with tables and figures – APA Style website
Headers and footers
Insert a header or footer on each page (except the title page). It should contain:
- your name (last name, first name/s)
- your student number
- the course code
- the assessment number
- page numbers.
Reference list
The reference list comes at the end of the assessment and should start on a new page labelled 'References'.
Need more help with reference lists? Check out the guides below:
Quick referencing APA guidelines (PDF 47 KB; opens in a new window)
Guide to APA referencing (PDF 395.11 KB; opens in a new window)
Appendices are used for information that:
- is too long to include in the body of your assessment
- supplements or complements the information you are providing.
Start each appendix (if applicable) on a new page. If there's just one appendix label it ‘Appendix’ without a number. If there is more than one, label them Appendix A, Appendix B, and so on.
In the main text of your assessment, refer to the Appendix by the label – for example, Appendix A.
Tops and bottoms of pages
Check the top and bottom of your pages to ensure they avoid:
- widows – single lines of text at the top of a page
- orphans – first lines of paragraphs at the bottom of a page
- tombstones – headings or subheadings alone at the bottom of a page
- split lists – lists that are divided between two pages (if possible).
General guidelines for hard copies
Most of the guidelines above also apply to hard copies (printed or handwritten documents).
If your course requires or allows handwritten assessments, be sure to follow the course instructions on presenting handwritten assessments.
Word limits and word count guidelines
Word limits support the development of concise writing skills. Word count guidelines help you to understand the expectation of workload for an assessment.
For more detailed information about these go to:
Word limits and word count guidelines
Got a question?
If you want to talk with someone about formatting and presenting your assessments, contact The Library and Learning Centre | Te Whare Pukapuka Wāhanga Whakapakari Ako.
Contact the Library and Learning Centre
A step-by-step guide for creating and formatting APA Style student papers
The start of the semester is the perfect time to learn how to create and format APA Style student papers. This article walks through the formatting steps needed to create an APA Style student paper, starting with a basic setup that applies to the entire paper (margins, font, line spacing, paragraph alignment and indentation, and page headers). It then covers formatting for the major sections of a student paper: the title page, the text, tables and figures, and the reference list. Finally, it concludes by describing how to organize student papers and ways to improve their quality and presentation.
The guidelines for student paper setup are described and shown using annotated diagrams in the Student Paper Setup Guide (PDF, 3.40MB) and the A Step-by-Step Guide to APA Style Student Papers webinar . Chapter 1 of the Concise Guide to APA Style and Chapter 2 of the Publication Manual of the American Psychological Association describe the elements, format, and organization for student papers. Tables and figures are covered in Chapter 7 of both books. Information on paper format and tables and figures and a full sample student paper are also available on the APA Style website.
Basic setup
The guidelines for basic setup apply to the entire paper. Perform these steps when you first open your document, and then you do not have to worry about them again while writing your paper. Because these are general aspects of paper formatting, they apply to all APA Style papers, student or professional. Students should always check with their assigning instructor or institution for specific guidelines for their papers, which may be different than or in addition to APA Style guidelines.
Seventh edition APA Style was designed with modern word-processing programs in mind. Most default settings in programs such as Academic Writer, Microsoft Word, and Google Docs already comply with APA Style. This means that, for most paper elements, you do not have to make any changes to the default settings of your word-processing program. However, you may need to make a few adjustments before you begin writing.
Use 1-in. margins on all sides of the page (top, bottom, left, and right). This is usually how papers are automatically set.
Use a legible font. The default font of your word-processing program is acceptable. Many sans serif and serif fonts can be used in APA Style, including 11-point Calibri, 11-point Arial, 12-point Times New Roman, and 11-point Georgia. You can also use other fonts described on the font page of the website.
Line spacing
Double-space the entire paper including the title page, block quotations, and the reference list. This is something you usually must set using the paragraph function of your word-processing program. But once you do, you will not have to change the spacing for the entirety of your paper–just double-space everything. Do not add blank lines before or after headings. Do not add extra spacing between paragraphs. For paper sections with different line spacing, see the line spacing page.
Paragraph alignment and indentation
Align all paragraphs of text in the body of your paper to the left margin. Leave the right margin ragged. Do not use full justification. Indent the first line of every paragraph of text 0.5-in. using the tab key or the paragraph-formatting function of your word-processing program. For paper sections with different alignment and indentation, see the paragraph alignment and indentation page.
Page numbers
Put a page number in the top right of every page header , including the title page, starting with page number 1. Use the automatic page-numbering function of your word-processing program to insert the page number in the top right corner; do not type the page numbers manually. The page number is the same font and font size as the text of your paper. Student papers do not require a running head on any page, unless specifically requested by the instructor.
Title page setup
Title page elements.
APA Style has two title page formats: student and professional (for details, see title page setup ). Unless instructed otherwise, students should use the student title page format and include the following elements, in the order listed, on the title page:
- Paper title.
- Name of each author (also known as the byline).
- Affiliation for each author.
- Course number and name.
- Instructor name.
- Assignment due date.
- Page number 1 in the top right corner of the page header.
The format for the byline depends on whether the paper has one author, two authors, or three or more authors.
- When the paper has one author, write the name on its own line (e.g., Jasmine C. Hernandez).
- When the paper has two authors, write the names on the same line and separate them with the word “and” (e.g., Upton J. Wang and Natalia Dominguez).
- When the paper has three or more authors, separate the names with commas and include “and” before the final author’s name (e.g., Malia Mohamed, Jaylen T. Brown, and Nia L. Ball).
Students have an academic affiliation, which identities where they studied when the paper was written. Because students working together on a paper are usually in the same class, they will have one shared affiliation. The affiliation consists of the name of the department and the name of the college or university, separated by a comma (e.g., Department of Psychology, George Mason University). The department is that of the course to which the paper is being submitted, which may be different than the department of the student’s major. Do not include the location unless it is part of the institution’s name.
Write the course number and name and the instructor name as shown on institutional materials (e.g., the syllabus). The course number and name are often separated by a colon (e.g., PST-4510: History and Systems Psychology). Write the assignment due date in the month, date, and year format used in your country (e.g., Sept. 10, 2020).
Title page line spacing
Double-space the whole title page. Place the paper title three or four lines down from the top of the page. Add an extra double-spaced blank like between the paper title and the byline. Then, list the other title page elements on separate lines, without extra lines in between.
Title page alignment
Center all title page elements (except the right-aligned page number in the header).
Title page font
Write the title page using the same font and font size as the rest of your paper. Bold the paper title. Use standard font (i.e., no bold, no italics) for all other title page elements.
Text elements
Repeat the paper title at the top of the first page of text. Begin the paper with an introduction to provide background on the topic, cite related studies, and contextualize the paper. Use descriptive headings to identify other sections as needed (e.g., Method, Results, Discussion for quantitative research papers). Sections and headings vary depending on the paper type and its complexity. Text can include tables and figures, block quotations, headings, and footnotes.
Text line spacing
Double-space all text, including headings and section labels, paragraphs of text, and block quotations.
Text alignment
Center the paper title on the first line of the text. Indent the first line of all paragraphs 0.5-in.
Left-align the text. Leave the right margin ragged.
Block quotation alignment
Indent the whole block quotation 0.5-in. from the left margin. Double-space the block quotation, the same as other body text. Find more information on the quotations page.
Use the same font throughout the entire paper. Write body text in standard (nonbold, nonitalic) font. Bold only headings and section labels. Use italics sparingly, for instance, to highlight a key term on first use (for more information, see the italics page).
Headings format
For detailed guidance on formatting headings, including headings in the introduction of a paper, see the headings page and the headings in sample papers .
- Alignment: Center Level 1 headings. Left-align Level 2 and Level 3 headings. Indent Level 4 and Level 5 headings like a regular paragraph.
- Font: Boldface all headings. Also italicize Level 3 and Level 5 headings. Create heading styles using your word-processing program (built into AcademicWriter, available for Word via the sample papers on the APA Style website).
Tables and figures setup
Tables and figures are only included in student papers if needed for the assignment. Tables and figures share the same elements and layout. See the website for sample tables and sample figures .
Table elements
Tables include the following four elements:
- Body (rows and columns)
- Note (optional if needed to explain elements in the table)
Figure elements
Figures include the following four elements:
- Image (chart, graph, etc.)
- Note (optional if needed to explain elements in the figure)
Table line spacing
Double-space the table number and title. Single-, 1.5-, or double-space the table body (adjust as needed for readability). Double-space the table note.
Figure line spacing
Double-space the figure number and title. The default settings for spacing in figure images is usually acceptable (but adjust the spacing as needed for readability). Double-space the figure note.
Table alignment
Left-align the table number and title. Center column headings. Left-align the table itself and left-align the leftmost (stub) column. Center data in the table body if it is short or left-align the data if it is long. Left-align the table note.
Figure alignment
Left-align the figure number and title. Left-align the whole figure image. The default alignment of the program in which you created your figure is usually acceptable for axis titles and data labels. Left-align the figure note.
Bold the table number. Italicize the table title. Use the same font and font size in the table body as the text of your paper. Italicize the word “Note” at the start of the table note. Write the note in the same font and font size as the text of your paper.
Figure font
Bold the figure number. Italicize the figure title. Use a sans serif font (e.g., Calibri, Arial) in the figure image in a size between 8 to 14 points. Italicize the word “Note” at the start of the figure note. Write the note in the same font and font size as the text of your paper.
Placement of tables and figures
There are two options for the placement of tables and figures in an APA Style paper. The first option is to place all tables and figures on separate pages after the reference list. The second option is to embed each table and figure within the text after its first callout. This guide describes options for the placement of tables and figures embedded in the text. If your instructor requires tables and figures to be placed at the end of the paper, see the table and figure guidelines and the sample professional paper .
Call out (mention) the table or figure in the text before embedding it (e.g., write “see Figure 1” or “Table 1 presents”). You can place the table or figure after the callout either at the bottom of the page, at the top of the next page, or by itself on the next page. Avoid placing tables and figures in the middle of the page.
Embedding at the bottom of the page
Include a callout to the table or figure in the text before that table or figure. Add a blank double-spaced line between the text and the table or figure at the bottom of the page.
Embedding at the top of the page
Include a callout to the table in the text on the previous page before that table or figure. The table or figure then appears at the top of the next page. Add a blank double-spaced line between the end of the table or figure and the text that follows.
Embedding on its own page
Embed long tables or large figures on their own page if needed. The text continues on the next page.
Reference list setup
Reference list elements.
The reference list consists of the “References” section label and the alphabetical list of references. View reference examples on the APA Style website. Consult Chapter 10 in both the Concise Guide and Publication Manual for even more examples.
Reference list line spacing
Start the reference list at the top of a new page after the text. Double-space the entire reference list (both within and between entries).
Reference list alignment
Center the “References” label. Apply a hanging indent of 0.5-in. to all reference list entries. Create the hanging indent using your word-processing program; do not manually hit the enter and tab keys.
Reference list font
Bold the “References” label at the top of the first page of references. Use italics within reference list entries on either the title (e.g., webpages, books, reports) or on the source (e.g., journal articles, edited book chapters).
Final checks
Check page order.
- Start each section on a new page.
- Arrange pages in the following order:
- Title page (page 1).
- Text (starts on page 2).
- Reference list (starts on a new page after the text).
Check headings
- Check that headings accurately reflect the content in each section.
- Start each main section with a Level 1 heading.
- Use Level 2 headings for subsections of the introduction.
- Use the same level of heading for sections of equal importance.
- Avoid having only one subsection within a section (have two or more, or none).
Check assignment instructions
- Remember that instructors’ guidelines supersede APA Style.
- Students should check their assignment guidelines or rubric for specific content to include in their papers and to make sure they are meeting assignment requirements.
Tips for better writing
- Ask for feedback on your paper from a classmate, writing center tutor, or instructor.
- Budget time to implement suggestions.
- Use spell-check and grammar-check to identify potential errors, and then manually check those flagged.
- Proofread the paper by reading it slowly and carefully aloud to yourself.
- Consult your university writing center if you need extra help.
About the author

Undergraduate student resources
How To Make A Cover Page For An Assignment? An Ultimate Guide
Link Copied
Share on Facebook
Share on Twitter
Share on LinkedIn

Level Up Your Assignment Game!
What if you made a shiny assignment but forgot to make the cover page? Remember that first impression in 'The Devil Wears Prada'? Well, your cover page for an assignment deserves a standing ovation, not a silent groan from your teacher. But don't worry! Here's an ultimate guide on how to make a cover page for an assignment that will transform your cover page from 'blah' to 'wow' in no time!
What is a Cover Page in an Assignment?
The cover page, your essay's first impression, sets the stage for professionalism. It's where your name, course details, and due date greet your instructor. Though not always obligatory, a polished presentation of the first page of an assignment can earn you favour. Following a good format for an assignment cover page for a university leads to higher scores, making it a smart academic move.
Why is a Cover Page Important?
As students, we all know the adage - you never get a second chance to make a first impression. That's where the cover page comes in - it's the gatekeeper to your assignment , and trust us, you don't want to drop the ball here. Mess it up, and your professor might write you off before they even start reading. But nail it? Well, that's like hitting a home run before you've even stepped up to the plate.
If you are thinking about how to make a cover page for an assignment, a well-formatted, error-free cover page is the key to unlocking your instructor's curiosity. Following the institution's template is just the cherry on top, showing you're a team player who respects the rules of the game.
How to Make a Cover Page for an Assignment?
When it comes to the question of how to make an assignment front page, the goal is clear! The cover page is our chance to grab the professor's attention right off the bat. Why settle for a drab intro when you can learn all about how to design the front page of an assignment? Let's dive into the essential elements of the cover page.

1. Running Header
A running header goes on top of the first page of an assignment, separate from the main text. It's often used for APA style. Keep it short, 50 characters max, all uppercase.
Next is the title, explaining your work's content. Write it in the title case, capitalising most words. Avoid abbreviations and aim for 15-20 words. Centre the fully written title on the cover page.
3. Institution/ University Name
Your university or institution name belongs on the cover page for an assignment, too. Different from the title, it shows readers where you're from and did the research . For reports or presentations , include your workplace or college .
4. Student’s Name and ID
How to make a cover page for an assignment look credible? The answer is to Clearly state the author(s), name(s), and id(s) on the cover page. Include affiliations for multiple authors. For group projects, list all students' names and universities before the title. It ensures proper author credit.
Including the date on your cover page tells readers when you finished the work. Use the exact publication date. It also helps for future reference if someone needs to find work within a certain timeframe.
6. Instructor’s Information
Providing your instructor's details, such as name, designation, and department, shows you completed the work for their specific class. It ensures the assignment reaches the right person and department, avoiding any confusion.
7. Numbering the Pages Ensure that all pages of your assignment are numbered. It is typically done in the header or footer of each page, starting from the front page of an assignment as page 1 . Consistent page numbering helps maintain organisation and easy navigation of the document.
8. Bibliography A bibliography is a crucial part of any academic assignment, listing all the sources you referenced. It should be placed at the end of your assignment and formatted according to the required citation style (APA, MLA, Chicago, etc.). On the cover page, you can include a note indicating that a bibliography is included.
Make your assignment's cover page in peace with amber's comfortable housing!
Book through amber today!
How to Make A Front Page of an Assignment: APA Format
The APA (American Psychological Association) format heavily emphasises the cover page details. To know how to make a cover page for an assignment in an APA format, follow these specific guidelines.

1. Page Number Placement: Start by placing the page number in the upper-right corner, always as 1, aligning it with the one-inch margin. It will be part of your running head, a feature in APA format, but for student papers, it's just the page number.
2. Title Placement: Move down three or four lines (double-spaced) from the top and centre of the title page of an assignment. Make it bold and use proper capitalisation rules for titles.
3. Author's Name: After the title, leave an empty line, then write your name. Keep it simple without any special formatting. If there are multiple authors, separate their names with commas and use "and" before the last author's name.
4. Department and School: Below your name, write your department or division, followed by your school's name, separated by a comma.
5. Course Information: Include the course name and its numeric code directly below your school's name.
6. Instructor's Name: Under the course information, write your instructor's full name, including any titles like ' Dr. '
7. Date: Finally, on the last line, write the date. Spell out the month for clarity.
How to Create a Cover Page for an Assignment: MLA Format
In MLA (Modern Language Association) style, you usually don't need a cover page for an assignment; instead, you list essential details at the start of the first page. If you are wondering how to make an assignment front page in MLA style, here are the instructions.

1. Student’s Name: Begin with the first student’s name on the top-left corner of the page, double-spaced.
2. Additional Authors: If there are more authors, list each on a separate line following the first student’s name.
3. Instructor’s Name: Below, the last author’s name, including the instructor’s title, like “Professor Willow,” on a new line.
4. Course Details: Write the course name along with its numeric code on the next line.
5. Date: Following the course details, write the date in full, avoiding abbreviations for months. You can use either day-month-year or month-day-year format.
6. Title of the Paper: The most crucial part of the tip on how to make the title page of an assignment. Centre the title four or five lines below the date, maintaining double spacing. Remember to capitalise the title according to standard rules, avoiding bold or italics.
How to Design Cover Page for Assignment: CMS Format
CMS (Chicago Manual of Style), a citation method for acknowledging sources in academic papers, grants ownership rights to authors, preventing plagiarism and aiding readers in locating sources. However, mastering one style isn't sufficient due to varying rules.

1. Margins: Leave one-inch margins on all sides of your cover page to give it a neat look and provide space for your text.
2. Font: Stick to Times or Times New Roman font in 12 pt size for a professional appearance that's easy to read.
3. Spacing: Double-space the text on your cover page to make it clear and readable.
4. Text Alignment: Align your text to the left to create a clean, organised appearance, avoiding fully justified text.
5. Indentation: For a structured layout, start paragraphs, block quotes, and bibliography entries with a 1/2" indent.
6. Page Numbers: Number your pages in the top right corner, excluding the cover page. Include your last name to avoid confusion if pages get mixed up.
7. Two-Sided Printing: Confirm with your teacher if you can print on both sides of the paper for eco-friendly printing.
8. Title: Centre the title of your paper halfway down the page for prominence and clarity.
9. Name: Centre your name under the title to identify yourself as the author.
10. Teacher's Information: Write your teacher's name, the course title, and the date at the bottom, centred in three lines.
11. Font Consistency: Maintain consistency by using Times or Times New Roman font in 12 pt size for the cover page. Avoid using bold, underline, or decorative fonts.
12. Page Numbering and Count: Exclude the cover page from page numbering and total page count. It's not necessary to add a page number to the cover page.
Tips and Tricks to How to Make a Good Cover Page for an Assignment?
Now that you have understood how to make a cover page for an assignment, it is also necessary to understand the basic tips and tricks before you start writing one. To make a great cover page, follow the steps outlined in the guide.
1. Correct Information
The main answer to the question of how to design a cover page for an assignment is to ensure that it includes accurate details such as your name, assignment title, course name, date, and any other required information to avoid confusion and errors.
2. Formatting
Use consistent formatting throughout the cover page, including font style, size, and spacing, to present a polished and organised appearance that aligns with academic standards.
3. Relevance
If you’re wondering how to write the front page of an assignment, then include relevant details that provide context. It would help the reader understand the purpose and scope of your work.
4. Clarity and Conciseness
Keep the content of the cover page clear and concise, using simple language and avoiding unnecessary information to communicate your message effectively.
5. Professional Tone
Maintain a professional tone on the cover page by using formal language and addressing the recipient respectfully, reflecting your commitment to the assignment and your academic integrity.
6. Proofreading
Carefully proofread the cover page for any grammatical errors, typos, or inconsistencies. Ensure it reflects your attention to detail and presents a polished final product.
A well-crafted cover page can make your assignment shine like a diamond in the rough. Follow these tips for how to write the front page of an assignment, and you'll impress your professor right off the bat. Don't drop the ball on this crucial first impression; knock their socks off with an A+ cover page material! The best part is that a good cover can improve your grades drastically!
Frequently Asked Questions
What are the essential elements of a cover page, what tools or software can i use to design a cover page, what are common mistakes to avoid when creating a cover page, what's the difference between a cover page in apa format vs. mla format, how to make a cover page for an assignment on canva.
Your ideal student home & a flight ticket awaits
Follow us on :

Related Posts

15 Best Universities in Australia

20 Countries With Free Education For International Students
.jpg)
Top 10 Best Countries to Study in Europe

amber © 2024. All rights reserved.
4.8/5 on Trustpilot
Rated as "Excellent" • 4800+ Reviews by students
Rated as "Excellent" • 4800+ Reviews by Students
How to Write a Perfect Assignment: Step-By-Step Guide
Table of contents
- 1 How to Structure an Assignment?
- 2.1 The research part
- 2.2 Planning your text
- 2.3 Writing major parts
- 3 Expert Tips for your Writing Assignment
- 4 Will I succeed with my assignments?
- 5 Conclusion
How to Structure an Assignment?
To cope with assignments, you should familiarize yourself with the tips on formatting and presenting assignments or any written paper, which are given below. It is worth paying attention to the content of the paper, making it structured and understandable so that ideas are not lost and thoughts do not refute each other.
If the topic is free or you can choose from the given list — be sure to choose the one you understand best. Especially if that could affect your semester score or scholarship. It is important to select an engaging title that is contextualized within your topic. A topic that should captivate you or at least give you a general sense of what is needed there. It’s easier to dwell upon what interests you, so the process goes faster.
To construct an assignment structure, use outlines. These are pieces of text that relate to your topic. It can be ideas, quotes, all your thoughts, or disparate arguments. Type in everything that you think about. Separate thoughts scattered across the sheets of Word will help in the next step.
Then it is time to form the text. At this stage, you have to form a coherent story from separate pieces, where each new thought reinforces the previous one, and one idea smoothly flows into another.
Main Steps of Assignment Writing
These are steps to take to get a worthy paper. If you complete these step-by-step, your text will be among the most exemplary ones.
The research part
If the topic is unique and no one has written about it yet, look at materials close to this topic to gain thoughts about it. You should feel that you are ready to express your thoughts. Also, while reading, get acquainted with the format of the articles, study the details, collect material for your thoughts, and accumulate different points of view for your article. Be careful at this stage, as the process can help you develop your ideas. If you are already struggling here, pay for assignment to be done , and it will be processed in a split second via special services. These services are especially helpful when the deadline is near as they guarantee fast delivery of high-quality papers on any subject.
If you use Google to search for material for your assignment, you will, of course, find a lot of information very quickly. Still, the databases available on your library’s website will give you the clearest and most reliable facts that satisfy your teacher or professor. Be sure you copy the addresses of all the web pages you will use when composing your paper, so you don’t lose them. You can use them later in your bibliography if you add a bit of description! Select resources and extract quotes from them that you can use while working. At this stage, you may also create a request for late assignment if you realize the paper requires a lot of effort and is time-consuming. This way, you’ll have a backup plan if something goes wrong.
Planning your text
Assemble a layout. It may be appropriate to use the structure of the paper of some outstanding scientists in your field and argue it in one of the parts. As the planning progresses, you can add suggestions that come to mind. If you use citations that require footnotes, and if you use single spacing throughout the paper and double spacing at the end, it will take you a very long time to make sure that all the citations are on the exact pages you specified! Add a reference list or bibliography. If you haven’t already done so, don’t put off writing an essay until the last day. It will be more difficult to do later as you will be stressed out because of time pressure.
Writing major parts
It happens that there is simply no mood or strength to get started and zero thoughts. In that case, postpone this process for 2-3 hours, and, perhaps, soon, you will be able to start with renewed vigor. Writing essays is a great (albeit controversial) way to improve your skills. This experience will not be forgotten. It will certainly come in handy and bring many benefits in the future. Do your best here because asking for an extension is not always possible, so you probably won’t have time to redo it later. And the quality of this part defines the success of the whole paper.
Writing the major part does not mean the matter is finished. To review the text, make sure that the ideas of the introduction and conclusion coincide because such a discrepancy is the first thing that will catch the reader’s eye and can spoil the impression. Add or remove anything from your intro to edit it to fit the entire paper. Also, check your spelling and grammar to ensure there are no typos or draft comments. Check the sources of your quotes so that your it is honest and does not violate any rules. And do not forget the formatting rules.
with the right tips and guidance, it can be easier than it looks. To make the process even more straightforward, students can also use an assignment service to get the job done. This way they can get professional assistance and make sure that their assignments are up to the mark. At PapersOwl, we provide a professional writing service where students can order custom-made assignments that meet their exact requirements.
Expert Tips for your Writing Assignment
Want to write like a pro? Here’s what you should consider:
- Save the document! Send the finished document by email to yourself so you have a backup copy in case your computer crashes.
- Don’t wait until the last minute to complete a list of citations or a bibliography after the paper is finished. It will be much longer and more difficult, so add to them as you go.
- If you find a lot of information on the topic of your search, then arrange it in a separate paragraph.
- If possible, choose a topic that you know and are interested in.
- Believe in yourself! If you set yourself up well and use your limited time wisely, you will be able to deliver the paper on time.
- Do not copy information directly from the Internet without citing them.
Writing assignments is a tedious and time-consuming process. It requires a lot of research and hard work to produce a quality paper. However, if you are feeling overwhelmed or having difficulty understanding the concept, you may want to consider getting accounting homework help online . Professional experts can assist you in understanding how to complete your assignment effectively. PapersOwl.com offers expert help from highly qualified and experienced writers who can provide you with the homework help you need.
Will I succeed with my assignments?
Anyone can learn how to be good at writing: follow simple rules of creating the structure and be creative where it is appropriate. At one moment, you will need some additional study tools, study support, or solid study tips. And you can easily get help in writing assignments or any other work. This is especially useful since the strategy of learning how to write an assignment can take more time than a student has.
Therefore all students are happy that there is an option to order your paper at a professional service to pass all the courses perfectly and sleep still at night. You can also find the sample of the assignment there to check if you are on the same page and if not — focus on your papers more diligently.
So, in the times of studies online, the desire and skill to research and write may be lost. Planning your assignment carefully and presenting arguments step-by-step is necessary to succeed with your homework. When going through your references, note the questions that appear and answer them, building your text. Create a cover page, proofread the whole text, and take care of formatting. Feel free to use these rules for passing your next assignments.
When it comes to writing an assignment, it can be overwhelming and stressful, but Papersowl is here to make it easier for you. With a range of helpful resources available, Papersowl can assist you in creating high-quality written work, regardless of whether you’re starting from scratch or refining an existing draft. From conducting research to creating an outline, and from proofreading to formatting, the team at Papersowl has the expertise to guide you through the entire writing process and ensure that your assignment meets all the necessary requirements.
Readers also enjoyed

WHY WAIT? PLACE AN ORDER RIGHT NOW!
Just fill out the form, press the button, and have no worries!
We use cookies to give you the best experience possible. By continuing we’ll assume you board with our cookie policy.
Brightspace Support

How do I Create an Assignment on the Content Page?
Brightspace enables users to create assignments that allow students to submit their work for grading. There are two primary methods for creating assignments:
1) Users may create an assignment directly on the assignment page 2) Users may create an assignment on the content page.
This tutorial will show you Method #2. For a tutorial on method #1, click here .
Method #2: Creating an Assignment via the Content Page
1) to create an assignment using the content page, locate the course navigation bar and click the tab for “ contents.”.

2) Click on the content module where you would like the assignment to go.
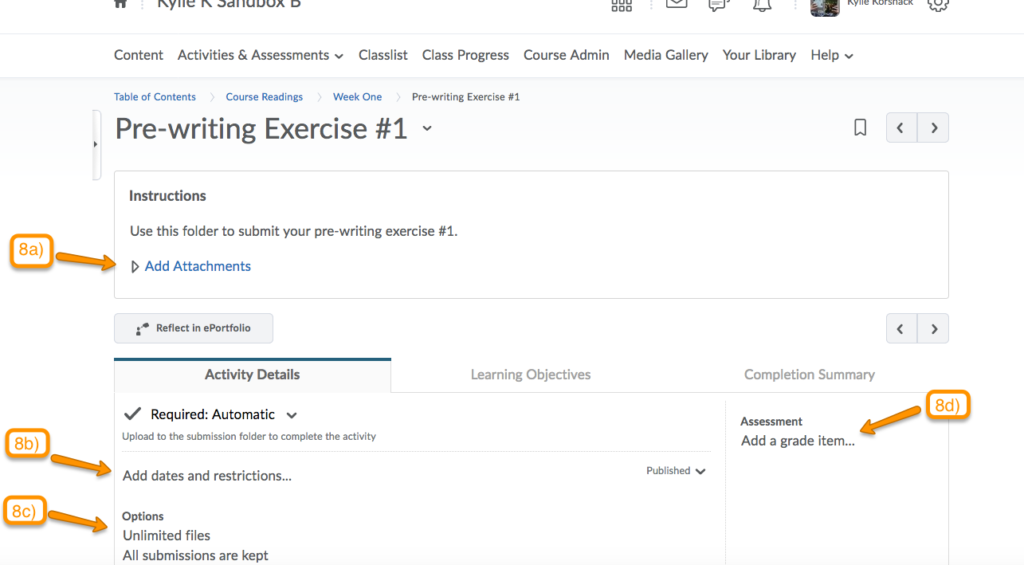
3) click on the button titled “ upload/create ”., 4) this will generate a drop-down menu. click on “ new assignment.”, , 5) on the next page, you will be able to create you new assignment by providing a title and a list of instructions for the assignment., 6) you can also choose for this assignment to be an individual submission or a group submission., 7) after adding this information, click “publish”, 8) on the next page, you can set more specific parameters for this assignment. you can*:, add attachments, specify dues dates/time restrictions, limit the number of submissions allowed, add a grade to the assignment.
*Click on each of these features to open up the customization options available for each category.
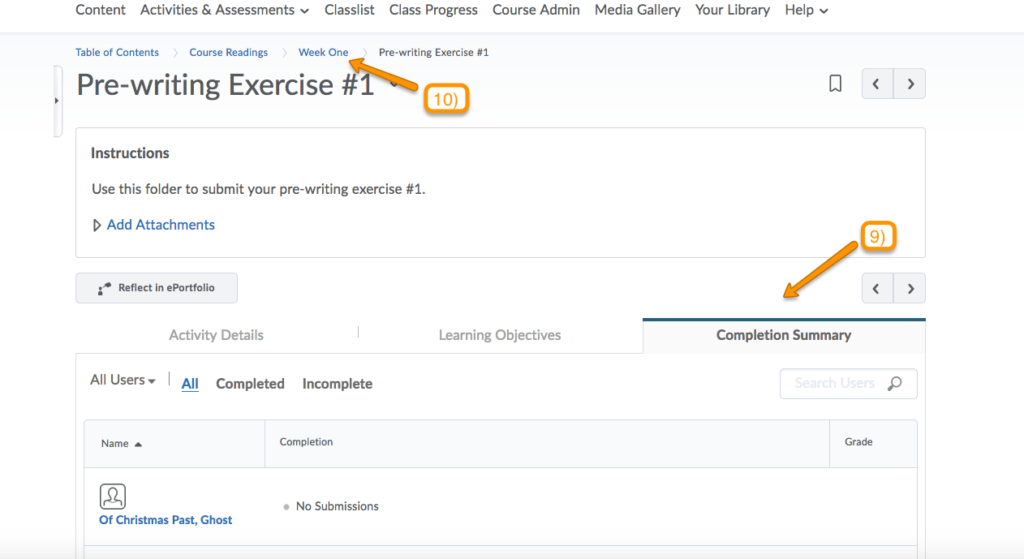
9) Finally, if you click on the tab for “Completion Summary” you can see which students in your course have completed the assignment.
10) if you go back to the content page, you will now see the assignment included within your content module. the assignment has been created.
For information about grading assignments and syncing assignments to the grade book, see on-demand resources page for “ Grades/Rubrics “.
WTO / Personal / Lists / Free Table of Contents Templates (for Microsoft Word)
Free Table of Contents Templates (for Microsoft Word)
Whether you are writing a book, large essay, dissertation, or other longer academic papers, you will have to include a table of contents. It will act as a roadmap for the reader to each portion of your writing. It helps the reader to locate specific information in a document or revisit their favorite parts easily within the text. A well-structured TOC should simplify the way the reader finds what they are looking for and should always be placed on a separate page, just after the first page of an academic paper and after the abstract.
Depending on the type of writing, you may find that different documents require different styles of a TOC. Some may require numbers, while others may require a non-numbered TOC. It is, therefore, the writer’s duty to check the type of TOC they are required to include in their writing.
Free Table of Contents Templates

Simple templates

What is a Table of Contents?
A Table of Contents (TOC) is an organized list of all the parts of a document or book organized in the order in which the parts appear.
The TOC usually contains the titles, chapters, figures, and major sections of a document clearly labeled by their page number. It should be added last or updated after completing the whole document or book to capture all the contents accurately.
The Purpose of table of contents
If a book, business proposal , business report , or publication is long enough to include chapters, then a TOC will likely be included at the beginning of the book, report, or publication.
The TOC provides a sequential list of the book’s organizational structure, most commonly denoting the title, chapter number, and the starting page location. The chapter, page number, and title will help guide the reader in finding specific sections.
Basically, it serves two main purposes; one is to provide the reader with a general overview of what is contained in the document and how the content is organized, and the other is to enable the reader to go directly to the specific section of an on-line document.
Key Elements of a Table of Contents
The TOC is where one lists the chapters and major sections of their document, together with their page numbers. A clear and well-out table is very important as it indicates a quality paper is structured.
The key elements that should be included in the TOC are:
- The page titles
- Clear headings and subheadings
- The page numbers that show where in the document each section can be found
When creating your table, make sure to include all level one and two headings. You may also decide to include level three headings, although they are optional to include and should not be included in the TOC has reached its maximum length of two pages.
Level One: CHAPTER 2: Literature Review
Level Two: 2.1 Overview of Information
Level Three: 2.1.1 Discipline of Knowledge
Ensure that you use clear headings throughout your document to make your table easy to understand. Keep in mind that the reader will see the table first before reading through your document.
Other things to include in your table include the appendices and tables. Including these two, however, depend largely on how many there are in your document.
If there are more than three tables and figures, you might consider listing them on a separate page. Else, you can include them in your table.
Steps to Create a Table of Contents in MS Word
For you to create a TOC in Microsoft Word, you must first define what you’d like to include in this part. First, start off by applying the different heading styles throughout your document.
Once you’ve done that, follow these steps to insert a TOC in MS Word automatically:
Add a title on the TOC page. Ensure that you follow the standard format specific to your document or as per your department’s guidelines.

Put your cursor where you want the table to go. The table is usually included between the abstract and the introduction.

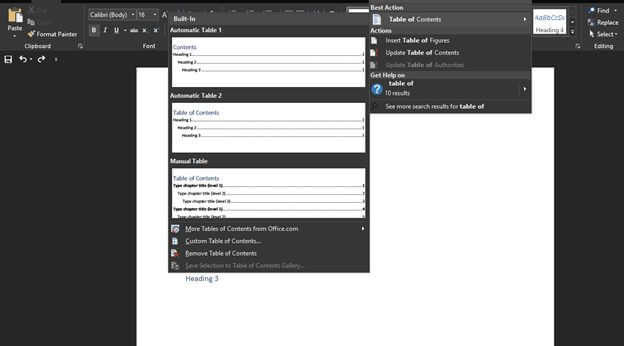
In the ribbon, find the reference section and locate the TOC section. Use the search tab on the ribbon to search for the table.

Click the arrow that is next to the TOC icon and select Custom Table of Contents. Here, select the level of heading that you would like to include in your table and also make the necessary adjustments to each level by clicking the modify button.
Click on Custom table of contents.
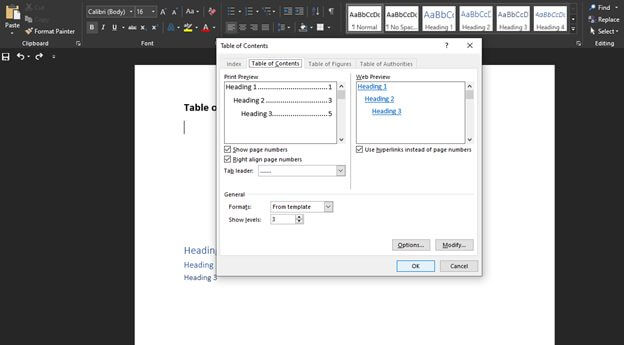
After you’ve made sure that everything is OK. Click OK, and your TOC will be automatically generated.
Tips on Preparing Table of Contents
It is recommended that you use your TOC template last after to make sure that it provides a clear overview of your document. You can still draw up a mock TOC in your early stages of writing to help you formulate a structure and think through your topics and how you are going to research.
Make sure that all the heading levels are properly defined in your document before inserting the template.
Remember that the reader will most likely go through your table first before diving into the document to get an overview of what to expect. Make sure that your TOC is clear and that it captures your entire document.
Frequently Asked Questions
No, the TOC is basically a snapshot of the headings, tables, and page numbers in a document and does not automatically update itself as you make changes. Anytime you make changes to your document, you can update it by simply right-clicking on it and selecting the update field.
No, the TOC is usually included between the abstract and the introduction.
Yes, the maximum length of a TOC should be two pages, regardless of the type of document you are writing.
Regardless of your document’s type or size, using a TOC can help direct the readers to exactly where they want to be. Other than making your document more reader-friendly, the table also makes it easier for the author to go back and change or update contents throughout their document if necessary. By default, MS Word generates a TOC when you use the first three built-in heading styles, i.e., Heading 1, Heading 2, and Heading 3. To apply the different heading styles, simply select the style from the “Home” tab, or you can use a TOC template. Once you’ve properly defined the heading styles, follow the procedure given above to insert your table automatically.
About This Article

Was this helpful?
Great! Tell us more about your experience
Not up to par help us fix it, keep reading.

Lists , Personal
40 free grocery list templates (word | excel) – easy savings.

12 Free Yes No Flowchart Templates (PowerPoint)

16+ Free Sign-in & Sign-up Sheet Templates (Excel | Word)

Lists , Log Sheets , Personal
25 free medication list templates for patients & caregivers, thank you for your feedback.
Your Voice, Our Progress. Your feedback matters a lot to us.
Search our database of 10,000+ Microsoft Office templates.
28+ Best Free Assignment Cover Page Formats for MS Word
What is an assignment cover page, key elements for a comprehensive front page.
- Institution Details: Begin by prominently featuring the name of your school, college, or institute. This establishes credibility and provides context for your assignment.
- Personal Information: Include your own name to indicate authorship and ownership of the assignment. This adds a personal touch and facilitates easy identification.
- Assignment Title: Clearly state the title of your assignment, conveying its purpose and focus. A concise and informative title sets the tone for your work.
- Course Information: Specify the relevant course title or code to indicate the academic context in which your assignment was completed. This assists in proper categorization and organization.
- Instructor’s Name: Acknowledge the teacher or professor who will be evaluating your assignment by including their name. This demonstrates respect and professionalism.
- Due Date: Clearly indicate the deadline or due date for the assignment submission. This ensures timely assessment and helps you stay organized.
What are the basic tips?
- Font style : It is always in the best interest to use bold, simple, and clear text instead of using fancy text fonts and styles. This helps the reader understand things in a better way. Moreover, the usage of pictures behind texts must be avoided as it creates poor visibility for the reader when reading the text printed on it.
- Presentation: Presentation plays an important role in expressing what you need to convey to someone and how you need to communicate it. Presenting the title page in the most effective manner is essential as this leaves an impression on the teacher reading the assignment. It also acts as a decisive tool for the teacher whether or not he/ she interestingly goes through the whole document.
- Spell Check: Before handing over the assignment, one should take a brief review of all the spelling and also look for any grammatical errors.
- Avoid plagiarism: A student must always be honest in what he writes. He should avoid copying material or texts from anywhere.
- Personal detail: One should never forget to mention his/her name. The font size used for writing the name must be bigger so that it makes the name visible to the teacher.
Advantages of an Impressive Assignment Cover Page
- Showcasing Professionalism: By meticulously designing your cover page, you demonstrate a strong commitment to professionalism. This attention to detail reflects positively on your work ethic and sets you apart as a dedicated student.
- Creating a Positive Impression: A well-crafted front page sets the tone for your assignment, capturing the attention of your teacher or professor. It establishes a positive first impression, arousing their interest and encouraging them to delve further into your work.
- Enhancing Visual Appeal: A visually appealing cover page enhances the overall presentation of your assignment. With carefully chosen fonts, colors, and layouts, you create an engaging and aesthetically pleasing introduction that captivates the reader’s attention.
- Communicating Pertinent Information: It provides a concise summary of essential details, such as the assignment title, your name, and the due date. This ensures clarity and facilitates seamless identification and organization of your work.
- Reflecting a Professional Attitude: By dedicating time and effort to creating an impressive cover page, you exemplify a professional attitude towards your academic pursuits. This level of dedication and care leaves a lasting impression on your teacher or professor.
Download Free Cover Page Templates
#1 – best format.

#2 – Assignment Cover Page for Case Study

#3 – Best Design for Critical Review

#4 – For Any Kind of Educational Assignment

Video Tutorial
#5 – essay assignment.

#6 – Syllabus Assignment

#7 – Cover Page For University Assignments

#14 – Cover Page for Business Assignment

#16 – Academic

#17 – Generic Cover Page for any Assignment

#18 – Biology Assignment

#19 – For Chemistry Projects

#20 – Cover Page for Computer Projects

#21 – For Engineering-Related Assignments

#22 – For English Assignment

#23 – For Geography Projects

#24 – Mathematics

#25 – Physics

#26 – Cover Page for School Assignments

#27 – Best for Science Projects

#28 – For Social Study Assignment

Versatile Designs and Layouts for Every Purpose
- Assignment Types: Our templates are designed specifically for different types of assignments, such as case studies, critical reviews, essays, syllabi, and business projects. Each template is tailored to suit the requirements and objectives of its respective assignment type.
- Academic Disciplines: Our collection includes templates suitable for various academic disciplines like biology, chemistry, computer science, engineering, English, geography, mathematics, physics, and social studies. Each template aligns with the themes and aesthetics of its corresponding discipline.
- Purposes: Whether you are a student, educator, or professional, our templates serve multiple purposes. They can be used for university assignments, school projects, research papers, or any academic or professional endeavor that requires a polished cover page.
- Designs, Layouts, and Styles: Our templates offer a diverse range of designs, from minimalistic and clean to visually captivating and sophisticated. You can choose from different layouts that creatively arrange text, images, and graphics. Our templates cater to a variety of styles, ensuring there is something for everyone’s preferences.
User-Friendly Customization: Make It Your Own
- Easy Modifications: We believe in keeping things simple. With just a few clicks, you can effortlessly modify our templates to suit your specific requirements. Change colors, fonts, and layouts with ease, and watch your cover page transform before your eyes.
- Colors and Themes: Infuse it with the perfect color scheme and themes that truly represent your assignment. Our templates offer a wide range of options, so you can find the ideal palette and theme that resonate with your content.
- Font Selection: The right font can make all the difference. Choose from our diverse selection of fonts to enhance the visual appeal and readability. From elegant and professional to modern and bold, we have fonts to suit every style.
- Layout Flexibility: It should reflect your unique presentation style. With our templates, you have the freedom to experiment with different layouts, arranging titles, subtitles, images, and text blocks in a way that best suits your assignment.
Benefits of Using Professionally Designed Templates: Make an Impact with Ease
- Time and Effort Saving: Our professionally designed templates eliminate the need to start from scratch. With pre-designed layouts, styles, and graphics, you can save valuable time and effort in creating visually appealing front pages. Simply customize the template to suit your assignment’s requirements, and you’re ready to impress.
- Consistency and Professionalism: Using our templates ensures consistency in your assignment submissions. The standardized design elements and formatting guidelines help maintain a professional appearance throughout your work. Presenting your assignments with a polished title page enhances the overall quality and credibility of your content.
- Visual Appeal: A visually appealing title page grabs attention and sets the tone for your assignment. Our templates are thoughtfully crafted by design professionals, incorporating aesthetically pleasing elements, color schemes, and typography. By leveraging these designs, you can effortlessly create eye-catching cover pages that captivate your professors or readers.
- Positive Impression: First impressions matter, and a well-designed cover page leaves a positive impact on professors and readers alike. Showcasing your assignment in a professional and visually appealing manner demonstrates your dedication and attention to detail. It sets the stage for an engaging reading experience, encouraging your audience to delve deeper into your work.
- User-Friendly Customization: Our templates are designed to be easily customizable, allowing you to add your personal touch without technical expertise. You can modify text, colors, images, and other elements to align with your assignment’s theme and requirements. This flexibility ensures that your cover page reflects your unique style while maintaining a professional look.
Tips for Maximizing the Impact: Make Your Cover Page Stand Out
- Choose Colors Wisely: Select colors that complement your assignment’s theme and evoke the desired emotions. Vibrant colors can grab attention, while muted tones create a sense of elegance. Maintain consistency with your assignment’s overall design and avoid using too many colors that may distract from the main message.
- Opt for Legible Fonts: Use clear and readable fonts to enhance the accessibility and professionalism of your cover page. Avoid overly decorative or complex fonts that may hinder readability. Opt for fonts that align with your assignment’s tone and maintain consistency throughout the document.
- Incorporate Relevant Graphics: Graphics can enhance the visual appeal of your cover page and reinforce the assignment’s subject matter. Choose images or icons that are directly related to the topic or convey the assignment’s main concept. Ensure that the graphics are high-quality and appropriately sized to maintain clarity.
- Organize Information Effectively: Arrange the information in a logical and visually appealing manner. Use headings, subheadings, and bullet points to break down content and make it easier to read. Highlight key details such as the assignment title, your name, course information, and submission date.
- Maintain Simplicity: While it’s important to make it visually appealing, avoid cluttering it with excessive elements. Keep the design clean and uncluttered, allowing the key information to stand out. Remember, simplicity often has a greater impact than complexity.
- Preview and Proofread: Before finalizing, preview it to ensure that all elements are properly aligned and visually balanced. Proofread the content to eliminate any spelling or grammatical errors. A polished and error-free cover demonstrates your attention to detail and professionalism.
← Previous Article
Next Article →
You may also like

- Doctor Prescription Pad Formats
- Printable ID Cards
- Creative Resume Formats for Freshers
- Modern Resume Templates
- Best Cover Page Formats
- Printable Report Cards
- Business Proposal Templates
- 22 Raffle Ticket Templates
- Free Certificate Templates
- 5+ Free Food Diary Templates to Transform Your Eating Habits
- Make it Memorable: Free 4th of July Flyer Templates
- Say Goodbye with Style: Free Impactful Resignation Letter Templates
- Share Your Appreciation: Free Memorial Day Card Templates
- Crafted with Love: Free Mother’s Day Cards to Warm Mom’s Heart
- Stand Out from the Crowd: 6+ Free Fact Sheet Templates
- Make Your Mark: Free Printable Dog Name Tags for Every Tail-Wagger!
- 7+ Free Stunning Easter Templates for Joyful Celebrations
- 9+ Free Admit-One Ticket Templates: Flexible and Easy to Edit
- Get Cooking with Style: 8+ Free Customizable Recipe Card Templates
- 11+ Free Mortgage Flyer Templates to Elevate Your Marketing
- Enhance Your Events with 20+ Unique and Free Ticket Voucher Templates
- Certificates
- Cover Pages
- Educational
- Event Templates
- Invoices & Receipts
- Letterheads
- Office Related
- Personal Use
- 137+ Professional Reports – MS Word & Excel
- 70+ Printable & Editable ID Card Designs
- 59+ Proposal Formats
- 31+ Best Flyer Designs & Formats
- 100+ Cover Page Templates
- 22+ Free Letterhead Designs and Formats
- 24+ Free Resume Designs & for Freshers and Professionals
- 136+ Printable Certificate Templates
- 55+ Quotations & Invoices
- Create FREE PDF Calendar Online
- 301 Academic Skills Centre
- Study skills online
Formatting your assignments
Illustrated step-by-step guides to help you understand the formatting and presentation expectations of university assignments.

Introduction
Although formatting your essay, report or dissertation can feel like a lesser priority than the process of research and writing itself, it is an important way to ensure your ideas are given the spotlight through visually accessible, professional presentation. Formatting can be a minefield, especially when you’re formatting at the last minute; it’s important to leave a few days at the end of your essay writing process for working on your formatting, and to spend some time familiarising yourself with the different aspects of formatting.
301 Recommends:
Our Essay Structure and Planning workshop will outline how to analyse your essay question, discuss approaches logically structure all your ideas, help you make your introductions and conclusions more effective, and teach how to link your ideas and ensure all essay content flows logically from the introduction.
Below, you will find some general introductions to the key areas.
Action: know the rules
Because formatting rules can vary greatly depending on your department or assignment, it’s crucial to check the formatting specifications in your assignment description/rubric, and any general departmental presentation standards, as a first port of call. Many referencing systems also have specific rules about how to format your work, so make sure to familiarise yourself with the university library’s referencing guides . Many referencing systems also have more detailed style guides available via their websites.
Formatting key information
Assignment cover sheets .
In some departments, you may be expected to include a cover sheet on the front page of your assignment. This is a page including key information about your assignment, such as your module number, student registration number, essay title, and submission date.
You may be asked to submit a plagiarism declaration and to make your markers aware of any disabilities through the yellow sticker system . If you are asked to include a cover sheet in your assignment, your department should make you aware of where you can access this.
Assignment titles
Place your assignment title at the top of your first page, either centre or left aligned, in bold font. At university, you may be assigned a pre-designed essay title/question, or asked to select from several possible titles. You may also be asked to design your own essay title. Here are some top tips on designing your own title:
- To bring focus to your essay, draft a working title at the essay planning stage. You can come back and review this title in light of your finished essay draft.
- Make sure to use action words in your essay title that reflect the skills your assessors are looking for, both in the assignment description and the marking criteria you have been given. For example, if heavy emphasis is placed on critical analysis, you could use a title like ‘Analyse the effect of…’ See this glossary of essay terms , containing examples that you can use in your own titles.
- The action words you choose can also help you to reflect the structure of the essay in your question. For example, an essay using the action word ‘Discuss’ might use a for/against/conclusion or advantages/disadvantages/conclusion structure, or an essay using the term ‘Analyse’ might break an issue down into parts, e.g. into key themes, to understand its meaning as a whole. Think about the type of essay you want to write: do you want it to be comparative, look at several topics equally, or do you have a clear argument that you want to put forward? You can then create a question that gives you the opportunity to approach the topic from your own perspective.
- Make sure to include the main terminology you are working with in your assignment title.
- Make sure your question has a realistic scope, without being so broad that you cannot answer it within the limitations of your essay. To limit your question, you could include any limiting factors you are working with, such as specific time periods, geographical regions or sub-themes within the overall topic area. For example, in the title ‘Evaluate the proposition that a global monoculture will destroy diversity and difference’, the broad topic of global monoculture is limited down through a specific sub-focus on diversity and difference.
Stating word counts
Depending on the instructions you have been given, you may be asked to state your word count, either on your cover sheet or at the beginning of your essay. If you are asked to include this information, make sure your word count accurately reflects the assessment guidance: for example, are references included in your word count?
Visual clarity
Line spacing .
Most assignment descriptions specify that you should increase the space between each line on the page, from the standard 1.0 spacing to either 1.5 or 2.0 spacing. You are asked to do this to make the essay more visually accessible and easier to read, by breaking up the number of lines on each page.
Download this step-by-step illustrated guide to line spacing in Microsoft Word and Google Docs.
Fonts
All non-examination based assignments should be word processed rather than handwritten. Most assignment descriptions will specify that for visual clarity, and to ensure a professional appearance, you should use a plain, sans-serif font such as Arial. For readability, this should be in 11 or 12 point size. Check your departmental or assignment guidance for any specific rules about font choices.
Page numbering, headers and footers
Including page numbers in your assignments makes them more accessible. Depending on the departmental guidance you have been given, you may be asked to include these in either the header or the footer of your essay (the blank space above and below where the text would go on a normal page in a word processor). It may also be helpful to include your registration number and the module code of the essay in the same header or footers that specify the page number.
Download this step-by-step illustrated guide to adding page numbers and using headers and footers in Microsoft Word and Google Docs.
Page layout
Margins .
A margin is the amount of blank space on either side of a paragraph in a normal word processor. Traditionally, assignment descriptions specified that the margins should be made wider at the binding edge (the left hand side) of the page, to allow for easier reading of printed essays. However, with the shift to online essays, you might not be asked to do this any more and the default settings on your word processor are likely to be sufficiently wide.
For printed dissertations and theses, you may receive specific guidance about the suitable layout of margins, as these are more likely to be printed: see this university guide on formatting PhD theses .
Download this step-by-step illustrated guide to adjusting margins in Microsoft Word and Google Docs.
Paragraph alignment
Most formatting instructions specify that paragraphs should be lined up in a straight line (aligned) on the left hand edge, but left jagged on the right hand edge (like this page). This is called left alignment, or flush-left style, and should be the default alignment setting for your word processor. This style can be helpful for visual accessibility, but check any specific instructions you have been given by your department to see which style of alignment you have been asked to use.
Download this step-by-step illustrated guide to adjusting paragraph alignment in Microsoft Word and Google Docs.
Paragraph indentation
You may be asked to add indents to your paragraphs: an indent is an additional small gap between the margin and the beginning of a paragraph (it makes a ‘dent’ in the first line of your paragraph). Indents are used to provide extra clarification that the reader is starting a new paragraph after finishing the last one: therefore, they should not be used in the first paragraph of your essay. Indents are not always required, and whether you are expected to use them may depend on your referencing style , and any formatting instructions you have been given by your department.
Download this step-by-step illustrated guide to indenting paragraphs in Microsoft Word and Google Docs.
Formatting referenced material
Footnotes and endnotes .
Some referencing systems require you to use footnotes or endnotes to format your references (make sure to check the library’s referencing guide to familiarise yourself with the expected format of your referencing style). Inserting a footnote into your word document when you have cited from a source adds a superscript number (a number formatted in a smaller font) to the sentence. It creates a note with a matching number at the bottom of the page you are working on (in the footer), which you can add the reference information to.
Endnotes work in the same way, but instead of appearing at the bottom of the page, the reference list appears at the end of the document.
Download this step-by-step illustrated guide to manually inserting footnotes and endnotes in Microsoft Word and Google Docs.
References and bibliographies
Instead of, or alongside footnotes/endnotes, some referencing systems ask you to include a bibliography and/or a reference list at the end of the essay (make sure to check the library’s referencing guide to familiarise yourself with the expected format of your referencing style). A reference list is a list of all the sources you have directly referred to in the essay, which could be ordered numerically or alphabetically, depending on your referencing style.
A bibliography could be used alongside, or instead of, a reference list, depending on your referencing style; here, you list all the sources you have consulted that have influenced your ideas, whether they are included in the essay or not. The way this is ordered also depends on your referencing style.
If you auto-generate your citations in Microsoft Word or Google Docs, you can auto-generate your bibliography instead of creating it manually: instructions for doing so are in the resource below. If you use a different reference manager, such as Mendeley, Zotero, or Endnote, these have their own specific instructions for auto-generating bibliographies. See the reference management resources offered by the university.
Download this step-by-step illustrated guide to manually or automatically formatting a bibliography or reference list in Microsoft Word and Google Docs.
Block quotations
When you need to include a quotation in your essay that is three or more lines long, you can add this as a block quotation. A block quotation appears on a separate line to the other parts of the paragraph, and is indented (i.e. there is a wider gap between a block quotation and the left-hand margin than there is between the rest of the paragraph and the left-hand margin). Block quotations aren’t placed in quotation marks, so the indentation is used to indicate that you are using a quotation.
Check your referencing guide and any departmental guidance to learn more about the specific rules on formatting block quotations in your department. Because they take up large chunks of your word count, and break up the flow of your texts, make sure to use block quotations sparingly: they are especially helpful when you are going to perform close analysis of a large section of text. For more information on different types of quotation and how to use them, see our workshop on paraphrasing and using academic sources.
Download this step-by-step illustrated guide to formatting block quotations in Microsoft Word and Google Docs.
Advanced formatting
Headings and contents tables .
Most standard short essays do not include headings, other than the essay title and reference list and/or bibliography. Section headings may be required for some longer or more structured types of academic writing, such as reports; reports often follow a very closely prescribed structure, so it is essential to pay very careful attention to the specific guidelines issued with your brief. Make sure that any system you use for numbering your headings and subheadings is consistently applied throughout the document.
Depending on the advice you have been given, and the length and complexity of a lab report, you may also be required to include a table of contents to help the reader navigate between headings. Contents tables are generally standard practice in longer assignments such as dissertations and theses. Make sure to check any departmental guidance you have been given about formatting reports.
Download this step-by-step illustrated guide to formatting headings and contents tables in Microsoft Word and Google Docs.
301 Recommends: Scientific Writing and Lab Reports Workshop
This workshop will help you to familiarise yourself with some of the specific expectations associated with this assignment format.
Figures and tables
Some kinds of essays, dissertations and reports will require you to make use of figures (pictures, diagrams, and graphs) and tables (any data in a table format). Figures and tables are normally numbered in sequence, e.g. ‘Table 1’, ‘Figure 4’, and are directly referred to in the text according to their number, rather than according to their location on the page (e.g. ‘as shown in Table 2’ rather than ‘as shown below’).
If your text is of dissertation or thesis length, or if your text has several figures, it may also be helpful to include a list of figures immediately after the table of contents. Some referencing guides have specific rules about presenting and referencing tables and figures, so make sure to familiarise yourself with these and carefully read any specific instructions about figures and tables in your assignment brief.
Download this step-by-step illustrated guide to inserting figures and tables and creating lists of figures/tables in Microsoft Word and Google Docs.
Top tips for formatting tables and figures:
- Make sure that any tables or figures you use are placed below the paragraph where you refer to them, and that you have directly referred to all figures and tables in the text of the essay.
- The caption for a table usually acts as its title, so this is placed above the table in the document. The caption for a figure is usually placed underneath the figure. Do not include unnecessary additional titles in the graph image itself, if the title is already included in your image caption.
- Make sure to label your captions consistently, choosing between ‘Fig.’ or ‘Figure’ and consistently using either a full stop or a colon after the label (i.e. ‘Figure 1:’ or ‘Fig. 1.’)
- Your caption should clearly and succinctly explain what the figure or table is. If the figure is taken from an external source, you must provide a reference that accurately reflects its copyright status (see these university library guides to inserting and attributing images and figures in university work).
- Make sure to include legends in any charts you use (a key that helps to explain the data in the chart). Any data series you use should be clearly distinguishable from each other (e.g. avoid printing a report with coloured graphs in black and white!) If you are only using one series of data, a legend is not always necessary.
- Make sure tables are clear and easy to read, using sans serif fonts, a readable font size, and avoiding unnecessary use of colour.
- Make sure graphs are clear and easy to read, with clearly and appropriately labelled axes. Be wary of 3D effects that may obscure the clarity of a graph.
- Make sure to avoid presenting the same information in a graph and a table.
- Images and figures in printed essays, such as dissertations and theses, should be large enough for the text and numbers to be legible on the printed copy. Make sure they do not extend beyond the print margins of the document.
301 Recommends: Displaying Data in Graphs and Tables Workshop
This workshop will provide more technical advice on using graphs and tables in your work. See also this Engineering department guidance on formatting graphs and tables in Engineering lab reports.
Appendices
Appendices commonly appear in dissertations, theses, and lab reports. An appendix provides supporting information that gives the reader a better understanding of the essay, but that might be too long, detailed or awkward to insert into the main body of the essay without breaking up its flow. Interview questions or transcripts, sample questionnaires, raw data, figures, photographs, large/complex datasets, and diagrams are all examples of information that could be included in an appendix, if it is relevant to do so.
The reader should be able to understand the essay without reference to this supporting information, as all the most important and relevant information needed to answer the question should be included in the body (i.e., the appendix should not be used to make room for content that doesn’t fit within your word count). Your appendices must be clearly signposted and explained in the body of your report, highlighting any information that is essential for your reader to understand. Do not include any appendices that are not referenced in the text itself.
The appendices should be placed in numerical or alphabetical order, and signposted according to this specific system (e.g. ‘Appendix B indicates that…’) They should be clearly labelled, using headings that match up to the in-text reference. Appendices usually appear at the very end of the assignment, after your references/bibliography. Make sure to list any appendices used in your table of contents; if you have been instructed to do so by your department or within your referencing system, you could include a list of appendices separate to your contents list.
The specific format of the appendix heading, and the reference made to the appendix in the text, depends on your referencing style , so make sure to carefully review this information before you design your appendices.
Download this step-by-step illustrated guide to inserting appendices and creating lists of appendices in Microsoft Word and Google Docs.
Tips and resources
- Use this 301 proofreading checklist to check over your work when you are finished.
- Use the University Library referencing guide for advice about referencing and formatting that is specific to your referencing style. If you need extra clarification about formatting rules, it is often possible to download an extended style guide from the official website for a specific referencing system.
- For further training on referencing, using reference generators, and using images in your work, see the University Library workshop programme .
Related information
Academic Writing
Proofreading
Essay structure and planning
Scientific writing and lab reports
Creating accessible Word documents

Summer support
Are you getting ready to start a new academic year? Or preparing for summer resits?
We have a whole host of support ready for you to access whenever you need it. Our online resources allow you to develop your academic skills at your own pace, building on your existing skills ready for whatever you are facing next.
Take advantage of our curated Level Up Your Skills packages and start working through resources for your upcoming level of study, or use study skills online to find specific topics you want to work on.
Word & Excel Templates
Printable word and excel templates.

Assignment Cover Pages
Assignment cover page is the first page of an assignment. When you hold an assignment, the first page that you will see is the cover page. It is also called the title page. An assignment cover page includes the name of the institution, the title of the assignment, the name of the student, and the student’s ID. The assignment cover page helps identify what the assignment is about and which student submitted it.
Many students submit assignments to instructors, and instructors are usually teaching more than one subject. Therefore, without an assignment cover page, it would be difficult for the instructor to manage and sort out different assignments.
When there is an assignment cover page, instructors can easily sort out the assignments and grade them. Even the students submitting multiple assignments on the same day could end up submitting the wrong assignment if the assignments didn’t have a cover page.
Another important reason for having assignment cover pages is that this is part of training students to submit work professionally. An assignment cover page shows professionalism in submitting work. When students are trained for professional work, they are better equipped to succeed in their jobs. Thus, professors and instructors usually ask students to create cover pages for their assignments so that the students develop this habit early in their academic life.
The assignment cover page usually includes the name of the institution, title of the assignment, name of the student, student ID, and date of submission. In some cases, the title page may also mention the instructor’s name. Usually, the title page is not page-numbered.
Some courses might also require the students to format the assignment cover pages using popular referencing styles. For example, there is a particular format to make an assignment cover page using APA or MLA referencing styles.
In some cases, professors may also issue detailed instructions on how to format an assignment cover page. These instructions may include font style, font size, text color, page borders, and the information that must be stated on the cover page along with a particular order.
Cover pages are required in several situations:
- When submitting a project report
- When submitting a research proposal
- When submitting a dissertation
- When making a report that is longer than 2-3 pages
- When the assignment instructions require an assignment cover page
- When the professor is handling more than one subject assignments may be erroneously sorted
Assignment cover pages are very useful and can be created in MS Word or Adobe. MS Word software allows pictures and text to be used on the cover page. Students may also use headers and footers, page borders, and other features in MS Word to create a nice cover page. You can even use the popular heading styles given in MS Word.
If you do not have the time or energy to create a cover page, you may use cover pages available on our website. We offer editable cover page templates that you can easily download and customize. Browse through our specially designed assignment cover pages and save your time and effort.

Editable with MS Word

- Birthday Gift Card Templates
- Security Clearance Card Templates
- Parking Cards/Permits for Employees
- Company Meal Card Templates
- Conference Room Reservation Cards
- Employee Birthday Announcement Card Templates
- Happy Holiday Cards for Employees
- Good Luck Card Templates for Word
- Miscarriage Sympathy Cards
- Kids School ID Badge Templates
- Theater Ticket Templates for MS Word
- Service Dog ID Cards
- Service Dog ID Badge Templates
- Christmas Wish Cards in Editable Format
- Christmas Party Invitation Cards
5 Steps Guide On How To Write Assignment First Page

The assignment’s first page acts like a welcoming handshake—it’s the initial impression that sets the stage for your work. It grabs attention, providing essential details about what follows. A well-crafted first page isn’t just about rules; it’s your chance to engage your reader and show your commitment to delivering quality work.
It isn’t just about looks—it’s the mood setter. It cues readers about what to expect, conveying the vibe and seriousness of your work. It’s like the opening scene of a movie, shaping expectations and guiding your audience through the journey ahead.
So today we are going to see the answer to a very common question i.e. how to write assignment first page. It will serve as a complete guide book for you.
Importance Of A Good Assignment
Table of Contents
Assignment’s are the basis of your grades and not only grades it represents your character and thinking. It plays an important role in a student’s life and following are some points which will make it more to you.
- Academic Success: A well-crafted assignment demonstrates understanding and mastery of the subject matter, contributing to academic achievements.
- Demonstration of Knowledge: It showcases your grasp of concepts, theories, and application of learned materials.
- Preparation for Real-world Skills: It cultivates skills like time management, organisation, and research, which are valuable in professional settings.
- Feedback and Improvement: Feedback received on assignments helps identify areas for improvement, aiding in continuous learning and growth.
- Building a Portfolio: High-quality assignments can serve as a portfolio demonstrating expertise and skills for future opportunities.
After this the importance of a well-executed assignment cannot be overstated. In recognizing the crucial role of a well-executed assignment, we understand the challenges students face in meeting these academic standards.
That’s why our assignment help service is here as a guiding hand, supporting students in crafting exceptional assignments that not only meet requirements but also exceed expectations.
5 Steps: How To Write Assignment First Page
For helping you in order to make an effective first page for assignment and creating a good impression we have summarised all the essentials in 5 steps and they are as:

Step 1: Grasping Specific Formatting Requirements For Assignment First Page
It is always required to understand the specific formatting requirements, such as font size, spacing, and placement of details, to create a professional and polished cover page. Different universities and departments may have varying formatting guidelines, so it’s crucial to check the assignment description and rubric for specific instructions.
Step 2: Guidelines On Font Spacing And Margins
Follow these standards ensures a clean and professional appearance for your assignment’s first page:
Font Style and Size:
- Use a readable font style like Times New Roman, Arial, or Calibri.
- Typical font size is 12 points for the main text.
- For headings and subheadings, consider slightly larger sizes (14-16 points) for differentiation.
- Double-space the entire text, including the title, subtitles, and body paragraphs.
- Ensure consistency in spacing—don’t mix double-spacing with single-spacing within the document.
- Set margins on one-inch margins on each side of the page (top, bottom, left, and right).
- Check if your instructor or institution specifies different margin requirements.
Step 3: Structuring The First Page
Structuring the First Page is crucial in laying the groundwork for a well-presented assignment. Proper placement of elements like Title and Subtitle sets the tone, guiding readers into your work. Author Information and Affiliation lend credibility, while Date and Course Details establish context, forming the backbone of your assignment’s initial impression. Mastering these placements ensures a professional and organised first page. Here are some key points to consider:
- Title and Subtitle Placement: The Title and Subtitle are the front door of your assignment; they should be clear and inviting. Place the main title at the center, standing out boldly, while the subtitle, if used, can follow underneath to offer a sneak peek into your assignment’s focus. Keep them concise yet informative, giving readers a glimpse of what’s to come.
- Author Information and Affiliation: Author Information and Affiliation is like introducing yourself before a conversation. It goes at the bottom of the title page, including your name and any relevant details like your university or course. It adds credibility to your work, helping readers understand your perspective and expertise in the subject.
- Date and Course Details : The Date and Course Details are the assignment’s GPS they show where and when it belongs. Placed below the author’s info, they provide context, indicating when the assignment was crafted and for which course. It helps organise your work and ensures clarity for anyone reading it, making sure they know its relevance and timeline.
Step 4:Crafting A Compelling Title For Assignment First Page
Crafting an appealing Title requires a perfect mix of creativity and clarity, essential for catching readers’ attention while staying true to the assignment’s essence. Here are some tips to achieve this balance:
- Be Specific yet Engaging: Craft a title that hints at the assignment’s focus without giving away everything, sparking curiosity.
- Use Powerful Language: Incorporate strong, descriptive words that evoke interest and relevance to the assignment’s content.
- Consider the Tone: Match the title’s tone to the assignment’s nature, whether it’s formal, informative, or creative.
- Avoid Ambiguity: Ensure the title accurately represents the assignment’s core concepts while avoiding vagueness or confusion.
- Get Feedback: Test the title’s impact by seeking opinions from peers or colleagues to gauge its effectiveness in grabbing attention while maintaining clarity.
Step 5: Subtitle Or Abstract
The Subtitle or Abstract serves as a supporting actor, providing additional context to the main title and offering a concise summary of your assignment. Its inclusion is vital for:
- Enhanced Clarity: The subtitle elucidates the main title, providing a brief overview of the assignment’s scope or focus.
- Informative Preview: It offers readers a glimpse into the assignment’s content, helping them understand what to expect.
- Summary of Main Points: Briefly outline the central themes or objectives of the assignment.
- Relevance: Explain the assignment’s significance or relevance to the subject matter.
- Scope: Highlight the boundaries or limitations of the assignment’s coverage.
- Engagement: Aim for a captivating summary that entices readers to delve deeper into the assignment.
Dos And Don’ts For The First Page
A professional and powerful beginning to your work is ensured by following the Dos and Don’ts for the First Page. Here are some of them:
- Follow Guidelines: Adhere strictly to formatting and style guidelines provided by your institution or instructor.
- Ensure Accuracy: Double-check all details such as names, dates, and course information for accuracy.
- Maintain Professionalism: Use a formal tone, proper language, and avoid casual or colloquial expressions .
Don’ts:
- Avoid Overcrowding : Refrain from cluttering the page with excessive information or decorative elements.
- Skipping Proofreading: Never submit without proofreading; errors can diminish the assignment’s credibility.
- Steer Clear of Plagiarism: Always cite sources properly to avoid plagiarism issues.
Best Practices:
- Consistency is Key: Ensure uniformity in font, spacing, and margins throughout the first page.
- Prioritise Clarity: Keep content concise, clear, and relevant, avoiding unnecessary information.
- Seek Feedback: Consider seeking feedback from peers or mentors to refine the first page for maximum impact.
In crafting an assignment first page, following these five essential steps of formatting, title creation, abstract drafting, structuring, and adhering to dos and don’ts can make a significant difference. By understanding the importance of formatting guidelines (for How To Write Assignment First Page), creating an engaging title and informative abstract, structuring the page effectively, and avoiding common pitfalls, anyone can set the stage for a compelling and professional assignment. Remember, the first page acts as a gateway, making a lasting impression on your readers. Paying attention to these steps ensures clarity, professionalism, and an inviting introduction to your work, ultimately ensuring the way to a successful academic journey.
Related Posts

7+ Tips On How To Get Higher Grades In Exams In 2023

How to Write a Research Paper- A guide From Professionals
- Help Center
- Assignments
- Privacy Policy
- Terms of Service
- Submit feedback
- Instructors: Create, edit and delete courses and assignments
Create an assignment
Use Assignments to create, collect, and give feedback on assignments in a learning management system (LMS).
Before you begin
To use Assignments, you need an LMS and a Google Workspace for Education account. The account usually looks like [email protected] . If Assignments isn't installed in your LMS, ask your administrator to go to Get started with Assignments .
Create an assignment in Canvas
- Sign in to Canvas.
- Open the course.
- Enter a name and description for your assignment.
- When you set the points to zero, assignments are left ungraded in Google Assignments.
- Points that use a decimal value will be rounded down in Google Assignments.
- Due dates are imported automatically into Google Assignments if the Canvas assignment has a single due date for all students. Otherwise, the due date is left unset in Google Assignments.
- To save your assignment, click Save or Save & Publish .
- To confirm your changes and return to the rest of your assignment, click Edit .
- Tip : Your Canvas admin might have given Assignments a different name.
- If you’re signed in to your Google Workspace for Education account—Click Continue .
- If you’re not signed in—Sign in with your Google Workspace account.
- If this is your first time using Assignments in this course, you must link your LMS account to your Google Account. For instructions, go to Link your account to Assignments (below).
- Files students submit are shared with the instructor.
- Tip: Files students submit automatically upload to SpeedGrader™.
- Click Create .
Tip : Students can't see an assignment until you publish it.
Copy an assignment to another course in Canvas
- In the sidebar, click Assignments .
- Click Copy .
Use SpeedGrader with Google Drive files
If you create an assignment in Canvas, you can use SpeedGrader to grade students’ Drive files. However, you won’t be able to use the features included in Assignments. For details, go to Use SpeedGrader with Google Drive files in Canvas .
Create an assignment in Schoology
- Sign in to Schoology.
- In the sidebar, click Materials .
- Click Add Materials and select Google Assignments .
- If this is your first time using Assignments in this course, you must link your LMS account to your Google Account. For instructions, go to Link your account to Assignments (below).
- Enter a title for the assignment.
- (Optional) To edit the total points or add a due date or any other instructions, enter the details.
- Click Create .
- Open the assignment.
Create an assignment in another LMS
Setting up an assignment varies for each LMS. Contact your IT administrator. Or, for more information, go to the Assignments Help Community .
Link your account to Assignments
The first time you use Assignments in a course, you need to link your Google Workspace for Education account. When you do, Assignments creates a folder in Google Drive for student assignments and automatically sends grades to the LMS. Students can't submit classwork until you link your account. After you select Google Assignments as an external tool, choose an option based on whether you're:
Google, Google Workspace, and related marks and logos are trademarks of Google LLC. All other company and product names are trademarks of the companies with which they are associated.
Need more help?
Try these next steps:.
14 Best Steps on How to Make an Assignment on MS Word

Nowadays, it is very common for students to complete their assignments using Microsoft Word. Thus, they look up how to make an assignment on MS Word. Because of the numerous options provided by MS Word, it might be difficult for a beginner to handle. All you have to do is become familiar with MS Word’s options before moving on to the assignment.
Here in this blog, we will explain 14 best steps you need to follow in order to know how to make an assignment on MS word.
How to make an assignment on MS word
Table of Contents
Yes, we understand that completing an assignment is challenging for most students. Because some of them are worried about completing the task like write my paper , and even if they aren’t worried, they don’t know how to use Microsoft Word effectively, which can be disastrous for many. Similarly, we are publishing this blog to teach you how to make an assignment in Microsoft Word.
| . |
Yes, we understand that completing an assignment is challenging for most students. Because some of them are worried about completing the task, and even if they aren’t worried, they don’t know how to use Microsoft Word effectively, which can be disastrous for many. This blog is being published to teach you how to make an assignment in Microsoft Word.
1. Setting the layout of the page for your assignment
On the Toolbar, select the Page Layout tab. Likewise, Page Setup options will appear.
2. Set Margins
Set the margins as follows (Standard measure for the margin):
- Bottom: 2.5cm
- Left: 2.5cm (or 3.2cm)
- Right: 2.5cm (or 3.2cm)
3. Setting Orientation of the page
- Orientation: Portrait
4. Setting Size
- Set to A4 unless otherwise specified.
5. Setting styles
Go Back to the Home tab, You will find the Styles options in the right of the toolbar you will need to use these steps to set the headings and paragraph text for your work.
6. For Headings
Always use the first three headings (Heading 1,2 and 3)
- H1: Arial 14 pt bold
- H2: Arial 12 pt bold, italics
- H3: Arial 10.5-11 pt bold
And the text type should be Normal text
- Times New Roman 12 pt (or equivalent)
7. To set the headings styles for your work, you will have to
- Click the small Styles icon/button.
- Select/highlight the style to modify (e.g. ‘H1’), and then right-click >Modify. Likewise, the Modify Style dialog box will appear.
- Under Formatting, You can change the font style and size as per your need.
- Click OK.
8. Setting up your assignment as the one document
Also, your Work, including the title page and references ( not the Assignment Attachment form*), must be aggregated as a single word (.docx) report.
Therefore, it is simpler to make one record, embed your significant headings, and enter the content from that point. But, if you decide to make separate documents while setting up your task (for example, a different record for references), you will need to copy and paste the final contents into the one-word document and finalize the formatting there.
*The assignment attachment structure is either submitted electronically as a different document or attached to a submitted printed copy.
If you face any issues related to PowerPoint or find it difficult to complete your PowerPoint homework, use our PowerPoint PPT Homework Help by Experts .
9. Inserting section breaks, page breaks, and page numbers
The document has two sections
Section 1 Contains
- The title page
- Table of contents
Section 2 Contains
- The remainder of the assignment.
There are then page breaks within each section i.e
(e.g. between ‘Abstract’ and ‘Table of contents’; ‘Conclusion’ and ‘References’).
To insert the Section break (i.e. make two sections)
- Position your cursor at the end of the Table of contents. (Just have this as a heading; the actual table will be added at the end.)
- From the toolbar at the top of your document, open the Page Layout tab and select Breaks>Section Breaks>Next Page. Under Section break types, select ‘Next page’. This has now divided the assignment into two sections.
Now to insert the page breaks
- Place your cursor at the foot of the title (cover) page.
- Select the Page Layout tab>Breaks>Page Breaks>Page. This has now created a page break between the title page and Abstract.
- Place the cursor at the foot of the Abstract page and repeat to make the break between the Abstract and Table of contents.
- Place a page break between the Conclusion in the next section.
10. Now to add the page numbers
For section 1:.
- Place your cursor within the title page. Click on the Insert tab and then select Page Number in the Header & Footer set of options.
- Select Top of Page>Plain Number 3 (‘right’ alignment). Do not close the Header and Footer just yet.
- Check the box for Different First Page. (This will remove the page number from the title page.)
- In the Header & Footer group of options to the left of the toolbar, select Page Number>Format Page Numbers. Select i, ii, iii .. from the Number format
- Drop-down list. Under Page numbering, click the Start at the radio button (if not already activated) and select i. Click OK.
- Close the Header and Footer. [This will paginate slightly differently from the example, with Abstract on page ii. ]
For section 2:
- Go to the start of section 2 (i.e. beginning at the ‘Introduction’) and double click on the existing page number. This will open the Header settings options.
- In the Header & Footer options section on the toolbar, select Page Number>Format Page Numbers.
- Make sure the ‘Show number on the first page is selected (i.e. the box is ticked).
- Select 1, 2, 3 from the Number format drop-down list. Under Page numbering, Click on the Start at the radio button and set the start on page 1.
11. Inserting the Table of contents
- Move the cursor under the ‘Table of contents’ heading.
- Check the checkboxes for ‘Show page numbers’ and ‘Right align page numbers’.In the (last) Show levels box, set it to either just ‘1’ (i.e. list only the heading 1 level headings) or ‘2’ (to show both H1, and H2 headings).
- To update the table anytime, right-click on the table and it’s almost done.
12. The title page
Follow these steps as the model for your work:
- Assignment title: Arial 28 pt, italics, centered
- (Assignment number): Arial 18 pt, italics, centered
- Other details: Times New Roman 14 pt, left-justified; single tab spacing for items on the one line.
13. Word count
Show the word count properly for the body of your assignment, because it’s’ important.
- Place your cursor on the Introduction title, hold the Shift key down, and got to the end of the Conclusion.
- And then Tools>Word Count and record the number of words.
14. Spelling and Grammar Check
Always keep an eye on spelling and sentence structure and Before you get a printed copy of your task,
What you have to do is
- Run the word spell and sentence structure, and carefully look at your Work. (Tools>Spelling and Grammar.)
- Ensure the Dictionary Language is set to English (Australia, UK, Canada).
Get the Best Excel Assignment Help Now
6 Tips On How To Make an Assignment First Page Best
8 Best Steps On How to Write An Assignment Report
4 Tips on How to Write an Assignment Introduction
6 Tips on How to Make An Assignment For High School
To this end, now you know the 14 best steps on how to make an assignment on MS Word in detail. Many times students are worried about their assignments but we are here to assist you with all your problems. You can contact our experts anytime if you have an issue with MS Office assignment help.
As a result, Our computer science assignment help experts are available for you to provide help 24/7.
Related Posts

How to Hire someone to do my Statistics Homework for Me?
Students ask to do my statistics homework for me. Although there are many online tutors or statistics homework service providing websites available to help you…

How to Get Good Grades in Exams Tips by Experts
Here in this blog, Codeavail professional experts will help you to understand how to get good grades in Exams. Notice that not all the material…
Teaching, Learning, & Professional Development Center
- Teaching Resources
- TLPDC Teaching Resources
How Do I Create Meaningful and Effective Assignments?
Prepared by allison boye, ph.d. teaching, learning, and professional development center.
Assessment is a necessary part of the teaching and learning process, helping us measure whether our students have really learned what we want them to learn. While exams and quizzes are certainly favorite and useful methods of assessment, out of class assignments (written or otherwise) can offer similar insights into our students' learning. And just as creating a reliable test takes thoughtfulness and skill, so does creating meaningful and effective assignments. Undoubtedly, many instructors have been on the receiving end of disappointing student work, left wondering what went wrong… and often, those problems can be remedied in the future by some simple fine-tuning of the original assignment. This paper will take a look at some important elements to consider when developing assignments, and offer some easy approaches to creating a valuable assessment experience for all involved.
First Things First…
Before assigning any major tasks to students, it is imperative that you first define a few things for yourself as the instructor:
- Your goals for the assignment . Why are you assigning this project, and what do you hope your students will gain from completing it? What knowledge, skills, and abilities do you aim to measure with this assignment? Creating assignments is a major part of overall course design, and every project you assign should clearly align with your goals for the course in general. For instance, if you want your students to demonstrate critical thinking, perhaps asking them to simply summarize an article is not the best match for that goal; a more appropriate option might be to ask for an analysis of a controversial issue in the discipline. Ultimately, the connection between the assignment and its purpose should be clear to both you and your students to ensure that it is fulfilling the desired goals and doesn't seem like “busy work.” For some ideas about what kinds of assignments match certain learning goals, take a look at this page from DePaul University's Teaching Commons.
- Have they experienced “socialization” in the culture of your discipline (Flaxman, 2005)? Are they familiar with any conventions you might want them to know? In other words, do they know the “language” of your discipline, generally accepted style guidelines, or research protocols?
- Do they know how to conduct research? Do they know the proper style format, documentation style, acceptable resources, etc.? Do they know how to use the library (Fitzpatrick, 1989) or evaluate resources?
- What kinds of writing or work have they previously engaged in? For instance, have they completed long, formal writing assignments or research projects before? Have they ever engaged in analysis, reflection, or argumentation? Have they completed group assignments before? Do they know how to write a literature review or scientific report?
In his book Engaging Ideas (1996), John Bean provides a great list of questions to help instructors focus on their main teaching goals when creating an assignment (p.78):
1. What are the main units/modules in my course?
2. What are my main learning objectives for each module and for the course?
3. What thinking skills am I trying to develop within each unit and throughout the course?
4. What are the most difficult aspects of my course for students?
5. If I could change my students' study habits, what would I most like to change?
6. What difference do I want my course to make in my students' lives?
What your students need to know
Once you have determined your own goals for the assignment and the levels of your students, you can begin creating your assignment. However, when introducing your assignment to your students, there are several things you will need to clearly outline for them in order to ensure the most successful assignments possible.
- First, you will need to articulate the purpose of the assignment . Even though you know why the assignment is important and what it is meant to accomplish, you cannot assume that your students will intuit that purpose. Your students will appreciate an understanding of how the assignment fits into the larger goals of the course and what they will learn from the process (Hass & Osborn, 2007). Being transparent with your students and explaining why you are asking them to complete a given assignment can ultimately help motivate them to complete the assignment more thoughtfully.
- If you are asking your students to complete a writing assignment, you should define for them the “rhetorical or cognitive mode/s” you want them to employ in their writing (Flaxman, 2005). In other words, use precise verbs that communicate whether you are asking them to analyze, argue, describe, inform, etc. (Verbs like “explore” or “comment on” can be too vague and cause confusion.) Provide them with a specific task to complete, such as a problem to solve, a question to answer, or an argument to support. For those who want assignments to lead to top-down, thesis-driven writing, John Bean (1996) suggests presenting a proposition that students must defend or refute, or a problem that demands a thesis answer.
- It is also a good idea to define the audience you want your students to address with their assignment, if possible – especially with writing assignments. Otherwise, students will address only the instructor, often assuming little requires explanation or development (Hedengren, 2004; MIT, 1999). Further, asking students to address the instructor, who typically knows more about the topic than the student, places the student in an unnatural rhetorical position. Instead, you might consider asking your students to prepare their assignments for alternative audiences such as other students who missed last week's classes, a group that opposes their position, or people reading a popular magazine or newspaper. In fact, a study by Bean (1996) indicated the students often appreciate and enjoy assignments that vary elements such as audience or rhetorical context, so don't be afraid to get creative!
- Obviously, you will also need to articulate clearly the logistics or “business aspects” of the assignment . In other words, be explicit with your students about required elements such as the format, length, documentation style, writing style (formal or informal?), and deadlines. One caveat, however: do not allow the logistics of the paper take precedence over the content in your assignment description; if you spend all of your time describing these things, students might suspect that is all you care about in their execution of the assignment.
- Finally, you should clarify your evaluation criteria for the assignment. What elements of content are most important? Will you grade holistically or weight features separately? How much weight will be given to individual elements, etc? Another precaution to take when defining requirements for your students is to take care that your instructions and rubric also do not overshadow the content; prescribing too rigidly each element of an assignment can limit students' freedom to explore and discover. According to Beth Finch Hedengren, “A good assignment provides the purpose and guidelines… without dictating exactly what to say” (2004, p. 27). If you decide to utilize a grading rubric, be sure to provide that to the students along with the assignment description, prior to their completion of the assignment.
A great way to get students engaged with an assignment and build buy-in is to encourage their collaboration on its design and/or on the grading criteria (Hudd, 2003). In his article “Conducting Writing Assignments,” Richard Leahy (2002) offers a few ideas for building in said collaboration:
• Ask the students to develop the grading scale themselves from scratch, starting with choosing the categories.
• Set the grading categories yourself, but ask the students to help write the descriptions.
• Draft the complete grading scale yourself, then give it to your students for review and suggestions.
A Few Do's and Don'ts…
Determining your goals for the assignment and its essential logistics is a good start to creating an effective assignment. However, there are a few more simple factors to consider in your final design. First, here are a few things you should do :
- Do provide detail in your assignment description . Research has shown that students frequently prefer some guiding constraints when completing assignments (Bean, 1996), and that more detail (within reason) can lead to more successful student responses. One idea is to provide students with physical assignment handouts , in addition to or instead of a simple description in a syllabus. This can meet the needs of concrete learners and give them something tangible to refer to. Likewise, it is often beneficial to make explicit for students the process or steps necessary to complete an assignment, given that students – especially younger ones – might need guidance in planning and time management (MIT, 1999).
- Do use open-ended questions. The most effective and challenging assignments focus on questions that lead students to thinking and explaining, rather than simple yes or no answers, whether explicitly part of the assignment description or in the brainstorming heuristics (Gardner, 2005).
- Do direct students to appropriate available resources . Giving students pointers about other venues for assistance can help them get started on the right track independently. These kinds of suggestions might include information about campus resources such as the University Writing Center or discipline-specific librarians, suggesting specific journals or books, or even sections of their textbook, or providing them with lists of research ideas or links to acceptable websites.
- Do consider providing models – both successful and unsuccessful models (Miller, 2007). These models could be provided by past students, or models you have created yourself. You could even ask students to evaluate the models themselves using the determined evaluation criteria, helping them to visualize the final product, think critically about how to complete the assignment, and ideally, recognize success in their own work.
- Do consider including a way for students to make the assignment their own. In their study, Hass and Osborn (2007) confirmed the importance of personal engagement for students when completing an assignment. Indeed, students will be more engaged in an assignment if it is personally meaningful, practical, or purposeful beyond the classroom. You might think of ways to encourage students to tap into their own experiences or curiosities, to solve or explore a real problem, or connect to the larger community. Offering variety in assignment selection can also help students feel more individualized, creative, and in control.
- If your assignment is substantial or long, do consider sequencing it. Far too often, assignments are given as one-shot final products that receive grades at the end of the semester, eternally abandoned by the student. By sequencing a large assignment, or essentially breaking it down into a systematic approach consisting of interconnected smaller elements (such as a project proposal, an annotated bibliography, or a rough draft, or a series of mini-assignments related to the longer assignment), you can encourage thoughtfulness, complexity, and thoroughness in your students, as well as emphasize process over final product.
Next are a few elements to avoid in your assignments:
- Do not ask too many questions in your assignment. In an effort to challenge students, instructors often err in the other direction, asking more questions than students can reasonably address in a single assignment without losing focus. Offering an overly specific “checklist” prompt often leads to externally organized papers, in which inexperienced students “slavishly follow the checklist instead of integrating their ideas into more organically-discovered structure” (Flaxman, 2005).
- Do not expect or suggest that there is an “ideal” response to the assignment. A common error for instructors is to dictate content of an assignment too rigidly, or to imply that there is a single correct response or a specific conclusion to reach, either explicitly or implicitly (Flaxman, 2005). Undoubtedly, students do not appreciate feeling as if they must read an instructor's mind to complete an assignment successfully, or that their own ideas have nowhere to go, and can lose motivation as a result. Similarly, avoid assignments that simply ask for regurgitation (Miller, 2007). Again, the best assignments invite students to engage in critical thinking, not just reproduce lectures or readings.
- Do not provide vague or confusing commands . Do students know what you mean when they are asked to “examine” or “discuss” a topic? Return to what you determined about your students' experiences and levels to help you decide what directions will make the most sense to them and what will require more explanation or guidance, and avoid verbiage that might confound them.
- Do not impose impossible time restraints or require the use of insufficient resources for completion of the assignment. For instance, if you are asking all of your students to use the same resource, ensure that there are enough copies available for all students to access – or at least put one copy on reserve in the library. Likewise, make sure that you are providing your students with ample time to locate resources and effectively complete the assignment (Fitzpatrick, 1989).
The assignments we give to students don't simply have to be research papers or reports. There are many options for effective yet creative ways to assess your students' learning! Here are just a few:
Journals, Posters, Portfolios, Letters, Brochures, Management plans, Editorials, Instruction Manuals, Imitations of a text, Case studies, Debates, News release, Dialogues, Videos, Collages, Plays, Power Point presentations
Ultimately, the success of student responses to an assignment often rests on the instructor's deliberate design of the assignment. By being purposeful and thoughtful from the beginning, you can ensure that your assignments will not only serve as effective assessment methods, but also engage and delight your students. If you would like further help in constructing or revising an assignment, the Teaching, Learning, and Professional Development Center is glad to offer individual consultations. In addition, look into some of the resources provided below.
Online Resources
“Creating Effective Assignments” http://www.unh.edu/teaching-excellence/resources/Assignments.htm This site, from the University of New Hampshire's Center for Excellence in Teaching and Learning, provides a brief overview of effective assignment design, with a focus on determining and communicating goals and expectations.
Gardner, T. (2005, June 12). Ten Tips for Designing Writing Assignments. Traci's Lists of Ten. http://www.tengrrl.com/tens/034.shtml This is a brief yet useful list of tips for assignment design, prepared by a writing teacher and curriculum developer for the National Council of Teachers of English . The website will also link you to several other lists of “ten tips” related to literacy pedagogy.
“How to Create Effective Assignments for College Students.” http:// tilt.colostate.edu/retreat/2011/zimmerman.pdf This PDF is a simplified bulleted list, prepared by Dr. Toni Zimmerman from Colorado State University, offering some helpful ideas for coming up with creative assignments.
“Learner-Centered Assessment” http://cte.uwaterloo.ca/teaching_resources/tips/learner_centered_assessment.html From the Centre for Teaching Excellence at the University of Waterloo, this is a short list of suggestions for the process of designing an assessment with your students' interests in mind. “Matching Learning Goals to Assignment Types.” http://teachingcommons.depaul.edu/How_to/design_assignments/assignments_learning_goals.html This is a great page from DePaul University's Teaching Commons, providing a chart that helps instructors match assignments with learning goals.
Additional References Bean, J.C. (1996). Engaging ideas: The professor's guide to integrating writing, critical thinking, and active learning in the classroom . San Francisco: Jossey-Bass.
Fitzpatrick, R. (1989). Research and writing assignments that reduce fear lead to better papers and more confident students. Writing Across the Curriculum , 3.2, pp. 15 – 24.
Flaxman, R. (2005). Creating meaningful writing assignments. The Teaching Exchange . Retrieved Jan. 9, 2008 from http://www.brown.edu/Administration/Sheridan_Center/pubs/teachingExchange/jan2005/01_flaxman.pdf
Hass, M. & Osborn, J. (2007, August 13). An emic view of student writing and the writing process. Across the Disciplines, 4.
Hedengren, B.F. (2004). A TA's guide to teaching writing in all disciplines . Boston: Bedford/St. Martin's.
Hudd, S. S. (2003, April). Syllabus under construction: Involving students in the creation of class assignments. Teaching Sociology , 31, pp. 195 – 202.
Leahy, R. (2002). Conducting writing assignments. College Teaching , 50.2, pp. 50 – 54.
Miller, H. (2007). Designing effective writing assignments. Teaching with writing . University of Minnesota Center for Writing. Retrieved Jan. 9, 2008, from http://writing.umn.edu/tww/assignments/designing.html
MIT Online Writing and Communication Center (1999). Creating Writing Assignments. Retrieved January 9, 2008 from http://web.mit.edu/writing/Faculty/createeffective.html .
Contact TTU
MS Word Cover Page Templates
Download, personalize & print, assignment front page designs.
Posted By: admin 25/01/2019
What is an assignment front page?
The immediate page that can be seen right after the cover page is known as the front page. The front page is also known as the title page. It is as important as the cover page. An assignment can be submitted without a cover page however, the assignment’s front page can never be skipped.
Why is the assignment’s front page important?
An assignment front page provides information about the student who has created the assignment. This page is considered to be important because it enables the teacher to know about the student who has submitted the assignment. Many students also forget to add their name to the assignment which results in zero marks. The use of the front page in the assignment never lets the student forget to add the name.
How to write the front page of an assignment?
It should be kept in mind that there is no specific format to be followed when it comes to making the assignment front page. However, it should always be ensured that you include all the necessary details on the front page needed by the teacher to identify your assignment. The main details that should be added to the assignment’s front page are:
- Title of the subject
- Topic of assignment
- Name of teacher
- Name and roll number of students
- The registration number of students
- Department in which the student is enrolled
The assignment’s front page should be made with great care. It should be ensured that the details added to it are more than enough for your teacher.
Guidelines for making the assignment front page:
It is important to make a front page that can impress your teacher. Here are a few guidelines that you can follow to make a professional-looking front page.
- Keep the cover page precise. Never overcrowd the front page with a lot of details as it does not look good.
- The front page should be decent and catchy. The color combination for a colored front page should be appropriate since your assignment is representative of your mind.
- Make the design of the front page attractive and catchy. It should be able to grab the attention of the teacher. If you are not good at designing the front page, you can use a template.
Assignment front page template:
For those who want to save time and effort, readymade templates for the front page of an assignment are available here.
There are lots of assignment front page samples that you can see and choose the one that you like. The likeness of the design varies from person to person. Therefore, different samples from the perspective of different people have been given here.
The assignment front page samples are designed in MS Word mostly. The samples have been designed by the experts. Since they are readymade, all you need to do is add the details specific to you and print the template. You can also bring changes to them according to your likes.
Business Report Cover Pages
MS Word Report Cover Pages
Printable Cover Pages
Professional Cover Pages
Book Cover Page Templates
Book Title Page Templates
Computer Assignment Cover Pages
Engineering Assignments Cover Pages
Physics Assignment Cover Pages
Chemistry Assignment Cover Pages
Biology Assignment Cover Pages
University Assignment Cover Pages
Mathematics Assignment Cover Pages
English Assignment Cover Pages
Social Study Assignment Cover Pages
Be the first to comment on "Assignment Front Page Designs"
Leave a comment cancel reply.
Your email address will not be published.
Save my name, email, and website in this browser for the next time I comment.

How to Make a Cover Page for Assignment
Table of Contents
What Is the Cover Page of an Assignment
What does the title page contain, how to make assignment first page, assignment cover page example, some useful resources to approach cover page making.
Without a doubt, if you have already written at least one college assignment, the chances are high that you know a bit about the rules of composing an assignment cover page. Even if this concept sounds new to you, the importance of an accurate cover assignment cannot be ignored. It is one of the most crucial attention grabbers. It provides metadata with all the vital information like your name, course number, university specifics, and so on. While it will always depend on each particular course, there are still rules that one must know and check along the way as the assignment is composed.
Another reason why a cover page is important for every college assignment is the first impression factor. It is the first element that your college professor would encounter by seeing your paper. Therefore, if your cover sheet is not done properly in terms of style and format or has anything missing, it will make an instant impression that you are not focused and attentive. Likewise, it can impact your final grade in a negative way. As you might be asking for some assignment help online , make sure that you share detailed information about your cover assignment requirements to do everything correctly. It is exactly the case where being precise matters!
While the rules might differ for every style format and the university in question, there are still obligatory parts that will be met in almost every institution. As you may be asked to follow the classic MLA header format with the name and the title written on the left top part of the page, you may still be required to create a separate cover page. It is done to help the teachers see the content and to avoid mixing up subjects they have to check. The obligatory cover page elements must include (in the following order):
- Assignment Title . This is your name part of the cover page that takes the central part of the page. The title is always centered. As for the cover page for assignment font size, always consult your academic advisor.
- Student’s Name . The cover assignment format requires your full name as written on the student’s card. You may also have to include your academic advisor below your name if your course requires so. It is also the part where your registration number or any other critical details may be mentioned.
- Academic Details . It means that you should provide your academic information like the name of the professor, class name, section number, relevant paper details, subject name.
- The Date and Signature . Always provide the current date according to your format and style. In certain cases, you may have to include your handwritten signature, especially for the final college assignment cover page or when you are granted laboratory access.
Find the writer according to your requirements
- AssignmentBro is a team of experienced writers in any field of academic research
- We thoroughly choose writers with advanced multistep selection process
- Our writers work according to the highest academic standards
You have two options to write an assignment first page:
- Download your university’s cover page template.
- Make your own from scratch.
- Find free templates and replace the information for your paper type with all the obligatory fields that must be included.
In either case, your assignment title page will always depend on your academic writing format (APA, MLA, etc).
Below is the basic university cover page sample that you can use as a visual reference. Do not forget that in certain cases you will have to use your university’s cover page template that will have a shiny header included, unlike this one.

Essentially, you should always check with your college professor regarding what kind of information must be included and how your cover page must be formatted. It is always good to have a good example.
Here are some useful resources related to cover page tasks for all purposes (not only your university assignments!):
- Design Cover Pages Online for Free.
- Professional Report Cover Page Templates.
- Free Cover Page Images.
- Purdue Owl’s APA Formatting Guide.
- 43 Free MS Word Cover Page Templates.
Remember that these should be used as assignment front page templates. It means that you can download any of them and adjust things to match your course name and the other requirements. Do not forget to check every point regarding space and indents twice!
As you are done with your cover page, check the spelling of your name for mistakes and verify the other important spellings twice. Next, take a look at the current date to ensure that you have the correct formatting. As the final measure, check the general formatting rules in terms of spacing and fonts. If your university does not provide you with a template, you can approach one of the free templates above or have a talk with your college professor in case of any doubts!

What is an Assignment and Why Do We Need it? An assignment is a set task students or employees must complete as part of their study or job role and is usually presented in written form...
What is an Assignment and Why Do We Need it? An assignment is a set...
❓ What is a case study assignment and how to write one? Unsure of how to do a case study assignment? Read on, to help you get started! A case study assignment is based on a professional...
❓ What is a case study assignment and how to write one? Unsure of...
What is an Acknowledgement in Academic Writing? Writing an acknowledgment for a college paper, research project or dissertation is an important section. It gives students an opportunity to...
What is an Acknowledgement in Academic Writing? Writing an...
Over 1000 students entrusted Bro
We use cookies to give you the best experience possible. By continuing we’ll assume you board with our cookie policy .
Assignment Front Page Format, Design, and PDF File
Today we are sharing the assignment first page format for schools and college students. This format very useful for students for their assignment submission in school, college and university. You can also download this assignment front page design in word file format.
Note: There is a no specific and pre-defined format for assignment cover page. The front page of assignment define by school, college, university, etc. But there is general format for assignment submission which is use globally. You can change or modified this format according to you.

1. Assignment Front Page Format
2. Assignment Cover Page Design

3. Download Assignment Design PDF & Word File
Here you can download the assignment front page format in word download. You can easily download assignment design file and edit it as per your need. You can also find this files in your Microsoft Office. Choose you best assignment front page design and impress your teachers or professors.

Source File & Credit: Microsoft Office
Use Microsoft Word to edit this file. You can easily edit this file in Microsoft Office. Replace the file with your college name, logo, etc.
Assignment is a very crucial part in academic. Your project report front page or assignment first page design play an important role like first impression is last impression. If you impress your processor or teacher then you will score good mark.
See More: General Topics for Presentation
IMAGES
VIDEO
COMMENTS
Content Page Of Assignment..How To Make An Effective Content Page On MS Word..With Formatting..#ContentPages#AssignmentSeries #EffectiveAssignment #Formattin...
Now you can generate your table of contents. First write the title "Contents" (in the style of a level 1 heading). Then place your cursor two lines below this and go to the References tab. Click on Table of Contents and select Custom Table of Contents…. In the popup window, select how many levels of heading you wish to include (at least ...
Make a table with two columns. Then, place the headings and subheadings in the first column in order. Put the applicable page numbers in the second column. Check that the subheadings are located underneath the correct headings, indented to the right. Make sure there are page numbers for the subheadings listed as well.
Insert the Contents Page. A contents page is normally inserted at the beginning of the document. Scroll to the top of the document and position the cursor before the first letter of the first word in the document. Press CTRL+Enter to insert a page break. Click the References tab.
Put your cursor where you want to add the table of contents. Go to References > Table of Contents. and choose an automatic style. If you make changes to your document that affect the table of contents, update the table of contents by right-clicking the table of contents and choosing Update Field. To update your table of contents manually, see ...
Title page. Most assessments need a title page, which should include: the title and number of the assessment; the course number and name; the due date; your full name and student number. Centre this information on the page, starting approximately one-third of the way down the page. Numbering. Number and clearly label figures and tables.
Double-space the whole title page. Place the paper title three or four lines down from the top of the page. Add an extra double-spaced blank like between the paper title and the byline. Then, list the other title page elements on separate lines, without extra lines in between.
1. Margins: Leave one-inch margins on all sides of your cover page to give it a neat look and provide space for your text. 2. Font: Stick to Times or Times New Roman font in 12 pt size for a professional appearance that's easy to read. 3. Spacing: Double-space the text on your cover page to make it clear and readable.
To construct an assignment structure, use outlines. These are pieces of text that relate to your topic. It can be ideas, quotes, all your thoughts, or disparate arguments. Type in everything that you think about. Separate thoughts scattered across the sheets of Word will help in the next step. Then it is time to form the text.
Brightspace enables users to create assignments that allow students to submit their work for grading. There are two primary methods for creating assignments: 1) Users may create an assignment directly on the assignment page. 2) Users may create an assignment on the content page. This tutorial will show you Method #2.
Step 4: Click the arrow that is next to the TOC icon and select Custom Table of Contents. Here, select the level of heading that you would like to include in your table and also make the necessary adjustments to each level by clicking the modify button. Click on Custom table of contents.
An easy to follow tutorial demonstrating all the tools and techniques needed to create a cover page for your assignment, report or thesis. The themes, graph...
Download Free Cover Page Templates. Explore our collection of 23 beautifully designed cover page templates in Microsoft Word format. These templates feature captivating colors and layouts that are sure to make a lasting impression. Simply click on the preview image of each template and download it for free.
Place your assignment title at the top of your first page, either centre or left aligned, in bold font. At university, you may be assigned a pre-designed essay title/question, or asked to select from several possible titles. You may also be asked to design your own essay title. Here are some top tips on designing your own title: To bring focus ...
Assignment cover pages are very useful and can be created in MS Word or Adobe. MS Word software allows pictures and text to be used on the cover page. Students may also use headers and footers, page borders, and other features in MS Word to create a nice cover page. You can even use the popular heading styles given in MS Word.
Step 2: Guidelines On Font Spacing And Margins. Follow these standards ensures a clean and professional appearance for your assignment's first page: Font Style and Size: Use a readable font style like Times New Roman, Arial, or Calibri. Typical font size is 12 points for the main text.
Open the course. In the sidebar, click Assignments. Next to the assignment, click More Copy To. Under Select a Course, enter the name of the course click the course. (Optional) To copy the assignment to a specific module, under Select a module (optional), enter the name of the module click the module. Click Copy.
13. Word count. Show the word count properly for the body of your assignment, because it's' important. Place your cursor on the Introduction title, hold the Shift key down, and got to the end of the Conclusion. And then Tools>Word Count and record the number of words. 14. Spelling and Grammar Check.
However, when introducing your assignment to your students, there are several things you will need to clearly outline for them in order to ensure the most successful assignments possible. First, you will need to articulate the purpose of the assignment. Even though you know why the assignment is important and what it is meant to accomplish, you ...
The main details that should be added to the assignment's front page are: Title of the subject. Topic of assignment. Name of teacher. Name and roll number of students. The registration number of students. Department in which the student is enrolled. The assignment's front page should be made with great care.
Student's Name. The cover assignment format requires your full name as written on the student's card. You may also have to include your academic advisor below your name if your course requires so. It is also the part where your registration number or any other critical details may be mentioned. Academic Details.
Your project report front page or assignment first page design play an important role like first impression is last impression. If you impress your processor or teacher then you will score good mark. See More: General Topics for Presentation