

Create or change a presentation’s handout
You can use the Handout Master tab to edit the appearance of presentation handouts, including the layout, headers and footers, and background. Changes made to the handout master appear on all pages of the printed handout.
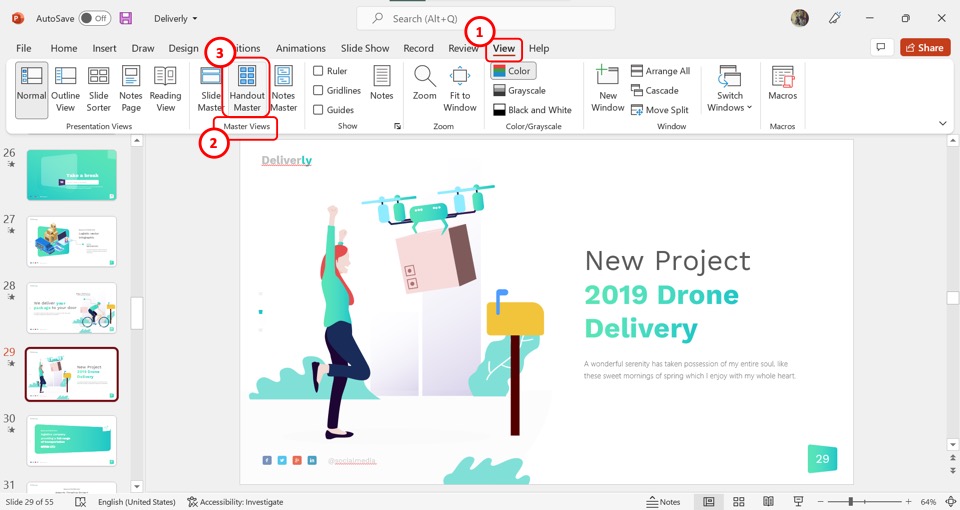
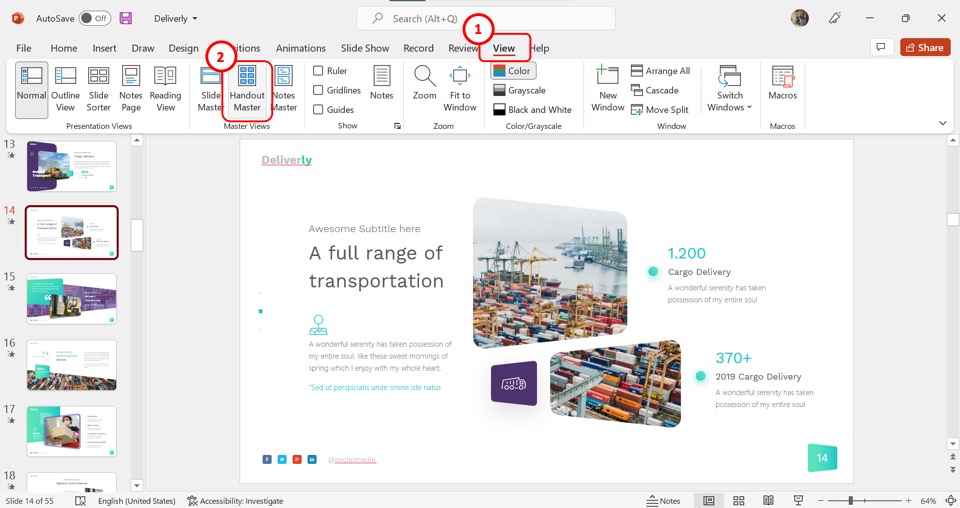
To see the handout options, click the View tab, and then click Handout Master in the Master Views group.

This opens the Handout Master view.

Change the layout
In the Page Setup group, you can specify the number and layout of slides to print on each page, change the orientation of handouts, and set the slide size. You can use settings on all three menus— Handout Orientation , Slide Size , and Slides Per Page —to customize your layout exactly how you want it.

Set the slides per page
Click Slides Per Page .

Choose a layout option from the thumbnail images.
Tip: The 3 Slides option includes lines that your audience can use to take notes.
Set the orientation
Click Handout Orientation , and then choose Portrait or Landscape .

Set the slide size
Click Slide Size , and then choose one of the options.

When PowerPoint is unable to automatically scale your content, it will prompt you with a message. Select Maximize to increase the size of your slide content when you are scaling to a larger slide size. (Choosing this option could result in your content not fitting on the slide. ) Select Ensure Fit to decrease the size of your content. (This could make your content appear smaller, but you’ll be able to see all content on your slide.)

To set a custom size, including width, height, slide numbering, and orientation of slides and notes, click Custom Slide Size on the Slide Size menu.
To make sure your slides will print the way you want, preview your handouts before printing.
Change headers and footers
You can adjust headers and footers in the Placeholders group. By default, the placeholders appear in the top and bottom corners of the Handout Master page.

Click in a text placeholder (Header, Footer, Date, or Page Number) to make changes to it. You can do things like:
Edit or add content in the text placeholders : In addition to text changes, you can use commands on the Insert tab to add graphics or other content types.
Format text shape and appearance : Select the text and use the options on the Format tab to make changes.
Change text placeholders : Drag a text placeholder to move it, and use the text box sizing handles to change its size.
Turn placeholders on or off : Clear the check box of the placeholder (Header, Date, Footer, or Page Number) that you want to turn off.
Change the background
You can change the background of your handouts (but not the background of your slides) in the Background group. You can also quickly change the font for all for your handout text at once, and you can apply special borders and visual effects.

Colors : Choose a color theme for your handout background. You may have to click Background Styles and choose an option to see it applied.
Background Styles : Choose a style option from the list. The colors displayed depend on your choice in the Colors list.
Tip: Click Format Background at the bottom of the Background Styles list to open the Format pane and choose from more background options, such as advanced fill settings, artistic effects, and color and image settings.
Fonts : Choose a font from the list to quickly apply it to all headers and footers.
Effects : Choose an effect from the list to apply a theme effects, with features including shadows, reflections, lines, fills, and more.
Preview your handouts
To preview the way your handout will look when printed:
Click File > Print .
Go to Settings > Full Page Slides , and then under Handouts , select the layout you want and look at the preview pane. Click the File tab again to return to your previous view.
For more information about working with PowerPoint handouts, see:
Work with handout masters
Print your handouts, notes, or slides
Create your own theme in PowerPoint

Need more help?
Want more options.
Explore subscription benefits, browse training courses, learn how to secure your device, and more.

Microsoft 365 subscription benefits

Microsoft 365 training

Microsoft security

Accessibility center
Communities help you ask and answer questions, give feedback, and hear from experts with rich knowledge.

Ask the Microsoft Community

Microsoft Tech Community

Windows Insiders
Microsoft 365 Insiders
Was this information helpful?
Thank you for your feedback.
Microsoft 365 Life Hacks > Presentations > How to create effective presentation handouts
How to create effective presentation handouts
Whether you create presentations for school, work, or clubs, distributing handouts makes an impression and amplifies your message. The benefits are twofold: putting together a handout prepares you for your speech and allows your audience to retain the information better.
You can put together handouts easily. Learn what to include to ace your next presentation.

Why are presentation handouts important?
Creating handouts help you prepare what you want to say . They also set expectations for your audience members and allow them to focus more on your speech because they don’t have to take such thorough notes.

Tell your story with captivating presentations
Powerpoint empowers you to develop well-designed content across all your devices
If you want to create an effective presentation handout, here’s what you should include.
1. List the key points of your presentation
To create a strong presentation handout, list the key facts from your speech. Keep it simple—you don’t need to rewrite your entire presentation. Remember, you’ll discuss a lot of the material in your slides as well. Listing out your presentation’s key points help your listeners reflect on the information later. By reading your presentation’s key points, your audience may also come up with or remember the questions they want to ask you at the end of your talk.
2. Include your sources
Effective presenters back up their information with sources, especially in science and history-related fields. Providing sources encourages your audience do more research on their own time. You can also provide further reading in your handout, like books or article links, if you aren’t able to cover everything in a single lecture.
3. Make your presentation handout professional
A professional-looking presentation handout establishes your credibility and authority with your audience. When presenting for work or an organization, include your logo on your handout.
You don’t have to be a graphic designer to create an attractive presentation handout—explore dozens of free Microsoft Word templates you can use to polish your handout.
4. Include white space
Not everyone comes prepared for a presentation. Leave white space in your handout so your audience can take notes on what you say. They can also use this space to write down questions they want to ask you, so they don’t forget them by the end of the presentation.
5. Include your contact information
Audience members may want to ask you questions about your presentation later. Include information like your name, job title, website, and email so your audience can contact you in the future.
6. Proofread your handout
Before you print out or email your presentation handouts, make sure to thoroughly proofread everything first. Are your sources spelled correctly? Are there any typos in your email address or links? Do the key points correspond with your presentation? Taking the time to review your handout before finalizing it will ensure it’s a quality handout.
Creating a presentation handout will make your presentation stronger and the information easier to digest. Are you feeling nervous about an upcoming presentation? Learn how to calm presentation anxiety .
Get started with Microsoft 365
It’s the Office you know, plus the tools to help you work better together, so you can get more done—anytime, anywhere.
Topics in this article
More articles like this one.

How to introduce yourself in a presentation
Gain your audience’s attention at the onset of a presentation. Craft an impressionable introduction to establish tone, presentation topic, and more.

How to add citations to your presentation
Conduct research and appropriately credit work for your presentation. Understand the importance of citing sources and how to add them to your presentation.

How to work on a group presentation
Group presentations can go smoothly with these essential tips on how to deliver a compelling one.

How to create a sales presentation
Engage your audience and get them interested in your product with this guide to creating a sales presentation.
Everything you need to achieve more in less time
Get powerful productivity and security apps with Microsoft 365

Explore Other Categories
Book a complimentary consultation
What type of service are you looking for, thanks we will contact you soon.
+1 (617) 982-3329
Effective Presentation Handouts: A Step-by-Step Guide
Discover how to create handouts that captivate and educate your audience. From layout to content, learn easy-to-follow techniques to make your presentation handouts stand out. Start now and make a lasting impression

What’s a Rich Text element?
The rich text element allows you to create and format headings, paragraphs, blockquotes, images, and video all in one place instead of having to add and format them individually. Just double-click and easily create content.
- Nostrum non voluptas alias sit ut corporis perspiciatis nihil molestiae. Vitae quidem aut aut quia quia porro explicabo. Similique occaecati sit quo. Enim enim dolor ut. Et error alias nam fuga voluptas inventore placeat et. Eligendi similique officia provident magni aut quasi soluta qui.
- Deleniti totam eius similique repellendus.
- Deleniti totam eius similique repellendus. Doloremque sunt nihil et. Tenetur delectus velit ut. Pariatur velit ipsa.
3 Static and dynamic content editing
4 static and dynamic content editing.
A rich text element can be used with static or dynamic content. For static content, just drop it into any page and begin editing. For dynamic content, add a rich text field to any collection and then connect a rich text element to that field in the settings panel. Voila!
5 Static and dynamic content editing
6 static and dynamic content editing.
A rich text element can be used with static or dynamic content. For static content, just drop it into any pa ge and begin editing. For dynamic content, add a rich text field to any collection and then connect a rich text element to that field in the settings panel. Voila!
How to customize formatting for each rich text
Headings, paragraphs, blockquotes, figures, images, and figure captions can all be styled after a class is added to the rich text element using the "When inside of" nested selector system.
"Headings, paragraphs, blockquotes, figures, images, and figure captions can all be styled after a class is added to the rich text element using the "When inside of" nested selector system."
Presentation handouts can play a significant role in the process of effective presentation delivery if you know how to use them to your benefit. These supplementary means can back up your main message and make sure that your presentation creates a lasting impression.
Many people think that handouts for a presentation are something they used to work on while in college. However, these additional materials, if they are well-thought-out and relevant, can assist business professionals, educators, and students equally well.
Today, we'd like to discuss the main purpose of presentation handouts. We'll show you how to plan and design effective handout material. Moreover, we will also share a few handy tips and useful tools to amplify the effect of your supplementary means.
Does that sound like a plan?
Understanding Presentation Handouts
Jerry Weissman , the author of 'Presenting to Win: The Art of Telling Your Story," compares the notion of a presentation handout to a bridge between your presentation and the long-term memory of your audience. We want to simplify the definition a little. Presentation handouts are additional materials that you share with the audience to support the central message of your presentation and improve the level of comprehension.
If you put a handout and a presentation face to face, the first one will remain the static source of additional information that the viewer can refer to at any time. At the same time, presentations are a dynamic source of information, and a viewer does not have any control over its pace.
Usually, a presentation contains multiple vital aspects for the audience to focus on and digest. The main aim of handouts for presentations is to enhance viewer engagement and ensure a lasting impact even when the presentation is over. You can refer to the handouts at any time during the presentation or after it, so the materials improve retention and help to recall specific essential details.
The handouts mustn't replicate the presentation. They should complement it.
Planning Your Handouts

A great example of a handout for a presentation is a well-planned one. It means that you shouldn't treat your handouts as a last-minute task.
Key information
As you brood upon the data to include, you can start with additional statistics, relevant details, and facts that support and strengthen the core message of your presentation. Choose information that helps the audience understand some field-specific or overly complex notions.
Highlight the main aspects that you want the audience to remember in your handouts.
Audience needs
Another critical part of the handout planning is the audience you will interact with. You should consider the level of expertise, needs, and preferences when working on supplementary materials. There will be little use of handouts that are irrelevant, overly simplified, or too complicated.
Format and structure
Even the best handouts will lose their impact if they are unappealing, illogical, and unorganized. A neat structure topped with relevant visuals will enhance user perception and trigger their productivity. That is why you may want to play around with different headings, supporting images, graphs, bullet points, colors, and fonts.
Designing Effective Handouts
A quality presentation handout template relies on effective design as much as it depends on the informative component. There are a few principles to stick to when you design your handouts.
Basic design
Whitepage pitch deck design agency outlines three principles that may assist you in creating a successful handout for presentation.
Use these practical tips to move in the right direction:
- Present different types of content in complementary but distinguishable fonts
- Section information with the help of headings and subheadings
- Outline the main aspects through bullet points
- Ensure that all the data is easy to read, avoid unclear and small fonts
- Use the same color palette and theme throughout the presentation and the supplementary materials
- Add brand logos to stress consistency

The right visuals make any information twice as easy to remember and digest. Whitepage professionals share the following advice:
- Use charts, tables, graphs, and other visuals to deliver complex notions concisely and more comprehensively.
- Intertwine text content with images that complement the core narrative
- Symbols and icons aid in better understanding

Appeal and informativeness
It is not enough to design visually appealing presentation handout templates. They should carry out an informative purpose as well. You can do the following to achieve the desired effect through your presentation handouts:
- Use different colors to highlight vital points and trigger the reader's interest
- Use whitespaces to define the structure of your handouts
- Use contrast to attract user attention to critical aspects of the presentation

Content Creation for Handouts
We may be stating the obvious, but your handouts should contain clear and concise content. You don't want to distract the audience from the presentation as they are trying to make out some complex notions written in the supplementary materials.
A professional handout sample for presentation should:
- Deliver the main message without unnecessary details mentioned
- Steer clear of tech-savvy language and slang and preserve an accessible tone
- Present essential data through lists and bullet points

On top of that, you can complement your handouts with relevant and appealing, not to mention appropriate visuals. Different charts and images can improve information perception and enhance retention.
Lastly, handout ideas for presentations prove to generate better results when spiced up with well-thought and strategic CTAs(Call-to-Action elements):
- Give the audience clear instructions if any action is requested
- Use questions and activities to promote engagement
- Provide contact information in case someone decides to contact you later
Utilizing Technology in Handout Creation

After you come up with a desired design and content, you will naturally start to wonder how to make a handout for a presentation. Luckily, many tools and software solutions come of use.
Platforms like Microsoft PowerPoint, Adobe InDesign, Canva, Venngage, and Inkscape present multiple features to create and enhance handouts. Some of them are free. Others include paid options. You can work on text, visuals, and charts using these tools.
However, if you want to make your presentation handout example a little more interactive, you should implement such interactive elements as QR codes and online resource links. You can find free QR code generators online to succeed with the task effectively.
QR codes can serve as a linking piece between physical and digital supplements. As the audience exploits their devices during the presentation, they will find additional facts and details that intensify the primary message. The same applies to online resource links if you use digital handouts only.
We would like to stress the fact that a balance of printed information and digital addition will add more dynamics to the learning process. Such an approach ensures that you cater to every user's needs and provide a better and more memorable experience.
Printing and Distribution
You can present your handout examples for presentation in two formats – either physical or digital. Each comes with a set of perks and downsides.
Physical handouts
The physical template for the presentation handout is a good old sheet of paper that contains all the information you want to share with the audience. It is material, you can touch it, and you don't require additional devices to interact with it. On a slightly less bright side, print paper has a negative environmental impact, which is a concern for many. You can try to decrease that impact by using recycled paper, vegetable ink, and double-sided printing.
Digital handouts
Digital examples of handouts for presentations that do not pose an environmental threat can be shared within seconds through email and other online platforms. They can be enhanced with all sorts of multimedia and interactive elements. However, digital handouts can't be accessed without electronic devices that support the format. While that isn't much of a challenge in today's world, the use of various devices can distract the audience from the presentation.
Distribution timing

There's an ongoing debate as to when you should plan to distribute a presentation handout: before, during, or after the presentation. Different timing can have a diverse effect on the audience.
Before . Some of the viewers may get curious and leaf through the material before you start. This means they will know what to expect from the presentation. It isn't entirely a bad thing, but it may have a distractive effect.
During . You can share your handouts to support the presented message and help the audience understand some points or learn more about the subject.
After . If you want to ensure that the message sets in, you can share the handouts after the presentation is over. In this case, you should include your contact information in the handout to make sure that the audience can reach out to you in case of any questions.
Examples and Templates
If you still feel a bit uncertain about how to make a handout that is well-structured and appealing, you can make use of downloadable templates.
Education handouts
A good teaching plan will have a positive effect on the students. You can enhance their interest and involvement with an elegant and straightforward handout template.
Business handouts
Any business plan presentation highlights a fair share of statistics and analytical information. With a template like this, you can coat complex notions into simple visuals and improve user experience, which leads to better understanding and positive actions.
All-purpose handouts
Some templates can be suited for any purpose. While they are subtle and non-specific, they remain well-structured and appealing.
If you need more presentation handout ideas to inspire from, our experts suggest you check these sources out:
- Template.net
- WPSTemplate
Common Mistakes to Avoid

As you try to keep away from making presentation design mistakes , you should try to minimize handout errors as well. There are a few common pitfalls to stay clear of:
- Information overload – use white spaces to avoid clutter and hand-pick information you want to add to the template.
- Poor readability – choose clear and legible fonts, and don't try to overdecorate the handout.
- Color distraction – try to use complementing and subtle colors so that the color palette doesn't hurt the eye and make the viewer's mind wander.
- Absent interactivity – while static content is necessary, you should combine it with such interactive elements as QR codes and links to relative resources.
- Low content quality – you must proofread your handouts before sharing them with the audience to avoid any typos and errors that can put your professionalism under question.
Advanced Tips for Professionals
Is there any professional advice on how to make handouts that promote successful presentations? Professional presentation design services point out a few advanced tips you can benefit from:
- You can use more than a single QR code and place them strategically so that one complements the other and boosts user engagement.
- Make your infographics interactive if you are using digital handouts. Implement additional details that the audience can find by hovering over certain icons. Make sure you highlight those interactive parts.
- Leave blank spaces for the users to write down critical points and make notes.
- Modern design is all about minimalism. Consider the trend when designing your template.
- Consider investing in responsive design when using digital handouts.
- Make sure that your digital handouts work across multiple devices.
- Create collaborative templates that allow different members to interact and discuss some crucial points.
What is a handout for a presentation? It is a practical link between your presentation and the audience. A quality presentation handout can enhance subject perception, improve understanding, and promote desired impact.
If you consider your audience's needs, keep up with modern presentation trends, and create concise and well-structured supplementary materials, you can count on projecting a lasting impression and succeeding with your project goals.
Wonder how to hire a presentation design agency to help you achieve the desired result and get ahead of the competition? Whitepage team is only a phone call away!
Download "What Should Be in a Pitch Deck Presentation" for free!

Thank you, we have sent you the material to your mail
Talk to a presentation design expert now.

Expand Your Presentation: Make Them Longer & Stronger

The Ultimate Guide to Body Language in Public Speaking

The Ultimate Guide for Using Fonts in Decks & Presentations
Presentation Design
Presentation
Design tips
Presentation hacks

8 Transformative Tips to Speak Eloquently | Master Presentation Eloquence

How to Write an Effective Presentation Outline

Master Slide Deck Presentations: Expert Tips to Captivate Your Presentations

Common Presentation Design Mistakes
Case Studies
2024 © Whitepage. All rights reserved.
- Skip to main content
- Skip to secondary menu
- Skip to primary sidebar
- Skip to footer
Erin Wright Writing
Writing-Related Software Tutorials
How to Create Handouts in PowerPoint (Printable & Editable)
By Erin Wright

Quick Links:
How to Create Printable PowerPoint Handouts
How to create editable powerpoint handouts with microsoft word.
This tutorial is also available as a YouTube video showing all the steps in real time.
Watch more than 100 other writing-related software tutorials on my YouTube channel .
The images below are from PowerPoint for Microsoft 365 and Word for Microsoft 365. These steps also apply to PowerPoint 2019, PowerPoint 2016, and PowerPoint 2013.
- Select the File tab in the ribbon.

- Select Print in the Backstage view.

- (Optional) If you don’t want include all your slides, enter specific slide numbers separated by commas or a number range (e.g., 3,5,7,9-14) into the Slides text box.

- Select the Full Page Slides menu.

- Select an option from the Handout section in the menu. (You may need to use the scrollbar on the right side of the menu to see all the options shown here.)
- One slide per page
- Two slides per page
- Three slides per page with lines for notes
- Four horizontal slides per page
- Six horizontal slides per page
- Nine horizontal slides per page
- Four vertical slides per page
- Six vertical slides per page
- Nine vertical slides per page

- (Optional in PowerPoint for Microsoft 365 only) Uncheck Print slide numbers on handouts if you don’t want to include slide numbers.

- (Optional) Enter the number of copies into the Copies text box.

- Select the Print button.

PowerPoint doesn’t provide a way to save the handout options you just chose. So, repeat these steps if you need to print additional handouts in the future.
Important Note: Some users may have difficulty exporting large PowerPoint files into Microsoft Word. If you encounter problems, please see the Microsoft Support website for two possible solutions .
- Select the File tab in the ribbon (see figure 1).
- Select Export in the Backstage view.

- Select Create Handouts in the Export screen.

- Select the Create Handouts button.

- Select a page layout option from the Send to Microsoft Word dialog box. (The dialog box label may be abbreviated to “Send to Microsoft…”)
- Note next to slides
- Blank lines next to slides
- Notes below slides
- Blank lines below slides
- Outline only (This option only pastes the text from your slides, not the slides themselves.)

- Select the Paste or Paste link option. (These options won’t be available if you selected “Outline only” in step 5.)
- Paste duplicates your slides and notes (if applicable) into a Word document.
- Paste link duplicates your slides and notes (if applicable) into a Word document and creates a link between the files. Therefore, if you update your PowerPoint slides, the Word file will update also. (Unfortunately, the links don’t apply to PowerPoint notes.)

- Select the OK button.

Your PowerPoint file will be pasted into a Word document. This process may take several moments if your PowerPoint file is large.
- If Microsoft Word doesn’t open automatically, select the Word icon in the Windows taskbar.
- Within Word, your slides and notes (if applicable) are placed in a table. Select the table selector to see the table rows and columns, which you can adjust or delete.

For more information about working with tables in Word, please see “ Three Ways to Insert Tables in Microsoft Word .”
How to Update the Link between Your PowerPoint Slides and Your Word Handouts
If you selected Paste Link in step 6 but don’t see updates in your Word handouts after updating the PowerPoint slides, right-click the slide in the Word file and then select Update Link from the shortcut menu.

Continue to add content to your new Word file, and then save and print it as you normally would.
Related Resources
How to Save Shapes and Objects as Images in PowerPoint
How to Convert PDFs to PowerPoint Slides in Adobe Acrobat
How to Insert a Linked PowerPoint Slide in Microsoft Word
Updated November 02, 2021
- Microsoft Word Tutorials
- Adobe Acrobat Tutorials
- PowerPoint Tutorials
- Writing Tips
- Editing Tips
- Writing-Related Resources
- PRO Courses Guides New Tech Help Pro Expert Videos About wikiHow Pro Upgrade Sign In
- EDIT Edit this Article
- EXPLORE Tech Help Pro About Us Random Article Quizzes Request a New Article Community Dashboard This Or That Game Happiness Hub Popular Categories Arts and Entertainment Artwork Books Movies Computers and Electronics Computers Phone Skills Technology Hacks Health Men's Health Mental Health Women's Health Relationships Dating Love Relationship Issues Hobbies and Crafts Crafts Drawing Games Education & Communication Communication Skills Personal Development Studying Personal Care and Style Fashion Hair Care Personal Hygiene Youth Personal Care School Stuff Dating All Categories Arts and Entertainment Finance and Business Home and Garden Relationship Quizzes Cars & Other Vehicles Food and Entertaining Personal Care and Style Sports and Fitness Computers and Electronics Health Pets and Animals Travel Education & Communication Hobbies and Crafts Philosophy and Religion Work World Family Life Holidays and Traditions Relationships Youth
- Browse Articles
- Learn Something New
- Quizzes Hot
- Happiness Hub
- This Or That Game
- Train Your Brain
- Explore More
- Support wikiHow
- About wikiHow
- Log in / Sign up
- Computers and Electronics
- Presentation Software
- PowerPoint Presentations
How to Create a Powerpoint Handout
Last Updated: March 19, 2023
This article was co-authored by Vikas Agrawal and by wikiHow staff writer, Nicole Levine, MFA . Vikas Agrawal is a Visual Content Marketing Expert & Entrepreneur, as well as the Founder of Full Service Creative Agency Infobrandz. With over 10 years of experience, he specializes in designing visually engaging content, such as infographics, videos, and e-books. He’s an expert in Making content marketing strategies and has contributed to and been featured in many publications including Forbes, Entrepreneur.com, and INC.com. This article has been viewed 177,784 times.
If you're giving a PowerPoint presentation and want to provide your viewers with a printed version, you can create a handout page. A handout page is a printed version of your presentation that can help viewers follow along, take notes, and keep the information for their own record. Since you can place more than one slide on a single handout, printing handouts rather than the entire presentation can save you a lot of paper and printer ink. This wikiHow teaches you how to quickly print helpful PowerPoint handouts, as well as how to design a handout master that lets you save handout customizations for future printing.
Printing Handouts the Quick Way

- Keep in mind that the more slides you print on one page, the smaller the text will be on each slide—if your slides are text-heavy, 6 slides per page should be your limit.
- If you want to encourage viewers to take notes as they watch your presentation, try the "3 slide" option—this prints three slides per page with ruled areas for note-taking next to each slide.

- To add the date and time, check the box next to "Date and time" and choose whether to update the time automatically (based on time of printing) or leave it fixed (date of your choosing).
- To add custom text to the top of each printed page, check the box next to "Header" and enter your text in the corresponding box.
- To add text to the bottom of each page, check "Footer" and add text to the corresponding box.
- If you make any changes in this window, click Apply to All to save your changes and return to the Print screen.

- If you're printing multiple sets of handouts, make sure to select Collated from the menu if it isn't already selected. F

Creating a Custom Handout Master

- You should only use royalty free fonts if you don't have a license to use a font.

- It's not usually advised to print a background color on handouts—it uses a lot of ink. Try to keep the fancy colors to your actual presentation!

- If you don't just want a basic background color, click the Background Styles menu again and select Format Background to expand the Format Background panel on the right. Here you can choose different background fills, such as images, textures, and gradients.

- For example, if you want to include an image on each printed handout page, click the Insert tab, select Pictures , choose your image and place it at the desired location.
- If you want to include custom text at the top or bottom of your handouts, click Header & Footer on the Insert tab, check the box next to "Header" or "Footer" (or both!) and type your desired text. When you click Apply to All , the handout master's header and footer will update to your new preferences.

- Now that you've customized your handout master, these settings will be in place when you're ready to print. To print, just go to File > Print , choose your printer and color options, and click Print .
Community Q&A
You Might Also Like

- ↑ https://support.microsoft.com/en-us/office/print-your-handouts-notes-or-slides-91c62c83-9032-497c-ab76-cae8f3e1a402
- ↑ https://support.microsoft.com/en-us/office/create-or-change-a-presentation-s-handout-c86f1231-abfd-48de-8d76-807f668512d2
About This Article

1. Go to File > Print . 2. Select how many slides to print per page. 3. Click the Full Page Slides menu. 4. Select a layout from the "Handouts" section. 5. Click Edit header and footer to customize the header and footer. 6. Choose the reset of your printing preferences. 7. Click Print . Did this summary help you? Yes No
- Send fan mail to authors
Reader Success Stories
Prafull Sinwal
Jun 22, 2016
Is this article up to date?

Featured Articles

Trending Articles

Watch Articles

- Terms of Use
- Privacy Policy
- Do Not Sell or Share My Info
- Not Selling Info
wikiHow Tech Help:
Tech troubles got you down? We've got the tips you need
Home Blog Design How to Create the Perfect Handouts for a Presentation
How to Create the Perfect Handouts for a Presentation

As we presenters know, aiming for a flawless presentation experience involves not only top-notch presentation skills but also graphics, a well-thought-out presentation structure, and articulating both how to start a presentation and how to conclude a presentation. Yet, very little is said about presentation handouts and their role in large-scale meetings, or their value when securing business deals.
Seasoned presenters acknowledge the impact of a presentation handout, and today we’ll guide you in the process of creating these printed-format assets to make your presentation more memorable.
Table of Contents
What is a Presentation Handout?
The role of presentation handouts, why create handouts for large scale presentations, examples of effective handouts for presentations, how to create presentation handouts in powerpoint, how to create presentation handouts in google slides, best practices for presentation handouts, final words.
A presentation handout is a supplementary document provided to the audience by the presenter or the event’s organization during or before a presentation. The core purpose is to enhance the understanding and retention rate of the information shared or to provide contact points with the presenter via email, LinkedIn, website, or social media profiles.

Handouts in presentations allow attendees to follow along more easily, take notes on specific parts, and have a further reference – ideal in large corporation events. The talk may not fully cover information, like detailed metrics, supplementary graphs, etc.; thus, they can be featured inside the handout to provide additional background on the presentation topic. In short, think of handouts as deliverable presentation aids .

Picture yourself attending a series of presentations at a large-scale event, like a medical conference. How many research presentations can you retain in your head? 3-4 top, whereas perhaps you attended over 12 in the past 8 hours. Handouts for presentations simplify attendees’ efforts, as they have a palpable reference about the presentations they attended, who delivered the talk, the conference presentation slides , etc.
Another interesting point of view for handouts is when we position ourselves in the shoes of an attendee with a physical impairment, like lessened hearing capacity. In this situation, we can picture a handout example, as the presenter integrates the audience, even those who cannot fully participate, by delivering information in a physical format.
When covering examples of handouts for presentations, we can position ourselves in generalistic situations as follows.
Helping people with physical impairments
Handouts don’t necessarily have to be printed in text format. Braille handouts can be used to assist people with low visual acuity to understand the missing gaps between the speech and the visuals shown in the slides. Electronic devices with screen readers can assist, as well as an audible format of the handout.
For people with hearing impairments, printed handouts summarizing the presentation’s key points are valid, but another creative method is to insert a QR code in PowerPoint and link to a PDF document with the transcript of the presentation, plus the slides.
Illustrations and Diagrams
Think about hard-to-understand topics involving a series of charts or graphs to comprehend the disclosed information. Those same graphics can be given to the audience in the format of handouts, with callouts or visual aids that remind the attendees of the importance of those concepts.
Summarize Key Information
Suppose you attended a chef conference, where new technologies, methodologies, or recipes are shared in presentations. You can refer to the handouts for detailed instructions and focus on the training presentation in real time rather than taking notes.
Contact Data
Finally, we can consider a handout format for people who want to get in touch for business partnerships, academic collaborations, etc. Rather than delivering a business card, provide additional information about your work and deliver a handout.
Follow these steps to create handouts in PowerPoint.
Open your presentation in PowerPoint. Go to the View tab and find Handout Master .

You can customize the appearance of your handout by adding a header, date, logo, contact details, etc. This works exactly the same as Slide Master in PowerPoint , so all changes will be reflected on all pages in your handout.

Now, go to File > Export and select Create Handouts .

Click on the Create Handouts button, and you will be prompted with a context menu with the following options:
- Notes next to slides
- Blank lines next to slides
- Notes below slides
- Blank lines below slides
- Outline only
Select the option you prefer. We highly recommend selecting Paste to add a tiny version of the slides to your new handouts document.

Once that’s done, a new Microsoft Word document will open with your presentation handouts, which can also be customized from Word.

For Google Slides, the instructions are much simpler. Select your desired presentation in Google Slides and go to File > Print Preview . All options for how to print slides in Google Slides are now available.

The option we’re interested in is the menu below the top bar that says 1 slide without notes .

Open that and select Handout , with the number of slides per page you prefer.

Then click on Print, and a new PDF document will be generated. Unlike PowerPoint, you have to edit everything beforehand or opt for a PDF editor like Adobe Acrobat.
Handouts should be concise. The idea is to summarize information, not to confuse the audience with an overwhelming amount of data. Although these recommendations are valid for all handouts created with PowerPoint templates and Google Slides, the same rules apply to handouts created in Graphic Design Software (Adobe Illustrator, Corel Draw, etc.), as it’s tempting to keep adding unnecessary data or complex illustration effects.
Sharing your handout before the presentation starts is advisable, as it’s the moment most attendees will gather and where the expectation about what the talk will be about is at its highest. In our experience, the audience tends to grow restless toward the last 5 minutes of your presentation, with some attendees leaving if they have to attend another conference with a very limited timeframe between both. Distributing a handout during the presentation is distracting and will negatively impact your presentation’s performance.
Finally, as you would do with poster presentations , focus on readability. Avoid using heavily contrasting colors or text that looks too small to read for the sake of adding more data. The handout is a tool to complement your presentation, not to summarize countless words.
Handouts for presentations are not an optional add-in. They are a vital element of effective academic and business presentations. By providing a clear structure to your handout or using digital mediums to help people with impairments, you are taking into account accessibility, one of the best practices you can engage early on in your path to becoming a professional presenter.
Like this article? Please share
Presentation Ideas, Presentation Tips Filed under Design
Related Articles

Filed under Google Slides Tutorials • August 6th, 2024
How to Use Google Slides Strikethrough Text
Customize your presentation slides by using Google Slides strikethrough and add a factor of humor, emphasize, or track changes in a truly visual method.

Filed under Business • July 24th, 2024
How to Create a Demo Presentation
Discover the secrets behind successful demo presentations and what they should contain with this article. Recommended PPT templates included.

Filed under Presentation Ideas • July 17th, 2024
How to Convert a Text Document into a Presentation with AI
One of the biggest challenges for presenters is to summarize content from lengthy reports, academic papers, or any other kind of written media in an informative and concise way. Rather than losing countless hours going over and over the same text, we can speed up the process thanks to the virtues of artificial intelligence. In […]
Leave a Reply
12 Tips to Prepare Handouts in a Presentation
- By Judhajit Sen
- May 14, 2024
A presentation handout is a presentation aid given to people attending a lecture, conference presentation, or talk. It helps them understand the main points and remember what was said. It’s not just an executive summary of the slides; it can include more details about each topic. This makes it easier for the audience to grasp the essential ideas and refer back to them later.
A good handout adds extra value to a PowerPoint presentation by expanding on what was discussed and keeping the slides tidy. It can include dense facts and figures that might clutter the slides, making the presentation look clean and professional.
Creating a presentation handout make it easier for the audience to follow along and remember the key points. They’re also handy for people who couldn’t attend the presentation but still want to know what was discussed. So, an effective presentation handout isn’t just helpful for the presenter, it’s useful for everyone involved.
Key Takeaways
- Reinforce Memory: Creating a handout helps people remember key points from your presentation by allowing them to review the information later.
- Detailed Information: Handouts enable you to delve deeper into topics without overwhelming your audience during the presentation, especially useful for complex subjects.
- Enhanced Calls to Action: Including contact information or action prompts in handouts can facilitate follow-up actions, particularly beneficial in sales pitches or business presentations .
- Potential Distractions: Handouts might distract attendees, draw attention away from your verbal presentation, and potentially spoil surprises if read ahead.
- Information Security: Distributing sensitive information via handouts carries risks of unauthorized dissemination, potentially compromising confidentiality.
- Strategic Distribution: Deciding when to distribute handouts depends on factors such as presentation style and audience dynamics, with options including before, during, or at the end of your presentation. Sharing beforehand can enhance focus and convenience for note-taking, while delaying distribution may seem punitive.
Pros and Cons of Using Presentation Handouts

Handouts in a presentation have advantages and disadvantages. Here’s a breakdown of the arguments for and against them.
Arguments for using handouts –
Helps remember and reinforces points: Handouts are handy because they help people remember what you talked about. After your presentation, folks can take the papers home, review them again, and remember the important stuff. It keeps your presentation alive in their minds even after you’re done talking.
Allows more details: You can’t cover every tiny detail during presentations. You want to keep it lively and engaging. Handouts come to the rescue here. They let you go into more depth without overwhelming your audience. You can explain technical stuff, timelines, and numbers better. This can be helpful, especially for internal company presentations where you must cover all bases.
Strengthens the call to action: A good call to action make it easy for people to do what you want them to do. Handouts can make this happen. For example, in sales presentations , you can leave behind papers with all the info prospects need to contact you later. It simplifies things, especially if they need to talk it over with others first.
Arguments against using handouts –
Can be distracting: Some folks argue that handouts steal the show. Instead of paying attention to you, people might end up reading what’s on paper. It’s like having a side attraction that detracts from your central performance. Some even say it’s like shooting yourself in the foot because you’re giving people something else to focus on before you start.
Audience might read ahead: Presentations are all about building suspense and excitement. But if people read ahead, it spoils the surprise. Imagine you’re about to reveal a big secret, but everyone already knows what it is. It’s like the plot twist in a movie being spoiled before you even watch it. That’s not cool.
Loses control over information: Your information is precious, especially sensitive company information. Handing out papers with essential data can be risky. What if they get copied or end up in the wrong hands? It’s like giving away the keys to the kingdom. You want to keep your information safe and sound, not let it wander off where it shouldn’t.
Tips for Creating Effective Handouts in a Presentation

Creating a presentation with handouts is as crucial as planning your speech and slides. These tangible takeaways can reinforce your message, provide additional information, and serve as a lasting reference for your audience. Here are some key considerations to keep in mind when you create effective presentation handouts –
1. Plan Ahead: Don’t leave handout creation as a last-minute task. Allocate enough time to make your handout alongside your speech and slides. Rushing to put something together moments before your presentation can result in an ineffective and hastily made handout.
2. Avoid Printing Slides: Resist the temptation to simply go to print option with your slides. This approach lacks effectiveness and may only make sense to readers with additional context. Instead, create your handout by typing out the content in the Notes pane of your ppt software to create more informative handouts.
3. Reflect Your Presentation: Ensure that your handout mirrors the structure and content of your presentation. This cohesion allows audience members to easily connect them with the key information presented during the talk, enhancing comprehension and retention.
4. Add Extra Information: Use handouts to provide supplementary information your presentation couldn’t cover. This additional content can inspire further exploration of the topic and cater to audiences seeking more in-depth knowledge.
5. Include References: Include citations in your handout if you reference research or external sources during your presentation. This enables interested individuals to delve deeper into the subject matter and validates your claims.
6. Create Action Sheets: Consider including action-oriented content in your handouts to encourage audience members to apply the insights gained from your presentation. Action sheets or worksheets engage your audience and help reinforce critical takeaways.
7. Ensure Stand-Alone Clarity: Your handout should be understandable even to those who didn’t attend your presentation or revisit it later. Provide brief background information about yourself for context, ensuring that the content can stand alone as a valuable resource.
8. Provide White Space: Leave ample white space for notes pages on your presentation handout design so attendees can take notes. This encourages active engagement during the presentation and consolidates all relevant information in one accessible document.
9. Maintain Professionalism: Your handout represents you and your presentation slides, so it should reflect professionalism. Proofread diligently, maintain a consistent brand identity, and ensure the layout is visually appealing.
10. Offer Additional Resources: Explore alternative handout templates for sharing supplementary materials, such as DVDs, websites, or online platforms. Providing diverse resources caters to different preferences and extends the conversation beyond the confines of the presentation.
11. Consider Digital Options: Consider creating digital alternatives like webpages or social media pages besides Microsoft Word printed handouts. These platforms facilitate ongoing engagement, allowing audience members to comment, ask questions, and access additional resources.
12. Communicate Limitations: If certain information discussed during the presentation is not included in the handout, clarify it to your audience. This transparency prevents confusion and encourages direct engagement for further clarification.
Adhering to these guidelines ensures that your presentation handouts serve as valuable assets that complement your verbal delivery and contribute to a memorable and informative audience experience.
The Best Time to Distribute Handouts in a Presentation
Deciding when to distribute your handout isn’t about finding a perfect moment. To help you figure out what’s best for your situation, it’s good to know how timing can affect your audience –
Handout before the presentation: If you share your handout beforehand, some of your audience might peek ahead, which could split their attention during your talk. Think carefully if this suits your presentation style.
Handout during the presentation: Give out handouts when they can support what you’re saying visually or emphasize your points.
Handout after the presentation: If you choose this option, your handout should include your contact information. If you’re sending it electronically, PDF works well. Adding a copyright notice might be smart, depending on who’s getting it.
Tip – Sharing the reading material before the actual presentation can be helpful. Some worry it might make the audience fidgety or distract them, but experience often shows it doesn’t hurt their focus. Many appreciate not having to jot down everything, allowing them to focus better on your words. Plus, they can make their own notes right on the handout. Waiting until the end of the presentation to give it out might make it seem like a punishment.
Crafting Effective Handouts in a Presentation
Handouts serve as invaluable presentation aids in reinforcing key messages, offering additional insights, and providing lasting references for your audience. They extend the reach of your engaging presentations beyond the confines of the spoken word, offering tangible takeaways that enhance understanding and retention.
Planning ahead is essential when preparing handouts, avoiding last-minute rushes that can result in ineffective materials. Resist the urge to simply print out your slides; instead, craft reading material that reflect the structure and content of your presentation while providing supplementary information and references for further exploration.
Consider incorporating action-oriented content to encourage audience engagement and maintain professionalism through diligent proofreading and consistent branding. Offering diverse resources and digital alternatives ensures accessibility and caters to various preferences.
Deciding when to distribute handouts depends on your presentation style and audience dynamics. While sharing them beforehand may seem counterintuitive, it enhances focus and allows for note-taking convenience. Adhering to these guidelines ensures that the distributed content effectively complement your verbal delivery, contributing to a memorable and informative audience experience.
Frequently Asked Questions (FAQs)
1. Why are handouts necessary in a presentation?
Handouts help people remember key points and provide extra details not covered in slides, making it easy for the audience to grasp information.
2. How do handouts benefit both the speaker and the audience?
Handouts reinforce the speaker’s message and serve as a lasting reference for the audience. They allow them to review the material at their own pace, even if they can’t attend the presentation.
3. What are the advantages of using handouts during a presentation?
Handouts aid in memory retention, allow for more in-depth explanations and strengthen calls to action, such as providing contact information for follow-up purposes.
4. What are the possible drawbacks of using handouts in a presentation?
Handouts may distract from the speaker, spoil surprises in the presentation, and pose risks of information leakage, especially with sensitive data.
5. How should handouts be prepared effectively?
Handouts should be planned alongside the presentation, reflect its structure and content, include supplementary information and references, and encourage audience engagement through action-oriented content.
6. When is the best time to distribute handouts during a presentation?
The timing of handout distribution depends on the entire presentation style and audience dynamics. However, sharing them beforehand can enhance focus and convenience for note-taking, while distributing them afterward ensures accessibility for further reference.
Craft Stellar Handouts with Prezentium: Your Key to Memorable Presentations!
Are you looking to make better presentations? Prezentium offers expert assistance in crafting stellar handouts that reinforce your message and captivate your audience. With our AI-powered services, we ensure that the reading material are not just summaries of slides but comprehensive documents that add value to your presentation.
Our overnight presentation service guarantees timely delivery, providing you with meticulously designed handouts by the next business day. Need help transforming ideas into exquisite presentations? Our team of specialists is here to assist, offering header design and template creation expertise.
But that’s not all – our Zenith Learning program comprising presentation trainers combine structured problem-solving with interactive communication training workshops, ensuring that your handouts engage and resonate with your audience.
Don’t settle for ordinary handouts. Elevate your presentations with Prezentium and leave a lasting impression on your clients. Contact us today to learn more about how we can help you craft exceptional handouts that amplify the impact of your presentations.
Why wait? Avail a complimentary 1-on-1 session with our presentation expert. See how other enterprise leaders are creating impactful presentations with us.
15 Job Interview Presentation Template Tips
4 types of communication styles, how to make an engaging medical presentation: a comprehensive guide.
13 Best Practice Tips for Effective Presentation Handouts
by Olivia Mitchell | 75 comments

Your presentation handout is the lasting concrete manifestation of your presentation. It’s an important part of the total experience for the audience:
But most of us focus on preparing what happens during the presentation, not what happens afterwards . Here are the benefits of having handouts:
Benefits for the presenter
- They allow you to cut down on the amount of material you cover in your presentation and so not commit information overload .
- They allow you to stop worrying about forgetting what you want to say .
- Audience members will have a concrete reminder making your presentation more memorable.
- Audience members can easily contact you later.
Benefits for audience members
- They allow audience members to relax about having to note down what you’re saying.
- If they like taking notes, they’ve got a place to do it.
- If they’re inspired by your topic, they’ve got more information on it.
- If they want to refresh themselves later on what you covered they’ve got a place to go.
Tips for Presentation Handouts
1. prepare your handouts in plenty of time.
Don’t leave it till the last moment to create your handout. I’ve been guilty of this. We’re most concerned about the actual presentation and not making a fool of ourselves up on the stage so you work on what you’re going to say and the slides, and then 30 mins before your presentation you realise you should have a handout and hurriedly put something together. Handouts are much too important to be relegated to an afterthought.
2. Don’t just print out your slides
This is lazy and not effective. If your slides are bullet-point slides (not recommended) then they will often be cut-down sentences which will no longer make sense to the reader a week later. And if they are visual slides (recommended) then they’re also unlikely to make sense without additional text. If you’re presenting with visual PowerPoint slides, one of the easiest ways of creating a handout is to type the text of the handout in the “Notes” pane of the PowerPoint edit screen. Then print your slides as “Notes”. You’ll have an effective handout.
3. Ensure your handout reflects your presentation
An audience member should be able to relate the handout to the presentation they’ve just attended. If you use the Notes pane of PowerPoint as I’ve suggested above this will happen naturally as you’ll be guided by the visuals you’re using in the presentation. You handout should have the same title as your presentation and should follow the same structure so that audience members can easily find the information they want.
4. Add more information
Presentations are not a good format for transferring a lot of information . However, they are good for inspiring people to find out more about a topic. That extra information can be in the handout. And if you’re the sort of person who wants to tell the audience everything you know about the topic… you can put it in the handout.
5. Include references
If you’re citing research do include the references in the handout. For most presentations (scientific presentations to a scientific audience would be an exception), don’t clutter up your presentation or your slides with references. But do be able to say: “The reference for this research is in your handout.” Let your audience know where they can find out more: books, websites, blogs etc.
6. Consider creating an action sheet
Handouts are a great place to help people put ideas from your presentation into action. You could either list a series of actions that people can take, or provide a worksheet that people fill in on what actions they will take as a result of your presentation. Have people fill in the action sheet near the end of your presentation.
7. Make your handout stand-alone
The handout may be passed onto people who were not at your presentation. Or an audience member may look at it a year from now when they’ve forgotten most of your presentation. Make sure that it will make sense to them. For people who weren’t present include brief credibility-establishing information about you.
8. Provide white space
Some people like to take notes during a presentation. Provide plenty of white space (or even some blank pages at the back) so that they can take notes on the handout and so keep all the information related to your presentation in one place.
9. Make your handout look professional
The handout is the concrete reminder of your presentation. It may also get passed onto other people who were not at your presentation. So it should enhance the perception people have of you:
- Have someone proofread it
- Create a consistent look and feel with your brand (this may include a logo and colors)
10. Consider what additional resources you can provide for your audience
You’re not limited to paper. My bioethics teacher friend who presents at bioethics and education conferences across the globe provides each of her attendees with a DVD with lesson plans and resources.
11. Consider creating a webpage
Cliff Atkinson suggests creating a “home page” for your presentation in his book The Backchannel . If you don’t have a website, you could create a squidoo lens or a Facebook Fan page . Or if you’d like to do more than that, create a wiki website (try pbworks or wikispaces ) or use blog software. Both of these can be done for free and just a little technical courage (techphobics shouldn’t try this). All of these options allow readers to comment on what you’ve written, so it’s a great way of continuing the conversation with audience members. For instance, audience members can ask you questions they weren’t able to ask at the time.
If you decide to go the web way, you can cut down the hard copy handout to one page with the most important points from your presentation, your contact details and the web address.
12. Distribute the handout at the beginning of your presentation
This is a perennial topic of debate amongst presenters. Some people are concerned that if they distribute the handout first, people will stop listening and start leafing through it. The problem here is not the handout, it’s that your presentation is not engaging enough.
Not distributing it till after the presentation suggests that you think you know best how people should pay attention to your information. Let your audience decide for themselves.
Recent research suggests that providing handouts to university students before the lecture does not harm their learning.
Update: In the comments to this post, Cathy Moore , Mike Slater and Adam Lawrence have identified three good reasons for distributing your handout after your presentation. I’ve highlighted these reasons in a new post: Three good reasons to distribute your handout after your presentation .
13. Do tell people if it’s not in the handout
Finally, if you go off on a tangent in reply to a question, do let them know that the answer is not in the handout.
Free Course
How to tame your fear of public speaking.
In this video-training series (plus workbook with transcripts) you’ll learn:
- The three things you must know BEFORE you begin to tackle your fear of public speaking
- Why the positive-negative thought classification doesn’t work for fear of public speaking
- The two powerful self-talk tweaks that can make an immediate difference.
You have Successfully Subscribed!
I ask for your email address to deliver the course to you and so that I can keep on supporting and encouraging you with tips, ideas and inspiration. I will also let you know when my group program is open for enrolment. I will keep your email safe and you can unsubscribe at any time.
75 Comments

Excellent article.I would like to introduce a website Slidebazaar with thousands of professional PowerPoint templates which can be easily customizable with high quality

This is very interesting, Thank you for sharing your article. I really appreciate your efforts and I will be waiting for your further post thanks once again

I really enjoyed this site. This is such a Great resource that you are providing and you give it away for free.

Very interesting. Thank you for all the information on the topic.

Suitable for Investment Company HYIP Investment Website hyip templates Templates Professional modern and contemporary design

I have a project and I am going to make a presentation in the next week. I hope this post will be helpful for other like me who want to present something.

Very interesting. Thank you for all the information on the topic

Thanks for the advice! It’s really helpful! At some point, everyone will need your advice. It’s nice when you can find really useful information on the Internet. Unfortunately, not all information is reliable. But I trust you

Your content is nothing short of brilliant in many ways. I think this is engaging and eye-opening material. Thank you so much for caring about your content and your readers.

Thanks for the post! This is a great guide and help for creating presentations. I think that help is always needed, even with difficulties it is easier to cope together. What to say about grants

This is a great thing, I think everyone feels this information is very valuable, thank you usps tracking

Thank you so much for such a wonderfully and well presented subjective view of all that a presentation entails! Very much appreciated! It always good to get a second opinion when making sure you’ve dotted your “I’s” and crossed your “T’s”.

“Thanks for sharing such an informative article! I found your insights that s are so particularly interesting. In fact, I wrote a related post on my blog unique hyip templates that expands on some of the points you mentioned. I’d love to hear your thoughts on it and feel free to share it with your article too. Keep up the great work!”

“Thanks for sharing an informative article! I found your insights that are so particularly most effective and interesting. In fact, I wrote a related post on my blog and website unique hyip templates that expands on some of the points you mentioned. I’d love to hear your thoughts on it and feel free to share it with your article too. Keep up the great work.

SocialWave is the ultimate SMM Panel that empowers businesses and influencers to boost their social media presence like never before. With an intuitive and user-friendly interface, SocialWave offers a comprehensive suite of tools to manage and optimize all major social media platforms.

I’ve tried my fair share of smm panel before, but none measure up to Follower SMM in my experience. Their services are simply unparalleled in helping businesses expand their social media reach and gain valuable insights into their audience. The growth I’ve seen since using Follower SMM has been incredible!

Drifting techniques not only require excellent driving skills but also require understanding and creating a difference in drifting phases. Drift Boss

Drifting techniques not only require excellent driving skills but also require understanding and creating a difference in drifting phases
Need to be more relaxed when you deliver your next presentation?
Learn a system that will allow you to focus on engaging with your audience - not worrying about what you're saying.
Recent posts
- Why striving to be authentic can be a trap
- The first time is never the best
- The Need to be Knowledgeable
- Would you wear clothes that clash?
- An unconventional approach to overcoming the fear of public speaking
Connect With Me

Recommended Books
Click here to see my favorite presentation books.
I earn a small commission when you buy a book from this page. Thank you!
- Audience (22)
- Content (62)
- Delivery (31)
- Nervousness (30)
- Powerpoint (37)
- Presentation blogs (2)
- Presentation books (4)
- Presentation critiques (9)
- Presentation myths (6)
- Presentation philosophy (5)
- Presentation research (11)
- Presentation skills (23)
- Presenting with Twitter (10)
- Visual thinking (3)
How to Tame your Fear of Public Speaking
- Do you have to perform perfectly?
- Do you beat yourself up if you don't?
- Would you talk to a friend the way you talk to yourself?
- Does it make sense that if you changed the way you talked to yourself, you could reduce your fear of public speaking?
I will show you exactly how in this free video training series and workbook.
Discover more from Speaking about Presenting
Subscribe now to keep reading and get access to the full archive.
Type your email…
Continue reading
Handouts in Powerpoint – Everything You Need to Know!
By: Author Shrot Katewa

When you go for a presentation, it is always a good feeling to have a Handout of it with you, that way it makes it easy to follow through with the presenter, even if you can’t see the screen properly.
To create handouts in PowerPoint, first, click on the “View” tab in the “Menu” ribbon. Then, click on the “Handouts Master”. Customize the handouts using the “Preview” option, and then click “Close Master View”. This will return to the normal view and the changes to your handouts will be saved.
However, this is just a quick summary on how to make handounts in PowerPoint. There are quite a few things you should know while creating handouts in PowerPoint. In this article, we shall cover all the nuances involved in creating PowerPoint handouts. So, let’s get started!
1. What are Handouts in PowerPoint and Why are They Used?
Microsoft PowerPoint slides can be printed or converted into a copy of “Handouts.” Handouts are either PDF, Word, or paper copies of a PowerPoint presentation that you can hand to the audience.
They provide something substantial for your audience to take hand notes and to keep with themselves. Handouts can also be used for adding notes alongside each slide by the presenter.
2. How to Create Handouts in PowerPoint?
Creating handouts of a PowerPoint presentation can be helpful for both the presenter and the audience to keep track of all the slides. Besides, it allows the audience to review it even after the presentation is over. You can easily create handouts in Microsoft PowerPoint using the “Handout Master” feature.
2a. Using Handout Master on PC
On a Windows PC, you can create a PowerPoint handout. All you have to do is follow the 3 easy steps.
Step-1: Click on “Handout Master”
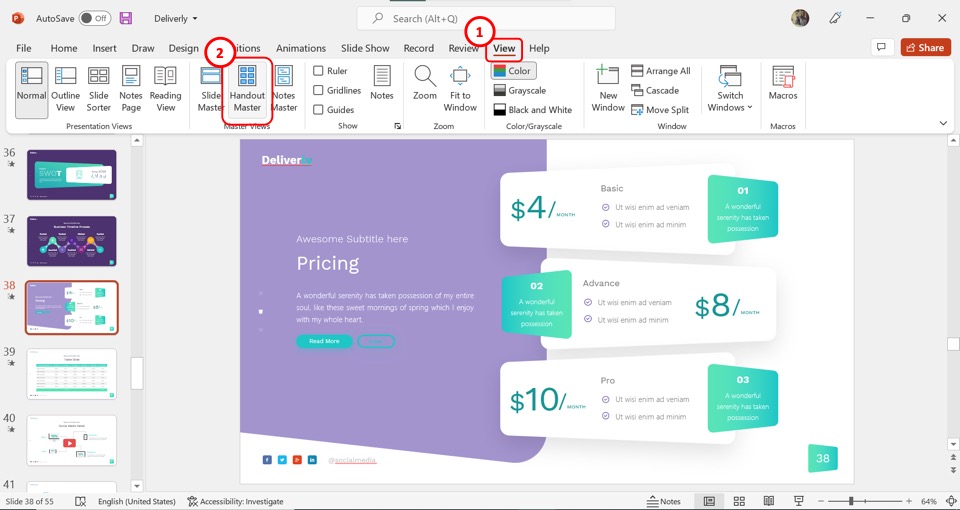
In the menu ribbon located at the top of the screen, click on the “View” tab. Then you have to click on the “Handout Master” option.
Step-2: Customize the handout
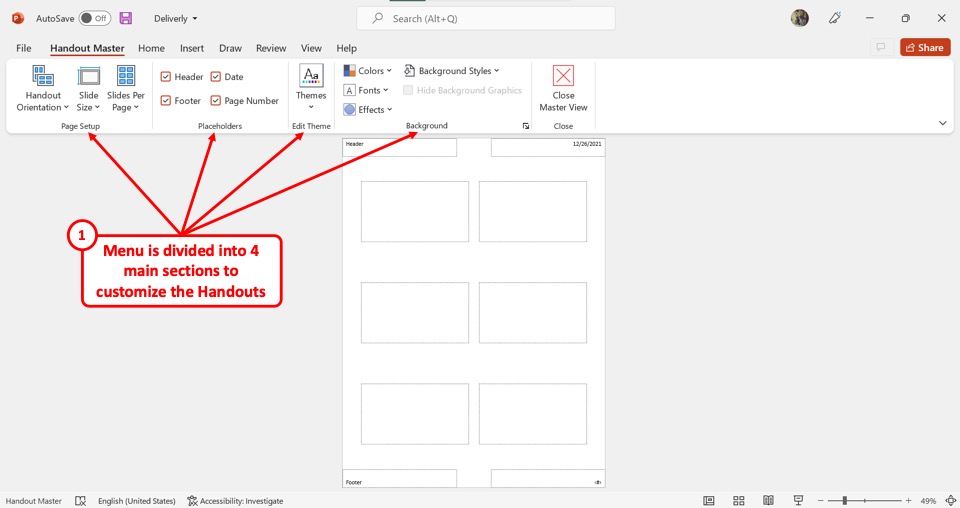
In the “Handout Master” view, you can preview the PowerPoint handout. The menu is divided into four main sections: “Page Setup” , “Placeholders” , “Edit Theme” and “Background” . You can use the options under each section to customize the handout according to your preference.
Step-3: Click on “Close Master View”
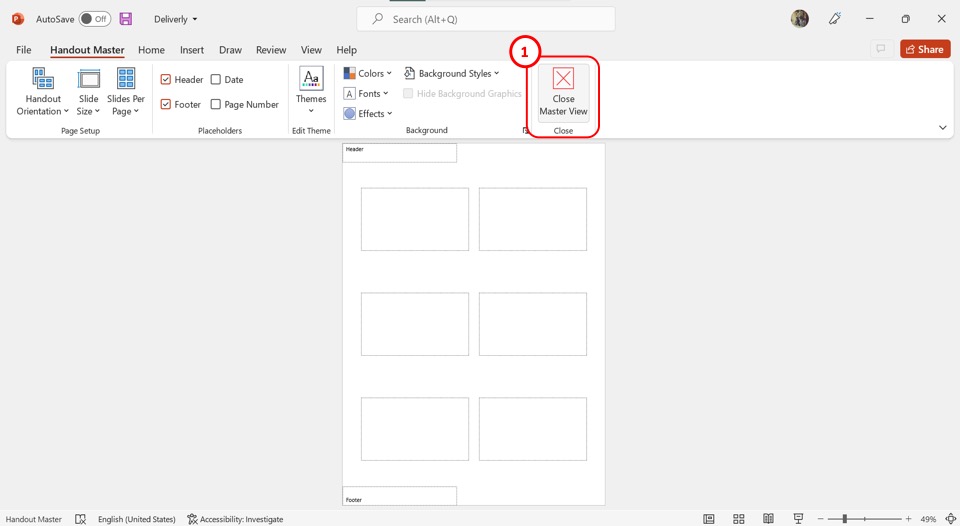
The final step is to click on the “Close Master View” button after customizing the handout. This will automatically save the handout and return it to “Normal View” where you can go back to editing the presentation slides.
2b. Using Handout Master in PowerPoint on Mac
To use the “Handout Master” in PowerPoint for creating handouts on Mac, follow the 3 quick steps.
Step-1: Click on “View”
In the menu bar at the top of the screen, click on the “View” tab. This will open the “View” menu right under the menu bar. Click on the “Handout Master” option in the “View” menu.
Step-2: Arrange the handout with the preferred settings
In the “Handout Master” view, you will find various options to customize the handout. Click on “Handout Orientation” to change the orientation of the handout.
You can also click on the “Slide Size” button to access the “Page Setup” dialog. You can also add or remove the “Header” , “Footer” , “Date and Time” and “Page Number” .
Step-3: Click on “Close Master”
The final step is to click on the “Close Master” option to save the preferred settings for the PowerPoint handout.
3. How to Create Multi-slide Handouts in PowerPoint?
Microsoft PowerPoint allows you to create handouts with one to nine slides per page. To create multi-slide handouts in PowerPoint, follow the 3 simple steps.
Step-1: Click on the “View” tab
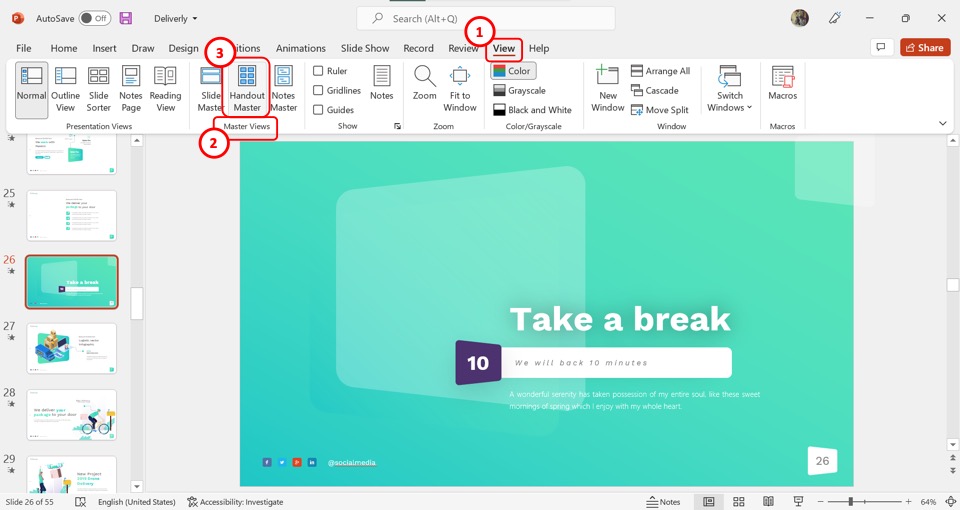
The first step is to click on the “View” tab from the menu bar. In the “View” menu, click on the “Handout Master” option in the “Master Views” section.
Step-2: Click on the “Slides Per Page” option
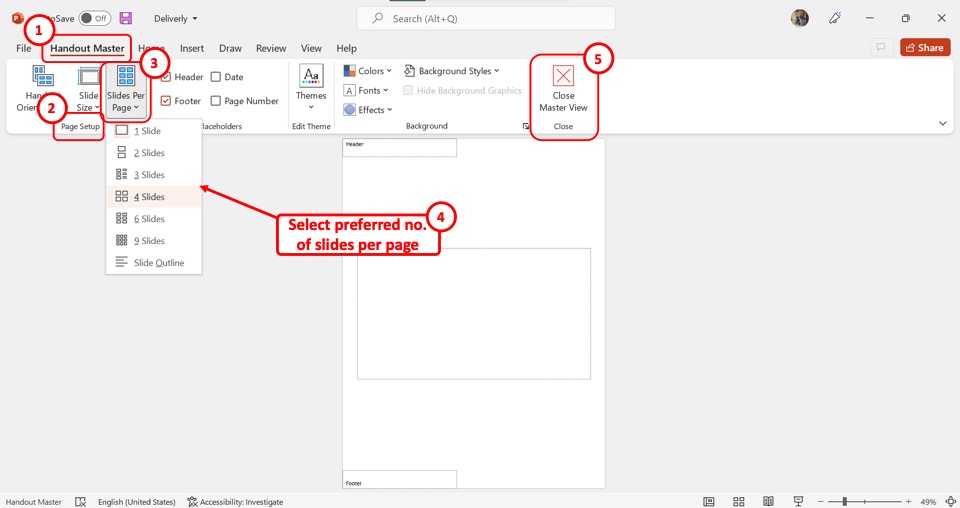
In the “Handout Master” view, click on the “Slides Per Page” option which is in the “Page Setup” section. From the dropdown menu, click on your preferred number of slides for a single page.
Step-3: Click on the “Close Master View” option
Now all you have to do is click on the “Close Master View” option to save the multi-slide template for the handout. (shown in the image above)
4. How to Change Handout Orientation?
The handout orientation controls whether the PowerPoint handout will be in landscape or portrait mode. To change the handout orientation, follow the 3 simple steps.
Step-1: Click on the “Handout Master” option
The first step is to click on the “View” tab in the menu ribbon. Then click on the “Handout Master” option in the “Master Views” section.
Step-2: Click on “Handout Orientation”
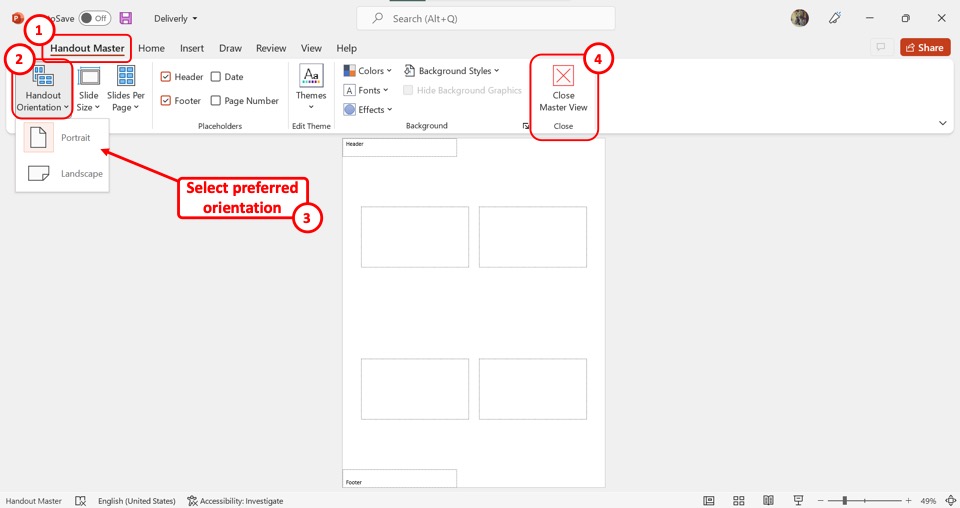
The next step is to click on the “Handout Orientation” option which is the first option in the “Page Setup” section in the “Handout Master” view. This will open a dropdown menu. Click on “Portrait” for portrait orientation or click on the “Landscape” option for landscape orientation.
Step-3: Click on the “Close Master View” button
Now all you have to do is click on the “Close Master View” button to save the new orientation. The screen will return to “Normal View” (as shown in the image above)
5. How to Change Header and Footer of Handouts in PowerPoint?
Using the “Handout Master” in the PowerPoint presentation, you can change the header and the footer of the handouts. Follow the 5 easy steps.
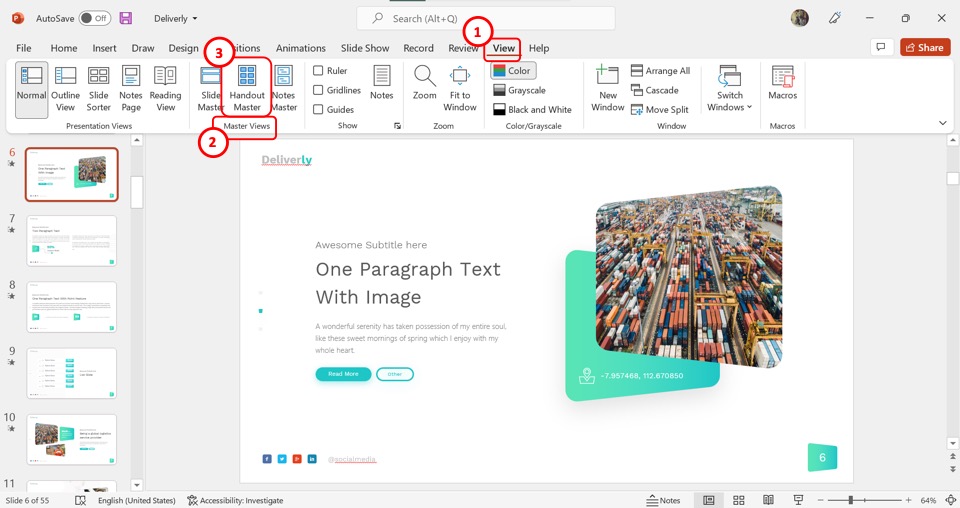
The first step is to open the “Handout Master” view. You have to first click on the “View” tab in the menu ribbon. Then click on the “Handout Master” option in the “View” menu.
Step-2: Click on the “Header” and the “Footer” options /
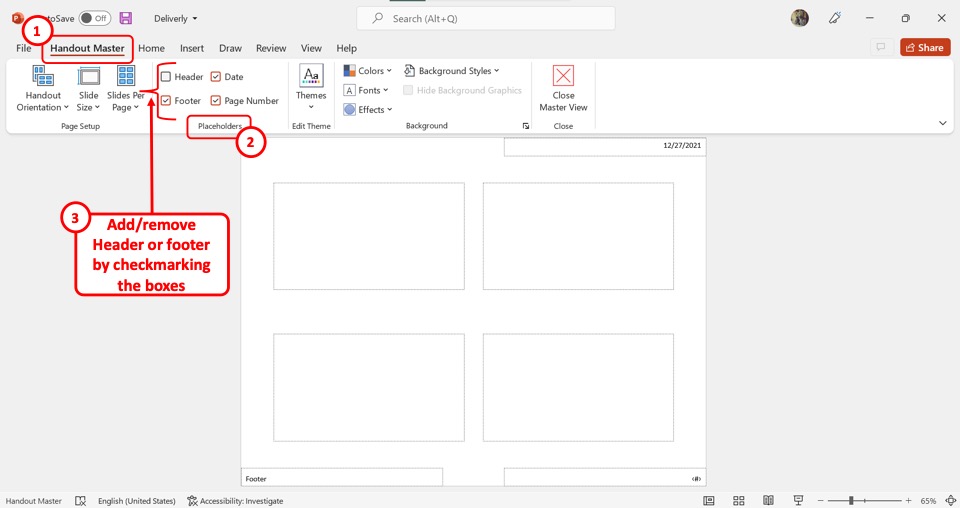
In the “Handout Master” view, you can make both or either of the header and the footer disappear. To remove the header, click on the checked box beside the “Header” option in the “Placeholders” section of the toolbar.
Similarly, you can click on the checked box at the left side of the “Footer” option to make it disappear. To make them reappear, click on the unchecked box again and the checkmark will reappear.
Step-3: Click on the “Header” placeholder
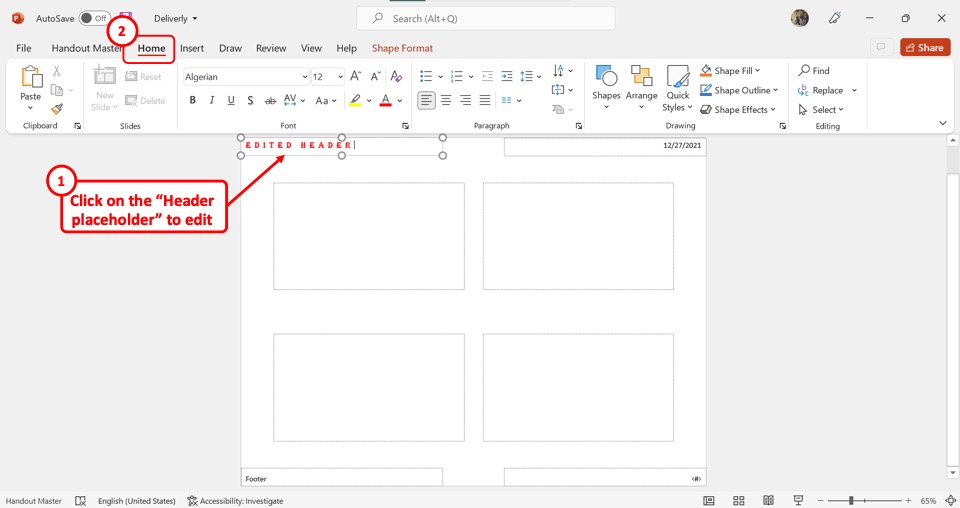
To edit the header, click on the “Header” placeholder. It is located at the top left corner of the “Handout Master” . Then click on the “Home” tab in the menu ribbon. You can use the toolbar in the “Home” menu to edit the header of the handout.
Step-4: Click on the “Footer” placeholder
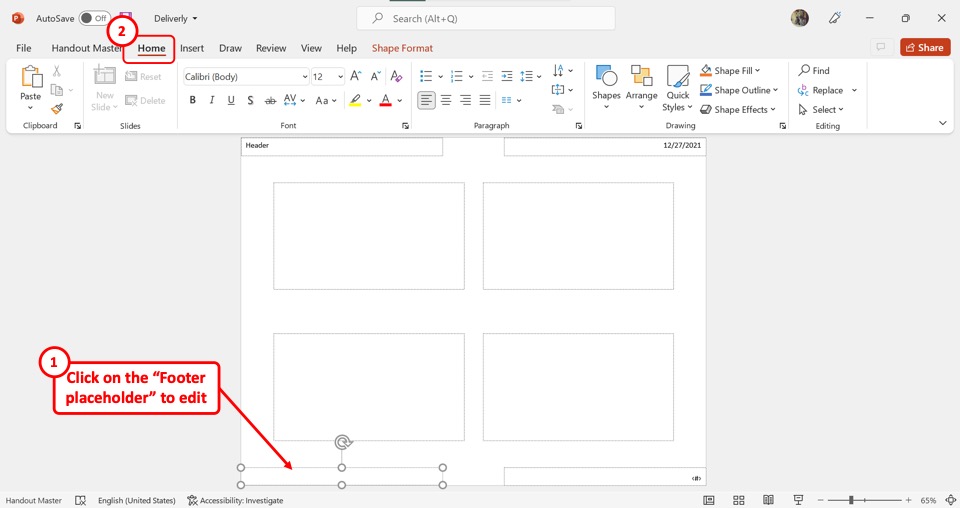
You can also edit the footer in a similar way. Click on the “Footer” placeholder located on the left side at the bottom of the “Handout Master” . Then click on the “Home” tab to access the editing toolbar. You can also drag the placeholder to resize or reposition it.
Step-5: Click on “Close Master View”
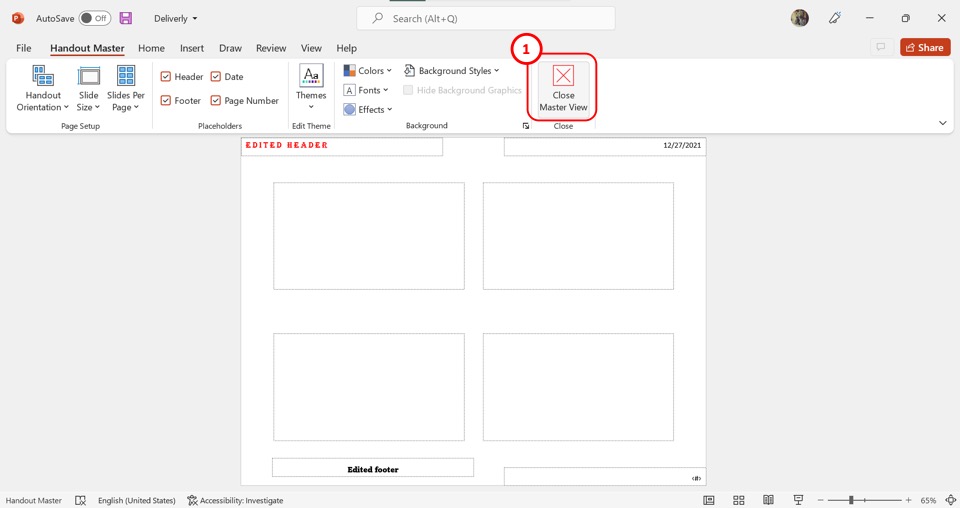
Now all you have to do is click on the “Close Master View” option in the “Handout Master” tab. This will save the edited changes of the header and the footer.
6. How to Change the Background of Handouts in PowerPoint?
Microsoft PowerPoint allows you to change the background of the handouts. This does not affect the background of the presentation slides. To change the background of the handouts, follow the 3 quick steps.
Click on the “View” tab in the menu ribbon at the top of the screen. Then click on the “Handout Master” in the “View” menu.
Step-2: Click on the tools in the “Background” section
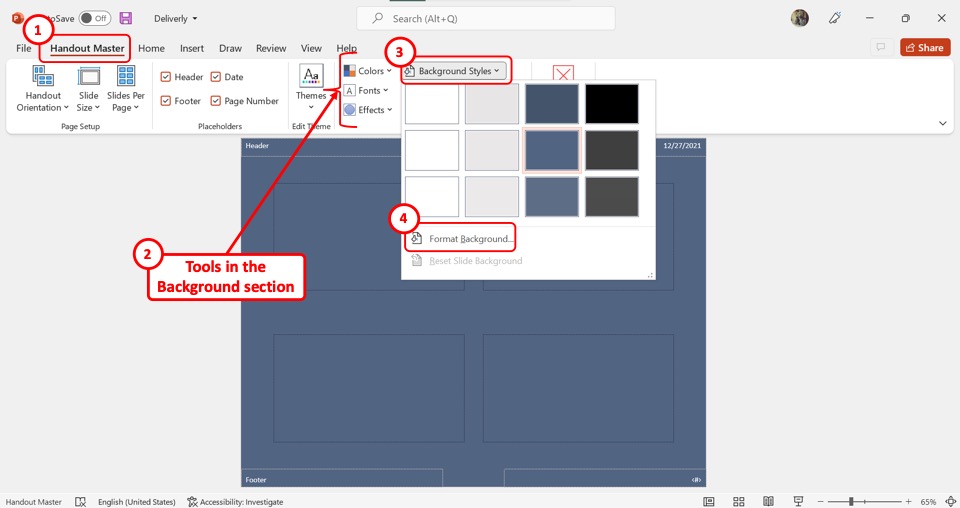
In the “Handout Master” view, you can use the tools in the “Background” section to change the background of the handout. There are “Colors” , “Fonts” , and “Effects” options.
Click on “Background Styles” and then click on the “Format Background” option from the dropdown menu to customize the background.
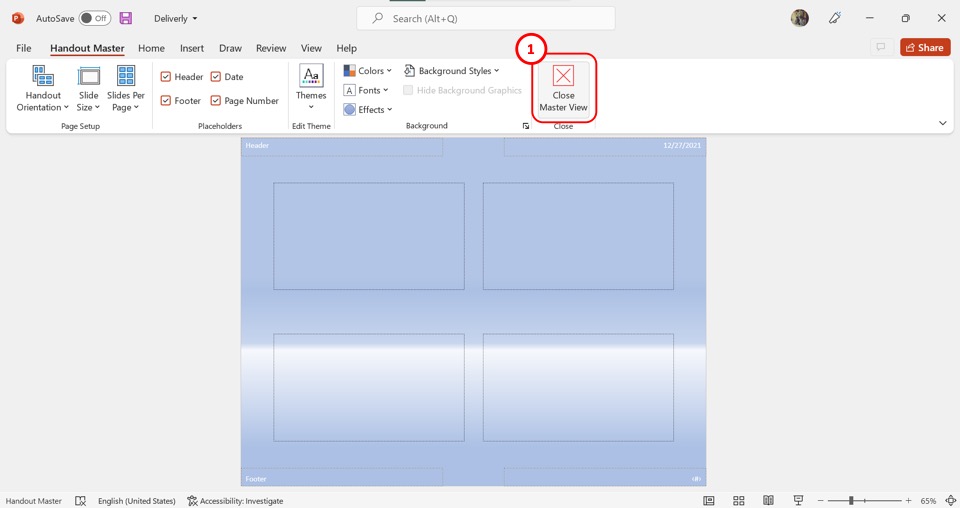
To save the changes to the handout background, all you have to do is click on the “Close Master View” button at the top of the screen.
7. How to Preview Handouts in PowerPoint?
Using the “Print” option in Microsoft PowerPoint, you can preview the handouts. All you have to do is follow the 3 simple steps.
Step-1: Click on “File”
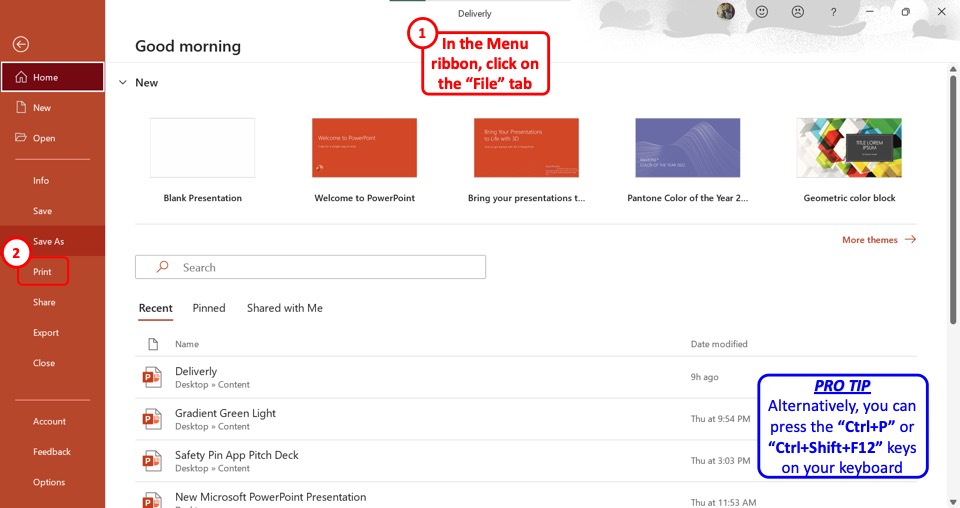
In the menu ribbon located at the top of the screen, click on the “File” tab. In the “File” menu, you have to click on the “ Print” option. Alternatively, you can press the “Ctrl+P” keys or the “Ctrl+Shift+F12” keys on your keyboard. This will open the “Print Preview” screen.
Step-2: Click on the “Print Layout” option
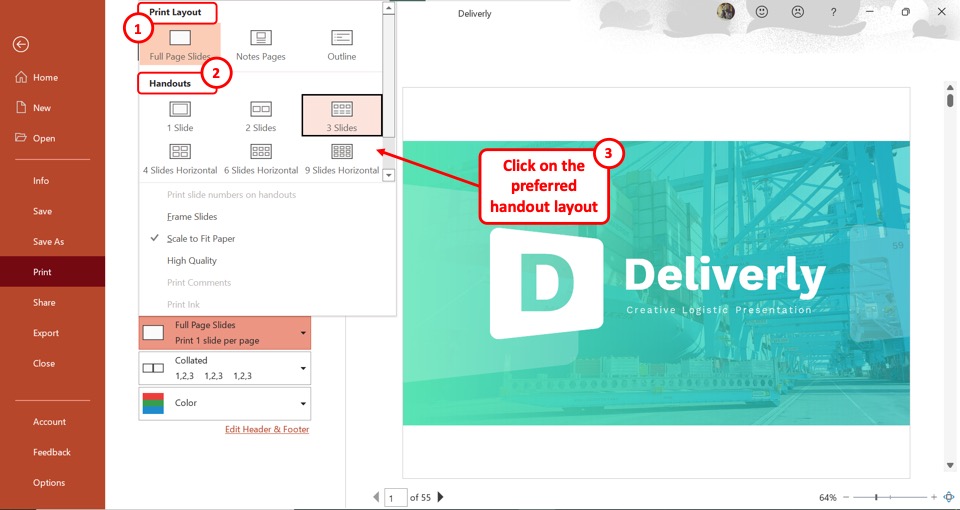
The next step is to click on the “Print Layout” option which is the second box under “Settings” . In the “Print Layout” menu, the default option is “Full Page Slides” . You have to instead click on the preferred handout layout from the “Handouts” section.
Step-3: Click on the “Next Page” arrow
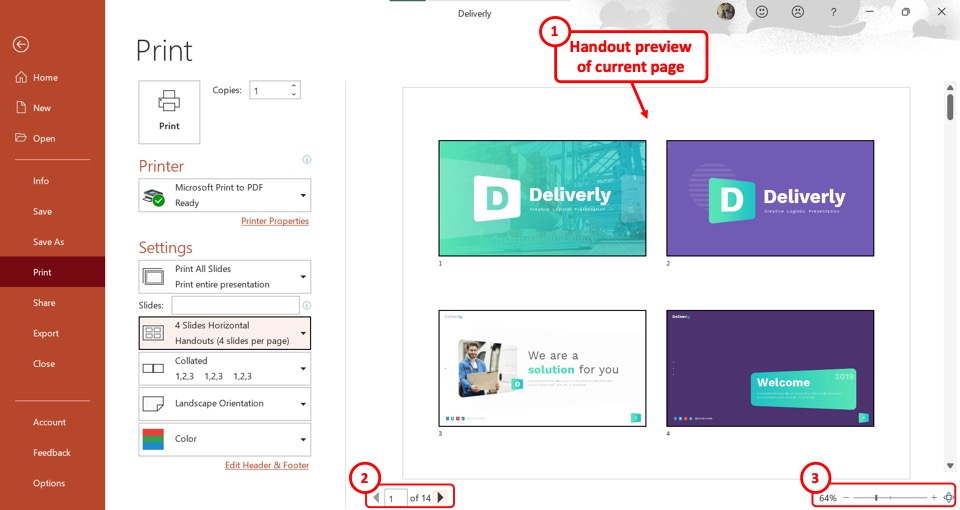
Now you can see the handout preview of the current page. At the bottom of the screen under the preview, you can click on the “Previous Page” option which is the leftward-facing arrow to preview the previous pages.
Click on the “Next Page” option which is the rightward-facing arrow to preview the next pages of the handout. You can also use the “Zoom” option to zoom in or zoom out on the preview page.
8. How to Print Handouts in PowerPoint?
Microsoft PowerPoint allows you to print out handouts or save them as a PDF file. There are also multiple layouts available for printing handouts.
8a. How to Print Handouts in PowerPoint?
To print handouts in PowerPoint, follow the 4 easy steps.
Step-1: Click on the “File” tab
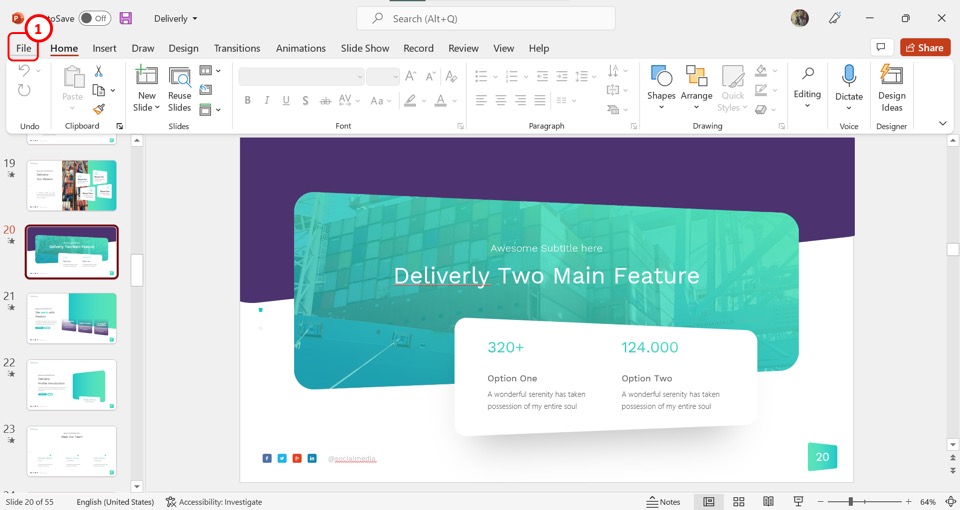
The first step is to click on the “File” tab on the left side of the menu bar. In the “File” menu, click on the “Print” option from the sidebar at the left side of the screen (shown in image below).
Step-2: Click on the “Full Page Slides” box
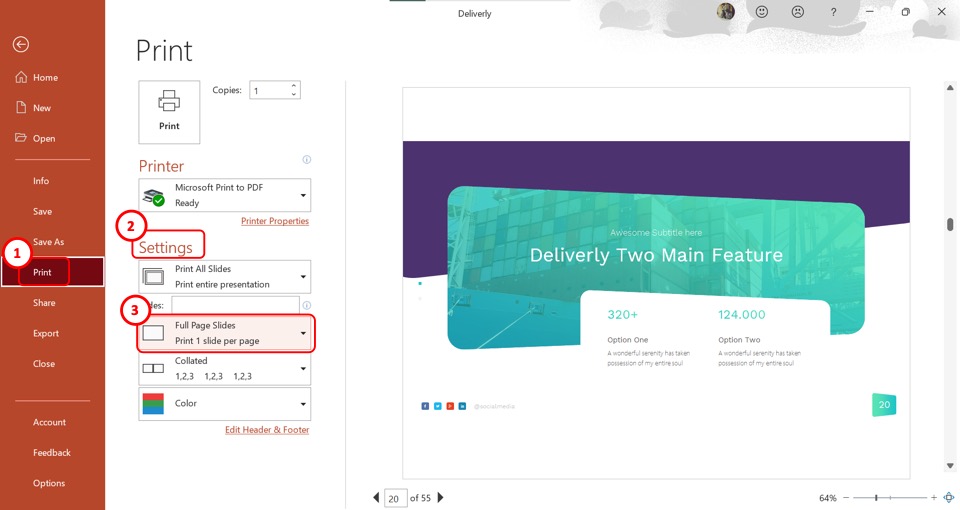
In the “Print Preview” screen, click on the “Full Page Slides” box under the “Settings” . It will open the “Print Layout” dropdown menu.
Step-3: Select the preferred handout layout
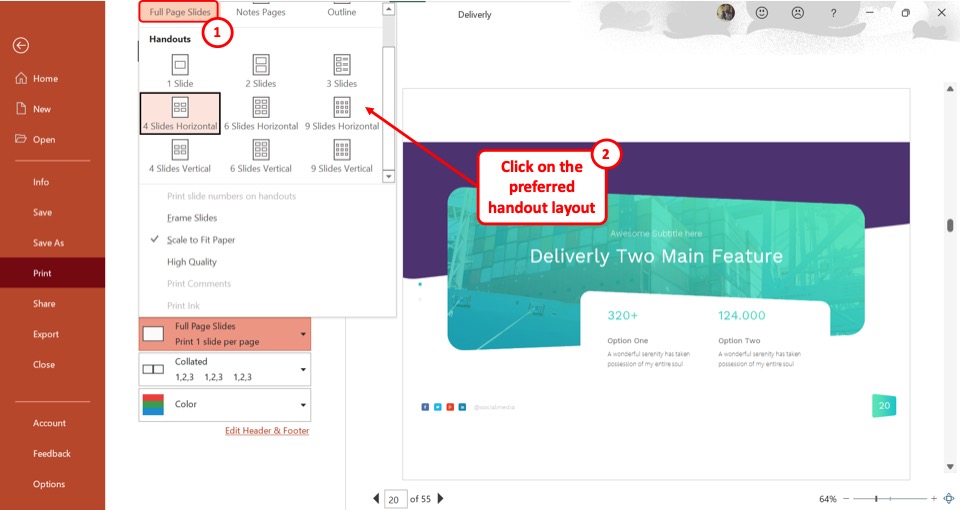
In the “Print Layout” menu, you will find 9 different options under the “Handouts” section. Click on your preferred handout layout. You can see a preview on the screen.
Step-4: Click on the “Print” button
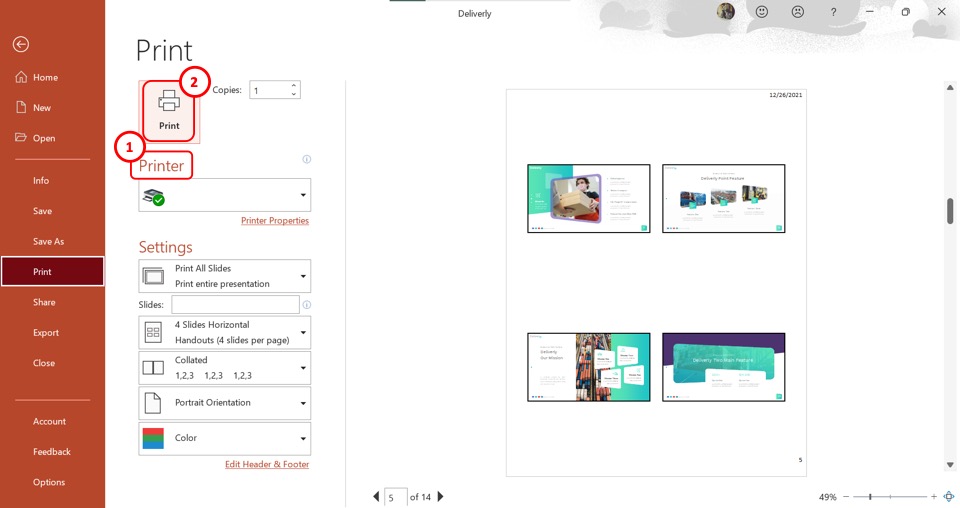
In the “Printer” section, make sure that the correct printer device is connected to your computer. Now all you have to do is click on the “Print” button at the top of the screen.
8b. How to Print Handouts with Slide Number in PowerPoint?
You can easily print handouts with slide numbers in PowerPoint. All you have to do is follow the 4 simple steps.
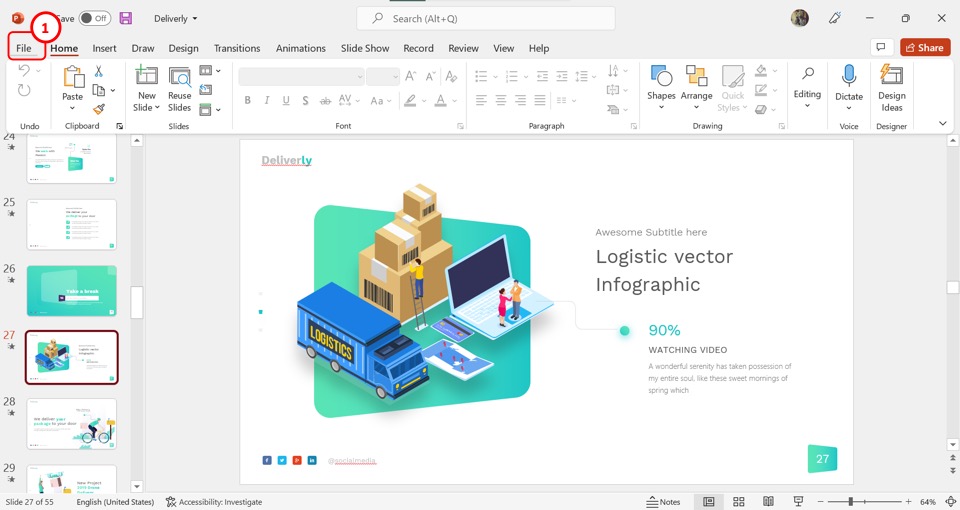
In the menu ribbon located at the top of the screen, click on the “File” tab. In the “File” menu, click on the “Print” option.
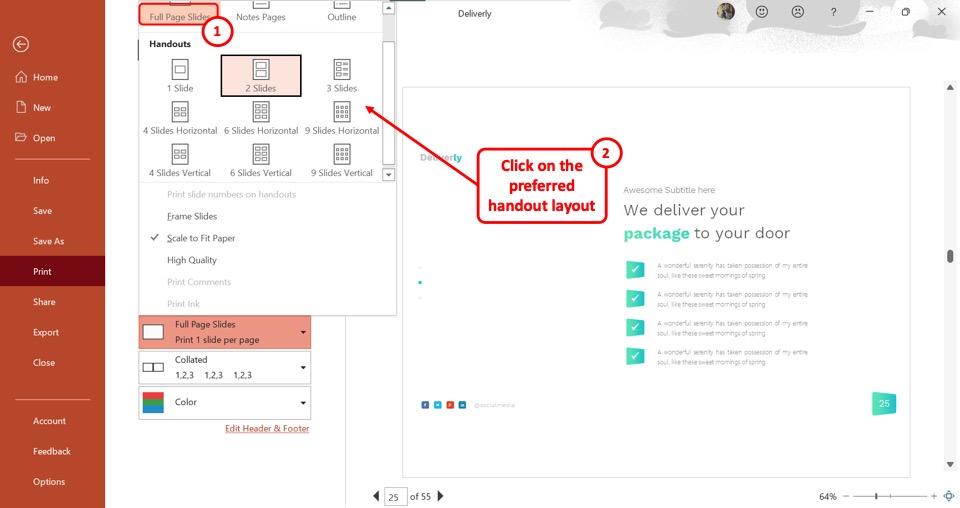
In the “Print Preview” screen, click on the “Print Layout” option which is the second box under the “Settings” section. In the “Print Layout” menu, select your preferred handout layout under the “Handouts” section.
Step-3: Click on “Print slide numbers on handouts”
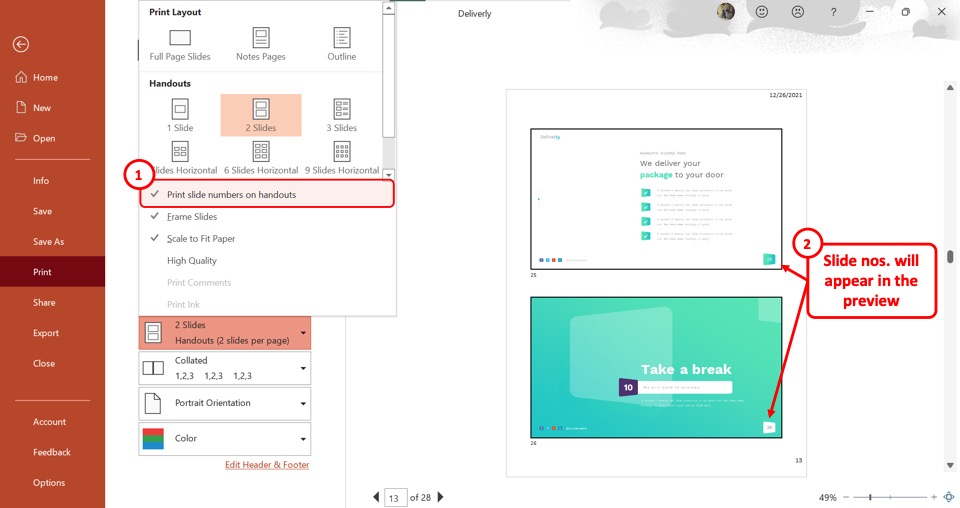
The next step is to click on the “Print slide numbers on handouts” option in the “Print Layout” menu. You will see a checkmark appear on the left side of the option. In the preview screen, slide numbers will appear under each slide.
Step-4: Click on “Print”
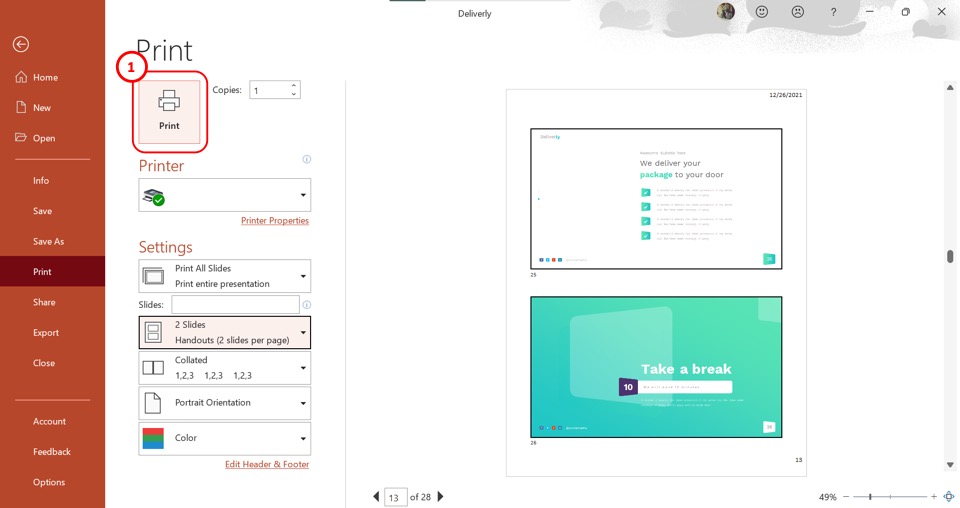
Now all you have to do is click on the “Print” button located at the top of the screen to print the handouts with slide numbers in PowerPoint
8c. How to Print Handouts as PDF?
To save the handouts as a PDF file, follow the 4 quick steps.
Step-1: Click on the “Print” option
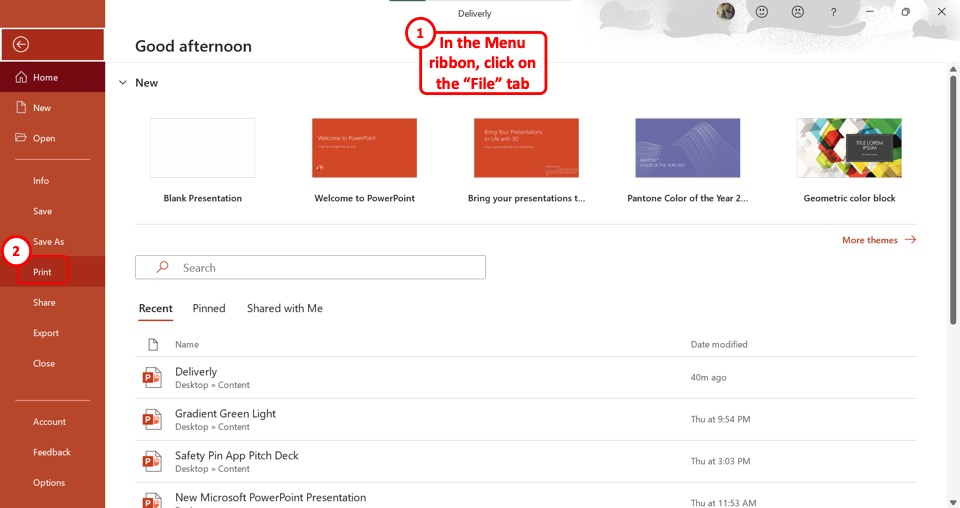
The first step is to click on the “File” tab in the menu ribbon. Then click on the “Print” option from the sidebar at the left side of the screen in the “File” menu.
Step-2: Click on “Print Layout”
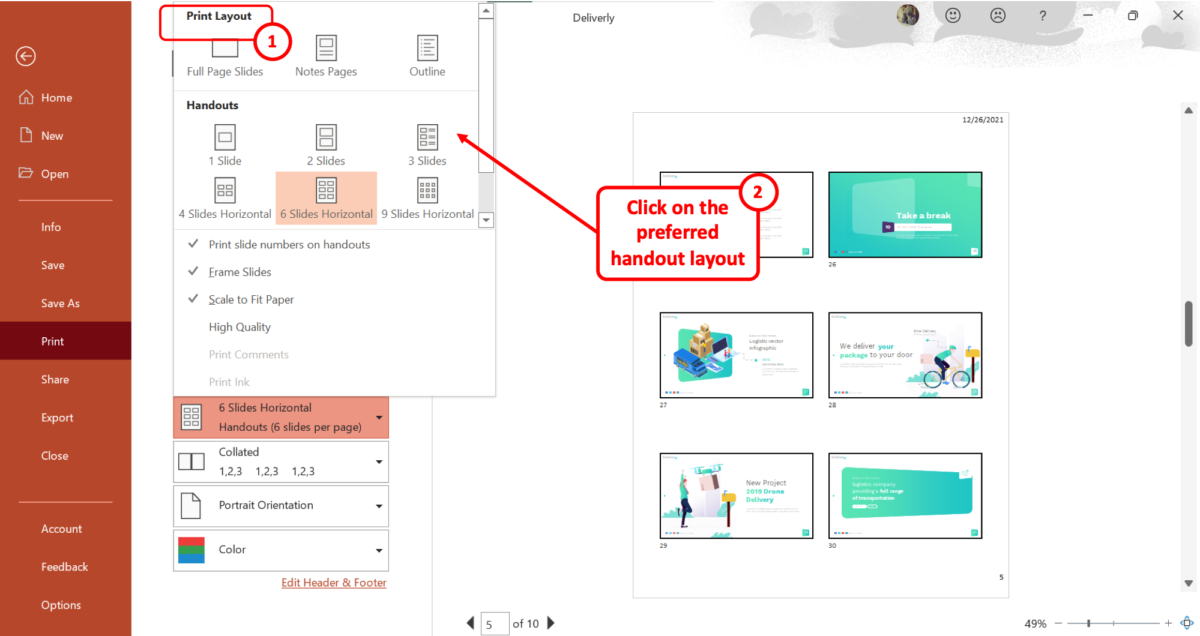
The next step is to click on the “Print Layout” option. It is the second box under the “Settings” section. In the “Print Layout” menu, select your preferred handout layout. There are nine different layouts available to choose from in the “Handouts” section.
Step-3: Click on the “Printer” box
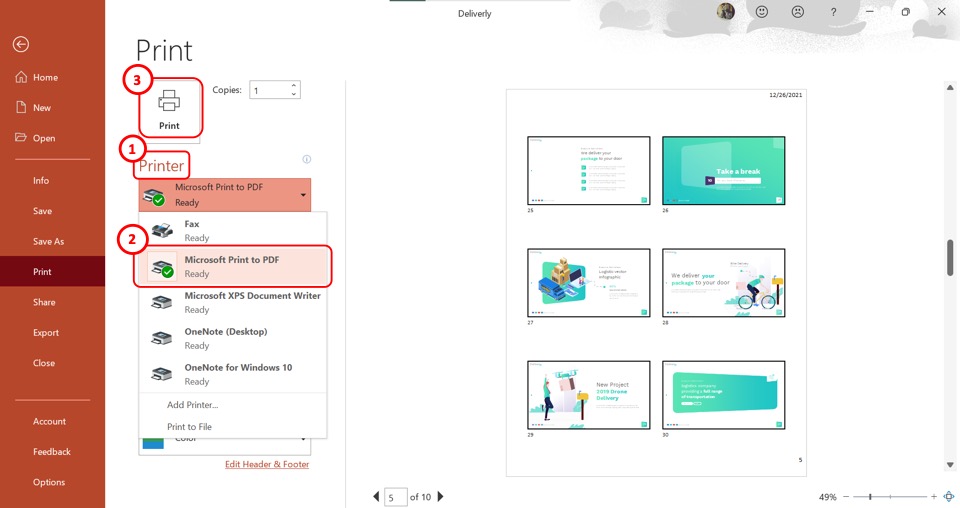
Click on the “Printer” box to open a dropdown menu. Then click on the “Microsoft Print to PDF” option.
The last step is to click on the “Print” option. This will save the Microsoft PowerPoint handouts as a PDF document (as shown above).
9. How to Export Handouts to Word From PowerPoint?
In Microsoft PowerPoint, there is a feature that allows users to export handouts to Microsoft Word. Using this feature, you can edit the notes and rearrange the handout slides. To export handouts to Word from PowerPoint, follow the 3 simple steps.
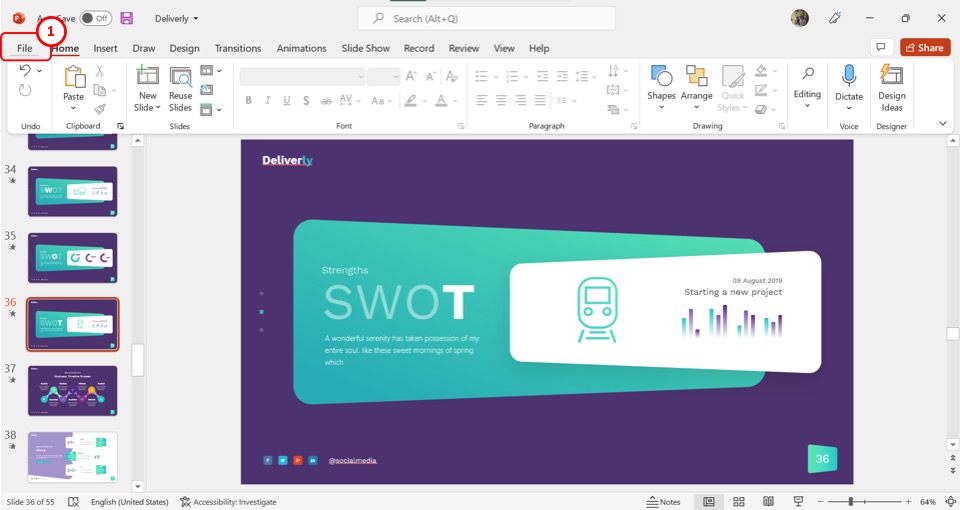
In the open Microsoft PowerPoint presentation, click on the “File” tab from the menu ribbon. Then click on the “Export” option from the left sidebar in the “File” menu.
Step-2: Click on the “Create Handouts” option
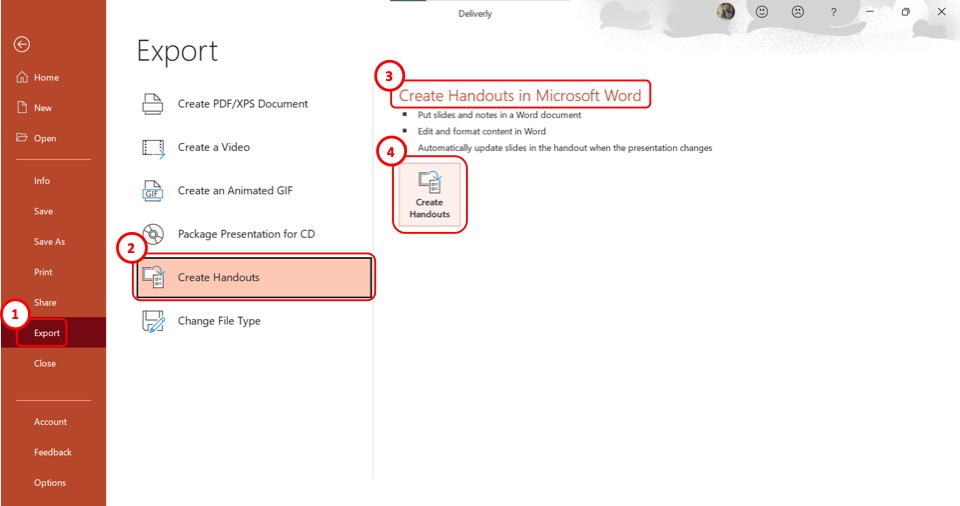
The next step is to click on the “Create Handouts” option from the secondary sidebar in the “Export” screen. Then click on the “Create Handouts” button under the “Create Handouts in Microsoft Word” section. This will open a new dialog box.
Step-3: Select your preferred page layout
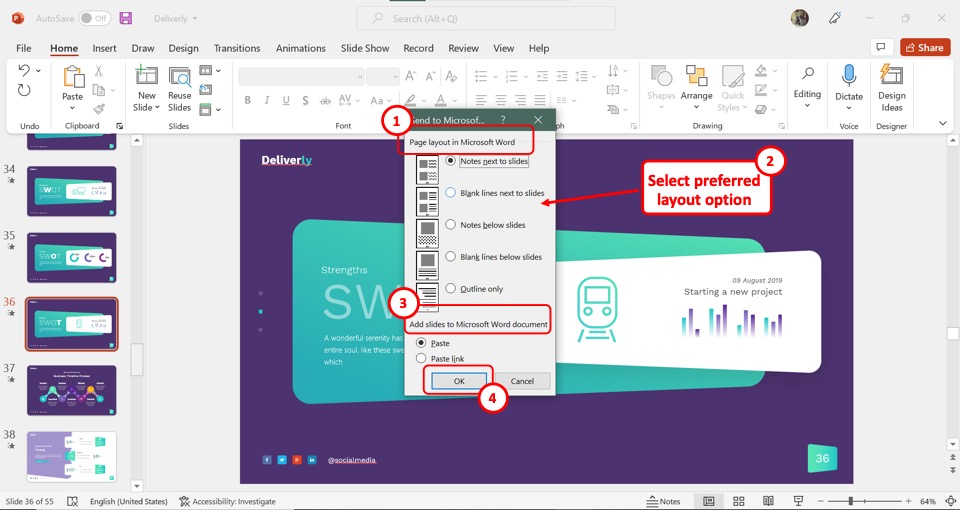
In the “Send to Microsoft Word” dialog box, click on your preferred layout under the “Page layout in Microsoft Word” option. Then click on the “Paste” option under the “Add slides to Microsoft document” section if you want to export the handout in its current state.
You can also click on the “Paste link” option if you want the exported handout to update when you update the PowerPoint. Finally, click on the “OK” button to export the handouts to Microsoft Word.
10. Difference Between Notes and Handouts in PowerPoint
The main difference between “Handouts” and “Notes” is that handouts are mostly designed for your audience while the notes are for you, the presenter. Notes usually contain the speaker notes and key points of a presentation. The handouts contain printed slides where the audience may add their own notes.
Credit to user18526052 on Freepik for the featured image of this article (further edited)
Creating a Handout to Support and Enhance Your Presentation!
Got a presentation coming up and need to create a useful handout to complement it? Great idea – but how do you go about it? Many people think handouts are just used in college, but in the business world they can be really useful to reinforce the content of your presentation.
Whether it’s a business meeting or a training course, a handout will underscore your points and support your presentation when done right. It can be tricky, though, to decide on what to include, the format, how to structure a handout and at what point of the presentation to distribute it.
Before starting to create your handout, you need to think about such things as structure, content and timing . This blog covers everything you need to know!
What is a Handout?
As the name suggests, a handout is any type of document that a speaker hands out to participants during a lecture, presentation, conference or meeting. It allows your audience to get a clear overview of the main points, or to sum up what they have heard afterwards.
A handout isn’t just a summary of slide titles; it can be much more detailed, summing up each individual topic and serving as a reference for core concepts and central insights.
What is a Handout actually for?
Your handout must provide added value . It contains information either covered or referred to in your presentation, allowing you to expand upon what might have only been touched on, and free your slides from clutter.
It can not only summarise your arguments, but can relieve pressure on your slides: dense facts and figures can be sidelined to the handout, allowing your PowerPoint presentation to be slick and professional.
Handouts offer three main advantages to your audience, depending on when they’re given out:
- The audience can follow what is said during the presentation
- The audience can make their own notes to supplement or clarify for themselves what you have presented
- It consists of an overview of what you have presented, which can then be read by interested parties

A handout not only means that you can create a clean and uncluttered presentation, but allows your audience to understand your points better and remember them afterwards . It’s also very useful for conveying your arguments to anyone who may have missed the actual presentation.
Tip: So why not just Start with the Handout?
There are obvious advantages both to your audience and yourself to having of a clearly structured handout. Once you know what to do, they can be relatively straightforward to produce. Of course, this still takes time, and you need to allow for this.
Cobbling together a handout at the last moment is not only stressful, it can be counterproductive, as it undermines your professionalism and never goes unnoticed.
TIP: For a change, why not start your presentation with a handout ? By getting the essentials out of the way first, you can then develop your presentation step by step using the handout as a basis.
The great advantage here is that you not only end up with a detailed handout, but you find a s trong common thread , allowing you to create an equally “crisp” presentation and navigate your way through it.
Creating a Handout: How to Structure it
As with most things concerning design, the motto “ less is more ” applies very effectively to handouts. In concrete terms, this means: do without whole sentences and make use of key points, abbreviations, arrows and symbols. Ideally, your handout should not consist of more than two A4 pages.
In addition to important information from your presentation, a handout needs to include the following :
- Basic information, probably in the upper left corner of the handout, such as the location of the presentation and the speaker’s name and title
- The date, probably in the upper right corner
- A concise heading – preferably the title of your presentation – centered
- Page numbers in the footer
- A clear structure, based on the individual headings of the presentation
- A consistent page layout using standard, unembellished fonts such as Arial or Times New Roman

The structure of your handout should follow the structure of your presentation, especially if you give out the handout during your presentation. It is best to limit your points to those which support your main argument. Keep the sub-items on the handout as simple as possible and don’t go into too much detail.
To make your handout visually appealing, it helps to think about the font. In addition to using clear, standard fonts , as mentioned above, try to keep the font size in the headers and footers uniform and smaller than in the main part.
TIP: Create an area for the audience to make their own notes on your handout. Either make the right margin wider or leave a few lines of space under your last point.
Handout Content – Short and to the Point
You’ve decided the layout of your handout, entered the key points and created a rough outline. Now it’s time to expand on individual points and create the main content of your handout.
Before doing so, focus on your target audience : how much background knowledge can you assume they have on the topic of your presentation? Keeping your audience in mind means you tailor the handout to their level, avoiding technical terms where they would distract from your point, including them when you are faced with an audience knowledgeable in a particular discipline.
It is very important to condense the core statements of your presentation into key points, rather than including a distracting stream of text. This way, you retain your audience’s full attention.
TIP: To arouse your audience’s curiosity right at the beginning of your presentation, you could include an upbeat quote, a proverb or a question. Choose a slightly provocative question to get your audience thinking from the start. You can repeat this verbatim on your presentation handout.
Although the main thing about handouts is that they should be short and concise , they should still be understandable when read outside the context of your presentation. If this is forgotten, they can’t act as an aid to your audience’s memory afterwards.
Nice-to-have: Additional Information on Your Handout
The main elements of a handout, as covered above, can be supplemented by additional information as you choose. This can even include pictures or graphics. Depending on the topic, a visual element can really clarify and supplement your main argument and tie things together.
As a rule, however, it pays to keep pictures and graphics on your presentation slides because they take up too much space on the handout. The costs and benefits need to be weighed up in each individual case.
It is also a good idea to include contact information on the handout; an e-mail address is the minimum. Depending on the type and purpose of the presentation, you can also provide your business address and telephone number.
If your handout consists of several pages, it helps to put your contact details in the header so that they appear on every page. It can be useful to include a short bibliography in your handout if you’re using quotes or information from other sources. This way you can also link to relevant websites or further reading on your topic that may be interesting for your audience.

TIP : At the end of your handouts you can include questions or food for thought to stimulate discussion. This is particularly useful if you wish to conduct a question and answer session after your presentation.
Tutorial: Creating a Handout with PowerPoint
When time is of the essence, PowerPoint has a feature that allows you to create a handout in minutes. Using the “Create handout” function, you can transfer a PowerPoint presentation to Microsoft Word, adapt it there and optimize it for printing.
With just a few clicks you can choose which presentation slides should appear on the handout. The number of slides can also be easily adjusted and you can cut text or expand it as necessary. You can also decide whether the handout should include a note margin, a header and/or a footer.
Your PowerPoint presentation remains untouched during this whole process. In addition to the option of printing the handout, you can also save it directly in Word as a Word or PDF document – a simple way to make the handout digitally available to your audience.
- Open your presentation in PowerPoint.
- To find the handout master, open the View tab in the top taskbar.

3. In the Master Views submenu you will find, among other things, the Handout Master.
The practical thing about this is that with just a few clicks, you can choose slides from your presentation to form a basis for your handout. It’s also easy to customize headers and footers – to insert your contact details or page numbers, for example.

It’s really easy to choose the size, number and design of your pages here; and PowerPoint also offers the option of exporting the handout you have just created to Microsoft Word. This makes it simple to print out or offer to your audience as a file.
- To do this, click on “File” in the upper task bar and then on “Export” .

2. Select Create handout .
3. In the context menu that opens, you can decide whether your handout should have a margin for adding notes, for example, or other useful options.

When is the Best Time to Distribute Your Handout?
There is no such thing as the perfect time. To help you decide the timing for your particular presentation, it helps to understand how timings influence your audience:
- Handout before presentation : In this case, you have to expect at least some of your audience to have leafed through the handout and read ahead, meaning that at any point they know what’s next. This can sometimes mean that your audience’s concentration is divided, so you need to consider carefully whether this option is appropriate.
- Handout during presentation : Distribute your handout at the point when it is useful as support, either in terms of visual illustration or as a means to emphasize your argument.

Our tip: Share your handout prior to the presentation . It is often the same arguments that are used when it comes to giving out the handout before the presentation: ‘Too restless, the audience rustles with the papers and does not concentrate on the lecture’ and many more. You probably know the arguments.
Nevertheless, our 25 years of experience with PowerPoint shows that these arguments should not be believed. Experience shows that it does not negatively affect the concentration of the audience, but even has positive effects for many to know that they do not have to take notes and that a protocol is available so that they can fully concentrate on the presentation.
In addition, listeners can add other relevant notes directly to the handout. If you withhold the handout until the end of the presentation, you also run the risk of having carried out a kind of unspoken “disciplinary action.”
Conclusion: Don’t go without a handout!
Whichever timing you decide upon, a well-prepared handout can be an effective tool to support your presentation , acting as a guide and memory aid for both you and your audience. Used properly, they can increase the interest and attention of your audience, and allow you to give a clear and professional presentation.
Need help with creating a presentation and a great handout to go with it? We have years of experience in the field of PowerPoint presentations. Just get in touch, and our team can help you create exactly what you need ► presentation agency
If you have any further questions about handouts, or anything to do with PowerPoint, feel free to get in touch at [email protected] . We’re always happy to help!
You might also be interested in the following articles:
- PowerPoint Presenter View
- Insert Notes in PowerPoint
Share this post
- share
- save

Design Thinking: Problem Solving with a Difference

Why Corporate Mission Statements Are So Important

7 Tips & Learnings from the Apple Keynote
How to Create a Quick & Easy PowerPoint Handout
5 second powerpoint handouts, instructions.
So… you’ve created an awesome presentation, you’ve practiced your delivery, and the presentation date is just around the corner. If the last thing on your checklist is to create a PowerPoint Presentation Handout , this post is for you! If you find yourself always scratching your head when it comes to creating handouts, bookmark this page right now. Trust us, you will be using it often.
How to create am amazing presentation handouts is one of the most frequently asked questions for the Presentation Geeks. Although Microsoft PowerPoint has an easy way to create a handout, many people make these so infrequently that it’s easy to forget what buttons to click and what options to select.
Before we jump into the 4 easy steps to create and print a PowerPoint handout , let’s talk about why a presenter might want to create a handout, what layout options are available for your slides, and finally, how many slides is optimal for your PowerPoint handouts.
Why would a presenter want to create a PowerPoint Handout?
Too much text.
When a presenter is given the opportunity to deliver a PowerPoint presentation, the time that they are awarded is valuable. The average attention span is only 17 minutes. This means that the presenter only has a limited amount of time to click through their slides and deliver their information before their audience loses interest . 17 minutes translates into a limited number of slides. The average presenter can deliver between 10 to 15 slides within this amount of time. Often, this limits the amount of text you can deliver and expect the audience to retain. In this case, a presenter might opt to print a handout that contains additional content so that the audience can take the handout and read through the additional text at a later date. Audiences like this approach because it allows them to focus on the presenter for a more engaging presentation.
Concepts versus Facts
If your presentation slides are filled with charts and data, it may be unrealistic to expect that the audience will retain this information. People generally remember concepts rather than facts. Audiences like when stories are included in presentations as they are often the most memorable parts of a presentation . Concepts are easy to understand because they don’t require additional context. One example of this is that your audience would sooner remember that a human foot contains many bones (concept) before they remember the number of bones in a human foot (it’s 26 just in case you were wondering). For a presentation that contains a number of facts, whether they are charts, tables, stats, or graphs, these are best included in PowerPoint handouts. It doesn’t mean that you can’t include a stat in your presentation, but you should follow them up in your handouts.
Educational Presentations
If you are delivering an educational presentation , you might want to include a handout that includes enough room for notes. Notes are an important way for people to recall information, and Microsoft PowerPoint includes layout options that contain notes. When printed, this may cause the slides on the handout to be smaller and a little tougher to view, and this should be considered when you select your text font size for your slides. The use of PowerPoint handouts in an educational presentation should strongly be considered when planning your presentation.
Microsoft PowerPoint offers multiple different layout options for your handouts. They include:
Additional options included adding speaker notes, or choosing an outline view to try to condense the PowerPoint slides.
Which Layout should I use for my PowerPoint Handout?
How do you know which layout option to select? it would depend on a few factors.
- Is there a lot of text on your slides? If so, you might want to select 3 or fewer slides per page so that the audience can view each slide without having to squint.
- are you slides full color? If your presentation is full of big beautiful pictures that span across the entire width of your slides, you may want to print 4 or more slides per page to avoid the additional expense when. it comes time to print.
- If you are presenting an educational presentation, the experts at Presentation Geeks recommend choosing. the 3 per page layout to allow your audience room to take notes.
HOT TIP: If you want to go for more of a custom handout, print the first slide as a full-page, and print the remaining slides as multiple per page.
Enough background.. let's find out how to use microsoft powerpoint to create a handout., step 1 - file > print.

To access the handout menu, click the File dropdown, and then use the Print option to begin creating your handout. This is the first step needed to create your presentation handout.
Step 2 - Click Show Details

What makes creating a presentation handouts tricky for most people, is remembering to click the “Show Details” button. Click the Show Details button in. order to unlock a bunch of cool new options you can use, including creating handouts. When you don’t click this button it can seem as though the handout option isn’t available, but using these steps will help you make creating a handout simple and easy.
Step 3 - Layout > Slides

The next step is to choose how many slides you would like on each page. We typically choose 3 slides per page allowing for room for notes, but as mentioned above, not all presentations require the audience to take notes. Click the dropdown menu to view all of the layout options. Using the preview on the left-hand side you may want to click through a few different options in order to find out slide size makes the text clear enough to read.
Step 4 - Save as PDF

The final step in your journey is to click the PDF button, and then select or click Save as PDF.
A Few Final Words
And that’s it! With a click here and there, you can use this article to create a PowerPoint Handout in 5 seconds. Hopefully, this helps you remember the steps required to create a handout the next time you have a big presentation coming up.
If you need a little help or require further customization, such as a personalized cover, full-page charts, or a customized infographic, please don’t hesitate to enquire about our Powerpoint Presentation services.

Author: Ryan
Related posts.

FREE PROFESSIONAL RESOURCES DELIVERED TO YOUR INBOX.
Subscribe for free tips, resources, templates, ideas and more from our professional team of presentation designers.
Handout Essentials: A Guide To Creating Memorable Presentation Handouts
Hrideep barot.
- Presentation

Creating effective presentation handouts is a crucial aspect of enhancing audience engagement and understanding during and after a presentation. The choice of tools plays a vital role in shaping the quality and visual appeal of these handouts. Various tools, from traditional word processors like Microsoft Word to design-focused platforms like Canva and Adobe InDesign, offer unique features and functionalities. Each tool caters to different user preferences, design needs, and collaboration requirements. In this context, exploring the pros and cons of popular tools becomes
- What Are Presentation Handouts?
- What Is The Importance Of Presentation Handouts?
- Ways To Create Memorable Presentation Handouts.
Tools One Could Use For Creating A Presentation Handout.
- Conclusion.
What Are Presentation Handouts?
Presentation handouts serve as valuable tools to complement and reinforce information shared during a presentation. These materials are typically distributed to the audience before, during, or after the presentation , offering a more comprehensive understanding of the subject matter.
In printed form, handouts may include outlines, summaries, charts, or key visuals, providing tangible references that attendees can follow along with during the presentation and keep for future reference . By offering this supplementary material, presenters aim to enhance the learning experience and ensure that the audience retains essential information.
Whether in print or digital form, presentation handouts play a crucial role in knowledge transfer and retention. They serve as valuable reference materials, offering the audience a roadmap to navigate complex information. Additionally, well-crafted handouts can facilitate post-event reflection and encourage further exploration of the presented topic, transforming a one-time presentation into an ongoing learning experience for the audience.

What Is The Importance Of Presentation Handouts?
The importance of presentation handouts lies in their ability to enhance the overall effectiveness of a presentation and contribute to the audience’s learning experience. Here are several key reasons why presentation handouts are valuable:
1. Comprehensive Reference:
Presentation handouts provide the audience with a tangible and comprehensive reference to the information presented . Attendees can follow along with the speaker, refer back to key points, and have a structured outline of the content, aiding in better understanding and retention.
2. Reinforcement of Key Concepts:
Handouts reinforce the key concepts and messages of the presentation. By combining visual and written elements, handouts can emphasize important information , making it more likely that the audience will grasp and remember key takeaways.
3. Post-Presentation Review:
Handouts serve as a post-presentation review tool. Attendees can revisit the material after the event, reinforcing their understanding and allowing for a deeper exploration of the topic . This supports long-term retention of the information.
4. Customization and Personalization:
Presenters can customize handouts to suit the specific needs of their audience. This might include additional resources, references, or supplemental material that can further engage participants and cater to diverse learning styles.
5. Audience Engagement:
Handouts encourage audience engagement during the presentation. Attendees can annotate, take notes, and actively participate in discussions. Interactive elements in digital handouts can further enhance engagement.
6. Accessibility:
Digital handouts, especially in formats like PDFs or PowerPoint presentations , are easily accessible. Attendees can access them on various devices, fostering convenience and ensuring that the information remains available long after the presentation concludes.
7. Sustainability:
In the context of environmental sustainability, digital handouts offer an eco-friendly alternative to printed materials . This aligns with modern trends toward reducing paper usage and promoting greener practices.
8. Continued Learning:
Well-crafted handouts can serve as a starting point for continued learning. They can include additional resources, recommended readings, or links to relevant websites , encouraging the audience to explore the topic further.
Check this out to also know how to ace group presentations:
In summary, presentation handouts play a crucial role in supporting the presenter’s message, engaging the audience, and facilitating a more thorough understanding and retention of the presented material. Whether in print or digital form, these materials extend the impact of a presentation beyond the event itself.
Ways To Create Memorable Presentation Handouts

Creating memorable presentation handouts involves thoughtful planning, visual appeal, and alignment with the presentation’s goals. Here are strategies to make handouts more memorable:
1. Visual Design:
Consistent Theme: A cohesive theme reinforces the brand and aids in recognition. Ensure that fonts, colors, and imagery align with the overall aesthetic of the presentation, creating a seamless visual experience for the audience.
Graphics and Images : Thoughtfully chosen visuals enhance understanding. Infographics, charts, and relevant images break down complex information, making it more digestible for the audience.
2. Clear Structure:
Logical Flow: Arrange information in a sequence that mirrors the presentation. A logical flow allows the audience to follow along effortlessly, enhancing comprehension.
White Space: Purposeful use of white space prevents visual overload. It provides a visual break between elements, making the content more digestible.
3. Engaging Content:
Concise Text: Brevity is key. Each point should be succinct, conveying essential information without overwhelming the audience. This facilitates better retention.
Use of Examples: Real-world examples bring concepts to life. They provide context and relevance, making the content more memorable for participants.
4. Interactivity:
Spaces for Notes: Dedicated areas for notes encourage active engagement. Participants can jot down thoughts, questions, or personal reflections, fostering a sense of involvement.
QR Codes or Links: Incorporate QR codes or links to additional resources. This not only enhances interactivity but also allows participants to delve deeper into topics of interest.
5. Incorporate Branding:
Logo and Brand Elements : Prominently display the logo and relevant branding elements. Consistent branding across materials reinforces the presenter’s identity and message.
Quality Printing (for Physical Handouts):
High-Quality Paper: Opt for a paper that feels substantial and professional. The tactile experience of quality paper can contribute to a positive perception of the handouts.
Readable Fonts: Choose fonts that are easy to read, even from a distance. The goal is to make the content accessible to all participants.
6. Digital Enhancements:
Hyperlinks and Multimedia: Hyperlink relevant sections for easy navigation in digital formats. Including multimedia elements, such as videos or interactive content, adds dynamism to the handouts.
Responsive Design: Ensure that digital handouts are responsive to various devices. A user-friendly design accommodates different screen sizes and devices.
7. Highlight Key Points:
Emphasis Techniques: Utilize formatting tools to emphasize crucial information. Whether through bolding, italics, or color, draw attention to key points for better focus.
Post-Presentation Resources:
Additional Reading: Provide a curated list of readings or resources for further exploration. This demonstrates a commitment to ongoing learning and offers participants avenues for continued engagement.
Contact Information: Include clear contact details for presenters or subject matter experts. This facilitates post-presentation communication, encouraging participants to reach out with questions or feedback.
8. Feedback Section:
Survey or Feedback Form: Design a concise survey or feedback form. Collecting participant feedback is invaluable for refining future presentations and tailoring content to the audience’s needs.
9. Call-to-Action (CTA):
Pro: End with a clear call to action for the audience to take the next steps. A well-crafted CTA guides the audience on what actions to consider after reviewing the handout.
Con: Unclear or demanding CTAs may lead to inaction . If the call-to-action is ambiguous or if it requires too much effort from the audience, it may result in a lack of follow-through. Ensure that your CTA is straightforward, feasible, and aligns with the goals of your presentation.
Check this out to know how to research for a presentation:
By meticulously implementing these strategies , presenters can create handouts that not only serve as supportive materials but also elevate the overall presentation experience for participants.
Creating a presentation handout involves selecting tools that offer flexibility, design capabilities, and ease of use. Here are some tools you can consider for crafting effective presentation handouts:
Microsoft Word:
Pros: Familiar interface for most users, extensive font and formatting options, compatibility with various file formats, ability to track changes and collaborate through Microsoft 365.
Cons: Limited design features compared to dedicated design tools, potential formatting challenges when collaborating with users of other word processors.
Google Docs:
Pros: Excellent real-time collaboration features, cloud-based accessibility from any device, auto-save functionality, and integration with other Google Workspace apps.
Cons: Basic design options, may lack advanced formatting features needed for complex layouts.
Pros: User-friendly with a drag-and-drop interface, extensive template library for quick design, and a diverse range of visual elements and icons, suitable for both beginners and professionals.
Cons: While many features are free, some advanced elements and templates are paid, and may not be suitable for intricate designs.
Adobe InDesign:
Pros: Industry-standard design tools, precise control over layout, advanced typography options, and support for complex document structures.
Cons: Steeper learning curve, may be overwhelming for beginners, subscription cost for full access.
Microsoft PowerPoint:
Pros: Familiar interface for creating presentations, easy integration of multimedia elements, ability to convert presentations to printable handouts.
Cons: Primarily designed for presentations, not as feature-rich as design-specific tools for complex layouts.
Google Slides:
Pros: Seamless collaboration features, integration with other Google Workspace apps, cloud-based accessibility.
Cons: Limited design options compared to PowerPoint, may not support intricate formatting needs.
Lucidpress:
Pros: Online collaboration, templates available for various document types, professional-grade design tools.
Cons: Some features may require a subscription, and may not be as widely known or used as other tools.
Piktochart:
Pros: User-friendly interface, suitable for beginners, focuses on infographics and visual storytelling.
Cons: Free version limitations, may not be as versatile for general document creation.
Conclusion .
Selecting the right tool for crafting presentation handouts depends on factors such as design complexity, collaboration needs, and personal familiarity. Microsoft Word and Google Docs provide straightforward solutions with collaborative features, while design-specific tools like Canva, Adobe InDesign, and Visme offer advanced creative options. The choice between PowerPoint, Google Slides, Lucidpress, Piktochart, Venngage, and design software like Adobe Illustrator depends on the balance between user proficiency, required features, and budget considerations. By weighing the pros and cons, presenters can make a strategic choice that aligns with their presentation objectives and enhances the overall impact on their audience.
Click here to embark on an enlightening adventure.

Enroll in our transformative 1:1 Coaching Program
Schedule a call with our expert communication coach to know if this program would be the right fit for you

How to Brag Like a Pro as a Speaker

Less is More! Tips to Avoid Overwhelming Your Audience

What does it mean to Resonate with the Audience- Agreement, Acceptance, Approval
- [email protected]
- +91 98203 57888
Get our latest tips and tricks in your inbox always
Copyright © 2023 Frantically Speaking All rights reserved
- Delivery Techniques →
How to Create Engaging Presentation Handouts

So you want to create engaging handouts for your presentations, huh? You’re probably expecting this blog post to tell you exactly how to create amazing handouts in a few simple steps. Well, sorry to disappoint, but that’s not what this post is about. What I’m here to do is to give you the best tips and tricks to transform your ordinary handouts into something your audience will find exciting and inspiring. Creating engaging handouts is more than just picking a font and any old text to fill up the page. It’s about strategizing what content to include and how to make it visually appealing. While the exact form each handout takes will differ from presentation to presentation, the goal should always remain the same: to create something that people will enjoy reading. So let’s dive into exactly how to make your handouts attractive, informative, and truly engaging!
What Are Handouts in Presentations?
Handouts are material given to an audience of a presentation, typically including supplementary information and visuals which compliment the speaker’s discussion. Handouts can be distributed physically, or shared electronically through the internet. Regardless of their form, handouts are effective tools that help capture the interest of your audience and support the message of your core presentation. When creating handouts for a presentation, there is a debate as to whether or not you should include all content discussed in the presentation, or simply key points and takeaways. On one hand, providing handouts with too much detail can lead to audiences relying on them as a crutch and losing focus during important points in the presentation. On the other hand, by limiting what is included in handouts it can leave audiences feeling under-informed once they leave your presentation and lose some of the impact of your talk. It is important to find balance and decide which approach works best for particular presentations based on who your target audience is going to be and what you’re hoping attendees will gain from participating in your talk. In the next section we will examine more closely what the purpose of having handouts in presentations may be so that you can make an informed decision based on selecting the right materials for your specific needs.
What Is the Purpose of Handouts in Presentations?
Handouts can be an effective tool for reinforcing key points and engaging your audience , but it is important to consider their purpose when designing your presentation. Handouts can have both positive and negative impacts on a presenter’s objectives. On one hand, handouts can provide an opportunity for the audience to connect and interact with the presentation, aiding comprehension. They can also help to increase engagement from listeners, as well as acting as a visual reinforcement of key concepts. On the other hand, if not properly designed or used, handouts can detract from a presentation. A cluttered slideshow or distracting graphics can cause confusion or create excessive distraction and boredom in an audience. Poorly tailored handouts such as translations of slideshows into paragraphs or too much material packed into limited space could leave listeners feeling overwhelmed and unable to focus. Overall, it is important for presenters to carefully consider the purpose of their handouts before incorporating them into their presentations. The goal should always be creating an engaging experience that further aids audience understanding. With careful attention to design, thoughtfully chosen materials and allotted time for participation, presenters can leverage handouts as a powerful resource to maximize the success of their talks. Now that you understand the role of handouts in presentations, let’s dive into ways you can improve your audience’s understanding with them.
Improving Audience’s Understanding
Understanding your targeted audience is key for creating engaging handouts that are well received. When preparing a handout, it is important to consider the Age, Gender, Educational background and other relevant factors of those in attendance. Presenters should strive to provide enough information on the topic while also adapting their presentation to meet their audience’s needs. This helps ensure that presentations are meaningful and beneficial for participants. When available, it is beneficial to add data visualizations, such as graphs and charts, to further explain concepts and ideas. Visual representations of data can help viewers comprehend complex topics quickly and easily. Also, providing helpful resources and references in materials distributed during or after the presentation can help deepen participants’ understanding of the presented information. Nonetheless, excessive visual aids may not be necessary; visuals should only be used if they improve understanding of the material and increase comprehension. To reinforce audience’s understanding of main points throughout the presentation, speakers should summarize their message several times during various intervals. Summarizing key points allows viewers to connect core content with the overall message of the handout. Additionally, lecturers should include information on how participants can apply what they have learned in their own lives or work environment for greater comprehension and engagement with the material. Demonstrating understanding of different learning styles is another effective way to engage learners. Differentiating delivery methods – such as transitioning from lecture format to interactive activities like discussion or debate – can be effective for diverse audiences. By becoming aware of a variety of knowledge retention tools, presenters are more likely to create engaging handouts that better meet their attendees’ needs. Once you’ve created an engaging handout that appeals to your audience and improves understanding, it is important to reinforce and summarize these main points throughout the presentation. In our next section, we will discuss strategies presenters can adopt when reinforcing information during their presentations.
Reinforcing and Summarizing
When you’re preparing handouts for your presentations, it is important to remember that their purpose is to reinforce and summarize the content of your presentation. Handouts should be concise and easy to read; an effective handout should include no more than two pages of material that highlights the most important points from your talk. They should also provide supplemental visuals, such as graphs and charts, to help illustrate key concepts. When designing a handout, it is helpful to use the same font and color scheme that you plan on using in your presentation so that they can work together seamlessly. You should also provide enough detail so that viewers can continue their exploration or review content from your presentation if needed. Additionally, consider adding a quote from the speaker or additional text as a reference on the handout for attendees to use in writing about the event online. Some argue that limiting handouts to two pages reduces the amount of material attendees can take with them, but this ensures that only the most important details are present for viewers to access. Without proper reinforcement and summarization included within your handouts, there will be less reinforcement of the content within viewers’ minds and they may potentially forget some of what was discussed during the presentation. It is essential to create handouts that succinctly yet accurately summarize what was discussed in order to enhance understanding of the topics and improve retention of information. To further engage audiences while reinforcing key messaging, handouts can come in multiple forms: physical printed materials as well as digital platforms such as tablets and slide shows. The next section will explore how utilizing both physical and digital materials effectively create engaging handouts for presentations.
Essential Points
When preparing a presentation handout, it is important to make sure that the content is concise and easy to read and that it reinforces the main points from the talk. Fonts and colors should be consistent with those in the presentation and additional visuals, such as graphs and charts, should be included. Handouts can also include a quote from the speaker or additional material for attendees to use when writing about the event online. The handout should not exceed two pages and should provide enough detail so that viewers can review the content of your presentation. Finally, physical and digital materials should both be utilized to create engaging handouts for presentations.
Handouts as Physical and Digital Materials
Handouts are one of the most effective tools for engaging an audience during a presentation. They serve as standalone reminders of what was discussed, making them invaluable as educational and reference materials. Handouts can be physical documents given at the presentation, or digital copies to be distributed via email or online. In either form, handouts should be concise and focused on helping reinforce the message in your presentation. When it comes to physical handouts, there are pros and cons to consider. On one hand, physical documents might not always be the most cost-effective or environmentally friendly option if you’re distributing them to a large audience. However, handing out physical materials helps to make presentations more interactive by ensuring that each attendee has something tangible they can refer back to at a later date. Furthermore, physical documents provide a sense of authentic communication, versus just reading text on a screen. These benefits may be worth the extra expense and resources required for production. On the other hand, when considering digital handouts, there may be advantages over traditional physical materials. For example, digital documents can save time and money by reducing the burden of having to produce physical copies for everyone in the room. Also, digital files may provide more flexibility in terms of design capabilities and customizability when compared to static print material. Additionally, digital copies can easily be shared with more people beyond just those in attendance at a presentation—they can be sent to any interested party with access to email or the web. Whether using physical or digital materials for handouts is best for any particular situation depends largely on audience size and type of content being presented. In either case, it’s important that these resources are easy to use and understand so that attendees retain what they learn after leaving the presentation. The next section will explore how to create effective types of physical handouts that meet these needs while engaging your audience before and after your presentation.
Types of Physical Handouts
Physical handouts are a powerful and essential tool for enhancing audience engagement with your presentation. They provide people with something tangible to refer back to as they revisit the concepts, ideas, and data discussed during your presentation. Furthermore, physical handouts allow you to capture an audience’s attention and draw them into the material in order to have greater impact. The types of physical handouts you choose to provide, however, will depend largely on what kind of material is included in your presentation and the amount of time you have for distribution. Generally speaking, physical handouts can be further divided into three categories: reference materials, visual aids , and discussion prompts. Reference materials are collections of facts or data related to the presentation’s topic that provide a reference point for audiences to review after your presentation. Examples could include pre-packaged binders full of information on a particular topic area or white papers summarizing research findings relevant to the subject. Visual aids consist of graphical displays or images related to your presentation topic that will help increase audience understanding and enhance their experience while viewing. Examples including infographics or charts that map out different elements of the presentation in a visually appealing manner and provide context for understanding the main points of your talk. Discussion prompts are written questions or statements that apply directly to the subject matter presented during your talk but can evoke further thought from the audience through encouraging open dialogue during group activities or roundtable discussions following the talk. This allows for more interactive conversations about your topic by introducing questions and ideas not discussed in depth during your presentation itself. Overall, there are numerous types of physical handouts that can be distributed before, during, or after presentations depending on the type of content being presented. While these include reference materials, visual aids, and discussion prompts, experimentation with various options can reveal which works best for any given situation. With this in mind though it’s important to take into account logistics related to gathering and disseminating physical handouts when planning presentations. Now that we’ve examined the types of physical handouts available let’s move onto looking at how digital ones can shape engaging presentations—the focus of our next section.
Types of Digital Handouts
When it comes to creating engaging handouts for your presentations, one popular way to deliver information is through digital formats. Digital handouts offer the convenience of being able to easily be shared electronically, which can be beneficial in cases where physical copies are not necessary. They can also be highly customizable and interactive, allowing you to quickly tailor your message to the audience. The most popular types of digital handouts are PDF files, PowerPoint slides, and multimedia tools such as videos and podcasts . PDFs allow you to easily share important documents or forms with large groups of people without having to print out hundreds of copies. PowerPoint slides are a great way to add visuals and animation to engage your audience; visual content has been found to be appealing to viewers and can help keep their attention. Multimedia tools provide further opportunities for interaction with audience members by giving them a chance to listen and watch rather than read, enabling increased engagement with your material. Although digital handouts have obvious advantages over physical copies, there are still some potential risks in using them for presentations. For example, if your presentation relies heavily on visuals, complex graphics may not always appear correctly when displayed on different devices or platforms. Additionally, if you’re relying on an internet connection for your presentation then any problems with signal strength or load times can cause disruption. Finally, data privacy is always a consideration when sharing materials electronically; you will need to take the necessary measures to ensure the personal data collected from attendees is kept safe and secure. Despite these potential issues, digital handouts are generally popular among presenters because they provide convenience and flexibility when sharing information. When used properly, digital handouts can help make presentations engaging and impactful for even a large audience. Now that we have discussed the types of digital handouts available, let’s move on to the next section which will explore “When to Use Handouts During Your Presentations”.
When to Use Handouts During Presentations
Whether or not to use handouts during a presentation is an age-old debate that has gone on for decades. Some speakers may feel that passing out handouts detracts from their presentation, while others believe they are a necessary tool to keep an audience engaged. Ultimately, it comes down to what type of content and audience the presenter is dealing with when deciding if handouts are appropriate. On one side, many presenters will claim that handouts should only be used sparingly in order to maintain audience engagement. This can be particularly effective when presenting to small groups or information-packed content that requires focus and concentration. Handouts can be easily misused by providing too much unnecessary information which can cause the audience to lose interest and quickly become overwhelmed. On the other side, handouts can also be a valuable asset when presenting longer lectures or more complex issues that offer an abundance of facts and figures. Handouts are often much easier for an audience to follow along with and can act as a great supplement for topics that require further explanation. Additionally, handing out material ahead of time gives the presenter an opportunity to gauge audience interest before getting started and make adjustments accordingly. In summary, the decision whether or not to utilize handouts depends greatly on the type of presentation and its intended content – being mindful not to overwhelm the audience by introducing too many material at once. With this in mind, let’s look at some tips presenters can use when preparing their handouts for their presentations.
Tips for Presenters for Using Handouts
Using handouts as a part of your presentation can help ensure that members of your audience are engaged and leave with the necessary materials to further their knowledge and understanding. To ensure that you make the most out of using handouts, there are several tips for presenters to keep in mind throughout their presentation. First, no matter how engaging the presentation may be, it’s important to provide handouts which summarize the points of your presentation. By allowing members of your audience to have a physical document of the topics discussed, they’ll be able to quickly refer back to information given or determine additional resources they need to seek out after the presentation has ended . As such, investing time into creating effective handouts can further engage and inform everyone in attendance. Second, it’s beneficial to give each member of your audience a copy of the handout so that they don’t have to rely on someone else’s copy if they miss something. Additionally, by giving each member their own copy your audience will be able to take notes directly on their paper and even make summaries that are most relevant for them. Moreover, if presenting virtually it’s essential you consider how the attendees will access the handouts; whether via email attachment prior to or during the beginning of the session. Some may find that giving handouts throughout a presentation may overpower and even distract from what is actually being said in real-time. This perspective may be valid and should certainly be taken into consideration when deciding when and how often one distributes handouts within their presentation. Ultimately, it should come down to what style works best within a unique setting and situation so that participants remain actively engaged in your information while simultaneously having access to any additional resources they may benefit from during or after the event concludes.
Responses to Frequently Asked Questions
What type of information should be included in a handout for a presentation.
When it comes to creating engaging handouts for a presentation, it’s important to include information that will help make the presentation more digestible and easier to remember after the fact. This could include key slides from the presentation, with accompanying notes and bullet points, highlighted quotes, summaries of key topics addressed in the presentation, as well as useful visuals like infographics and graphs so that participants can easily recall the most important details. Additionally, it’s a good idea to include contact information of the presenter or company, so that participants have an easy way to follow up or reach out for further discussion. Finally, adding applicable tips or tricks related to the topic being discussed can help keep participants engaged and give them something practical to take away from the experience.
How can handouts be used effectively during a presentation?
Handouts can be a very effective tool for aiding presenters during their presentations. Handouts provide audience members with a tangible item to refer back to and review after the presentation. They can also serve as a valuable reminder of key points made during the presentation and help to visually reinforce concepts or evidence that the presenter is attempting to convey. Handouts often have more detailed information than what is given in the presentation, making them an excellent means of providing follow-up materials to attendees who are interested in understanding the topic better. Additionally, since handouts can serve as concrete reminders of what was taught in the presentation, they are sometimes used after a presentation as a follow-up review tool. Finally, handouts can be used to provide insights into topics which may not be suitable for verbal presentation, such as data analysis or complex diagrams. When used effectively and thoughtfully, handouts can be an invaluable resource during any learning experience.
What are the pros and cons of using handouts in a presentation?
Using handouts in presentations can be very beneficial, but there are also some drawbacks that should be considered. One of the main advantages of using handouts is that it allows your audience to refer back to the materials you’re presenting for further study and reference. They can take notes in the margins, re-read information, and review topics they didn’t quite understand during the presentation. Additionally, by choosing handouts with illustrations, captivating images, or attractive designs, you can add an extra layer of engagement for your audience. On the other hand, one of the biggest disadvantages of using handouts is that it does take time away from the actual presentation. You may have to allocate time during your speech for people to get their hands on the material you’re providing or wait as they go through a particular section. Moreover, if your audience isn’t given enough time to review the information before they leave the talk, they likely won’t remember what they read once they get home. Overall, while using handouts in presentations can be beneficial when done correctly, taking note of the time constraints during a presentation and giving adequate time for your audience to review any information provided is essential.
How to Create and Format Handouts in PowerPoint

Your changes have been saved
Email is sent
Email has already been sent
Please verify your email address.
You’ve reached your account maximum for followed topics.
These 6 Apps Track Your Habits With Minimal Fuss
Slack vs. discord: which will better organize your personal life, why chatgpt’s speech to text is the best i’ve ever used.
Handouts are a fantastic tool to use in conjunction with PowerPoint presentations. They offer an additional level of information and detail that slides alone simply cannot convey.
Fortunately, PowerPoint fully supports this feature, and you can easily create handouts for your presentations. You can customize the look and layout of the handout, include notes, and then print or export it to share with your audience during your presentation.
What Are Handouts in PowerPoint?
Handouts are essentially a condensed version of your PowerPoint presentation. They include the slides in your presentation and any additional notes that you omitted in the slides.
PowerPoint users often overlook the handouts feature. As these handouts are usually in print format and not digital, their potential often goes unnoticed. However, handouts can actually transform your presentation from a dull monologue to an interactive experience. Here are some benefits of using handouts in your presentations:
- Provide a more comprehensive view of the topic being presented.
- Serve as a helpful reference for the audience to refer back to after the presentation.
- Keep your audience engaged by offering a tangible document.
- Encourage the audience to pay attention and stay focused.
- Allow your audience to jot down important information and ideas as you present them.
Thankfully, PowerPoint recognizes the usefulness of handouts and makes working with them easy. You can customize PowerPoint handouts in the Handout Master view. PowerPoint handouts can include 1, 2, 3, 4, 6, or 9 slides per page, and you can even export them to Word.
If you're set on aceing the presentation, you can use PowerPoint Speaker Coach to improve your presentation skills .
You can create and format your PowerPoint handouts using the Handout Master view. This view is similar to Slide Master in PowerPoint and lets you format the fixed elements of your handouts.

- In the Master Views section, click Handout Master .

- Check whether you want to display the header, footer, date, or page numbers in the Placeholders section.
- Change the appearance to your liking.
- Once you're satisfied with everything, click Close Master View to return to your slides.
If you've enabled the header and footer for your handout, you can double-click them in the Handout Master view to input text into them.

You can also add images to your handout by dropping them in PowerPoint. Keep in mind that the text and images are fixed components, and they'll appear on every page of the handout.
How to Print Handouts in PowerPoint
You can print handouts for your presentation in PowerPoint from the Print menu. You'll have the option to change the handout's layout here too.

- Go to the File tab in PowerPoint.
- Select Print .
- Under Settings , click Full Page Slides .
- Select your desired layout under Handouts in the drop-down menu.
- Check the rest of the print settings and then click Print .
The printed handout will contain images of the slides with the formatting you set in the Handout Master view, but it won't include notes. If you wish to include your notes in the handout, consider exporting it to Word.
How to Export PowerPoint Handouts to Word
Another nifty option is to export your handouts to Word rather than directly print them from PowerPoint. This feature allows you to include notes in your handout, and it links the PowerPoint slides in the Word document.
To export handouts in PowerPoint, follow these steps:

- Choose Create Handouts from the options.

PowerPoint will now start exporting your presentation to Word. The process might take a while, depending on the size of your presentation. Once the handout has been exported, Word will automatically open and display it. You can then make any necessary edits, save it as a PDF, or print it.
Enhance Your Presentation With Handouts
Using handouts in conjunction with PowerPoint presentations can greatly enhance the effectiveness and impact of your presentation. They provide a tangible representation of the information being presented and can help keep the audience engaged and focused throughout the presentation.
You can easily customize the handouts in PowerPoint to meet your needs. From there, you can either print the handouts from PowerPoint or export them to Word for more flexibility and editing. Next time you're preparing a PowerPoint presentation, consider including a handout—your audience will thank you for it.
- Productivity
- Microsoft PowerPoint
- Presentations
Blog > How to export & print handouts in PowerPoint
How to export & print handouts in PowerPoint
08.09.21 • #powerpoint #tips.
PowerPoint allows you to easily create handouts to share with the audience after the presentation. You can also export your presentation with slides and notes to Word for further editing and formatting. You can find out how this all works and how you can print out the handouts at the end in this blog post.
Format & print handouts without notes

Format & print handouts with notes

If you want to make them available to the audience, you can easily print them out. All you have to do is select "Notes page" instead of "Full page slide" in the print settings.

Exporting and editing handouts in Word

When exporting a PowerPoint presentation to Word, a lot of memory is used. Therefore, this process can also take for a while. If you get the error message "PowerPoint could not write to Microsoft Word", try restarting your computer.

Share slides digitally with the audience

Printing handouts for every attendee is cumbersome and also not quite environmental friendly. A much better solution is using SlideLizard (a cool software for live audience interaction in PowerPoint) for your presentations. Attendees can join your talk with their smartphone (or Laptop) and see your slide live during the presentation . They can also browse previous slides and as well download the slides directly as a PDF (if you allow it). In addition, participants can take private notes on their own smartphones directly within SlideLizard. These notes remain linked to the slides and at the end of the presentation all participants receive their own notes via email. Moreover, attendees can mark the most important slides with a star to find them more easily later. Live polls & quizzes are also possible with SlideLizard. You can try SlideLizard for free today !

How do I create handouts in PowerPoint?
To create handouts in PowerPoint go to "Handout Master" in the "View" tab. You can format your handouts for all pages there.
How do I print handouts from PowerPoint?
To print your handouts you have to go to "Print" in the "File" tab. You can then choose how many slides you want per page under "Full page slides" in the "Handouts" group.
Related articles
About the author.

Miriam Rapberger
Miriam supports SlideLizard in the area of marketing and design. There she uses her creativity for blog posts, among other things.

Get 1 Month for free!
Do you want to make your presentations more interactive.
With SlideLizard you can engage your audience with live polls, questions and feedback . Directly within your PowerPoint Presentation. Learn more
Top blog articles More posts

Family Feud – PowerPoint Quiz Template

How to use the morph transition in PowerPoint

Get started with Live Polls, Q&A and slides
for your PowerPoint Presentations
The big SlideLizard presentation glossary
Body language.
Body language is communication through movements, hand gestures and body posture.
Flipped Classroom
Flipped Classroom means that students work out the subject matter themselves at home through tasks such as reading, videos, etc. Interactive learning activities and exercises then take place in class.
.ppsm file extension
A .ppsm file includes one or more macro-enabled slides. They are used to show presentations with embedded macros, but not for editing them.
Open Educational Resources (OER)
Open Educational Resources are free learning and teaching materials provided on the web. They have an open license (e.g., Creative Commons), which allows anyone to use and benefit from these resources.
Be the first to know!
The latest SlideLizard news, articles, and resources, sent straight to your inbox.
- or follow us on -
We use cookies to personalize content and analyze traffic to our website. You can choose to accept only cookies that are necessary for the website to function or to also allow tracking cookies. For more information, please see our privacy policy .
Cookie Settings
Necessary cookies are required for the proper functioning of the website. These cookies ensure basic functionalities and security features of the website.
Analytical cookies are used to understand how visitors interact with the website. These cookies help provide information about the number of visitors, etc.
CHICAGO AUGUST 29-30 PUBLIC SPEAKING CLASS IS ALMOST FULL! RESERVE YOUR SPOT NOW
- Public Speaking Classes
- Corporate Presentation Training
- Online Public Speaking Course
- Northeast Region
- Midwest Region
- Southeast Region
- Central Region
- Western Region
- Presentation Skills
- 101 Public Speaking Tips
- Fear of Public Speaking
Make Your Handouts Look Great Without a Graphic Designer
Make your presentation handouts look professional without a graphic designer.

Step #1: Use a Canva Template to Create a Great Presentation Handout.
Canva ( https://www.canva.com ) is one of those online resources where the more that you use it, the more that you can’t do without it. It is graphic design software, similar to Photoshop, but made for the amateur designer. The software is so easy to use, that you can be designing and editing professional graphics in minutes. The major difference between Canva and Photoshop though, (other than being really easy to operate) is that it is loaded with thousands of templates for just about anything that you want to create.
I was first introduced to Canva when I was looking for a way to create eye-catching social media images. I knew that if I wanted to post images that would get the attention of the casual Facebook or Twitter reader, that I had to create my own. (Stock photos just wouldn’t do.) I had invested in Photoshop, but since I didn’t have a lot of experience with it, the software was very frustrating. Then I was listening to a podcast by Michael Stelzner and Social Media Marketing, and they mentioned Canva. I tried it out for about 15 minutes, and I was hooked. In fact, most of the images that you see on my websites and social media accounts are created using Canva, now.
Create Your Background from Scratch or Start with a Template.
Because I’ve been using Canva for a while, I now publish most of my backgrounds from scratch. But when I first started using the website, I often used the pre-installed templates. If you decide to use a template, for a handout background, you might want to start with the “Letterhead” templates. Most of these letterhead templates have white backgrounds and really nice and colored borders, so they are ideal if you will be adding a lot of text. The great thing about the software is that if you find a design that you like, but you need to customize the colors, just click on the template, and it will load onto your design. Next just select the border or shape item that you want to alter, and a colored square will pop up in the top-left corner of the toolbar. Click the square, and you can change the color to any that you like.
If you decide to create the background from scratch, just click the “Use Custom Dimensions” button in the top-right corner of the Canva homepage, and enter 8.5 in X 11 in. You’ll start with a blank white page, but you can quickly add shapes, colors, images, and icons at will. You are only limited by your creativity. When I create a custom template or background, I usually use either a custom border or a half-page image.

For a small monthly fee, Canva will allow you to use royalty-free images that are fantastic. If however, you want to kick your images up a notch…
Download Professional Stock Photos on a Budget.
There are a lot of stock photo companies out there, and many are really good, but my favorite is ShutterStock . The reason I like this service so much is that the images are very economical, and they have just about any type of image that you’d ever want. In the past, I was using stock images so much for social media and my blogs that I had a monthly plan where I could download up to 50 different images per month for just $100. Now, though, I purchase five images for $49, and I have an entire year to choose which five images that I want to download. So, the images are only $9.80 each. Once you purchase the license for the picture, you can use it (and re-download it if needed) forever. This is a fantastic deal compared to companies like Getty that charge $500 per image, and you have to buy different licenses for each type of use.
ShutterStock actually has a built-in editor that you can use before you download the image. However, I have never been able to use it effectively. However, once you find the perfect image that you want to use, download it, and then upload it to Canva. You can then insert it into your half-page photo background, or you can edit it and alter it as needed. For examples of what you can do when you combine Canva and Shutterstock, go to my Instagram page at https://www.instagram.com/leadersinstitute/ .
Once you have the background just like you like it, you can either download it as a PNG from Canva, or you can save your Canva background, copy it, and create your handout right in Canva itself.
If You Are Not Technical, Here is a Tip After Downloading Your Background.
To download your background from Canva, just click the Download button and select PNG. An image will be saved on your computer in your download folder. Open up Microsoft Word, Google Docs, or any other word processor. Insert the PNG that you created. Click the image and drag the corners to the edge of the page, so that the image takes up the whole page. In the top toolbar, you will see a new option called Format. Click that button, and select Wrap Text. Now, select the option to Send Behind Text. One last thing. Right-click the image, and select Size and Position. Select Position. De-select Move Object with Text and Select Lock Anchor Position. These little technical tricks will push the image to the background of the page so that you can type whatever you want on top of the photo without moving it. If you don’t do this, when you start typing your content for your handout, the image will move around and look strange. If you need a second page for your handout, just click anywhere on the image and Copy. Then on the new page, hit Paste. Viola, a professional handout without any technical or graphic design skills needed!

Podcasts , presentation skills
View More Posts By Category: Free Public Speaking Tips | leadership tips | Online Courses | Past Fearless Presentations ® Classes | Podcasts | presentation skills | Uncategorized
- Skip to primary navigation
- Skip to main content
- Skip to footer
Laura M. Foley Design
Cheat Death by PowerPoint!
How to make amazingly useful PPT handouts
October 3, 2019 by Laura Foley 3 Comments
PowerPoint handouts help people to remember a presentation. But too often, presenters distribute handouts that are totally useless. Here’s how not to do that.
You might have seen handouts that look like this:

How useless is this handout? If the presenter is lazy and exports every slide, even the ones that don’t contain helpful information or are part of animation sequences, you get a whole bunch of paper that might very well be tossed or a digital file that can’t be edited.
This type of handout is meant to encourage note taking, which isn’t a bad thing. But really, how often do people take notes on handouts during presentations? And how many presenters take the extra step of creating an interactive PDF instead of the static PDF that PowerPoint creates?
A better handout format
The most effective way for you to control your message after your presentation is to create handouts that reinforce it. This works best if your Speaker Notes are detailed and contain all of the information you want people to remember. If not, you’ll have a chance to edit them later. Here’s how to create the handouts:
- Click on the File tab, then select Export (1, below), Create Handouts (2), and Create Handouts (3). (Why PowerPoint makes you click create handouts twice is anybody’s guess.)

2. In the next window that appears, select “Notes next to slides” then click OK.

Watch in amazement as Word automatically launches and formats your handouts!

The best part about creating handouts this way is that it creates a separate Word document that you can edit as you like! Now’s your chance to add detailed notes for each slide. You can also delete slides that work for the presentation but don’t work for print, edit text, add hyperlinks or QR codes, change typefaces and colors, add your organization’s logo and contact information to the header and footer, etc.
When you’re done editing your handout in Word, go to File > Export > Create PDF/XPS Document to publish it as a PDF file. Congratulations! You’ve just created an electronic handout that’s searchable and which contains active links.
How to “hand out” your handouts
- Before your presentation, create your handouts and gather any reference materials you think may be helpful for your audience. Put these in a folder in cloud storage, such as Dropbox or Google Drive .
- Copy the URL of the folder then convert it into a short link using a service such as Tiny.cc . Customize the link to make it easier for people to type it on their devices.
- Also convert the link into a QR code using a service such as QR Code Generator .
- On the last slide of your presentation, put your contact information, the short link for the resources, and the QR code. Encourage the audience to snap pictures of the slide with their smartphones to make it easy for them to contact you and to download the resources. The cameras on some smartphones, such as the iPhone, automatically recognize the QR code and will immediately seek to open the folder.
The takeaway
Printed presentation handouts are virtually useless, but electronic handouts that contain so much more information, live links, and ways to contact you are amazing!
Share this:
How to make presentation handouts
- Written by: Kieran Chadha
- Categories: Presentation skills , Visual communication
- Comments: 1

Presentation handouts and leave-behinds are a great resource, giving your audience a tangible reminder of you and the company you represent. The problem is that they’re oft-neglected and oft-ignored. So how can you create presentation handouts that not only accurately represent your content, but look great and don’t take a fortnight to make?
How to make presentation handouts in PowerPoint: Basic method
If all you want to know is how to print your slides and speaker notes together, you came to the right place!
- Save a new copy of your presentation.
- Delete any overlapping visuals or anything that won’t print well.
- Go to File then Export and select PDF .
- In the window that opens there is an Options button – click it.
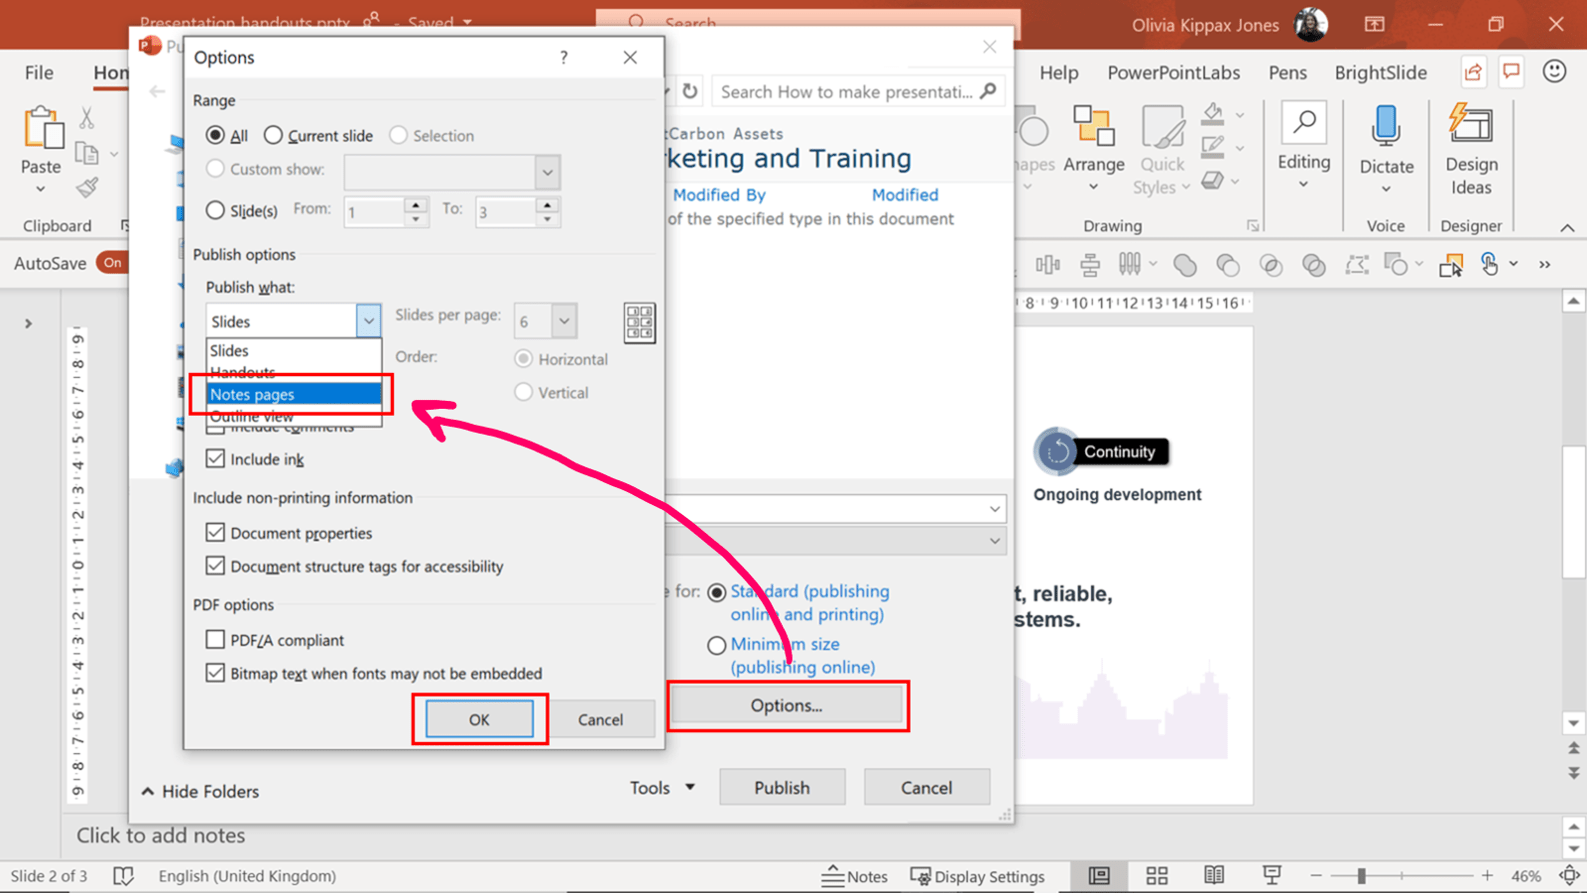
- Click OK then Save .
Your PDF will feature an image of each slide with the accompanying speaker notes underneath. Needless to say, make sure your presenter notes are ‘audience safe’ first. You can send the PDF file as an email or print it. The finished result is cheap ‘n’ cheerful – a great option if you’re in a rush.
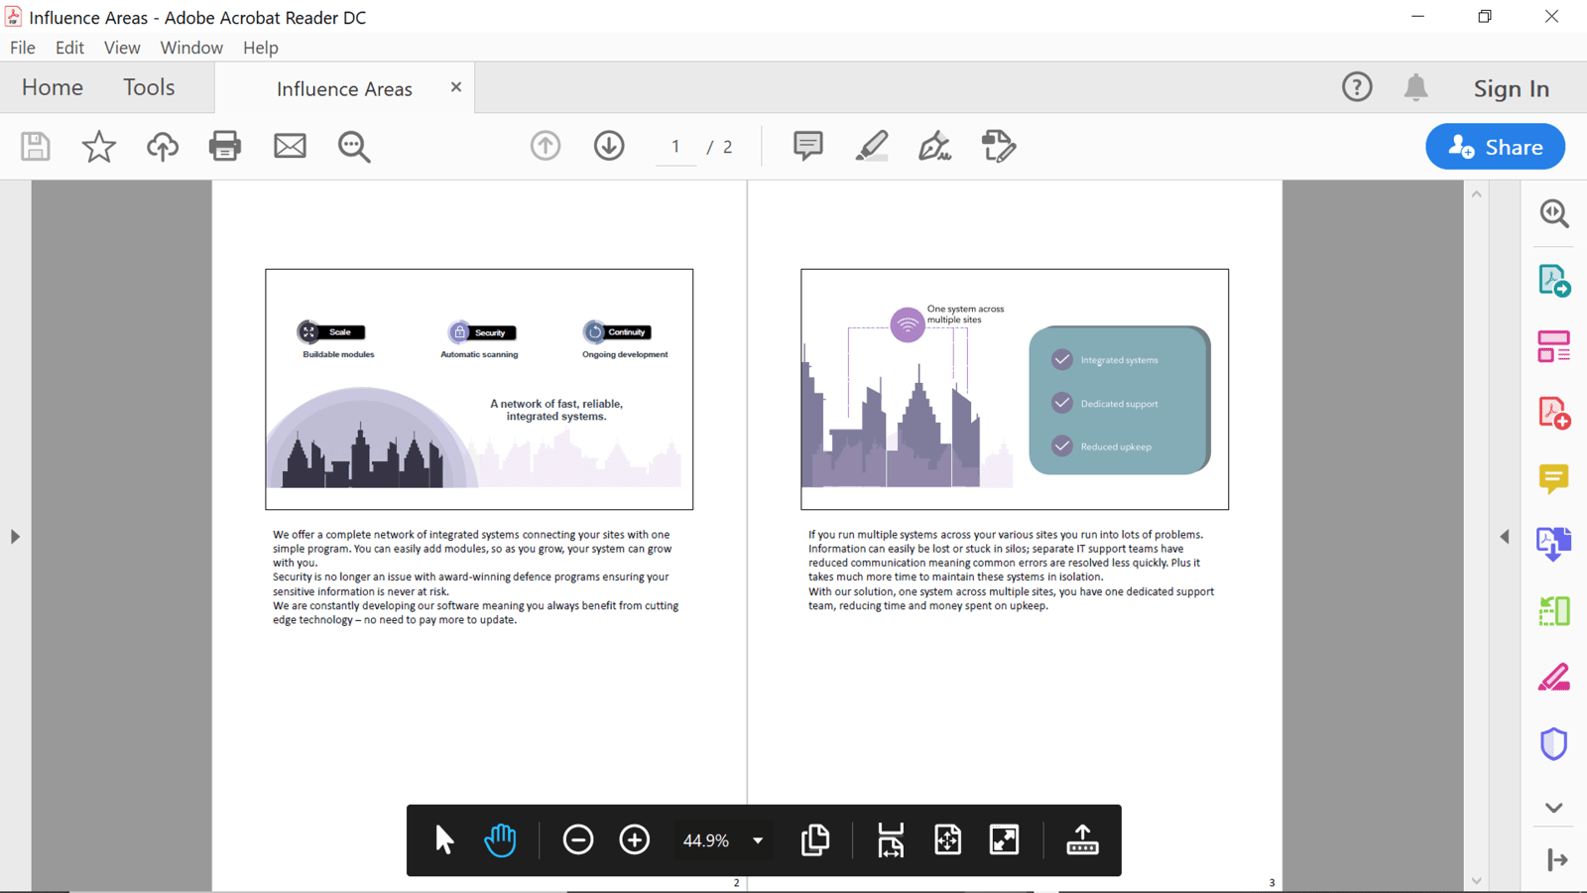
The problem with simply using your slides and notes is that presenter notes often aren’t written with the audience in mind – they’re there to jog the presenter’s memory, not inform the audience. Any materials you leave with your audience should be just as thought-through and polished as your presentation. So, let’s go back to square one and think about what should be in a presentation handout.
What should a presentation handout include?
Begin by pinning down what you want your presentation handout to achieve. Do you want your audience to remember the benefits of choosing you as a supplier? Do you want them to understand a specific process? Do you want to remind them of your pricing options? Or do you want to provide a place for them to make notes whilst you present?
Only the last aim actually calls for a presentation handout. Anything you give to your audience during or before your presentation will inevitably be a distraction; they will read the information, rustle the paper and generally pay less attention to you. Any presentation handout – that is, any material you give out before or during your presentation – should include a simplified version of your slides and plenty of blank space for notes. And that’s it.
However, if you want to provide your audience with a tool to refer back to, to remind them of what makes you unique or how they should carry out a certain process, what you need is a leave-behind.
What is a presentation leave-behind?
A presentation leave-behind can pack a punch, covering less material than the presentation, or more. It’s a piece of content you can either leave behind you when you’ve finished your presentation, or send to your audience a couple of days later to jog their memories. A good way to get started is to think about how you want the piece to be used. Here are a few less traditional leave-behind options to get you thinking:
- A 1- or 2-page summary of the most critical points

- A one-slide-per-page recap of the content you covered
- A process diagram

- An in-depth exploration of all the content plus much more
- A reference guide covering technical specifications, pricing etc.
Once you free yourself from the idea that a presentation handout or leave-behind has to be an exact replica of your slides and notes, the sky is the limit. When you’ve decided on the format for your leave-behind you can start to create it. A cut-and-paste job might not be the best solution; you may well have to rework some of your material to make it accessible for an audience revisiting it a week or two down the line.
How to create effective presentation leave-behinds
If you don’t want to create something from scratch, then a good approach is to use what you can from your slides, and write new notes to accompany them. We all have a dire recall rate when it comes to new information (see Ebbinghaus’ 1885 research for just how bad), and audiences are no different. Don’t overestimate how much they’ll remember; make your hand-out self-explanatory, accessible and informative. Cut out all the extraneous data (e.g. the history of your company) and focus on your key points.
There are two main formats to choose from when you’re ready to share your leave-behind.
Method one: PDF
- Save a copy of your presentation and create a simplified version of your slides
Be brutal and delete all the slides that don’t contain need-to-know information. Good content to include is your value proposition and main benefit points as these remind your audience of what differentiates you from the competition. You may also want to include any useful technical information or processes.
- Copy your slides into a word document and add text
In your PowerPoint file, right click on the slide you want to copy and select Copy . Then, in your Word document go to Home , Paste , Paste as Picture .
To create appropriate text pull from your presentation notes but also make use of any other collateral you have, like brochures, your website, promotional videos etc. To avoid overwhelming your audience with too much information add hyperlinks to relevant sections of your website or other resources. If you publish the document as a PDF, your audience will be able to click these hyperlinks and access the information they need.
And finally, it’s a good idea to add a call to action to encourage on-going communication.
- Save the document as a PDF
To save a Word document as a PDF go to File , click Export , then Create PDF . A benefit of doing this in word rather than exporting directly from PowerPoint, is that you have more control over the formatting so can keep it on-brand and looking good. If you want to add more design elements, you could also build the leave-behind in PowerPoint. Change the slide size by going to Design > Slide Size > Custom Slide Size .
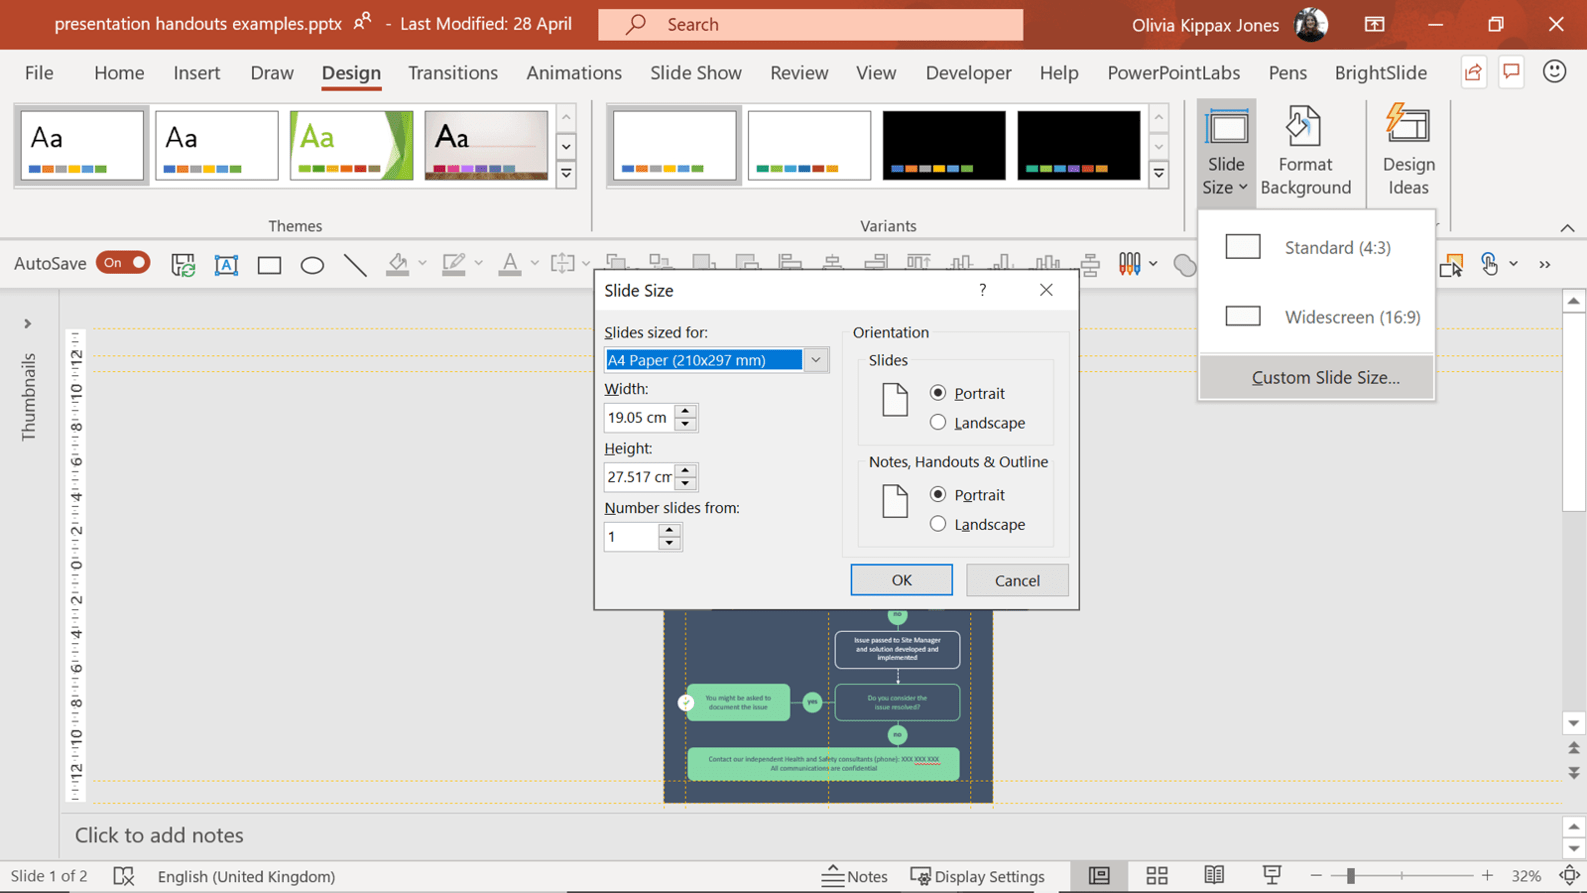
Of course, you could print the document but, putting aside poor print quality and environmental concerns, with paper handouts you have no way to track how many people have looked at the document or whether it has been ignored. However, with a PDF you can…
- Distribute using an email marketing service
Instead of printing and handing out your material, save the trees and save it as a PDF, then use an Email Marketing System like MailChimp to distribute it. You might not be able to see super detailed analytics, but you’ll still get useful data on who opened your message, and who showed interest in the material – all helpful stuff.
Method two: Video
There’s a sort of unwritten assumption that handouts have to be a document, particularly a document with slides. That’s not the case, and it’s often not the best method of delivery for follow-up content. Paper or a PDF has its advantages – it’s simple, easy to distribute and reasonably effective. However, it is limiting. It is less personal and might be ignored if it’s too dense. A powerful alternative to the conventional paper hand-out is to use PowerPoint to record narration and to output as narrated video. It’s a much more engaging, effective way of refreshing your audience’s memories.
- Make a simplified version of your PowerPoint deck
Again, you don’t want to send your audience your full twenty-five-minute presentation. Go through your content and trim it down to the essentials. Keep the key visuals and key benefit points.
- Write a script
A video with you um-ing and ah-ing over your slides isn’t particularly engaging or professional. You need to write a script so you can say precisely what you want to with no irrelevant detail or mistakes.
You audience won’t want to take much time out of their day, so aim for 3 – 5 minutes of content. We have some useful resources for script writing on our blog – start here .
- Record yourself presenting the new version
Once you’re happy with your script, you need to record yourself presenting the deck. Again, we’ve got a few stellar recourses to help:
- How to record narration in PowerPoint
- Recording voiceover for a narrated presentation
- Preparing for a presentation voiceover
- Export the video
To save your video go to File > Export > Create a Video . Make sure Use timings and narrations is selected on the drop-down menu.
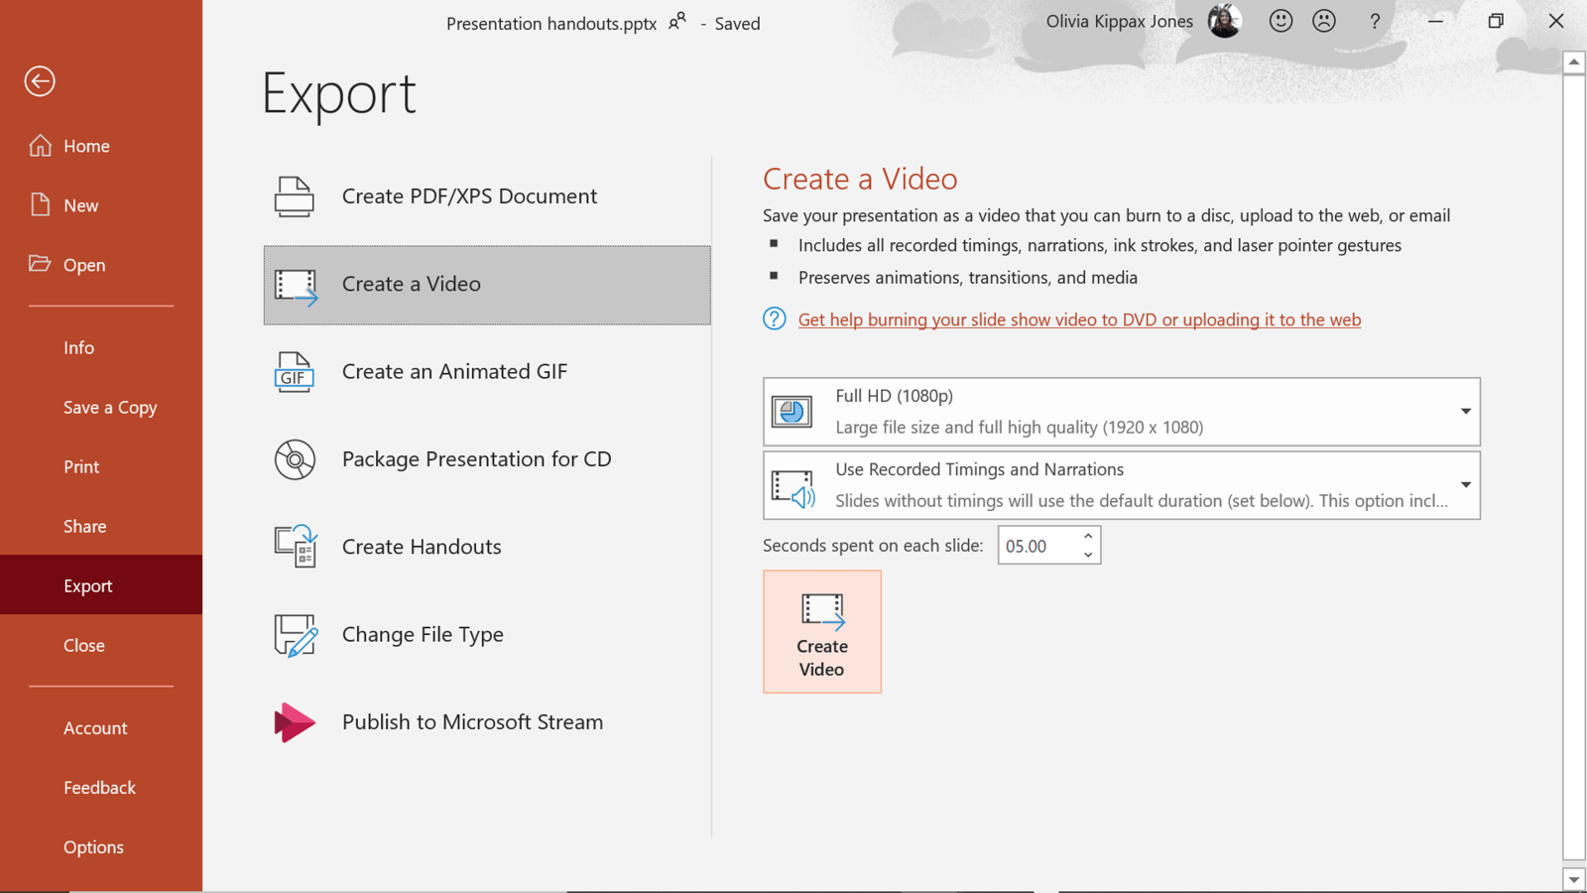
- Host the video online
Finally, make your video accessible to your audience. The beauty of using a platform like Vimeo is that it sits in the cloud so can easily be updated with new material. Viewing figures can be tracked, there are integration possibilities with other platforms, and reminders can be sent out for those that haven’t yet watched it. Vimeo is one option – but any trackable multimedia platform is a good method for delivering your content.
To see some example of short, narrated videos, visit our YouTube page .
Conclusions
Digital, custom-made leave-behinds are a change. And you’ll want to address this change when your audience sits down, eager to take home a couple of sheets of A4. However, the benefits are great: they get a more engaging, helpful resource, and you can track its reach, easily refresh the content and measure its success.
If you decide to use the good old-fashioned paper method – there’s one thing I’d encourage you to avoid: don’t distribute your presentation hand-out before you start speaking. It’s one of the most common mistakes we see, and it can really negatively impact the audience’s attention level. If you give your audience something to read, they will naturally start to read it. And from that point on, it’s a struggle for even the best presenter to command the room’s full attention.
Hold off until the end of the session but let everyone know that a handout will be available, so they don’t spend the entire session making their own notes. You want them attentive and engaged throughout and a little reassurance at the start goes a long way to help ensure that.
However, choosing a less traditional route can help you stand out from the crowd, so consider ditching the standard presentation handout for something a bit more creative.
Ready to transform your sales presentation too? Read our ultimate guide !

Kieran Chadha
Principal consultant; head of brightcarbon academy, related articles, review: glisser online interactive presentations.
- Presentation skills / Sales presentations / Presentation technology
Glisser is an online platform that allows you to create interactive presentations that can be used for marketing, training or any other type of events. The site has different functions available for presenters, attendees at events and event planners which all focus on allowing for increased presenter-audience interaction. Since creating engaging visual presentations is what we do, I decided to take a closer look at Glisser and see what it’s all about and how the various functionalities work.

The ULTIMATE guide to presentation skills
- Presentation skills
- Comments: 38
Presentation skills is a daunting area for many, but being a good presenter isn't something you're just born with. Even the most nervous, or clueless of presenters can learn how to present like professionals just by following some key advice.

5 ways to make your presentation more visual and effective
- PowerPoint design / Visual communication
Looking for some quick tips on how to create a more effective presentation? Know you want to make your PowerPoint slides more visual but not sure how?

Kieran, surprise surprise, someone’s commenting on a three year old article! I agree with all of your comments in relation to a live presentation but do you think they apply equally to an eLearning presentation (not a webinar)? For instance, I have sometimes used an on-line workbook/journal to encourage audience reflection/journaling/note-taking which some individuals don’t like. It seems that an ‘off-line’ paper version would benefit those who prefer not to leave the current screen or who distrust digital privacy. Do you think this would be distracting or does the fact that the individual could pause (be advised) to pause on-line content whilst writing make the difference?
Leave a Reply Cancel reply
Save my name and email in this browser for the next time I comment.
Join the BrightCarbon mailing list for monthly invites and resources
We were notified on Friday that we’ve been successful in our renewal bid. They were particularly complementary about our presentation and claimed it was one of the best they’ve had. Greg Tufnall Siemens

IMAGES
COMMENTS
Create or change a presentation's handout PowerPoint for Microsoft 365 PowerPoint 2021 PowerPoint 2019 More... You can use the Handout Master tab to edit the appearance of presentation handouts, including the layout, headers and footers, and background. Changes made to the handout master appear on all pages of the printed handout.
Use a presentation handout to provide your audience with key information on your presentation. Learn what to include in an effective presentation handout.
Discover how to create handouts that captivate and educate your audience. From layout to content, learn easy-to-follow techniques to make your presentation handouts stand out. Start now and make a lasting impression
Learn how to create printable handouts in PowerPoint and how to export your handouts to Microsoft Word for editing.
If you're giving a PowerPoint presentation and want to provide your viewers with a printed version, you can create a handout page. A handout page is a printed version of your presentation that can help viewers follow along, take notes, and...
Here are a few examples of handouts for presentations along with a step-by-step process of how to create handouts for a presentation.
Learn how to create effective handouts for presentations and the recommended structure for handouts with this guide.
Learn How to Create Effective Presentation Handouts for Class Lectures and Business Presentations With 12 Expert Tips. Dive In Now!
13 best-practice tips for creating effective presentation handouts. The handout is the lasting manifestation of your presentation.
How to Create Handouts in PowerPoint? Creating handouts of a PowerPoint presentation can be helpful for both the presenter and the audience to keep track of all the slides. Besides, it allows the audience to review it even after the presentation is over. You can easily create handouts in Microsoft PowerPoint using the "Handout Master" feature.
Learn two ways to create handouts in PowerPoint. The first method lets you print the handouts directly from PowerPoint. The second method exports your handouts to Microsoft Word where you can edit ...
Whether it's a business meeting or a training course, a handout will underscore your points and support your presentation when done right. It can be tricky, though, to decide on what to include, the format, how to structure a handout and at what point of the presentation to distribute it.
A PowerPoint handout may be the last step of your presentation, but don't let it be an afterthought! Here are some tips for creating quick & easy handouts.
Creating effective presentation handouts is a crucial aspect of enhancing audience engagement and understanding during and after a presentation. The choice of tools plays a vital role in shaping the quality and visual appeal of these handouts. Various tools, from traditional word processors like Microsoft Word to design-focused platforms like Canva and Adobe InDesign, offer unique features and ...
Improve your presentations with effective handouts. Tips, ideas, and examples for creating engaging handouts that reinforce your message.
Need to create handouts for your next presentation? Here's how to do it in PowerPoint easily.
To create handouts in PowerPoint go to "Handout Master" in the "View" tab. You can format your handouts for all pages there. How do I print handouts from PowerPoint? To print your handouts you have to go to "Print" in the "File" tab. You can then choose how many slides you want per page under "Full page slides" in the "Handouts" group.
Make Your Presentation Handouts Look Professional without a Graphic Designer Last week was part one of How to Create the Perfect Presentation Handout. In that article and podcast, I gave you three easy ways to create helpful handouts to accompany your in-person presentations.
Here's how to create the handouts: Click on the File tab, then select Export (1, below), Create Handouts (2), and Create Handouts (3). (Why PowerPoint makes you click create handouts twice is anybody's guess.) 2. In the next window that appears, select "Notes next to slides" then click OK.
In this post, presentation trainer, Dr. Echo Rivera shares how to create effective presentation handouts for class lectures, conferences, and training workshops!
You can design and print handouts of your PowerPoint presentation for your audience's review and reference. This video introduces you to options for the number of slides you want to appear on each ...
Presentation handouts and leave-behinds are a great resource, giving your audience a tangible reminder of you and the company you represent. The problem is that they're oft-neglected and oft-ignored. So how can you create presentation handouts that not only accurately represent your content, but look great and don't take a fortnight to make?
You can make handouts in PowerPoint by formatting the Handout Master. Choose View>Master>Handout Master (or View tab> Presentation Views group> Handout Master). To print them, choose File (or Office button)> Print and choose Handouts in the Print What drop-down list.
Presentation: Update on the Behavioral Health Collaborative Matching Grants - Community Mental Health Grant; Subcommittee Updates. ... (if anyone). If you pre-register to speak and wish to provide a handout before the meeting, please submit an electronic copy in accessible PDF format that will be distributed by HHS staff to SBHCC members and ...