This browser is no longer supported.
Upgrade to Microsoft Edge to take advantage of the latest features, security updates, and technical support.

Assign Azure roles using the Azure portal
- 4 contributors
Azure role-based access control (Azure RBAC) is the authorization system you use to manage access to Azure resources. To grant access, you assign roles to users, groups, service principals, or managed identities at a particular scope. This article describes how to assign roles using the Azure portal.
If you need to assign administrator roles in Microsoft Entra ID, see Assign Microsoft Entra roles to users .
Prerequisites
To assign Azure roles, you must have:
- Microsoft.Authorization/roleAssignments/write permissions, such as Role Based Access Control Administrator or User Access Administrator
Step 1: Identify the needed scope
When you assign roles, you must specify a scope. Scope is the set of resources the access applies to. In Azure, you can specify a scope at four levels from broad to narrow: management group , subscription, resource group , and resource. For more information, see Understand scope .

Sign in to the Azure portal .
In the Search box at the top, search for the scope you want to grant access to. For example, search for Management groups , Subscriptions , Resource groups , or a specific resource.
Click the specific resource for that scope.
The following shows an example resource group.

Step 2: Open the Add role assignment page
Access control (IAM) is the page that you typically use to assign roles to grant access to Azure resources. It's also known as identity and access management (IAM) and appears in several locations in the Azure portal.
Click Access control (IAM) .
The following shows an example of the Access control (IAM) page for a resource group.

Click the Role assignments tab to view the role assignments at this scope.
Click Add > Add role assignment .
If you don't have permissions to assign roles, the Add role assignment option will be disabled.

The Add role assignment page opens.
Step 3: Select the appropriate role
Follow these steps:
On the Role tab, select a role that you want to use.
You can search for a role by name or by description. You can also filter roles by type and category.

If you want to assign a privileged administrator role, select the Privileged administrator roles tab to select the role.
For best practices when using privileged administrator role assignments, see Best practices for Azure RBAC .

In the Details column, click View to get more details about a role.

Click Next .
Step 4: Select who needs access
On the Members tab, select User, group, or service principal to assign the selected role to one or more Microsoft Entra users, groups, or service principals (applications).

Click Select members .
Find and select the users, groups, or service principals.
You can type in the Select box to search the directory for display name or email address.

Click Select to add the users, groups, or service principals to the Members list.
To assign the selected role to one or more managed identities, select Managed identity .
In the Select managed identities pane, select whether the type is user-assigned managed identity or system-assigned managed identity .
Find and select the managed identities.
For system-assigned managed identities, you can select managed identities by Azure service instance.

Click Select to add the managed identities to the Members list.
In the Description box enter an optional description for this role assignment.
Later you can show this description in the role assignments list.
Step 5: (Optional) Add condition
If you selected a role that supports conditions, a Conditions tab will appear and you have the option to add a condition to your role assignment. A condition is an additional check that you can optionally add to your role assignment to provide more fine-grained access control.
The Conditions tab will look different depending on the role you selected.
Delegate condition
Delegating Azure role assignment management with conditions is currently in PREVIEW. See the Supplemental Terms of Use for Microsoft Azure Previews for legal terms that apply to Azure features that are in beta, preview, or otherwise not yet released into general availability.
If you selected one of the following privileged roles, follow the steps in this section.
- Role Based Access Control Administrator
- User Access Administrator
On the Conditions tab under What user can do , select the Allow user to only assign selected roles to selected principals (fewer privileges) option.

Click Select roles and principals to add a condition that constrains the roles and principals this user can assign roles to.
Follow the steps in Delegate Azure role assignment management to others with conditions .
Storage condition
If you selected one of the following storage roles, follow the steps in this section.
- Storage Blob Data Contributor
- Storage Blob Data Owner
- Storage Blob Data Reader
- Storage Queue Data Contributor
- Storage Queue Data Message Processor
- Storage Queue Data Message Sender
- Storage Queue Data Reader
Click Add condition if you want to further refine the role assignments based on storage attributes.

Follow the steps in Add or edit Azure role assignment conditions .
Step 6: Assign role
On the Review + assign tab, review the role assignment settings.

Click Review + assign to assign the role.
After a few moments, the security principal is assigned the role at the selected scope.

If you don't see the description for the role assignment, click Edit columns to add the Description column.
Related content
- Assign a user as an administrator of an Azure subscription
- Remove Azure role assignments
- Troubleshoot Azure RBAC
Coming soon: Throughout 2024 we will be phasing out GitHub Issues as the feedback mechanism for content and replacing it with a new feedback system. For more information see: https://aka.ms/ContentUserFeedback .
Submit and view feedback for
Additional resources
Navigation Menu
Search code, repositories, users, issues, pull requests..., provide feedback.
We read every piece of feedback, and take your input very seriously.
Saved searches
Use saved searches to filter your results more quickly.
To see all available qualifiers, see our documentation .
- Notifications
RBAC in Azure: A Practical Guide
What is azure rbac.
Azure role-based access control (Azure RBAC) enables access management for Azure resources. It’s an authorization system built into the Azure Resource Manager. You can use Azure RBAC to define which specific users should be allowed access to Azure cloud resources and assign a set of privileges for each user group. Let’s learn more about the specifics.
Azure RBAC vs Azure ABAC
As mentioned earlier, Azure RBAC allows you to manage access to Azure resources, defining what users can do with resources and their access areas. It lets you use role definitions and role assignments to control access. However, it does not offer fine-grained access management and can be difficult when managing hundreds of role assignments.
Azure attribute-based access control (ABAC) works differently.
Azure ABAC allows you to add role assignment conditions to achieve fine-grained access control. It builds on Azure RBAC, letting you add attributes for specific actions. Each role assignment condition provides an additional, optional check to a role assignment. Once you set it up, the condition can filter down permissions provisioned as a part of the role definition and assignment.
Azure RBAC Concepts
Azure rbac roles.
In Azure RBAC, a role definition is a set of permissions (role). It defines users’ actions, such as write, delete, and read. You can define high-level roles, such as an owner, or specific roles, such as a virtual machine (VM) reader.

Azure provides various built-in roles, including a virtual machine contributor role that allows users to create and manage VMs. If the built-in roles do not satisfy your requirements, you can also define Azure custom roles. You can use data actions to grant access to data stored in a specific object.
The term scope refers to a set of resources with specific access. It enables you to grant the relevant security principal to a certain role. Limiting the scope means limiting the scope of resources at risk if the security principal is compromised.
Azure RBAC lets you specify a scope at four levels, including a management group level, a subscription level, a resource group level, and a resource level. Azure structures scopes in a parent-child relationship, with each hierarchy level making the scope more specific. It lets you assign roles at any of the four levels. However, note that the level you choose determines how the role is applied.

Azure also lets you use management groups, a level of scope above subscriptions. However, management groups support complex hierarchies. The diagram below illustrates an example of a hierarchy of management groups and subscriptions.
Role Assignments
Role assignments enable you to attach role definitions to specific users, groups, service principals, or managed identities at a certain scope. When creating a role assignment, you grant specific access, and removing the assignment revokes this access.
Here is a diagram that illustrates an example of a role assignment:

This example assigns a contributor role to the marketing group—only for the pharma-sales resource group. It enables all users in the marketing group to create or manage Azure resources in the pharma-sales resource group. However, it does not provide marketing users with access to resources external to the pharma-sales resource group.
Azure Groups
Role assignments are transitive for groups, allowing users to gain permissions assigned to groups. If user A is a member of group B and group B is a member of group C with its own role assignment, user A gets the permissions in group C’s role assignment.
Azure RBAC uses an additive model to prevent issues when users get several overlapping role assignments. You can see an example of this principle in the image below. A certain user is granted a reader role by a resource group and a contributor role at the subscription level. The sum of the reader and contributor permissions is the contributor role. The reader role assignment has no impact.

Best Practices for Azure RBAC
Only grant the access users need.
With Azure RBAC, you can create isolation between different teams, granting each team only the access they need to get the job done.
Instead of granting unlimited permissions to everyone with an Azure subscription or resource, you can only allow specific actions within specific scopes. Avoid assigning broad roles, even if they seem more convenient at first. When you create a custom role, include only the permissions your users need. This ensures that there’s less risk if a principal account is compromised.
The following diagram shows the recommended pattern for granting permissions in Azure RBAC.

Use Azure AD Privileged Identity Management
To protect privileged accounts from malicious cyberattacks, Azure Active Directory Privileged Identity Management (PIM) can be used to reduce privilege issuance time and improve visibility through reports and alerts. PIM helps protect privileged accounts by providing temporary privileged access to Azure AD and Azure resources. Access is time-limited, after which privileges are automatically revoked.
Assign Roles Using Unique Role ID Instead of the Role Name
Role names may change over time, but the role ID always stays the same. Some common examples of changes to role names is when you are using your own custom role and decide to change the name, or when you are using a preview role that has (Preview) in the name. When the role is released from preview, it is automatically renamed.
To ensure consistency over time, it is a good idea to always assign users to a role ID when assigning roles using scripting or automation. This way, scripts won’t break if the name changes in the future.
Assign Roles to Groups and Limit Subscription Owners
To make it easier to manage role assignments, do not assign roles directly to users. Instead, assign roles to groups. Assigning roles to groups instead of users minimizes the number of role assignments. Note that Azure imposes restrictions on the total role assignments allowed per subscription.
Microsoft recommends having a maximum of 3 owners for each Azure subscription, to reduce the likelihood of a breach by a compromised or malicious insider.
Cloud RBAC with Frontegg
Frontegg provides out of the box RBAC model implementation. Customers can now create their own roles and permissions which represent their product models and use cases. Additionally, Frontegg empowers the end users to create custom roles to represent their permissions model, without having to change a single line of code in the product. Sounds too good to be true? Try it out now.
Looking to take your User Management to the next level?
Rate this post
4.8 / 5. 1355
No reviews yet

Full Solution, Easy Migration
Privacy overview.
Assigning groups to Azure AD roles and Privileged access groups, a first look!
On August 13th 2020, Alex Simons (Microsoft Identity PM) announced that assigning groups to Azure AD roles in now in public preview . This feature is one of the most requested features to be found in the Azure AD feedback forum .
I have been following this feature request for a while now, and up until recently Microsoft stated that implementing Azure AD role assignment for Azure AD groups wasn’t the issue, the issue was more related to who is able to manage those groups. For example, if enabled how can we circumvent that someone with the “User Administrator” role (capable of adding users to groups) is capable of adding someone to the group used to assign Global Administrator rights. When implemented incorrectly, this new “feature” could then introduce a new security risk in your environment.
Assigning groups to Azure AD roles requires an Azure AD Premium P1 license at minimum, for the Privileged Identity Functionality an Azure AD Premium P2 license is needed.
Disclaimer: This post reflects the status of assigning groups to Azure AD roles as of August 20, 2020. Functionality may change, even right after this post has been published.
So, let’s walk through on what was announced and see..
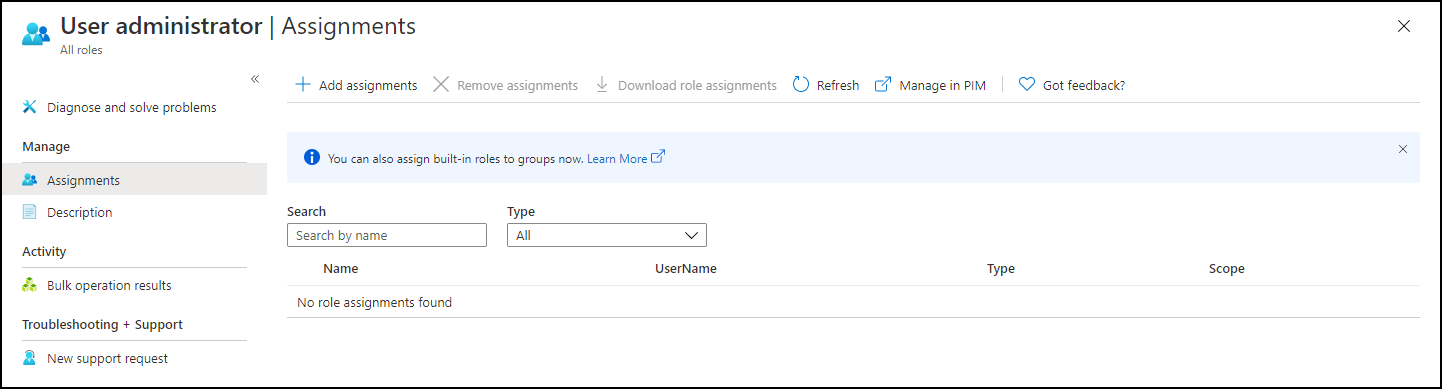
So, up until now when you wanted to assign a user an Azure AD role, you had to include the user account directly in the role. Verifying which account has what privileges is therefore hard, especially if you don’t have Azure AD Privileged Identity Management (PIM) licensed.
For a more in depth overview of what Azure AD Privileged Identity Management (PIM) is, please see another blogpost I wrote on this subject here: Lessons learned while implementing Azure AD Privileged Identity Management (PIM)
Changed behaviour while adding members to Azure AD Roles
On the topic of PIM, I also noticed some changed functionality when adding users when you have PIM enabled in your environment. If you don’t have PIM enabled you can assign a user to a role, but if you have PIM enabled there is another experience where when you want to assign an Azure AD role you are actually redirected to the Privileged Identity Management blade, where you can directly create an Eligible (must be activated) or Active (always active) assignment.
Adding users to Azure AD roles via Group membership
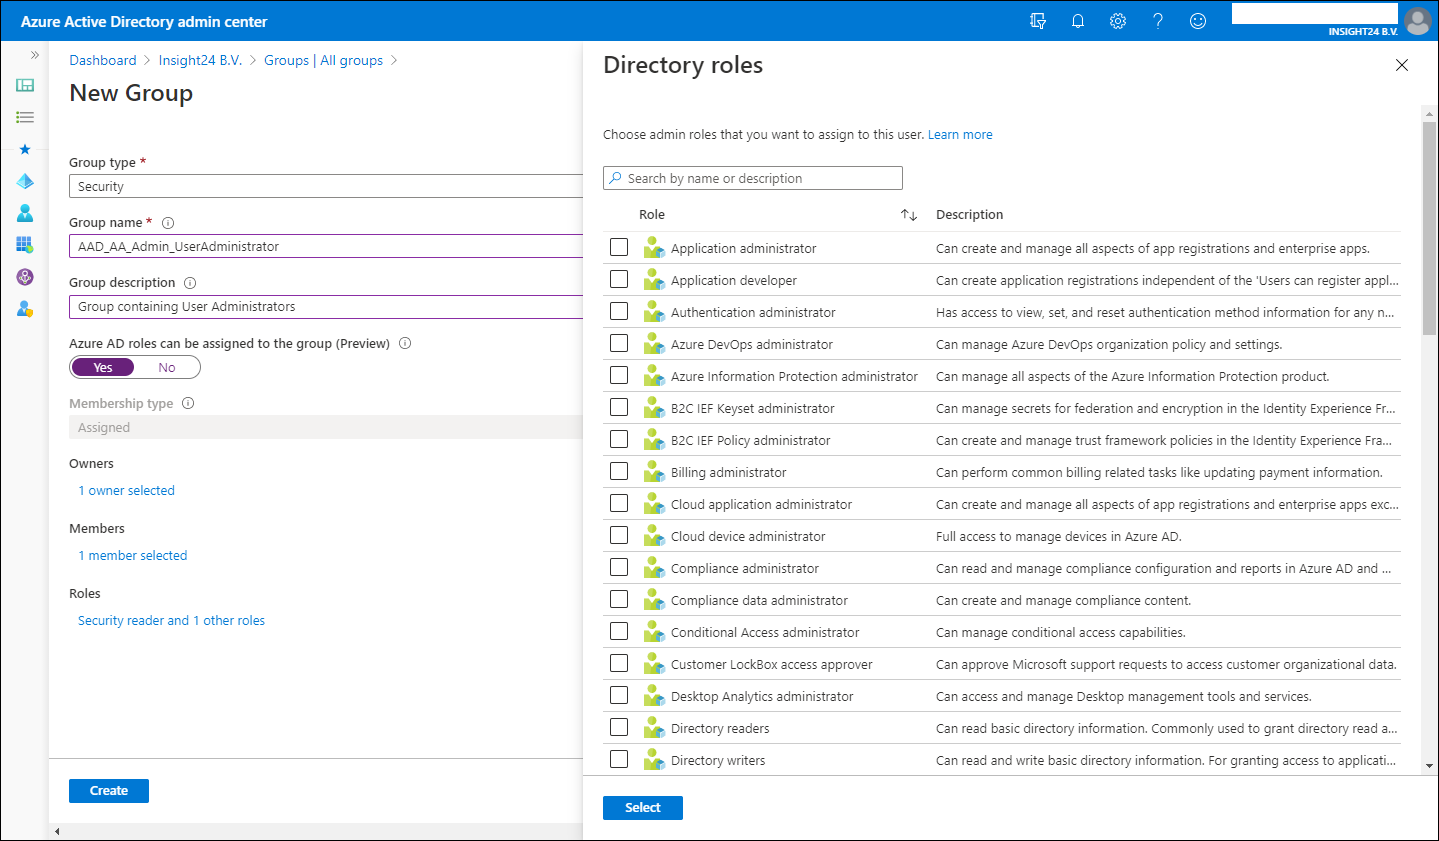
In order to add users to Azure AD roles via Group membership you first have to create a new group, so it’s not possible to repurpose an existing group for this.
New groups have the option to set the “Azure AD roles can be assigned to the group (Preview)” option which can be set to either “No” or “Yes”. When you switch this setting to ‘Yes’ the group’s eligibility for role assignment is permanent. Besides that you can only have a membership type of Assigned, so using Dynamic Groups is not supported, and within the wizard you can only add users as member and not groups (group nesting). Interestingly, you can assign multiple Azure AD roles to the group.

If you want to create the Group with the “Azure AD roles can be assigned to the group (Preview)” option enabled you will get an extra confirmation screen:

The option “Azure AD roles can be assigned to the group (Preview)” is only visible if you are member of either the Global Administrator or Privileged Role Administrator role.
Privileged access groups
Once a group with the option to enable Azure AD role assignments is created and you have PIM enabled, a new option becomes available called “Privileged access (Preview)”.
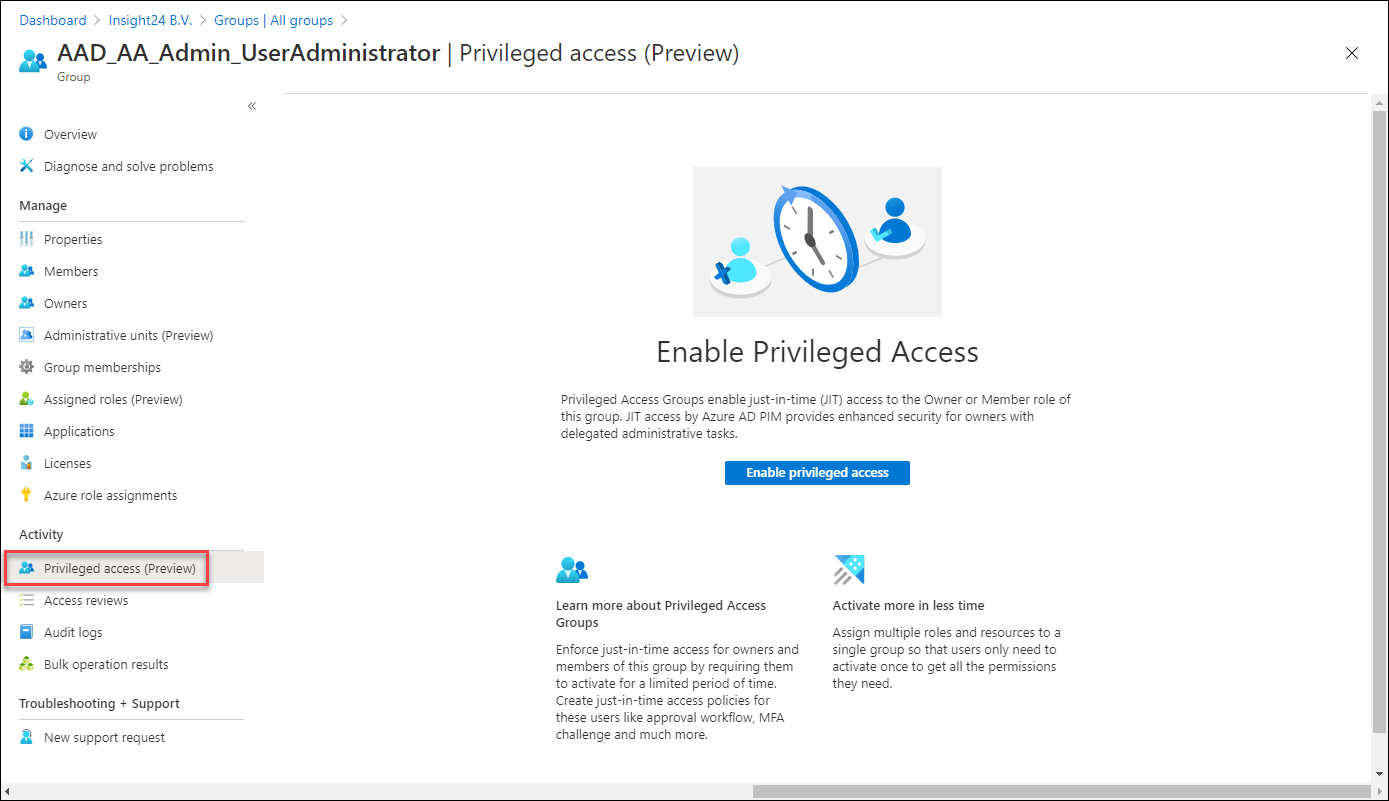
Enabling this option gives us the following options:
Define Eligible or Active assignments to the group
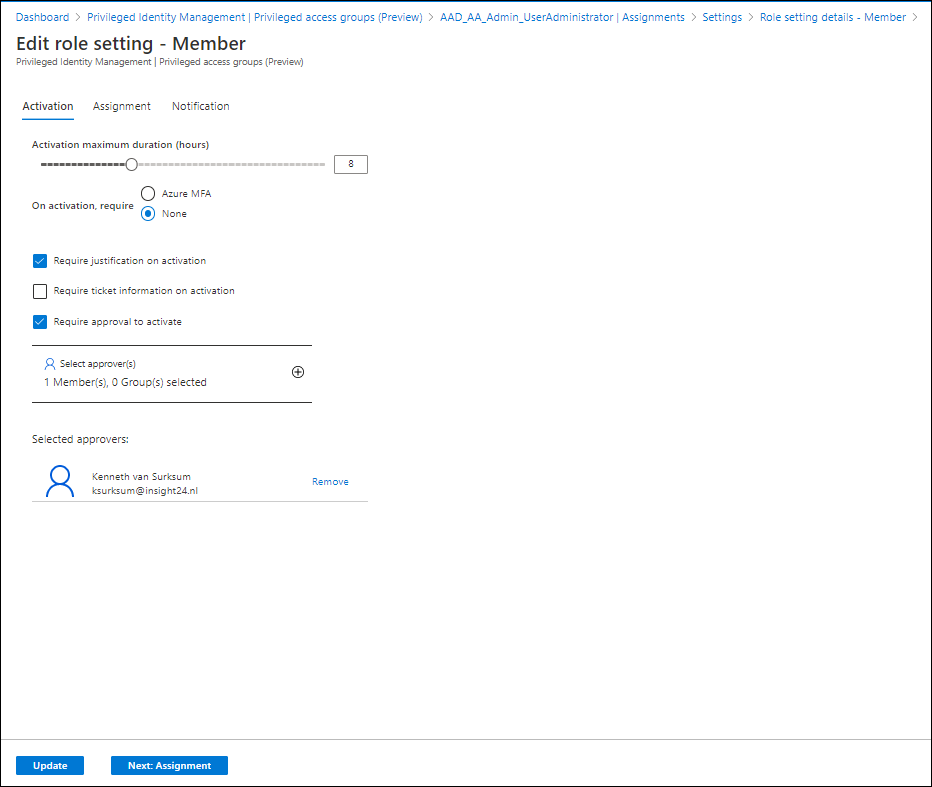
On the group you can assign members or owners using the capabilities provided by PIM. So for example, while adding our user as a member of the group permanently earlier in this article, I now have the option to make the membership Eligible. Also notice that this assignment type is time bound, with a maximum of 1 year.
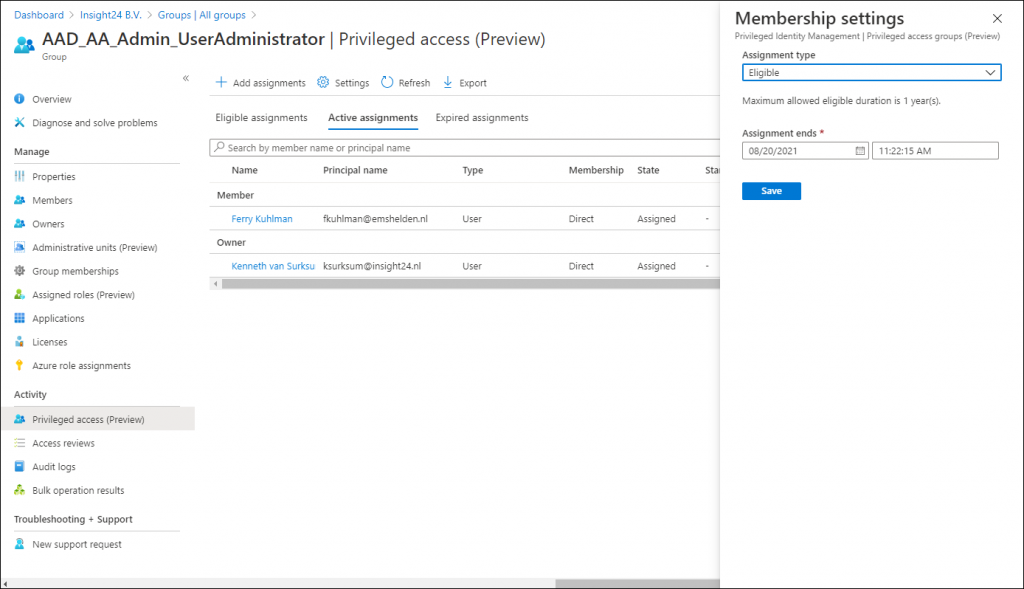
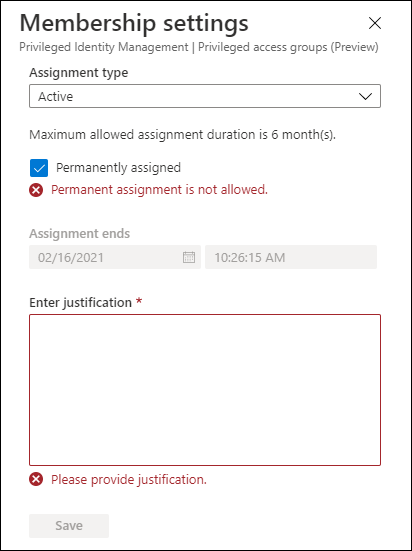
It’s also interesting to notice that if you want to update an Active Assignment you will not be allowed to Permanently assign an Active role by default. And that assigning an Active role has a maximum allowed assignment duration of 6 months. Once the group is enabled for Privileged Access and you want to add a member, then you don’t have the option “Permanently assigned” available. Also notice that providing a justification is mandatory.
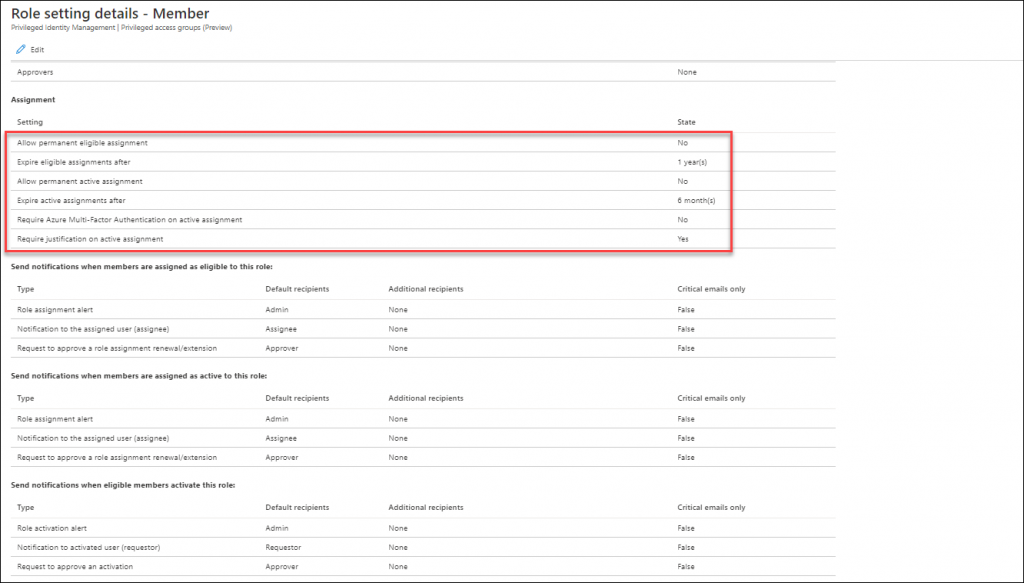
The default options described above are configurable though, trough the settings, so you are able to configure these depending on your requirements.
Activating your Azure AD role while using Privileged access groups
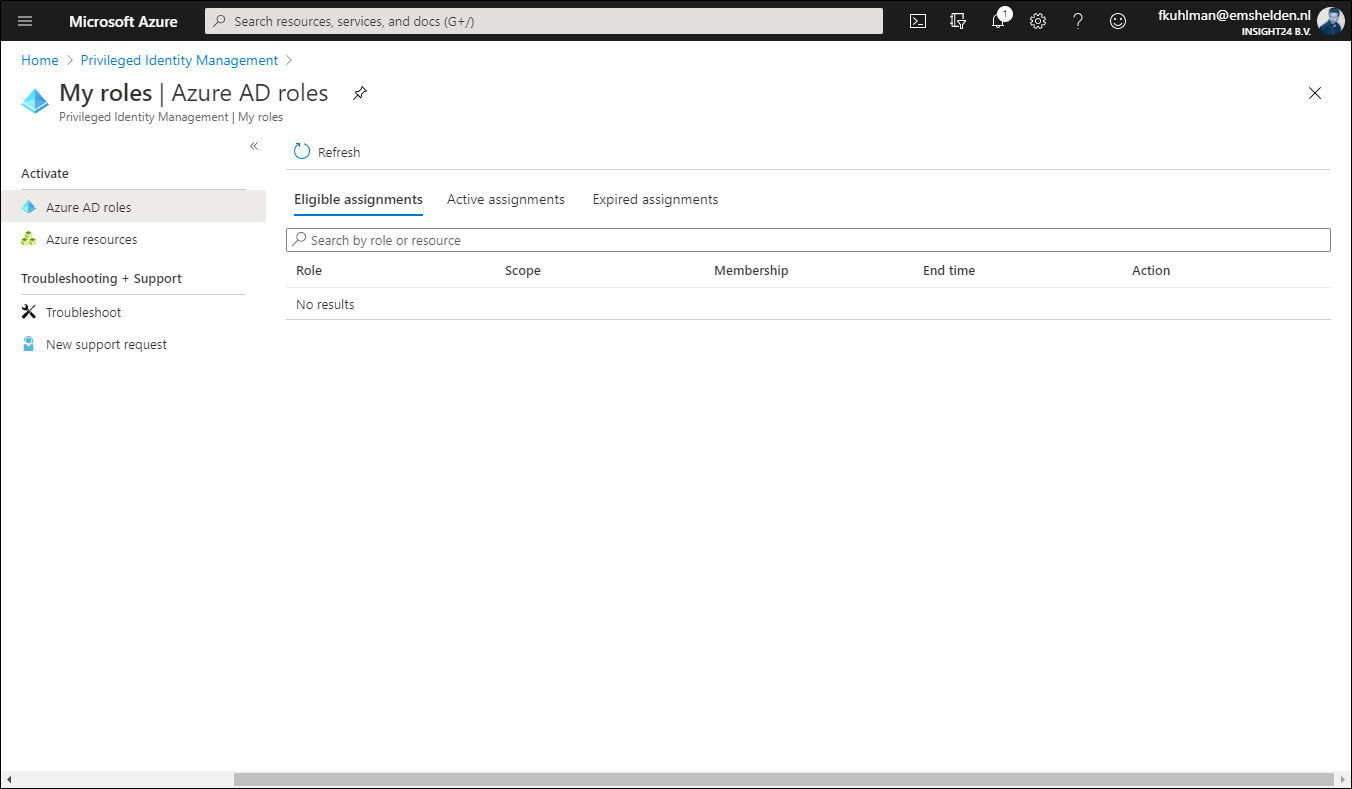
It’s interesting to see that once a user is set to Eligible for the privileged access group, that the Azure AD role doesn’t show up under Eligible Assignments when the user browses to My Roles in PIM. In order to active the Azure AD role in this scenario, the user must go to Privileged access groups (Preview) and active the role from there.
Once the role is activated via the group, it will show up under Active assignments, and what’s interesting to see is that at this time it’s still displayed as being permanent. But I expect that to be fixed while the functionality is still in preview.
Within the PIM settings of the group you can also specify that any Activation request for the group must be approved. This works similar to approval in PIM as we already know it. You define that approval is mandatory and specify who can approve. This can either be a user or a group.
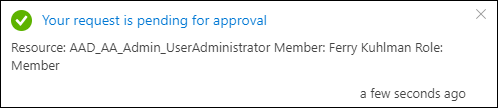
If the user now requests to activate the privileged access group, he will receive the message that the request is pending for approval
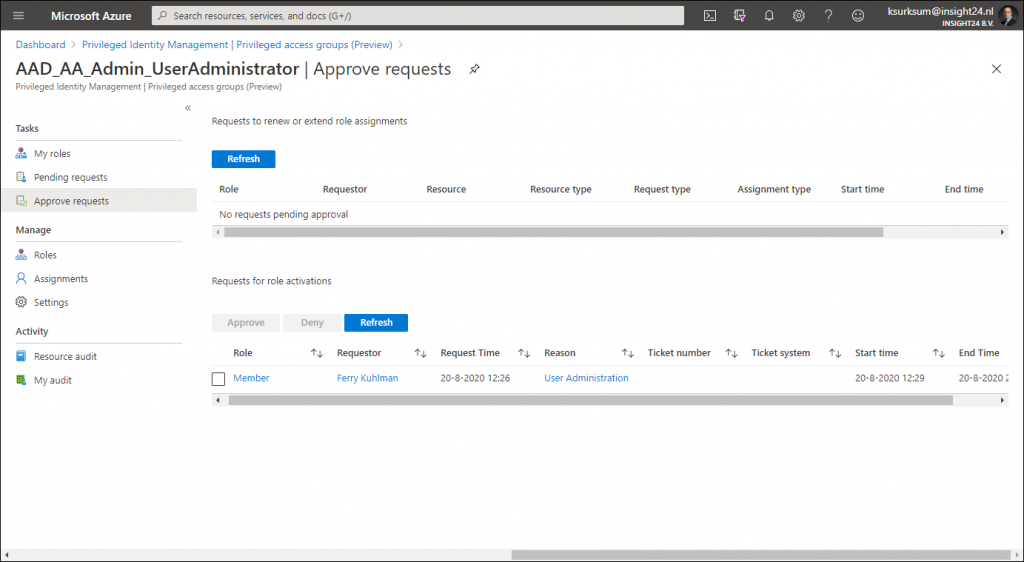
The approver doesn’t see the request under Privileged Identity Management | Approve requests but has to go to Privileged Identity Management | Privileged access groups (Preview) and select the group, from there the Approve Requests functionality is providing the ability to approve the request.
I hope this walkthrough gave you an idea on the new possibilities as announced in the public preview. And there is much more to cover actually when it comes to PIM, like more in depth information about auditing and access reviews.
Microsoft has addressed its own concerns by only allowing Global Administrators and Privileged Role Administrators to create the groups enabled for Azure AD role assignment. And having this functionality combined with Privileged Identity Management (PIM) makes the solution even better. Another reason to buy an Azure AD Premium P2 license for your administrative accounts at least.
A winning feature is that by using Privileged access with Azure AD Groups is that you can enable multiple Azure AD roles at once, this could save you creation of a custom role in some cases when using PIM.
While there are still some little fixes which must be applied, for now this looks like a welcome addition for any Azure AD tenant using Premium functionality.
Assigning groups to Azure AD roles is now in public preview!
Use cloud groups to manage role assignments in Azure Active Directory (preview)
Management capabilities for privileged access Azure AD groups (preview)
2 thoughts on “ Assigning groups to Azure AD roles and Privileged access groups, a first look! ”
- Pingback: Active Directory Identity Governance – Privileged Identity Management - JanBakker.tech
make the Security Admin Role a member Privilege Role Admin in Privilege Identity Management in Azure AD is this possible??
Leave a Reply Cancel reply
Your email address will not be published. Required fields are marked *
This site uses Akismet to reduce spam. Learn how your comment data is processed .
Privacy Overview
Documentation
Note: You are currently viewing documentation for Moodle 1.9. Up-to-date documentation for the latest stable version is available here: Allow role assignments .
- Allow role assignments
- Assign roles
- Override permissions
- Manage roles
- Allow role overrides
- Role permissions
Location: Administration > Users > Permissions > Define roles
The Allow role assignments page is for setting which roles each role can assign other users to. These roles are also available in the "Switch role to..." drop-down menu for users with the moodle/role:switchroles capability.
Default role assignments
- Administrator - may assign all other roles
- Course creator - may assign teacher, non-editing teacher, student and guest
- Teacher - may assign non-editing teacher, student and guest
Enabling teachers to assign other teachers

By default, teachers can only assign other users the roles of non-editing teachers, students and guests. If you want teachers to be able to assign other teachers in their course, you can allow the role assignment:
- Click on Permissions in the Site Administration block, then Define roles.
- Click the Allow role assignments tab.
- Click the checkbox where the teacher row and column intersect.
- Click the "Save changes" button.
- Capabilities/moodle/role:assign
- Administrator
How to Allow Users to Self Assign Their Roles on Discord Server
By default, only admins can set user roles on Discord servers. However, it would be a good idea to let users pick their own roles as it would shed off some responsibilities from the admins. While there is no native option to do so in the Settings, you can allow users to self-assign roles on Discord servers easily with the help of bots. Let’s see how.
Allow Users to Self-Assign Their Roles on Discord Servers
I’ll walk you through the entire process with an example. Here, I have a server called Rubic’s Cubers where people can talk about Rubik’s cube algorithms. But there are different methods like CFOP, Roux, and ZZ. As each user may choose a different method to solve the cube, I want users to select a method themselves. So people who have selected the CFOP role can access all the channels which discuss CFOP and so on. Here is how I have done that.
1. To allow users to assign roles on Discord themselves, we should create those roles first. To do that, you need to open Discord , select the server and click on the server name in the top right corner. Then in the drop-down menu, click on the Server Settings option.
2. In the server settings, select Roles in the sidebar and click on the + button to add a new role.

3. Here you can give a name to your role and also set the permissions they have on your server. Once done, click on Save Changes.

4. Now you have roles and the permissions for what users in those roles can access. All we need to do now is allow people to assign these roles to themselves. To do that, open the MEE6 Discord bot website and click on Add to Discord . In the pop-up that opens, log in with your Discord account.

5. Then Authorize MEE6 to access your account.

6. Now select the server on which you want to enable self-assigning roles by clicking on the Setup button. That will install the MEE6 bot and that server. Once done, click on the Go button to open the MEE6 Dashboard.

7. After logging in, select Reaction Roles plugin in the Plugins section under Server Management.

8. Now click on the New reaction role button to start creating a reaction role.

9. Now select the channel where users can assign roles. Normally, #Welcome, #Select_role, and #Get_Started are a few examples of the channels.

10. Then give a name to your reaction role.

11. Now in the reactions and roles section, click on the Add reaction button and select an emoji as a representation for that reaction.

12. Once you have added the emoji, click on the Plus + icon beside it and select the role. You can select multiple roles or a single role in that reaction. Users who select that emoji will be assigned to all the roles in that reaction.

13. Similarly, you can add multiple reactions. By default, you can add 2 reactions in the free plan. If you want to add more, you need to upgrade to a MEE6 Premium plan.
14. Now in the Messages section, explain to people that they have to choose any role. And also explain which emoji means which reaction. So that users can choose an emoji and get assigned to the roles associated with that reaction.

15. In the Reaction Mode section, select Default . If the user selects a reaction, they will get assigned the roles associated with that reaction in the default mode. Whereas in the Reverse mode, the role will be removed when users click on a reaction.

16. Finally, click on Save changes .
That’s it, you have successfully created a way for users to assign roles to themselves on the Discord server. You can open the server and go to the channel and check for yourself.

17. But, there is one last step to make sure that everyone can see that message. Open Server Settings > Roles and make sure Read Text Channels and Voice Channels are turned on . And also make sure to enable Add Reactions in the everyone roles settings.

Alternatively, You Can Also Use ProBot
ProBot is another Discord bot like MEE6 bot that will allow you to allow your server members to self-assign their roles on your server.
1. To set up ProBot on your Discord server, open the ProBot website and tap on the Add To Discord option.

2. It will open a pop-up window. Simply log in to the service with your Discord account.

3. Once done, select the server that you want to add ProBot to and click Continue .

4. Then click on Authorize which should close the pop-up window.

5. Now, you will be redirected to the ProBot dashboard, Here click on the Embed Messages option in the sidebar.
6. Now click on the Create option at the top to create a new embedded message.

7. Give your embedded message a name and then click the +Add Field option to add title, content, image, etc.

8. Add the required fields explaining the roles in your server to the new users.
9. Then click on the Send New Message button at the bottom.

10. In the pop-up, select the channel and then click Send New Message . This message will be sent as an Embedded message in the selected channel.

11. Once done, click on the Save Changes button.
12. Now click on the Reaction Roles option in the left sidebar and then click on Add Message .

13. Now under the Embeds section, select the embed that you just created in the step above.
14. Then under Choose a message , select the message that you just sent.

15. Then under Emoji reaction, click on Add Reaction button.

16. Select the emojis that represent the roles on your server. One emoji for each role.
17. Once selected, you should see emojis below with a plus icon beside them.
18. Click on the plus icon and select the role, if the user chooses that emoji, they will be assigned that role automatically on the Discord server.

19. Once done, click on Save Changes .
Now users can hop on to that channel or you can set it as a welcome channel. Users will then have to just click on the emoji reactions for that message to join the respective server.
Giving Users Option to Self-Assign Their Roles on Discord
Both MEE6 and ProBot can get the work done . Both are multi-purpose Discord bots, both have many similar features to compete with, and both are user-friendly. Another option is Carl Bot which also features the reaction roles function. So if you are using any of these three bots, you can continue using that instead of installing a new bot just for reaction roles as all three offer a similar experience.

Ravi Teja KNTS
Tech Enthusiast & Cinephile by Nature | Writing about technology for 3+ years on TechWiser| Currently interested in AI, PWAs, Cloud, Ecosystems & Esthetics. But I keep changing my mind faster than Google's Messaging apps.
You may also like
7 fixes for microsoft teams audio is not..., accidentally closed an important chrome tab – here’s..., how to manage collaborative collections on instagram, how to block adult websites on windows and..., 3 fixes for whatsapp status not showing, 2 best discord bots (or apps) to delete..., how do i enlarge a photo without losing..., watch netflix together with your long distance partner..., how to stream netflix on discord for watch..., i tried meta ai on whatsapp: 5 things..., leave a comment cancel reply.
You must be logged in to post a comment.
- What's new?
- Totara website
- v12 and earlier
- Request a demo
- Totara Cloud
- Getting started
- Using platform features
- Totara Learn
- Totara Perform
- Totara Engage
- Totara Mobile
- 22 Nov 2023
- 1 minute to read
Allow role assignment
- Updated on 22 Nov 2023
Roles are the bundles of capabilities that allow users to perform certain sets of actions on your site. You can define the roles a user can assign to another user based on their own assigned role.
- Go to Quick-access menu > Permissions > Define roles .
- Click the Allow role assignments tab.
- Find the role for which you wish to set role assignment permissions.
- Click the check box for the roles they should be able to assign.
- Click Save changes .
- Edit a role
- Allow role overrides
© Copyright 2024 Totara Learning Solutions. All rights reserved. Some content originally obtained via GPLv3 license and continues to be available under GPLv3. All other content is the sole copyright of Totara Learning Solutions.
What's Next
Table of contents
- Totara Platform
- Site Administrator
© Copyright 2024 Totara Learning Solutions. All rights reserved. Some content originally obtained via GPLv3 license and continues to be available under GPLv3. All other content is the sole copyright of Totara Learning Solutions.
Cookie consent
We use cookies to improve your experience on this site, and for site analytics. For more information please see Totara's privacy policy . By using this site you agree to our use of cookies.
IMAGES
VIDEO
COMMENTS
On the Role tab, select a role that you want to use.. You can search for a role by name or by description. You can also filter roles by type and category. If you want to assign a privileged administrator role, select the Privileged administrator roles tab to select the role.. For best practices when using privileged administrator role assignments, see Best practices for Azure RBAC.
Examples to delegate Azure role assignment management with conditions - Azure ABAC. ... This condition is useful when you want to allow a delegate to assign most roles, but not allow the delegate to allow others to assign roles. Note. This condition should be used with caution. If a new built-in or custom role is later added that includes the ...
Role Assignments. Role assignments enable you to attach role definitions to specific users, groups, service principals, or managed identities at a certain scope. When creating a role assignment, you grant specific access, and removing the assignment revokes this access. Here is a diagram that illustrates an example of a role assignment:
Step 4: On the Add role assignment condition page, specify how you want to constrain the role assignments this user can perform by selecting one of the templates. For example, if you only want to restrict the roles that a user can assign (ex. AcrPull and AcrPush) and the type of principals the user can assign roles to (ex. service principals ...
On August 13th 2020, Alex Simons (Microsoft Identity PM) announced that assigning groups to Azure AD roles in now in public preview.This feature is one of the most requested features to be found in the Azure AD feedback forum.. I have been following this feature request for a while now, and up until recently Microsoft stated that implementing Azure AD role assignment for Azure AD groups wasn ...
You can assign a policy on the Subscription or Management Group level, based on your governance structure. Policy definition below will block EVERY request trying to assign "Owner" role with no exception. Built-in Owner role is represented by "8e3af657-a8ff-443c-a75c-2fe8c4bcb635", same GUID across all Azure tenants.
Allow role assignments. By default, teachers can only assign other users the roles of non-editing teachers, students and guests. If you want teachers to be able to assign other teachers in their course, you can allow the role assignment: Click on Permissions in the Site Administration block, then Define roles. Click the Allow role assignments tab.
Routine checks of role assignments and generating alerts on new role assignments are one way to track and manage privileged role assignment. Chances are that when a user with privileged roles is approached, they'll say they need the role. This may be true; however, many times users will unknowingly say they need those permissions to carry out ...
2. In the server settings, select Roles in the sidebar and click on the + button to add a new role. 3. Here you can give a name to your role and also set the permissions they have on your server. Once done, click on Save Changes. 4. Now you have roles and the permissions for what users in those roles can access.
Instead of multiple roles assignments to individual users, the Administrator can assign the role to a group. When a user is added as a member of this group, the user will indirectly inherit the ...
You can define the roles a user can assign to another user based on their own assigned role. Go to Quick-accessmenu > Permissions > Define roles. Click the Allow role assignments tab. Find the role for which you wish to set role assignment permissions. Click the check box for the roles they should be able to assign. Click Save changes.
<div class="navbar header-navbar"> <div class="container"> <div class="navbar-brand"> <a href="/" id="ember34" class="navbar-brand-link active ember-view"> <span id ...
For now, There's no feature in azure to restrict global administrator to apply roles only at Security group level and not at user level. Also, there's no Azure policy to restrict this yet. As a workaround, You can have 1 User with global administrator role assigned who can create all the roles for your users and groups.