Creating a Turnitin Assignment
Turnitin assignments can be created on any course content area (content or assignments) pages. The instructor can open either page by clicking on the content link or assignments link on the left side course menu.
- 1. Go to the content area where you want the Turnitin assignment displayed and, mouse over Build Content.

- 2. Click Turnitin.
- 3. Fill out the Assignment Title and Max Grade (point value).
- 4. Pick the Start Date (when the assignment will become available to students), Due Date (when is the assignment due), and Post Date (when will Turnitin sync grades/feedback with Blackboard).
- 5. Include any instructions for the assignment.

- 6. Now click “Optional Settings.” This menu will allow you to select the specific combinations of settings as. For more information over each and every one of these different settings mouse over the small blue question marks next to their title.
- 7. Press Submit
After creating your new Turnitin assignment you may see a message saying the assignment may not be available to all students. This is expected behavior because Turnitin sets the start date as the date the assignment should be made available to students as an adaptive release rule. Any time an adaptive release rule is set that message will be displayed.


Technology Enhanced Learning and Design
for the Faculty of Biology, Medicine and Health

How to Add a Turnitin (TII) Essay Assignment in Blackboard
These are instructions on how to create TII submissions using the Turnitin Assignment pathway. This is the default pathway going forward for the creation of TII submissions. Turnitin (TII) is a tool that allows students to submit their written work in the form of a .pdf or .doc to Blackboard. TII then automatically scans the document for signs of plagiarism. These plagiarism scores should be treated as an indication that further investigation is required; the score should not be treated as absolute evidence that plagiarism has occurred.
Step 1 – Set up Turnitin Assignment
On the horizontal navigation bar within your Blackboard Content area, go to: Build Content > Turnitin Assignment .

Step 2 – Enter Assignment Settings

Instructions: Be sure to add information about the standard naming convention in this box, as well as any other important instructions. All students should submit work with a title made of the following: Marker Surname, Student ID, BIOL code. E.g. HIGH7654321BIOL10000.
Feedback release date: This is the date and time students can begin viewing their comments and grades. In UoM, this will also be the date the results are transferred to the Blackboard Grade Centre.
NOTE : Enable Peermark will remain unchecked (unless specifically desired).
Step 3 – Optional Settings (aka Essential Settings)
To begin customising your Turnitin assignment, click on the ‘Optional Settings’ tab to display all submission settings.
You can hover your cursor over the icon in Turnitin to view more information about each individual setting.
The settings displayed below are the default settings for a Turnitin assignment.
FBMH Recommended Settings Please click here to view recommended settings
The settings displayed below are our recommended settings. We believe these settings will suffice for most assignments being set up.

Allow submission of any file type: If you decide to check this box, please be aware that TII can only generate similarity reports on DOC, DOCX, HTML, TXT, RTF, PDF, ODT, HWP, PPT, Adobe Postscript, Corel WordPerfect and Google Docs via Google Drive.
Attach a rubric: This may be a desirable option for some. There is a set of rubric templates and existing rubrics available in the rubric manager. If you wish to create your own rubric(s), please visit this link.
Step 4 – Don’t forget to Submit!
Extra Help:
- How to access and mark Turnitin assignments by group
- How to set up groups in preparation for marking Turnitin by groups
Last Modified: 06/01/2022
- ← Creating groups in Blackboard
- Blackboard common access problems →
Create a Turnitin Assignment
This guide will walk you through the process of setting up a Turnitin Assignment for the submission of text based assignments (i.e. PDF, Word and PowerPoint files).
Similarity Report
A Similarity Report can be produced and highlights any text in a student’s assignment that matches sources in the Turnitin database, including web content, previously submitted assignment and subscription-based journals and publications.
Multiple file submissions and group assignments
Turnitin only allows the submission of one file. Turnitin also does not allow the submission of group assignments, consider using the Blackboard Assignment tool for group assignments that do not require a Similarity Report.
In case a group assignment where the Similarity report is required one member of the group will need to submit on behalf of all group members and marks will need to be manually entered for non-submitting group members. Refer to the Assessment tools guide.
Draft submissions
UQ Assessment policy states that students must have the opportunity to submit a draft assignment to Turnitin prior to submission of the final assignment. To comply with the policy, it is recommended that the setting Generate Similarity Reports for student submission should be set to Generate reports immediately (students can resubmit until a due date): After 3 resubmissions reports generate after 24 hours. Note, with one submission link it is not technically possible to limit the students to only one draft submission.
If it is required to limit students to one draft submission only, you will need to set up two Turnitin submission links: one for the draft and one for the final submission. Note, you will need to provide clear instructions to the students as two links may cause confusion.
Video guide
Watch the video (YouTube, 6m 35s)
Setting up your assignment
It is recommended that all Turnitin assignment links are added within the Assessment section in the Course Menu . Best practice is to create a folder for all required assessment information. To avoid student confusion, the folder should be given exactly the same name as the assignment in the Course Profile. Refer the Create a Folder guide.
Tip: Add an Item inside the folder with instructions for students regarding assignment submission and links to all relevant documents such as the assignment question and marking scheme (if it is not online). For step-by-step instructions, refer the Add an Item guide. The following information should be included in the assignment instructions:
- How the file should be named.
- The file type/s students may submit.
- Not to include animated text/images in PowerPoint files.
- What to do if they have problems uploading their assignment. i.e. Email the assignment to the course coordinator, continue to try to upload the assignment until they are successful and contact AskUs for help if needed.
- That late assignments are allowed and that all assignments automatically have a time/date stamp of when they are submitted.
- Include a link to the AskUs instructions on Turnitin: https://web.library.uq.edu.au/library-services/it/learnuq-blackboard-help/learnuq-assessment/turnitin-assignments
- Assignment submission is a three step process and it is the responsibility of the student to check the assignment preview and confirm that the assignment has been successfully submitted. Students need to download a copy of the Submission ID as proof they have submitted the assignment.
Creating the Turnitin assignment submission
- Click on the Build Content button.
- Select Turnitin from the drop-down list.

- The following screen will be displayed.

- Enter the Assignment title in the Title textbox.
Note: This should match the title of the assessment task in the Course Profile.
- Enter Assignment instructions in the Instructions textbox, such as "Click on the link above to submit your assignment".
Note: The text displayed is difficult to see (small font and grey) and it is recommend that you create an item with instructions for students regarding assignment submission and links to all relevant documents such as the assignment question and marking scheme (if it is not online).

- Enter the Mark the assessment is out of in the Max Grade textbox. Refer to the Marks / Rubrics / Grading form overview guide for information on options.
- Select the Start Date by using the Date Selection Calendar.
- Set the time in the Start Date box manually.
Note: Students are only able to submit assignments after the Start date has passed.
- Select the Due Date by using the Date Selection Calendar.
- Set the time in the Due Date box manually.
Please refer to UQ Assessment policy section 3.3.
Note: Students are blocked from submitting assignment after the Due date/time unless late assignment submission is enabled.
- Select the Feedback Release Date (when marked assignments and grades are available to students in Turnitin) by using the Date Selection Calendar and set the time in the same box manually..
Tip: Initially set well after the due date to allow for marking time and to cater for extensions. Set yourself a reminder to change the Feedback Release Date in your calendar for when you think you will have completed the marking.

Note: To avoid getting the error message 'date_start - start date can not be more than 1 year in the past' disable the Adaptive release by clicking on the Edit button. Choose Adaptive Release. Uncheck all display dates.
Optional Settings
- Click on the Optional settings link.

- Select Standard paper repository from the Submit papers to dropdown list. This will allow all submissions to go to the central database.
- Uncheck Allow submission of any file type checkbox. Only file types supported by Turnitin shall be used, otherwise similarity report will not be generated.
- Check Allow late submissions checkbox to cater for students with extensions.
Note: All assignments are time/date stamped and late assignments are labelled Late in the Assignment box.
Warning: This setting only allows students without a submission to submit after the due date (i.e. students with extensions who have already submitted before the due date will be unable to submit again). If a student needs to submit again after the due date and have previously submitted, you can submit on their behalf. Refer to the Submit an assignment on behalf of a student guide.
- Attach a rubric as required. Refer to the Rubrics guide.
Note: Turnitin rubrics are different to Blackboard rubrics. It is not possible to use a Blackboard rubric in Turnitin.
Note: The availability of rubrics is based on who is logged on, not what Blackboard course the Turnitin is accessed from. Your tutors will be able to use the rubric you attached for marking though it will not be available to them from the rubric list.

- Check all Compare against checkboxes.

- From the Generate Similarity Reports for student submissions drop-down list, select Generate reports immediately (students can resubmit until due date) .
Note: This option must be selected as per the 3.10.02 Assessment policy . Students will receive a Similarity Report for the initial submission and the next three resubmissions immediately. Any subsequent resubmissions will require students to wait 24 hours for a report. Students may resubmit as often as the student wishes until the assignment due date
Note: Only the latest submission is available to the instructor or student. No resubmissions are available after the due date and time of the assignment.
Note: UQ Assessment policy states that students must have the opportunity to submit a draft assignment to Turnitin prior to submission of the final assignment. The Similarity Report is a tool to assist students how to properly acknowledge sources as well as highlighting possible plagiarism issues.
Note: The Turnitin Similarity report does not compare assignments submitted by the same student within one course.
- Check the Allow students to view Similarity Reports checkbox.
- Uncheck the Exclude bibliographic materials checkbox.
Note: Unchecking the textbox will increase the percentage match in the Similarity Report. Bibliographic materials can also be included and excluded when viewing the Similarity Report. This setting cannot be modified after the first assignment has been submitted.
- Uncheck the Exclude quoted materials checkbox.
Note: Unchecking the textbox will increase the percentage match in the Similarity Report. Quoted materials can also be included and excluded when viewing the Similarity Report. This setting cannot be modified after the first assignment has been submitted.
- Uncheck the Exclude small matches checkbox.
Warning: If you decide to use small matches, avoid using the Percentage option as this ignores text matches equal to a percent of the total word count. (e.g. 2% of a 3000-word assignment would mean it will exclude matches of less than 60 words). Small matches can also be included and excluded when viewing the Similarity Report.
Note: Please communicate to the students Bibliography and quote exclusion definitions (Turnitin guide) .
- Click on the Upload Template or Create Custom Template button if you are using a template for your assessment.
Note: Uploaded or created templates of text will be automatically excluded from the Similarity Report.
Warning: Once a submission has been made to the assignment, templates can no longer be added or edited.
- Check Save these settings for future use if you want to use the same settings in your next assignments. If this box remains unchecked you will have to set the settings every time.
- Click on the Submit button.

- The Success! screen will be displayed.

The Turnitin assignment submission link will then appear in the folder you have created it in.

Include the Column in Grade Centre Calculations
Include in grade centre calculations.
- From the Control Panel , select Grade Centre > Full Grade Centre.
- Click on the down arrow for the assignment column you just created.
- Select Edit Column Information from the drop-down menu.

- Select Yes for Include this Column in Grade Centre Calculations .
- Click on the Submit button.

Hide column from students
To ensure students are not able to view their results prematurely, you will need to ensure the Turnitin assignment column is hidden from students until you are ready to release results. For step-by-step instructions on hiding the Grade Centre column, refer to the Control the Release of Results guide.
- Apply late penalities in Gradescope
- Assign questions to pages in Gradescope
- Change a Turnitin qualitative rubric to a grading rubric
- Copy a Gradescope assignment
- Gradescope exam papers formatting
- Mark by group in Gradescope
- Publish and Post Gradescope student results
- Review marked Gradescope assignments
- Norsk (Bokmål)
- Português, Brasil
Turnitin ® is a third-party tool that improves the student writing cycle by promoting originality and providing rich feedback to students. Visit Turnitin's help site to learn more on how to use it.
LTI Integration setup
Turnitin can be integrated with Learn Ultra. When Turnitin is enabled at your institution, instructors can enable Turnitin functionality when they create or edit assignments in Ultra courses.
For new Turnitin installations
If you have not previously installed the Turnitin LTI 1.3 external tool, follow these steps.
1. Access the Administrator Panel and select LTI Tool Providers .
2. Select Register LTI 1.3/Advantage Tool .
3. Enter in the Turnitin client ID 907b10a5-fbbe-4811-adbf-8ac3a40a2b34 .
4. Ensure the Tool status is set to Approved and all User Fields to Send are selected.
5. Ensure that both Allow grade service access and Allow Membership Service Access are selected to Yes and then select Submit .
6. A first-time registration process must be performed in the instructor workflow. This registration process is completed inside of a course. On the Course Content page in a course, open Assignment Settings for a new or existing assignment. Select Originality Report .
7. In the Originality Report panel, turn ON Enable Turnitin (ON is denoted with a green checkmark).
8. The first time Turnitin is enabled, a Turnitin prompt opens that asks you to select your platform. Select Global .
9. A sign in prompt is displayed. Sign in with credentials that Turnitin has provided.

10. Select the radio button next to your listed account. Select Submit .
11. Close Assignment Settings and open it again. Select Originality Report . You now have access to Turnitin.

For existing Turnitin installations
Once you have completed the steps above, or if you have previously installed Turnitin, follow these steps.
- Access the Administrator Panel in Learn and select LTI Tool Providers .
- Check the client ID associated with your existing Turnitin Feedback Studio LTI 1.3 registration. Locate your Turnitin tool and select the downward arrow to expand the context menu. Select Edit .
- Global client ID: 907b10a5-fbbe-4811-adbf-8ac3a40a2b34
- UK client ID: 39739bb5-c79e-437c-ab88-6b23b01dc095
- Choose this option to Register LTI 1.3/Advantage Tool and re-enter the same client ID to update your existing integration. This will refresh your current registration to ensure that it has the most recent updates.
If when re-registering you see an error that says, Unable to save [client ID], check if a registration named lti.int.turnitin.com exists.
If this registration is found within the list, delete this registration to complete the set-up of the new integration. Only delete the registration named lti.int.turnitin.com. Do not delete the registration named Turnitin Feedback Studio.
Following the deletion of lti.int.turnitin.com registration, complete the process of re-registration again, as described above.
This is an issue for institutions with older LTI 1.3 registrations that have not been recently updated to include an additional new domain lti.int.turnitin.com. For this reason, a fake registration lti.int.turnitin.com might be created within the list of LTI Tool Providers in Blackboard Learn due to some of the recent additions to the Turnitin Feedback Studio LTI 1.3 external tool (such as the Assignment Copy tool). When using the Assignment Copy tool, Blackboard Learn would be looking to associate the assignments with the new domain that does not exist, and rather than erroring out, a fake lti.int.turnitin.com registration is automatically created.
Following the re-registration of the LTI Tool, go to Manage Placements for the registration and select Synchronize Placements to bring through the new Asset Processor placement.
Enabling the integration in Learn
To enable Turnitin integration in Learn, follow these steps.
- Login to Learn and access the Administrator Panel.
- From the The Ultra Experience is Here module, select Configure .
- Under the Available Features setting, select Asset Processor in Institution to On . Select Save once complete.
- The integration should now be enabled and available for each Learn Ultra course.
Restricting access to Turnitin’s Asset Processor Service via Institutional Hierarchy
Blackboard Learn Ultra supports the ability to restrict tools to nodes within the Institutional Hierarchy, allowing institutions to roll out access to tools to specific departments or users if required. To support this, follow these steps.
- After the tool is enabled and deployed (see steps above), as an administrator, access Institutional Hierarchy from the Administrator Panel.
- If the node does not exist, select Create Node and add a name for your node. Select Submit . Visit the Learn help page for Institutional Hierarchy to learn more about how it works in Learn.
- Select the appropriate Node and the required Child Node .
- Select Tools within the child node and search for Turnitin .
- As an administrator or node Administrator you can now change the Availability from On to Off.
- Selecting the Padlock icon allows the enforcement of this On or Off state for the Node.
It is recommended to not delete these tool providers or, once they are enabled and in use, to exclude them. If an asset processor is added to an assignment, and then disabled or excluded, the change is not reflected in the user interface.
If a file doesn't process, you can learn more about the source of the issue around asset processor functionality from the BB services log. Administrators can download their logs from the Learn system.
Learn - admin
Need more help with learn .
- Log in to Behind the Blackboard for support
- Join the Community
- Find developer docs
- Find videos for your users
- (Click here for the student version of this page)
Online Assignments in Blackboard
- Benefits for Teaching & Learning
- Online Tutorials
- Quick Guides
- Additional Resources & Troubleshooting
- Information on Purchasing Equipment & Support Statement
You can create assignments within Blackboard and provide feedback using rubrics and annotations. Blackboard assignments offer greater support for group submissions and delegated marking than Turnitin assignments but have more limited annotation tools.
→ Click on the titles below to view information and guides on using Blackboard assignments.
Online assignments allow students to submit essays in Blackboard and provide you with the functionality to give detailed feedback to your students using annotations, rubrics and text. Click on the video below for a brief overview of how you can use rubrics in Blackboard assignments to provide detailed feedback to enhance student learning. A separate page is available for Turnitin in Blackboard assignments .
If you are planning to use the Blackboard Assignments tool for summative online exams, we have an overview page on online exams giving general advice on using Blackboard Assignments, Tests and Turnitin for exams.
Notice regarding the SafeAssign Similarity Score : You can enable SafeAssign when creating a Blackboard assignment - this allows you to check a student's submission against the SafeAssign database of papers. The similarity score in the SafeAssign report is not a measure of plagiarism within a piece of work but represents where there are similarities to other sources (journals, essays, books etc.). A submission with a high similarity score might be satisfactory once the bibliography, cover sheet etc. are accounted for whereas a submission could have a low score but could be heavily paraphrasing other sources without citation.
You can use online assignments to:
| • Create, manage, and circulate assignments within Blackboard for formative and summative learning |
| • Check for potential originality issues using a Similarity Report |
| • Grade using rubrics |
| • Manage how and when grades and feedback are released to students |
| • Provide video and audio feedback to students |
Quick Guide 1: Creating an Online Assignment
This Quick Guide gives IT Services' recommended settings for creating a standard individual or group assignment in Blackboard.
Quick Guide 2: Grading Student Submissions
This Quick Guide gives IT Services' recommended settings for grading individual or group assignment submissions in Blackboard.
Quick Guide 3: Releasing Assignment Results
This Quick Guide gives IT Services' recommended settings for releasing results for an assignment in Blackboard.
Webinar Recording: Assignments in Blackboard (Oct 2022)
This webinar recording covers how to create and grade individual or group assignments in Blackboard and the Bb Annotate tools for providing feedback.
Webinar Excerpt: Weighted Total Column
This brief excerpt from the Assignments in Blackboard webinar covers how to set up the Weighted Total column in your Blackboard module.
Submission Guide for Your Students
An online guide for students is also available to help them with the submission process. Refer your students to the 'Student Help' tab in Blackboard (top right of the screen after logging in) to access this and other guides on using Blackboard.
Blackboard Vs Turnitin Assignments
This interactive guide gives an overview of the pros and cons of using Blackboard or Turnitin assignments.
Procedure: if a student has issues submitting we would advise them to contact the module instructor so there is a record of this and because the instructor would need to make a determination as to whether to allow an additional attempt based on the different circumstances. Clearing/resetting attempts needs to be done by the instructor of a particular module in the first instance. We also strongly recommend that if there are submission issues due to account/access problems etc. with an individual student, please accept the submission via email as proof of submission until the issue is resolved. If an instructor cannot resolve the issue themselves, the instructor can contact us for advice via [email protected]. We recommend therefore when you create an assignment to allow more than one attempt. More details on granting an additional attempt are available on the Blackboard website.
Video Guide:
Below is a video guide covering the steps required to create a Panopto Student Video Assignment. You can also find a text version of the instructions on this page below the video.
Instructions: Create a Panopto Student Video Submission Assignment in Blackboard
- Choose a Location:
- Navigate to your Blackboard module, then select a folder in the left-hand menu where you would like to add the Panopto Student Video Submission Assignment (you could create a folder called Assessments and include it there if you do not already have one).
- Set Up the Assignment:
- Go to the menu bar within the folder and select Assessments > Assignment .
- Give the assignment a clear and descriptive name and enter instructions (refer to our Blackboard Assignments page for general advice on creating an assignment and the available options).
- Enable Panopto Submission:
- In the < Instructions > field, click the < + add content > button in the editor bar.
- An < Add Content > pop-up window will appear. Scroll down and select the < Panopto Student Submission> option. Important Note: This will open the Panopto Student Submission window, which creates an assignment subfolder within the module's Panopto folder. Students can use this subfolder to create and edit their video recordings before submitting them. Students cannot see each other's work in this folder. When the student is ready to submit, their recording is moved from the assignment's subfolder to a Student Submissions subfolder for review and marking via the Blackboard grade centre.
- Information for Students for recording: Student Submission
- Students will use the Panopto Student Submission tool to record their videos.
- They can save drafts of their work in their personal " My Folder " location within their Blackboard Panopto account to revisit the video and make edits.
- Once they are happy with their video, students will submit it through the Panopto Student Submission tool, which will move the final version from the interim Assignments subfolder (their own my Panopto folder) to the "Student Submissions" folder. Why not show the interim subfolder? The assignments subfolder may not be visible to students as it's a subfolder of the module's parent Panopto folder, which the lecturer may have hidden as the Panopto parent folder contains the lecturers' lecture recordings, which they may not want students to see. It's recommended that students use their " My Folder " for drafts to avoid confusion.
- Finalize the Assignment Settings:
- Close the Panopto Student Submission window by clicking on the X button to close and the Add Content window.
- Add any additional instructions for students in the instructions field in the assignment window. We advise that you insert the URL link to the Instruction Guide for Students Submitting their Video Assignments.
- Set the due date, point marks (always mark out of 100 if you are using Grades Journey), and <submission details> (allowing one attempt is recommended).
- Decide on your < marking options > and < display of marks > settings.
- Define when the assignment will be available and for how long with the availability settings.
- Click the Submit button to create and save the student video assignment, completing your setup.
- Grading Submitted Videos: Grading
- When students submit their video assignments, they will be stored within the Panopto folder (your Panopto link in the left-hand menu) –> Module Assignments –> Student Submissions Folder.
- Review in Blackboard: The easiest way to review submissions is via the Blackboard grade centre. Clicking on the student's video assignment in the grade centre will open the video player. You click on the student video to play it back and add your points, marks, and comments to record it in the grade centre for that student's attempt. The Blackboard grade centre will be updated with your marks for the student's video assignment.
- When drafting their submission, students create their videos in their My Folder (private to them) and can continue to edit this until they click on Submit. Once they submit their video, the file gets copied into a Student Submissions subfolder within your module's Panopto folder, thus preventing further editing. Important Note: We recommend they instead save their work-in-progress video recording to their own Panopto "My Folder" location until they are finally ready to submit the video assignment. The added advantage is that the student keeps a copy of their video recording in their My Folder Panopto account for future reference.
- Students can only see their own submissions - not each other's by default within the Student Assignment subfolder in your module's Panopto folder.
- The best way to grade student submissions is using the Grade Centre, as you would with a standard Blackboard assignment.
- Steps for your students are available in the Student Help tab . There is also an Instructor Guide: How to set up a Student Video Submission Assignment in Blackboard available to download above to attach to the assignment.
- Please consider the type of content students are asked to create and be mindful of potential risks associated with video assignments. Generally, the Panopto Student Video Submission option allows students to create recorded presentations. Consequently, there can potentially be data protection (GDPR) or privacy-related issues if students are asked to record videos involving themselves or third parties. Students should always be provided clear guidance and instruction before content creation. For example, avoid tasks leading to students creating videos containing sensitive or confidential information. Instructors should give students specific instructions regarding recording confidential data or special categories of personal data. Essentially, this type of data should not be recorded. For further information, please see this page on Special Category Data on the Data Protection website .
- If a student video assignment contains personal data of other individuals (e.g., a visual or audio recording of a person or other identifiable information), the student should obtain permission/consent from relevant individuals before recording. Permission should be obtained in a recordable format and retained on file.
- Caution should always be exercised when recording video assignments, and it may be a good idea to have students run their ideas past you if they are different from a standard presentation. Moreover, staff should review content and delete unnecessary, excessive or inappropriate data if included in a video assignment.
- Further information is available from the College Data Protection Officer - [email protected] or via the College Data Protection website - https://www.tcd.ie/dataprotection/ .
- Not all students will be comfortable creating and editing videos of themselves, so you should consider alternative assessments for those students who may not feel able to create a video.
- The Student Video Submission tool is provided by Panopto as part of their video hosting solution - if College ever changes to another video hosting provider (for example, as part of a tender process approximately every five years), we cannot guarantee that the new video hosting provider will have an equivalent assignment feature - however, staff would be notified well in advance of any change and workarounds may still be possible.
Terms of Use:
Please refer to our Terms of Use document for further guidelines and information on the Data Proctection aspects of using the Panaopto Student Video Submission Assignment option.
Below are external links and additional resources to help you get started with Blackboard Assignments.
If you are new to using online assignments we would recommend that you create a standard online assignment as above before using some of these features as options like Delegated Marking can add significant complexity to the marking workflow.
- Official Blackboard Assignments Hub Page
- Rubrics Guide
- Creating Weighted Total Columns
- Anonymous Grading
- Navigating the Grade Centre
- Viewing Grade History
- Creating & Managing Groups
- Delegated Grading
Latest Updates:

Aenean ornare velit lacus, ac varius enim lorem ullamcorper dolore aliquam.

Help & Support
For queries related to the content on these pages please contact the Teaching & Learning IT team via: [email protected]
- [email protected]
- (000) 000-0000
- 1234 Somewhere Road #8254 Nashville, TN 00000-0000
- Campus Resources
- Student Organizations
- Toggle navigation
Integrating Turnitin V2 in Brightspace Assignments
Introduction
Turnitin Integration (TII) Version 2 is a tool that helps maintain academic integrity by checking student assignment submissions for potential plagiarism and providing detailed feedback. This guide provides a step-by-step process for integrating TII V2 into your Brightspace assignments.
To enable Turnitin for an assignment:
1. Create or Edit an Assignment
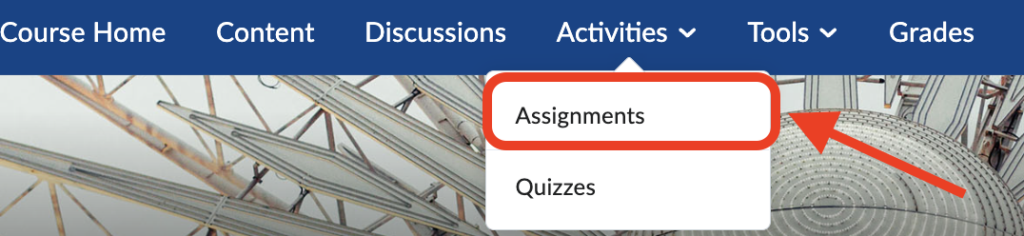
Navigate to your course. On the navbar, select Activities –> Assignments.
Do one of the following:
- To create a new assignment, click “New Assignment” and enter the name, grade, due date, and instructions.
- To add Turnitin functionality to an existing assignment, click “Edit Assignment” and select the desired assignment.
2. Enable Turnitin Integration
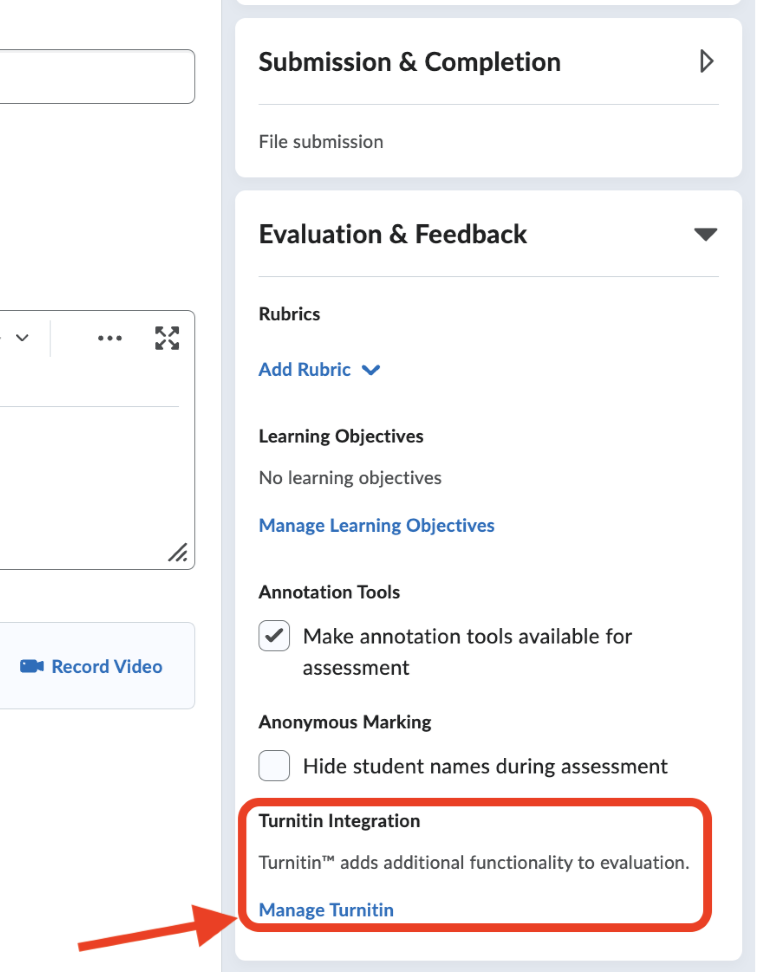
On the assignment settings page, open Evaluation & Feedback
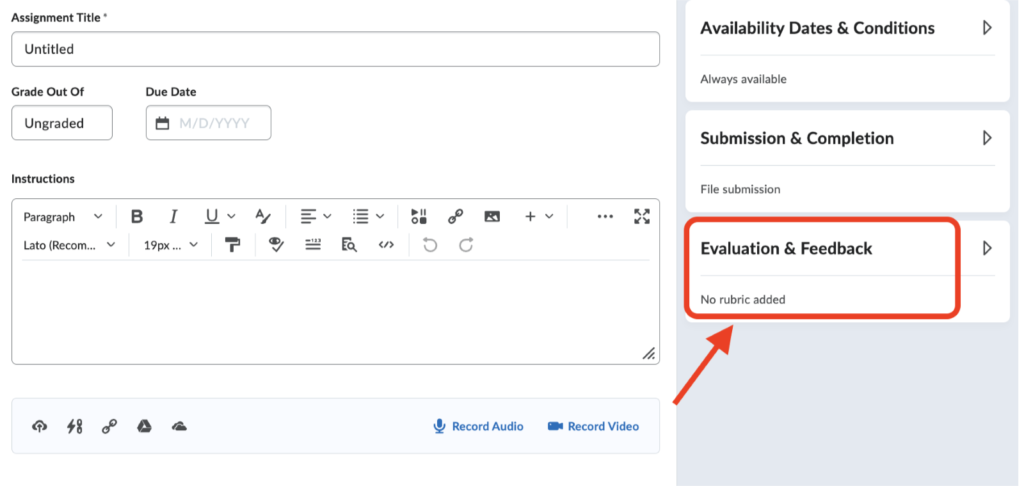
At the bottom of the Evaluation & Feedback area, select Manage Turnitin .
3. On Turnitin Integration Page:
- Click Enable Similarity Report for this folder.
- You can allow students to see the similarity scores for their submissions.
- You may also want Turnitin to automatically check all submissions.
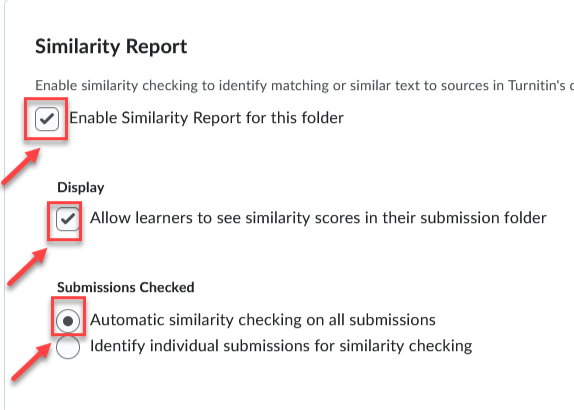
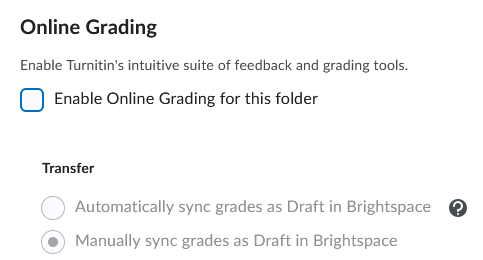
- You can use Brightspace Assignment tools to grade student submissions and provide inline feedback on their papers. However, if you prefer to use the Turnitin Feedback Studio to grade, you can select Enable Online Grading for this folder, and Automatically sync grades as Draft.
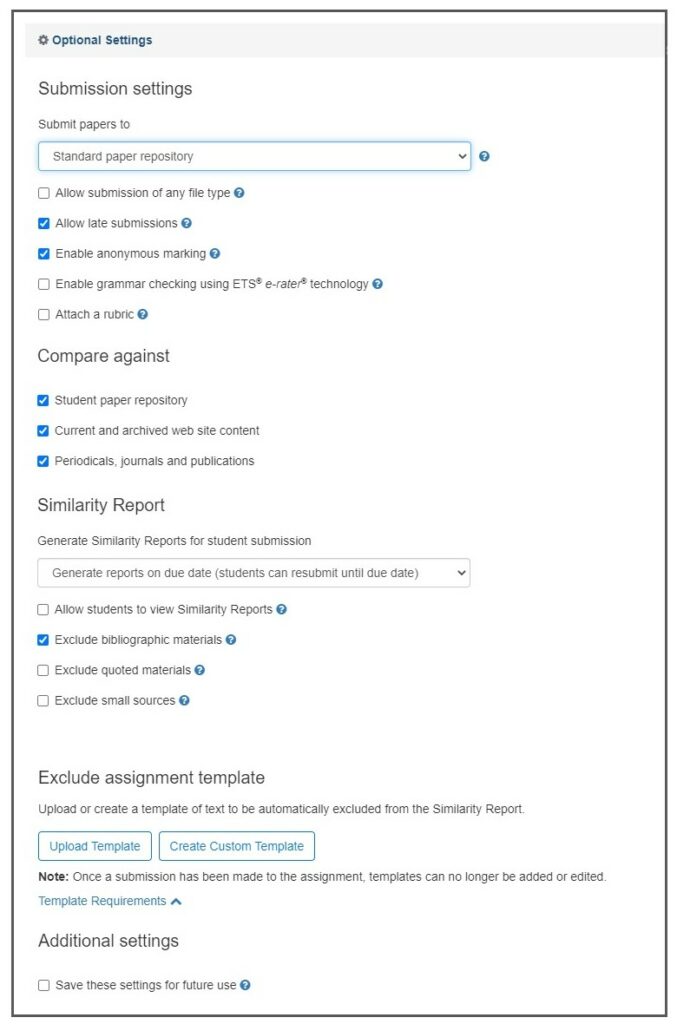
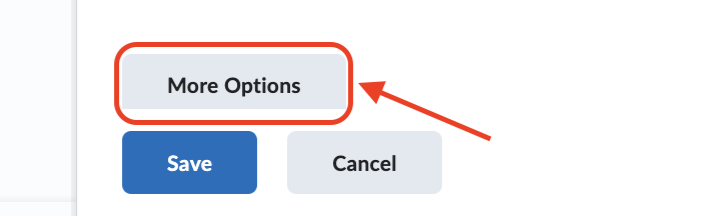
Options
Choose More Options to further customize settings.
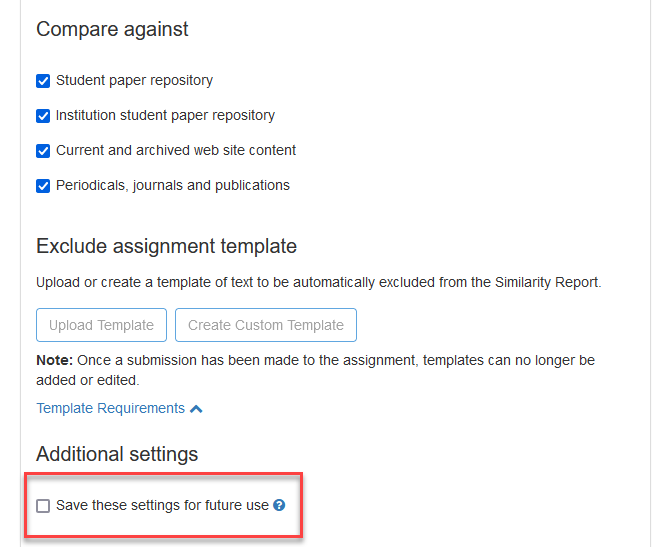
Submission settings: By default, student submissions are added to the institution’s repository, but you may choose not to add the submissions for a particular assignment if, for example, you are using the assignment for initial drafts.
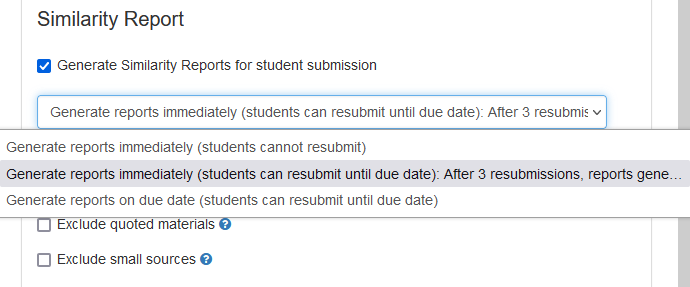
Similarity Report : By default, students can only submit once, but you can allow students to resubmit until the due date.
If you have customized the options and wish to save them for future assignments, check “Save these settings for future use.”
4. Save and Submit
After configuring the settings, click “Save.” Publish the assignment in Brightspace. Back in the Brightspace assignment settings window, make the assignment visible by toggling at the bottom of the window to make it available to students.
5. Viewing the similarity report and grading the submission
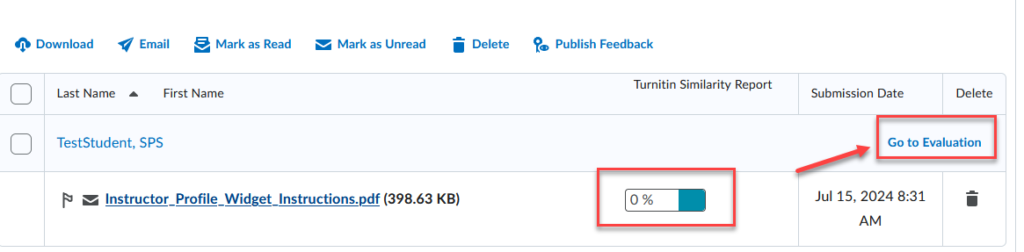
From Activities->Assignments, choose the assignment to evaluate. On the assignment screen,
- Choose Go to Evaluation to grade the submission.
- Click on the Similarity Report score to view. See the guide to navigating the report .
Support and Resources
- D2L Brightspace Overview of TurnItIn Assignments
- Access the Turnitin Help Center for detailed guides and FAQs .
Was this helpful?
Welcome to the CUNY SPS OpenLab!
Powered by:

You're signed out
Sign in to ask questions, follow content, and engage with the Community
- Canvas Developers Group
- Re: Why does the Assignments API not return any Tu...
- Subscribe to RSS Feed
- Mark Topic as New
- Mark Topic as Read
- Float this Topic for Current User
- Printer Friendly Page
Why does the Assignments API not return any Turnitin data and what can be done to fix it?

- Mark as New
- Report Inappropriate Content
- All forum topics
- Previous Topic

Page Error Something broke unexpectedly OAuth 2 Fl...
Using canvas api to get assignment calendar events..., finding the login url for a student, unable to publish course - backend issue, self-hosted canvas lti 1.3 issues... is it possibl..., calculate current mark (grade), account reports api using updated after parameter, intergrate grading service, are new quizzes endpoints available in api develop..., community help, view our top guides and resources:.
To participate in the Instructure Community, you need to sign up or log in:
- Turnitin Guides
- Administrator hub
- Release notes and known issues
- Welcome to Turnitin Guides
Welcome to Turnitin’s new website for guidance!
In 2024, we migrated our comprehensive library of guidance from https://help.turnitin.com to this site, guides.turnitin.com. During this process we have taken the opportunity to take a holistic look at our content and how we structure our guides.
This page is here to help you orientate yourself with these changes and update your resources
What's new?
We have restructured the content to help you navigate it more efficiently.
We are consolidating numerous pages to make our individual guides more valuable as well as removing duplicated content.
For example, our Similarity Report guidance on help.turnitin is repeated in numerous places to cater for each individual integration and license type. On guides.turnitin this content will exist in a single place to allow for users of all integrations and licenses to find it easily. We have made slight modifications to these guides to help you understand which guides are pertinent to you and your institution.
Our guidance search has greatly improved
As a result of our content restructure, the search functionality for guides.turnitin has improved. Use the search bar at the top of any page to locate the guidance you’re searching for.
Dedicated student and administrator guidance hubs
Visit the Student hub area to locate student guidance. For students who access Turnitin via an LMS or VLE, check out the subsection Submitting to Turnitin .
Visiting the Administrator hub area to locate administrator guidance and release notes.
iThenticate and Crossref Similarity Check guidance is now located on a separate site
To improve the experience for our iThenticate and Crossref Similiarity Check customers we have move their help content onto a separate help site, guides.ithenticate.com . This will improve the search for all users.
We have also created an orientation page for this site to help users become acclimatised.
Some guidance is no longer grouped within the LMS umbrella
Some guidance which was previously provided under each LMS has been moved to sections that reflect those workflows’ outcomes. Use the table below as a cheatsheet to quickly locate guidance.
| Student guidance | |
| LMS guidance for administrators and instructors | |
| Similarity Report and AI Writing guidance | |
| Creating PeerMark assignments guidance | |
| Creating and managing QuickMarks, rubrics and grading PeerMark assignments guidance | |
| User profile guidance for administrators and instructors |
|
| Administrator account settings and migration help | |
| Release notes and known issues |
Articles in this section
- Turnitin release notes
- Integrations release notes
- Integrations Known issues
IMAGES
VIDEO
COMMENTS
Select a course from the Course List. From the left-hand navigation, select Content under your course title. The Content page allows you to build content, create assessments or different tools to a module. To add a Turnitin assignment, select the Assessments drop-down menu, then select Turnitin Assignment. On the assignment creation page, enter ...
This tutorial will demonstrate how to create an assignment using Turnitin. Turnitin provides instructors with the tools to prevent plagiarism, engage studen...
Amy will show you how easy it is to set up a Turnitin assessment in Blackboard Ultra Course view. Use this video to learn how to use the optional settings in...
Step 1: Hover over "Build Content." Step 2: Locate the "TurnItIn LTI" button on the menu. Select it. Once selected, you should see the image shown below. Step 3 : Fill out all of the relevant information before clicking "submit." Now the assignment should appear in your course. Below, we will show you what is available when you click "Optional ...
Creating and editing assignments with Turnitin. When creating or editing an assignment, select Originality Report in Assignment Settings. In the Originality Report panel, turn ON Enable Turnitin (on is denoted with a green checkmark). Turnitin provides a number of other options in the Originality Report panel to customize how Turnitin scores ...
This tutorial demonstrates the procedure for adding a Turnitin assignment in a Blackboard Learn course.
Creating a Turnitin Assignment. Turnitin assignments can be created on any course content area (content or assignments) pages. The instructor can open either page by clicking on the content link or assignments link on the left side course menu. 1. Go to the content area where you want the Turnitin assignment displayed and, mouse over Build ...
Turnitin (TII) is a web-based submission system that can help identify occurrences of plagiarism in students' work. Whilst not a replacement for the traditional methods used by academics to identify plagiarism, it can reduce the time spent investigating possible cases, and act as a deterrent. To determine whether there are grounds for an ...
To create an assignment using the Ultra View of Blackboard, follow these steps: From the Courses page in Blackboard, click on the name of the course you'd like to create an assignment for. Under Course Content, click on the + sign. From the dropdown that appears, click Content Market. Select your Turnitin tool.
Step 2 - Enter Assignment Settings. Instructions: Be sure to add information about the standard naming convention in this box, as well as any other important instructions. All students should submit work with a title made of the following: Marker Surname, Student ID, BIOL code. E.g. HIGH7654321BIOL10000. Feedback release date: This is the ...
To submit a paper to a Turnitin assignment in Blackboard, the user must log in and upload a file to an existing assignment. Turnitin assignments cannot accept student submissions until the assignment start date and time has passed. Assignments may also reject submissions after the due date and time set by the instructor. To check the start date ...
Setting up the Assignment Inbox 1. Access your Blackboard Course Unit via My Manchester in the usual way. 2. Navigate to the area or folder where you wish to create your Turnitin Assignment link. We recommend that this is in a folder or area specifically for assessments, and that it contains links to the Turnitin student guides. 3. Make sure ...
You can use online assignments to: • Create, manage, and circulate assignments within Blackboard for formative and summative learning. • Check for potential originality issues using a Similarity Report. • Grade using rubrics. • Manage how and when grades and feedback are released to students. • Provide audio feedback to students.
Click on the Build Content button. Select Turnitin from the drop-down list. The following screen will be displayed. Enter the Assignment title in the Title textbox.; Note: This should match the title of the assessment task in the Course Profile. Enter Assignment instructions in the Instructions textbox, such as "Click on the link above to submit your assignment".
BbSupport 3 2/2/10 4. Enter the assignment title, the point value, and the start and due dates for your assignment. The post date is not needed, but should be set for a date later than the due date (it's used for services we don't have). Click the Submit button to post the assignment. Or click + more options for more options.
On the Course Content page in a course, open Assignment Settings for a new or existing assignment. Select Originality Report. 7. In the Originality Report panel, turn ON Enable Turnitin (ON is denoted with a green checkmark). 8. The first time Turnitin is enabled, a Turnitin prompt opens that asks you to select your platform. Select Global. 9.
This tutorial demonstrates the procedure for submitting to a Turnitin assignment from the student perspective.
Ensure that Edit Mode is ON. 2. From the menu bar, select Assessments > Turnitin Assignment. 3. Select Paper Assignment then click on Next Step. The 'Select your assignment type' screen will only appear when at least one assignment has already been created in the course. 4.
Creating a Turnitin Direct assignment. Enter a course and click the Content link in the sidebar. Then hover over the Assessments button and select Turnitin Direct Assignment from the list. If Edit Mode is off, you can enable it by clicking the Edit Mode button in the right corner of the page. On the assignment creation page, enter the following:
Turnitin in an LMS: Similarity Report and AI Writing guidance: Academic integrity tools: Creating PeerMark assignments guidance: Class and assignment management: Creating and managing QuickMarks, rubrics and grading PeerMark assignments guidance: Grading and feedback: User profile guidance for administrators and instructors: User profile settings
Go to the menu bar within the folder and select Assessments > Assignment. Give the assignment a clear and descriptive name and enter instructions (refer to our Blackboard Assignments page for general advice on creating an assignment and the available options). In the < Instructions > field, click the < + add content > button in the editor bar.
On the navbar, select Activities -> Assignments. Do one of the following: To create a new assignment, click "New Assignment" and enter the name, grade, due date, and instructions. To add Turnitin functionality to an existing assignment, click "Edit Assignment" and select the desired assignment. 2. Enable Turnitin Integration
When the first TFS assignment is created in a course, the default class end date on the TFS side is either 12 months in the future, or the latest assignment date, whichever is further in the future. When a class expires, students can no longer submit papers or enroll in the class. To further extend the class, the creation of any new assignments ...
In our institution we use the Turnitin LTI and I am trying to get the turnitin_enabled and turnitin_settings from assignments configured to use Turnitin. On Assignments - Canvas LMS REST API Documentation I find this information about it: turnitin_enabled (boolean, optional): Boolean flag indicating whether or not Turnitin has been enabled for ...
If you are using groups within Blackboard Basic you can access your group of choice from the Course Tools section of the Course Management side panel. Select Turnitin Assignments by Groups from Course Tools. Select the assignment containing the groups you wish to view. Use the drop-down to choose a group and select Go.
Follow the steps for a first time submission as listed in this manual. When a student user clicks on the Resubmit button in the class portfolio page for an assignment allowing overwrite resubmission, a warning pop-up will appear. This serves to notify the student user that, if available, Originality Reports for any resubmission that is made in ...